作者:VIjolie
前言
ArrayMap是谷歌推出的在安卓等设备上用于替代HashMap的数据结构,和HashMap相比,具有更高的内存使用率,因此适合在Android等内存较为紧张的移动设备,下面结合源码分析ArrayMap实现原理,主要分为添加数据、查找数据、删除数据以及缓存四部分,注意本文基于api29。
构造函数
首先先来来康康ArrayMap的构造函数如下:
/** {@hide} */
public ArrayMap(int capacity, boolean identityHashCode) {mIdentityHashCode = identityHashCode;// If this is immutable, use the sentinal EMPTY_IMMUTABLE_INTS// instance instead of the usual EmptyArray.INT. The reference// is checked later to see if the array is allowed to grow.if (capacity < 0) {mHashes = EMPTY_IMMUTABLE_INTS;mArray = EmptyArray.OBJECT;} else if (capacity == 0) {mHashes = EmptyArray.INT;mArray = EmptyArray.OBJECT;} else {allocArrays(capacity);}mSize = 0;
}
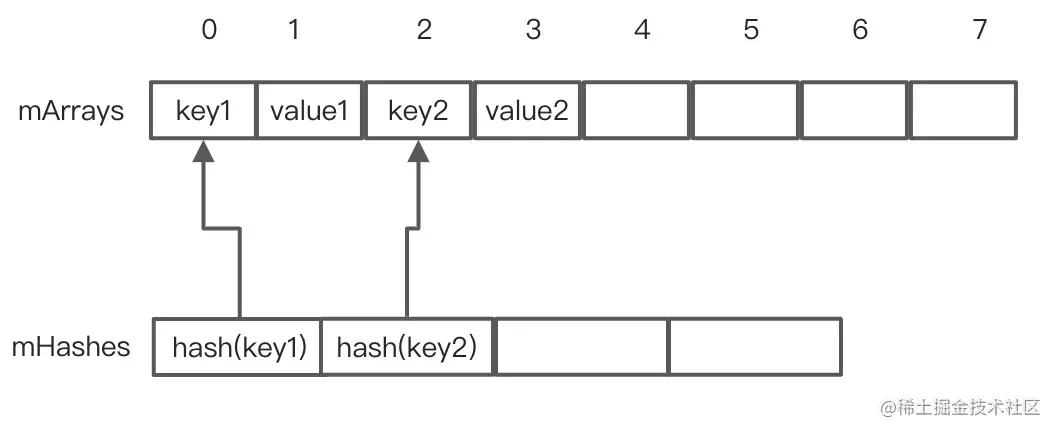
初始化了两个空数组,其中mHashes是用来升序存放key的hash值,mArrays 是用来存放key和value的,所以的mArrays的长度是mHashes的两倍,key和value是紧挨着存放的,如果将key所对应的hash在mHashes的位置记作为index,key在 mArrays 中的位置记作 keyIndex,value在 mArrays 中的位置记作valueIndex,他们之间有如下关系: keyIndex = index<<1,valueIndex= index<<1+1= keyIndex+1,如下图:
添加数据
添加数据主要看下put方法,提取部分关键代码如下:
public V put(K key, V value) {final int osize = mSize;final int hash;int index;if (key == null) {hash = 0;//关键代码1index = indexOfNull();} else {hash = mIdentityHashCode ? System.identityHashCode(key) : key.hashCode();//关键代码2index = indexOf(key, hash);}//关键代码3if (index >= 0) {index = (index<<1) + 1;final V old = (V)mArray[index];mArray[index] = value;return old;}
//关键代码4index = ~index;if (osize >= mHashes.length) {//关键代码5final int n = osize >= (BASE_SIZE*2) ? (osize+(osize>>1)): (osize >= BASE_SIZE ? (BASE_SIZE*2) : BASE_SIZE);final int[] ohashes = mHashes;final Object[] oarray = mArray;allocArrays(n);if (CONCURRENT_MODIFICATION_EXCEPTIONS && osize != mSize) {throw new ConcurrentModificationException();}if (mHashes.length > 0) {if (DEBUG) Log.d(TAG, "put: copy 0-" + osize + " to 0");System.arraycopy(ohashes, 0, mHashes, 0, ohashes.length);System.arraycopy(oarray, 0, mArray, 0, oarray.length);}freeArrays(ohashes, oarray, osize);}if (index < osize) {System.arraycopy(mHashes, index, mHashes, index + 1, osize - index);System.arraycopy(mArray, index << 1, mArray, (index + 1) << 1, (mSize - index) << 1);}if (CONCURRENT_MODIFICATION_EXCEPTIONS) {if (osize != mSize || index >= mHashes.length) {throw new ConcurrentModificationException();}}//关键代码6mHashes[index] = hash;mArray[index<<1] = key;mArray[(index<<1)+1] = value;mSize++;return null;
}
这个时候假设我们通过put给ArayMap添加一个key为null的值,这里null的hash值为0,如下:
ArrayMap<String,String> arrayMap = new ArrayMap();
arrayMap.put(null,"Empty");
会走到注释关键代码1处的indexOfNull(),如下:
int indexOfNull() {final int N = mSize;if (N == 0) {return ~0;}int index = binarySearchHashes(mHashes, N, 0);if (index < 0) {return index;}if (null == mArray[index<<1]) {return index;}int end;for (end = index + 1; end < N && mHashes[end] == 0; end++) {if (null == mArray[end << 1]) return end;}for (int i = index - 1; i >= 0 && mHashes[i] == 0; i--) {if (null == mArray[i << 1]) return i;}return ~end;
}
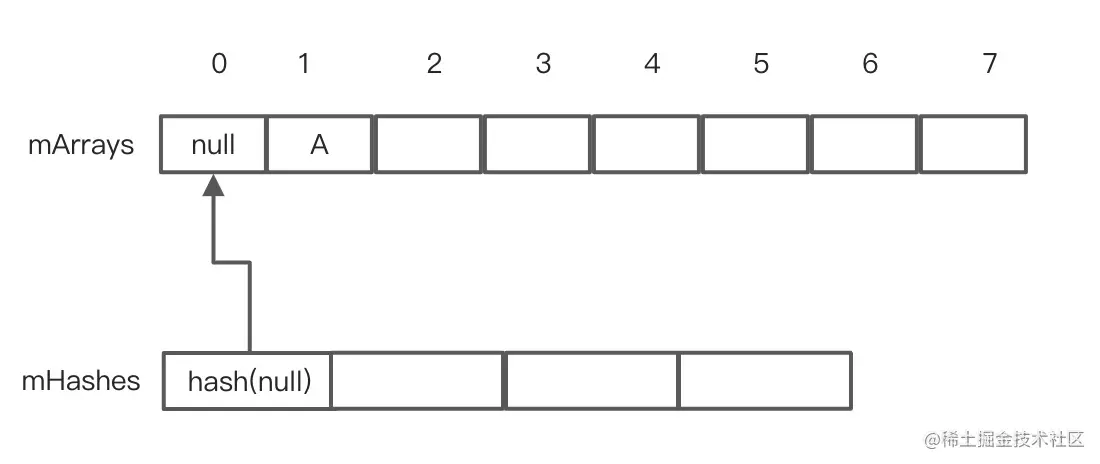
由于这个时候ArraMap还是空的,因此mSize=0,直接返回~0,这个时候走到了关键代码4,对返回的结果再次取反,index= ~index,index等于0,由于此时ArrayMap是空的,流程走到了关键代码5,开始给ArrayMap扩容,可以知道经过扩容mHashs的长度为4,mArray的长度为8,继续往下走到关键代码6,插入数据,插入完成之后,ArrayMap的结构示意图如下:
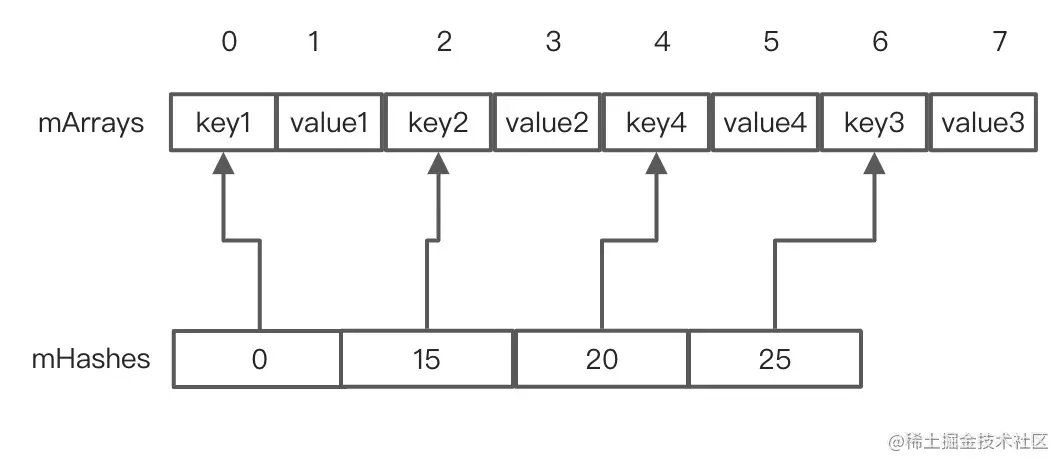
接下来我们来再来看看对于一个不空的 ArryMap 是怎样执行插入逻辑的,假设ArryMap现有数据如下图:

此时再往里面插入数据key4/value4,假设4的hash值为20,这事流程走到关键代码2的 indexOf 函数,最终走到了ContainerHelper的binarySearch(),见名知义通过二分查找找key4的hash值20对应的位置,代码如下:
static int binarySearch(int[] array, int size, int value) {int lo = 0;int hi = size - 1;while (lo <= hi) {final int mid = (lo + hi) >>> 1;final int midVal = array[mid];if (midVal < value) {lo = mid + 1;} else if (midVal > value) {hi = mid - 1;} else {return mid; }}return ~lo;
}
显然mHashes里面找不到,返回~lo,注意此时lo的值为2,可以发现这个2就是key4的hash值的正确插入位置,对lo取反返回,取反是为了能够走到关键代码4,关键代码4对返回值再次取反,获得key4的hash值的正确插入位置,走到了关键代码7,为key4的插入腾出空间,就是比20大的往后面挪动一位,最后到关键代码6执行插入,插入之后,如下图所示:
冲突解决
假设当前 ArayMap 数据如下:
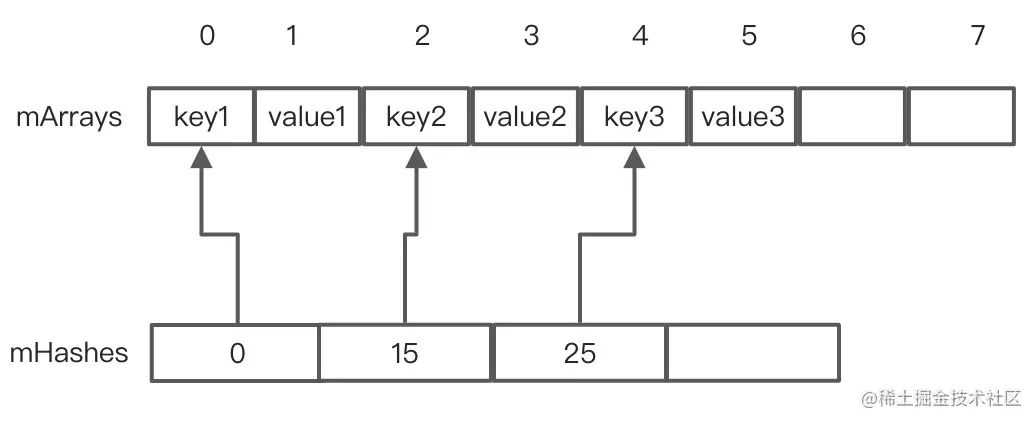
此时再往里面插入数据key4/value4,假设4的hash值为15,这事流程走到关键代码2的 indexOf 函数,最终走到了ContainerHelper的binarySearch(),通过二分查找找key4的hash值15对应的位置为1:
int indexOf(Object key, int hash) {final int N = mSize;if (N == 0) {return ~0;}//注释1 index=1int index = binarySearchHashes(mHashes, N, hash);if (index < 0) {return index;}//注释2if (key.equals(mArray[index<<1])) {return index;}int end;//注释3for (end = index + 1; end < N && mHashes[end] == hash; end++) {//注释4if (key.equals(mArray[end << 1])) return end;}for (int i = index - 1; i >= 0 && mHashes[i] == hash; i--) {//注释5if (key.equals(mArray[i << 1])) return i;}return ~end;}
如上代码注释1,此时index为1,走到注释2,通过index<<1所以得到key2,显然key4不等于key2,走到注释3处,找到了key4的的插入位置为2,如果走到注释4的return,说明从当前index往后遍历key4已经存在的的值,直接返回索引,否则的话就往前遍历,如果走到注释5的return说明key4已经存在直接返回更新(因为采用的是二分查找,找到的index在此过程中可能会跨过若干个hash值等于15的书其中可能包含等于key的的数据)如果都没有返回end的取反走到插入数据关键代码4的逻辑,插入之后,数据如下:

删除数据
调用remove方法最终会走到removeAt,代码如下:
public V removeAt(int index) {
//注释1if (index >= mSize && UtilConfig.sThrowExceptionForUpperArrayOutOfBounds) {// The array might be slightly bigger than mSize, in which case, indexing won't fail.// Check if exception should be thrown outside of the critical path.throw new ArrayIndexOutOfBoundsException(index);}final Object old = mArray[(index << 1) + 1];final int osize = mSize;final int nsize;//注释2if (osize <= 1) {// Now empty.if (DEBUG) Log.d(TAG, "remove: shrink from " + mHashes.length + " to 0");final int[] ohashes = mHashes;final Object[] oarray = mArray;mHashes = EmptyArray.INT;mArray = EmptyArray.OBJECT;freeArrays(ohashes, oarray, osize);nsize = 0;} else {nsize = osize - 1;//注释3if (mHashes.length > (BASE_SIZE*2) && mSize < mHashes.length/3) {final int n = osize > (BASE_SIZE*2) ? (osize + (osize>>1)) : (BASE_SIZE*2);if (DEBUG) Log.d(TAG, "remove: shrink from " + mHashes.length + " to " + n);final int[] ohashes = mHashes;final Object[] oarray = mArray;allocArrays(n);if (CONCURRENT_MODIFICATION_EXCEPTIONS && osize != mSize) {throw new ConcurrentModificationException();}
//注释4if (index > 0) {if (DEBUG) Log.d(TAG, "remove: copy from 0-" + index + " to 0");System.arraycopy(ohashes, 0, mHashes, 0, index);System.arraycopy(oarray, 0, mArray, 0, index << 1);}if (index < nsize) {if (DEBUG) Log.d(TAG, "remove: copy from " + (index+1) + "-" + nsize+ " to " + index);System.arraycopy(ohashes, index + 1, mHashes, index, nsize - index);System.arraycopy(oarray, (index + 1) << 1, mArray, index << 1,(nsize - index) << 1);}} else {//注释5if (index < nsize) {if (DEBUG) Log.d(TAG, "remove: move " + (index+1) + "-" + nsize+ " to " + index);System.arraycopy(mHashes, index + 1, mHashes, index, nsize - index);System.arraycopy(mArray, (index + 1) << 1, mArray, index << 1,(nsize - index) << 1);}//注释6mArray[nsize << 1] = null;mArray[(nsize << 1) + 1] = null;}}if (CONCURRENT_MODIFICATION_EXCEPTIONS && osize != mSize) {throw new ConcurrentModificationException();}mSize = nsize;return (V)old;
}
注释1处如果index大于当前ArrayMap的size,抛出数组越界,注释2如果当前的size小于等于1,直接将mHashes和mArrays置空,然后释放内存。注释3处如果mHashes的长度大于两倍的BASE_SIZE也就是8并且ArrayMap的size小于 mHashes 的长度三分之一,这个时候内存利用率不高,触发收缩逻辑,开始对mHashes和mArrays进行收缩,节省内存,具体的收缩策略是如果当前的size大于8那么就把数组长度设为size的1.5倍,否则就是8,这样的好处是避免size在两倍的BASE_SIZE和BASE_SIZE之间频繁的扩容和收缩,影响性能。逻辑走到注释4也就是删除两个数组中与index对应的数据即把index前面和后面的数据移动到一起。注释5处说明没有触发收缩逻辑,把index后面的数据往前移动一位,末尾的数据置空。
取数据
看下get函数:
@Override
public V get(Object key) {final int index = indexOfKey(key);return index >= 0 ? (V)mArray[(index<<1)+1] : null;
}
比较简单,就是通过key二分查找index,如果index大于0,直接返回找到的值否则返回null
缓存数据
ArrayMap为了避免频繁GC,会对数组进行缓存,以便复用,缓存分为插入缓存与取缓存
插入缓存
插入缓存的代码在freeArrays,主要在扩容和删除收缩的时候触发如下:
private static void freeArrays(final int[] hashes, final Object[] array, final int size) {if (hashes.length == (BASE_SIZE*2)) {synchronized (ArrayMap.class) {if (mTwiceBaseCacheSize < CACHE_SIZE) {array[0] = mTwiceBaseCache;array[1] = hashes;for (int i=(size<<1)-1; i>=2; i--) {array[i] = null;}mTwiceBaseCache = array;mTwiceBaseCacheSize++;if (DEBUG) Log.d(TAG, "Storing 2x cache " + array+ " now have " + mTwiceBaseCacheSize + " entries");}}} else if (hashes.length == BASE_SIZE) {synchronized (ArrayMap.class) {if (mBaseCacheSize < CACHE_SIZE) {//注释1array[0] = mBaseCache;array[1] = hashes;注释2for (int i=(size<<1)-1; i>=2; i--) {array[i] = null;}注释2mBaseCache = array;mBaseCacheSize++;if (DEBUG) Log.d(TAG, "Storing 1x cache " + array+ " now have " + mBaseCacheSize + " entries");}}}
}
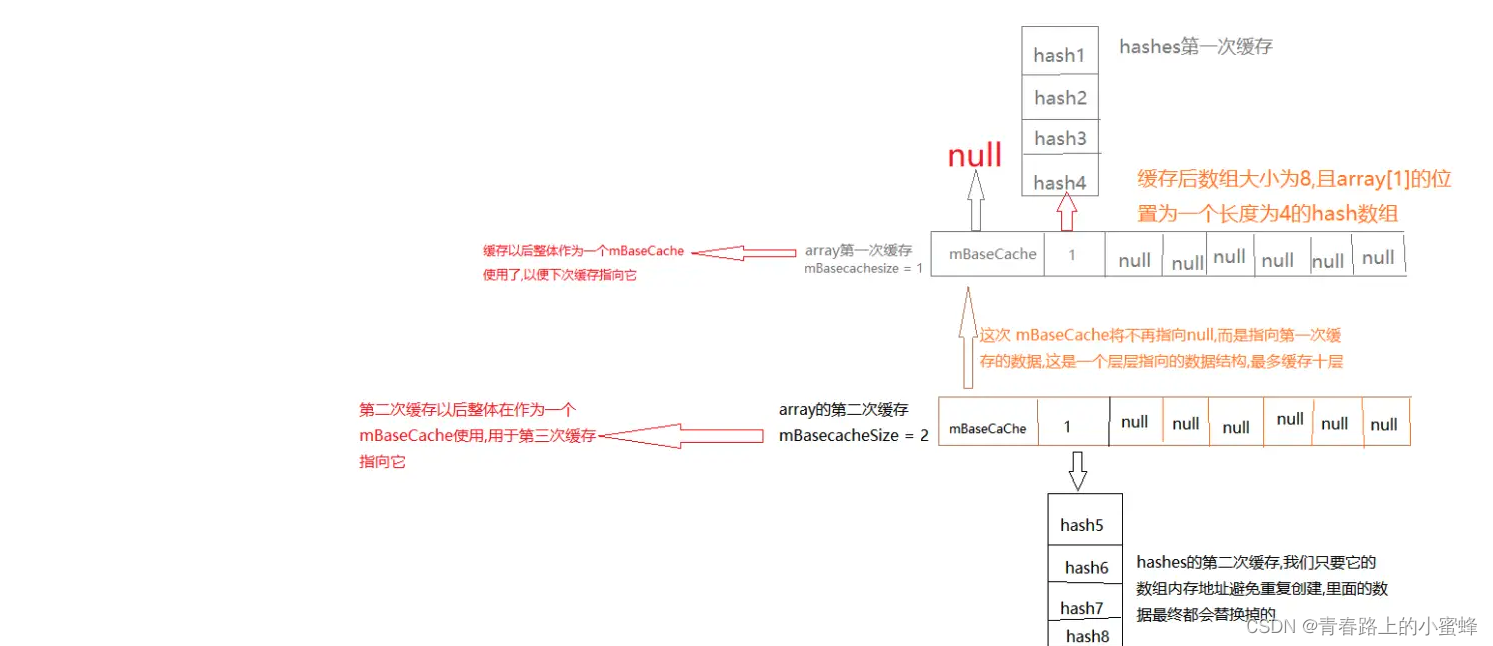
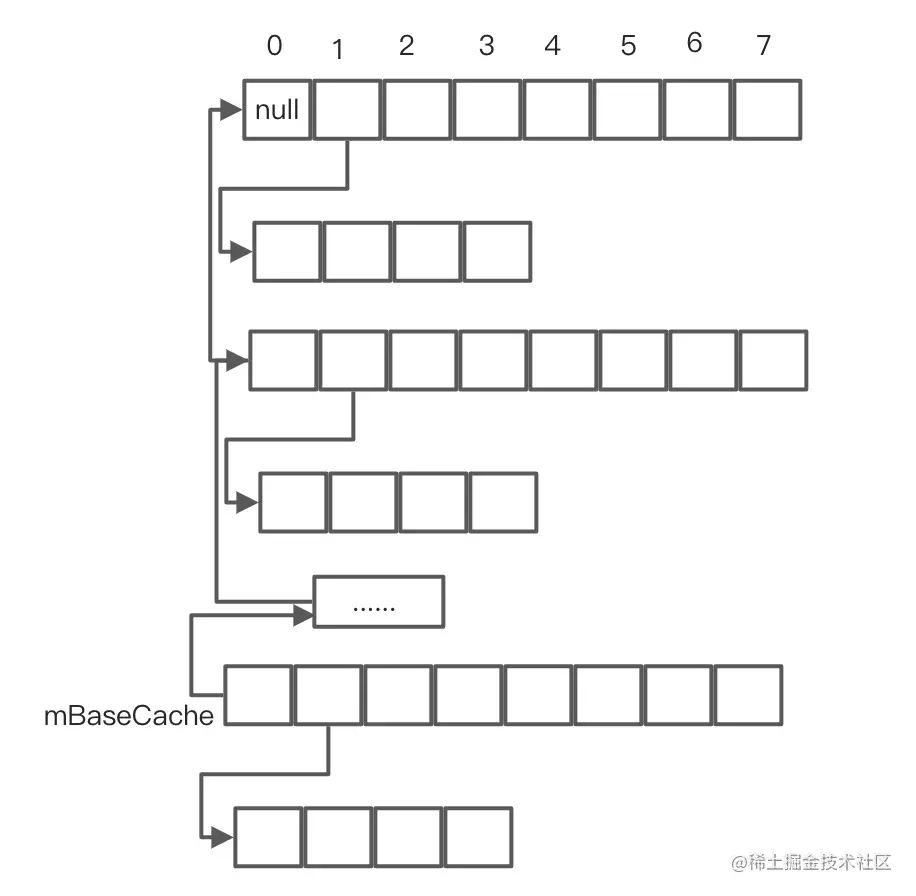
可以看到只对长度为BASE_SIZE以及两倍BASE_SIZE进行缓存,缓存的大小为10,mBaseCacheSize为当前缓存大小,mBaseCache以长度BASE_SIZE为例,mBaseCache为上次缓存的长度为BASE_SIZE的mArrays,注释1处将array的第0位赋值为上次缓存的mArrays,第1位赋值为mHashs,然后注释2处将array后面的值全部置空,更新mBaseCache,mBaseCacheSize加1,如此反复,最后BASE_SIZE缓存结构如图,其实感觉就是一个变形的链表,如图:
取缓存
逻辑在allocArrays,代码如下:
private void allocArrays(final int size) {if (mHashes == EMPTY_IMMUTABLE_INTS) {throw new UnsupportedOperationException("ArrayMap is immutable");}if (size == (BASE_SIZE*2)) {synchronized (ArrayMap.class) {if (mTwiceBaseCache != null) {final Object[] array = mTwiceBaseCache;mArray = array;mTwiceBaseCache = (Object[])array[0];mHashes = (int[])array[1];array[0] = array[1] = null;mTwiceBaseCacheSize--;if (DEBUG) Log.d(TAG, "Retrieving 2x cache " + mHashes+ " now have " + mTwiceBaseCacheSize + " entries");return;}}} else if (size == BASE_SIZE) {synchronized (ArrayMap.class) {//注释1 判空if (mBaseCache != null) {//注释2 取出当前mBaseCache指向的缓存final Object[] array = mBaseCache;mArray = array;//注释3 mBaseCache指向下一个缓存mBaseCache = (Object[])array[0];mHashes = (int[])array[1];//注释4 清理数据array[0] = array[1] = null;//注释5 缓存的大小减一mBaseCacheSize--;if (DEBUG) Log.d(TAG, "Retrieving 1x cache " + mHashes+ " now have " + mBaseCacheSize + " entries");return;}}}mHashes = new int[size];mArray = new Object[size<<1];
}
注释写的很清楚,这里就不在赘述。
总结
ArrayMap 根据官方文档的定义就是为了更加有效的利用内存,从源码剖析可以看出无论从插入数据的的扩容策略还是删除数据的回收策略都是尽可能的减小大容量的申请,并且增加缓存提高内存利用率,另外无论是插入删除还是查找都涉及的二分查找以及数组搬运,因此效率较低,因此要区分不同的使用场景来选择是使用ArrayMap还是HashMap。