一、数据结构
ArrayMap是一个key-value的数据结构,它比HashMap有更高的内存效率
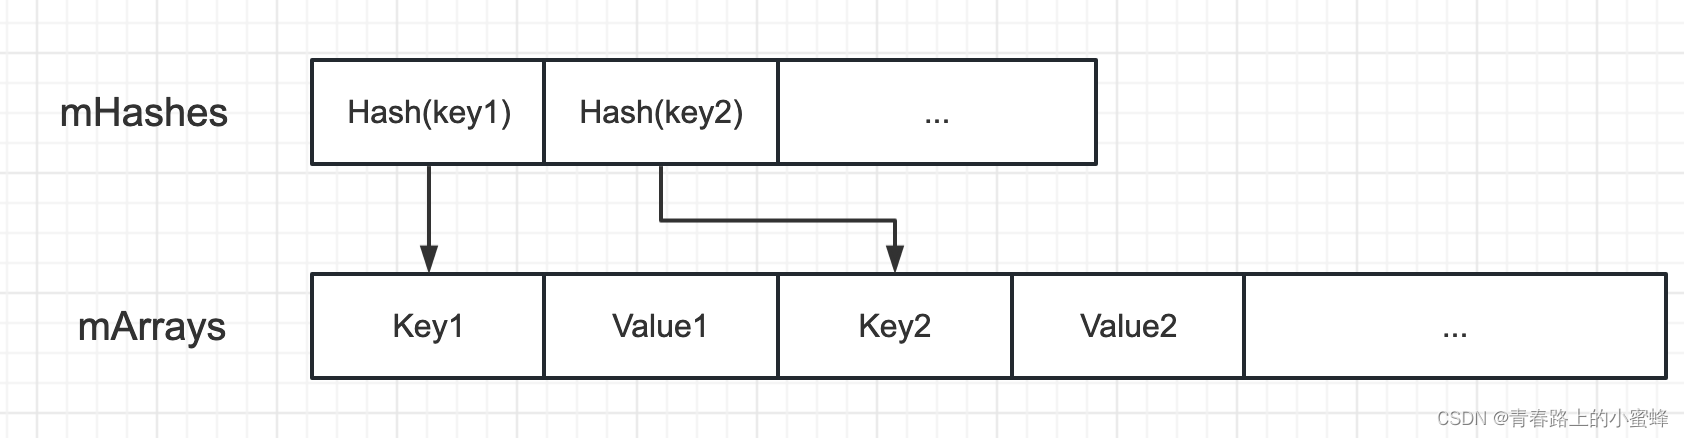
它映射到两个数组结构:一个整数数组mHashes,用来保存key的hashcode;一个对象数组mArray,保存key-value
它不适用于大量数据的存储,通常会比HashMap慢,因为查找需要二分查找。
二、源码解析
public final class ArrayMap<K, V> implements Map<K, V> 由上面可知,ArrayMap是Map的子类
1、成员变量
//默认的最小容量
private static final int BASE_SIZE = 4;
//缓存的容量
private static final int CACHE_SIZE = 10;
//是否使用 System.identityHashCode(key)来获取hashcode
private final boolean mIdentityHashCode;
//存放key的hashcode的数组
int[] mHashes;
//按顺序存放key、value的数组
Object[] mArray;
//mHashes的大小
int mSize;
private MapCollections<K, V> mCollections;
注意:mSize表示的是数组mHashes的大小,而mArray的大小为2*mSize。mHashes中升序存放key的hash值,mArray中顺序存储了key和value。若key的hash在mHashes的位置索引为index,那么key在mArray中的位置索引keyIndex=index<<1=index*2,value在mArray中的位置valueIndex=(index<<1)+1=index*2+1。
2、构造函数
public ArrayMap() {this(0, false);
}public ArrayMap(int capacity) {this(capacity, false);
}public ArrayMap(int capacity, boolean identityHashCode) {mIdentityHashCode = identityHashCode;if (capacity < 0) {mHashes = EMPTY_IMMUTABLE_INTS;mArray = EmptyArray.OBJECT;} else if (capacity == 0) {mHashes = EmptyArray.INT;mArray = EmptyArray.OBJECT;} else {allocArrays(capacity);}mSize = 0;
}
ArrayMap提供了三种构造方法,其中第三个构造方法,从外部传入mHash数组的初始容量capacity。
- 如果capacity<0,那么mHashes就被赋值一个不可变的int数组,mArray被赋值一个空对象数组。
- 如果capacity=0,那么mHashes就被赋值一个空int数组,mArray被赋值一个空对象数组。
- 如果capacity>0,那么就会调用allocArray(capacity)方法,申请指定容量大小的数组。
3、元素查询
int indexOf(Object key, int hash) {final int N = mSize;// ====== TAG 01 ======int index = binarySearchHashes(mHashes, N, hash);if (index < 0) {return index;}if (key.equals(mArray[index<<1])) {//走到这里,说明已经通过Hashcode找到对的key,这里再判断下查找到索引位置的key与要找的key是否相同,如果相同,则证明找到了,直接返回。如果不相同,则说明hash冲突了。return index;}// ====== TAG 02 ======for (end = index + 1; end < N && mHashes[end] == hash; end++) {if (key.equals(mArray[end << 1])) return end;}for (int i = index - 1; i >= 0 && mHashes[i] == hash; i--) {if (key.equals(mArray[i << 1])) return i;}return ~end;
}
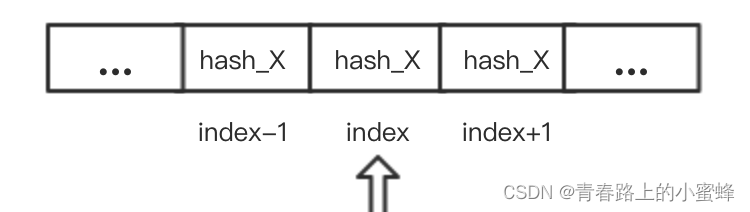
ArrayMap查找元素主要是通过binarySearchHashes二分查找方式来查找index;若HashCode和Key均匹配则为要查找的index;若只有HashCode相同但对象不同(即HashCode冲突),则从当前对应的Index向后和向前分别遍历查找。(ArrayMap处理Hash冲突的解决办法就是,采用开放地址法,即如果hash值对应的index已经存在值了,则需要从index的两边去寻找与当前key匹配时对应的索引。如果没有找到,则表示当前key原本不存在,需要新插入进来,而插入的位置,就是有着相同hash值且连续的子数组序列的末尾位置)
4、元素添加
ArrayMap的元素添加有两个方法:put()和append()
(1)put()
public V put(K key, V value) {final int osize = mSize;final int hash;int index;if (key == null) {hash = 0;index = indexOfNull();} else {hash = mIdentityHashCode ? System.identityHashCode(key) : key.hashCode();// ====== TAG 01 ====== index = indexOf(key, hash);}if (index >= 0) {// ====== TAG 02 ====== index = (index<<1) + 1;final V old = (V)mArray[index];mArray[index] = value;return old;}// ====== TAG 03 ====== index = ~index;if (osize >= mHashes.length) {final int n = osize >= (BASE_SIZE*2) ? (osize+(osize>>1)) : (osize >= BASE_SIZE ? (BASE_SIZE*2) : BASE_SIZE);final int[] ohashes = mHashes;final Object[] oarray = mArray;// ====== TAG 04 ======allocArrays(n);if (CONCURRENT_MODIFICATION_EXCEPTIONS && osize != mSize) {throw new ConcurrentModificationException();}// ====== TAG 05 ======if (mHashes.length > 0) {System.arraycopy(ohashes, 0, mHashes, 0, ohashes.length);System.arraycopy(oarray, 0, mArray, 0, oarray.length);}freeArrays(ohashes, oarray, osize);}// ====== TAG 06 ======if (index < osize) {System.arraycopy(mHashes, index, mHashes, index + 1, osize - index);System.arraycopy(mArray, index << 1, mArray, (index + 1) << 1, (mSize - index) << 1);}mHashes[index] = hash;mArray[index<<1] = key;mArray[(index<<1)+1] = value;mSize++;return null;
}
TAG 01:主要用于二分查找,在mHashes数组中查找HashCode相等的key
TAG 02:如果index>0说明已经找到,即有对应HashCode相等的Key,然后更新其Value值。
TAG 03:在index<0,说明没有找到,即没有对应的HashCode相等的Key,此时需要插入新数据。
这里需要注意下,会先判断是否需要扩容,如果mHashes数组已满,那么就需要调用allocArrays扩容,这里扩容的大小:
final int n = osize >= (BASE_SIZE*2) ? (osize+(osize>>1)) : (osize >= BASE_SIZE ? (BASE_SIZE*2) : BASE_SIZE);可以看出,如果扩容前的容量大小是否>=BASE_SIZE*2(即8),那么扩容为之前容量的1.5倍。如果扩容前容量小于8再判断之前容量是否>=4,如果>=4,那么扩容为8;如果<4那么扩容为4.
TAG 04:当需要扩容时,可采用allocArrays()方式分配更大的内存空间;
TAG 05:然后通过System.arraycopy将老的数组数据拷贝到新的数组中,再通过freeArrays()释放老的数组内存。
TAG 06:当需要插入的元素不在末尾时,拷贝完数据之后需要将index后移一位。
(2)append()
public void append(K key, V value) {int index = mSize;final int hash = key == null ? 0 : (mIdentityHashCode ? System.identityHashCode(key) : key.hashCode());if (index >= mHashes.length) {throw new IllegalStateException("Array is full");}if (index > 0 && mHashes[index-1] > hash) {RuntimeException e = new RuntimeException("here");e.fillInStackTrace();// ====== TAG ======put(key, value);return;}mSize = index+1;mHashes[index] = hash;index <<= 1;mArray[index] = key;mArray[index+1] = value;
}
append方法会优先判断需要插入到的数组中的位置,如果要插入到的位置在mHashes数组的中间,则调用put方法,如果插入的位置在mHashes数组的末尾,直接在末尾处添加。
5、元素删除
public V remove(Object key) {final int index = indexOfKey(key);if (index >= 0) {return removeAt(index);}return null;
}
public V removeAt(int index) {final Object old = mArray[(index << 1) + 1];final int osize = mSize;final int nsize;// ====== TAG 01 ======if (osize <= 1) {final int[] ohashes = mHashes;final Object[] oarray = mArray;mHashes = EmptyArray.INT;mArray = EmptyArray.OBJECT;freeArrays(ohashes, oarray, osize);nsize = 0;} else {nsize = osize - 1;// ====== TAG 02 ======if (mHashes.length > (BASE_SIZE*2) && mSize < mHashes.length/3) {final int n = osize > (BASE_SIZE*2) ? (osize + (osize>>1)) : (BASE_SIZE*2);final int[] ohashes = mHashes;final Object[] oarray = mArray;allocArrays(n);if (index > 0) {System.arraycopy(ohashes, 0, mHashes, 0, index);System.arraycopy(oarray, 0, mArray, 0, index << 1);}if (index < nsize) {System.arraycopy(ohashes, index + 1, mHashes, index, nsize - index);System.arraycopy(oarray, (index + 1) << 1, mArray, index << 1, (nsize - index) << 1);}} else {// ====== TAG 03 ======if (index < nsize) {System.arraycopy(mHashes, index + 1, mHashes, index, nsize - index);System.arraycopy(mArray, (index + 1) << 1, mArray, index << 1, (nsize - index) << 1);}mArray[nsize << 1] = null;mArray[(nsize << 1) + 1] = null;}}mSize = nsize;return (V)old;
}
TAG 01:当数组只有一个要删除的元素时,直接将mHashes和mArray置空并通过freeArrays释放内存
TAG02:当数组内存大小大于8并且元素的数量少于1/3空间大小时,通过allocArrays进行减少分配内存
TAG03:当删除其中一个元素时,需要将该元素之后的所有元素向前移动一位
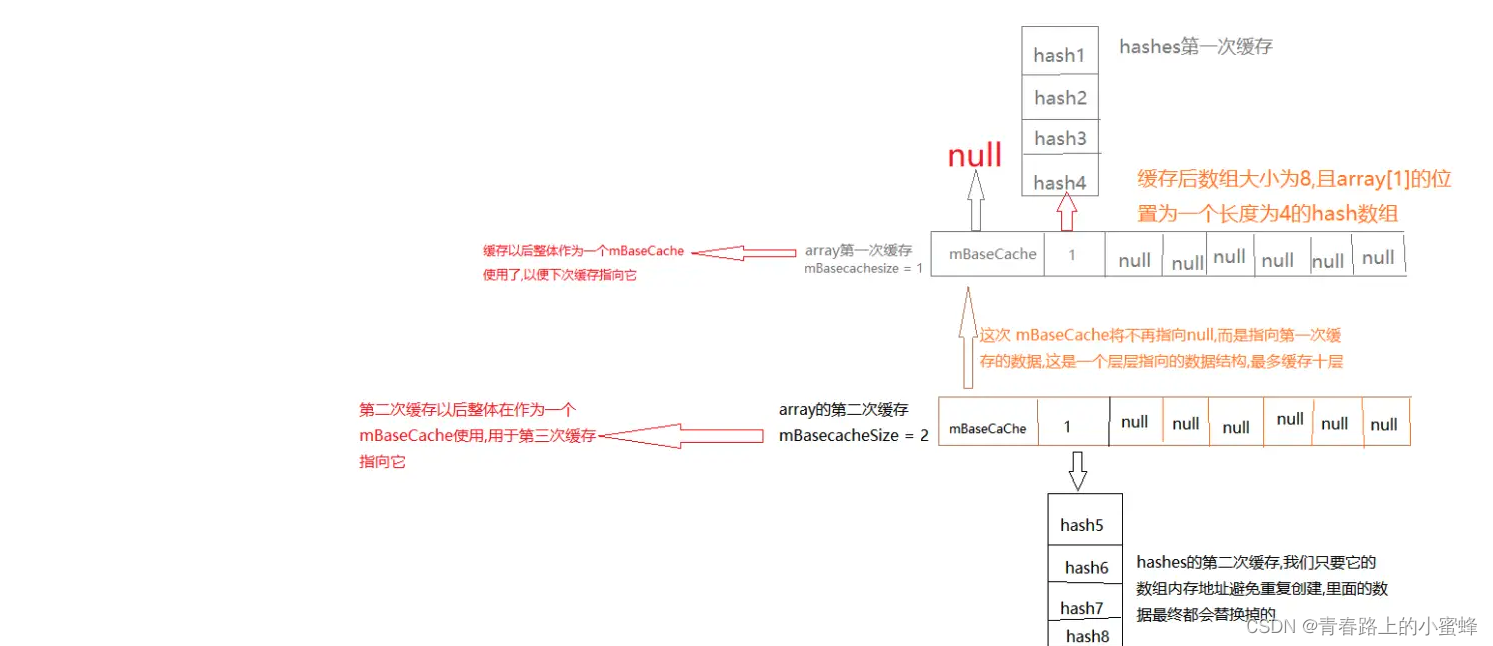
ArrayMap为了避免频繁的创建和销毁,提供了mBaseCache和mTwiceBaseCash两个数组缓冲池,同时提供了allocArrays和freeArrays内存分配和释放的方法,两者相互对应,都通过缓冲池分配和释放内存。
private void allocArrays(final int size) {if (size == (BASE_SIZE*2)) {synchronized (ArrayMap.class) {if (mTwiceBaseCache != null) {final Object[] array = mTwiceBaseCache;mArray = array;mTwiceBaseCache = (Object[])array[0];mHashes = (int[])array[1];array[0] = array[1] = null;mTwiceBaseCacheSize--;return;}}} else if (size == BASE_SIZE) {...}mHashes = new int[size];mArray = new Object[size<<1];
}
当需要分配内存大小为BASE_SIZE或BASE_SIZE*2时,会先查看对应的缓存池中取出mArray和mHashes;其方式是先将缓存池指向上一条缓存地址,将缓存池的第 array[1] 个元素赋值为 mHashes ,再把 mArray 的第 array[0] 和第 array[1] 个位置的数据置为 null;
private static void freeArrays(final int[] hashes, final Object[] array, final int size) {if (hashes.length == (BASE_SIZE*2)) {synchronized (ArrayMap.class) {if (mTwiceBaseCacheSize < CACHE_SIZE) {array[0] = mTwiceBaseCache;array[1] = hashes;for (int i=(size<<1)-1; i>=2; i--) {array[i] = null;}mTwiceBaseCache = array;mTwiceBaseCacheSize++;}}} else if (hashes.length == BASE_SIZE) {...}
}
当内存需要释放时,释放大小为 BASE_SIZE 或 BASE_SIZE * 2 时,会将数组加入到缓冲池中;其方式是先将原缓冲池和哈希数组分别指向 array 前两位,之后的元素全部置空,最后将缓存池的头部指向最新的数组位置;
三、HashMap和ArrayMap对比
1、查找效率
- HashMap因为其根据hashcode的值直接算出index,所以其查找效率是随着数组长度增大而增加的
- ArrayMap使用的是二分查找法,所以每当数组长度增加一倍时,就需要多进行一次判断,效率下降。
2.扩容数量
- HashMap初始值16个长度,每次扩容时,直接申请双倍的数组空间
- ArrayMap每次扩容时候,如果size长度大于8时申请size*1.5个长度,大于4小于8申请8个,小于4时申请4个。
- 这样比较,ArrayMap是申请了更少的内存空间,但是扩容的频率比较高。因此,如果数据量较大的时候,还是使用HashMap比较合适,因为其扩容次数要比ArrayMap少很多。
- ArrayMap没有实现Serializable,不便在Android bundle进行传输
- ArrayMap扩容比HashMap高效,因为HashMap扩容需要重新计算hash值和移动元素。而ArrayMap只需要拷贝。