目录
1. 问题分析
1.1 Context 有哪些?
首先,我们回顾一下 Context 以及它的子类,在之前的这篇文章里,我们曾经讨论过:《Android | 一个进程有多少个 Context 对象(答对的不多)》。简单来说:Context 使用了装饰模式,除了 ContextImpl 外,其他 Context 都是 ContextWrapper 的子类。
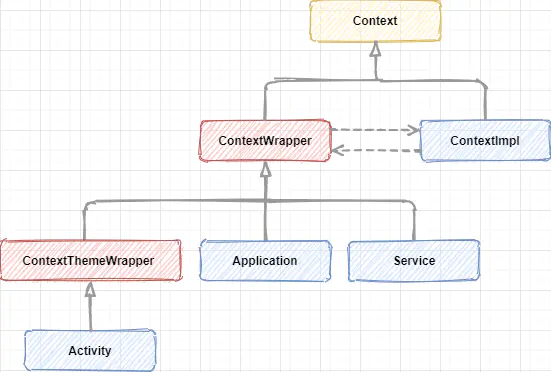
我们熟悉的 Activity & Service & Application,都是 ContextWrapper 的子类。调用getBaseContext(),可以获得被代理的基础对象:
ContextWrapper.java
Context mBase;public ContextWrapper(Context base) {mBase = base;
}public Context getBaseContext() {return mBase;
}
需要注意的是,Activity 也是可以作为被代理的对象的,类似这样:
Activity activity = ...;
Context wrapper = new ContextThemeWrapper(activity, themeResId);wrapper.startActivity(...); // OKwrapper instanceOf Activity // false
这个时候,代理对象wrapper可以使用 Activity 的能力,可以用它 startActivity(),也可以初始化 View,然而它却不是 Activity。看到这里,我们似乎找到了问题的一点苗头了:getContext() 可能返回 Activity 的包装类,而不是 Activity。
1.2 问题延伸
网上讨论得比较多的,主要还是View#getContext()的返回值,在这篇文章里,我们将延伸一下,以下几种情况我都会归纳,以便帮助你建立更为清晰全面的认识:
- View#getContext()
- Fragment#getContext()
- Window#getContext()
- Dialog#getContext()
2. View#getContext() 的返回值
我们来看View#getContext()的源码,可以看到,View#getContext()返回值是在构造函数中设置的,源码里未发现其它赋值语句。所以,这个问题的关键是看:实例化 View 时传入构造器的 Context 对象。
View.java
@hide
protected Context mContext;public final Context getContext() {return mContext;
}public View(Context context) {mContext = context;...
}
...
在使用 View 的过程用,有两种方式可以实例化 View :
- 方法1:代码调用,类似这样:
new TextView(Context)
很明显,只要你传入什么对象,将来你调用 getContext(),得到的就是同一个对象。回顾 第 1 节 的讨论,你可以传入 Activity,也可以传入包装类。诶,那可以传入 Service、Application、ContextImpl 吗?还真的可以,只是你要保证 getContext() 后的行为正确,一般不会这么做。
new TextView(Activity)
new TextView(ContextWrapper)
new TextView(Service)     一般不会这么做
new TextView(Application) 一般不会这么做
new TextView(ContextImpl) 一般不会这么做
- 方法2:布局文件,类似这样:
<TextView ...>
这种方式其实是利用了 LayoutInflater 布局解析的能力,在之前的这篇文章里,我们曾经讨论过:《Android | 带你探究 LayoutInflater 布局解析原理》,如果你对 LayoutInflater 布局解析的流程还不熟悉,可以先复习下,相同的地方不再重复提。在这里,我们只关注使用反射实例化 View 的地方:

createViewFromTag(...) 示意图
可以看到,实例化 View 的地方使用了反射,而Constructor#newInstance(...)的首个参数即为将来 getContext() 返回的对象。那么,mConstructorArgs[0]到底是什么对象呢,是 Activity 吗?我们逆着源码找找看:
LayoutInflater.java
public final View createView(@NonNull Context viewContext, @NonNull String name,@Nullable String prefix, @Nullable AttributeSet attrs){...疑问:viewContext 到底是什么呢?mConstructorArgs[0] = viewContext; final View view = constructor.newInstance(mConstructorArgs);...
}createViewFromTag() -> createView()(已简化)
View createViewFromTag(View parent, String name, Context context, AttributeSet attrs, boolean ignoreThemeAttr) {1. 应用 ContextThemeWrapper 以支持 android:themeif (!ignoreThemeAttr) {final TypedArray ta = context.obtainStyledAttributes(attrs, ATTRS_THEME);final int themeResId = ta.getResourceId(0, 0);if (themeResId != 0) {1.1 注意:这里使用了包装类context = new ContextThemeWrapper(context, themeResId);}ta.recycle();}2. 先使用 Factory2 / Factory 实例化 View,相当于拦截3. 使用 mPrivateFactory 实例化 View,相当于拦截4. 调用自身逻辑if (view == null) {view = createView(name, null, attrs);}return view;
}// inflate() -> createViewFromTag()public View inflate(XmlPullParser parser, @Nullable ViewGroup root, boolean attachToRoot) {...注意:使用了 mContextfinal Context inflaterContext = mContext;...final View temp = createViewFromTag(root, name, inflaterContext, attrs);...
}  protected LayoutInflater(Context context) {mContext = context;initPrecompiledViews();
}
AppCompatViewInflater.java
2. 先使用 Factory2 / Factory 实例化 View,相当于拦截
final View createView(...) {final Context originalContext = context;2.1 应用 ContextThemeWrapper 以支持 android:theme / app:themeif (readAndroidTheme || readAppTheme) {context = themifyContext(context, attrs, readAndroidTheme, readAppTheme);}if (wrapContext) {2.2 应用 ContextThemeWrapper 以支持矢量图 tintcontext = TintContextWrapper.wrap(context);}View view = null;switch (name) {case "TextView":2.3 实例化 AppCompatTextViewview = createTextView(context, attrs);break;...default:view = createView(context, name, attrs);}return view;
}-> 2.1 应用 ContextThemeWrapper 以支持 android:theme(已简化)
private static Context themifyContext(Context context, AttributeSet attrs, boolean useAndroidTheme, boolean useAppTheme) {// 事实上,分支 1.1 已经处理了,这里是兼容 Android 5.0 以前。return new ContextThemeWrapper(context, themeId);
}-> 2.2 应用 ContextThemeWrapper 以支持矢量图 android:tint(已简化)
public static Context wrap(@NonNull final Context context) {return new TintContextWrapper(context);
}
AppCompatTextView.java
-> 2.3 实例化 AppCompatTextView
public AppCompatTextView(Context context, AttributeSet attrs, int defStyleAttr) {super(TintContextWrapper.wrap(context), attrs, defStyleAttr);
}
以上代码已经十分简化了,当然你也可以选择直接看结论:
小结:
- 分支 1.1:应用 ContextThemeWrapper 以支持
android:theme,此时 View#getContext() 返回这个包装类; - 分支 2.1:应用 ContextThemeWrapper 以支持
android:theme(事实上,分支 1.1 已经处理了,这里是兼容 Android 5.0 前),同样也是返回包装类; - 分支 2.2:应用 ContextThemeWrapper 以支持矢量图
android:tint,这是为了兼容 Android 5.0 以前不支持 tint,同样也是返回包装类; - 分支 2.3:实例化 AppCompatTextView,同样也是返回包装类;
- 分支 4:返回的是 LayoutInflater#mContext,这个是
LayoutInflater.from(Context)传入的参数。在 《Android | 带你探究 LayoutInflater 布局解析原理》里,我们讨论过:在 Activity / Fragment / View / Dialog 中,获取LayoutInflater#getContext(),返回的就是 Activity。
第 2 节讨论完后,下面这几节就容易多了。
3. Dialog & Window 的 getContext() 的返回值
直接看源码:
Window.java
private final Context mContext;public final Context getContext() {return mContext;
}public Window(Context context) {mContext = context;mFeatures = mLocalFeatures = getDefaultFeatures(context);
}
Activity.java
final void attach(Context context, ActivityThread aThread,...){...注意:mContext 为 Activity 本身mWindow = new PhoneWindow(this, window, activityConfigCallback);...
}
Dialog.java
public Dialog(@NonNull Context context, @StyleRes int themeResId) {this(context, themeResId, true);
}Dialog(@NonNull Context context, @StyleRes int themeResId, boolean createContextThemeWrapper) {if (createContextThemeWrapper) {if (themeResId == Resources.ID_NULL) {final TypedValue outValue = new TypedValue();context.getTheme().resolveAttribute(R.attr.dialogTheme, outValue, true);themeResId = outValue.resourceId;}包装为 ContextThemeWrappermContext = new ContextThemeWrapper(context, themeResId);} else {mContext = context;}...final Window w = new PhoneWindow(mContext);...
}
小结:
- Dialog#getContext() 返回 ContextThemeWrapper;
- 在 Activity 中,Window#getContext() 返回 Activity;在 Dialog中,Window#getContext() 返回 ContextThemeWrapper;
4. Fragment#getContext() 的返回值
直接看源码:
Fragment.java
FragmentHostCallback mHost;public Context getContext() {return mHost == null ? null : mHost.getContext();
}
FragmentHostCallback.java
Context getContext() {return mContext;
}FragmentHostCallback(FragmentActivity activity) {this(activity, activity /*context*/, activity.mHandler, 0 /*windowAnimations*/);
}FragmentHostCallback(Activity activity, Context context, Handler handler, int windowAnimations) {mActivity = activity;mContext = Preconditions.checkNotNull(context, "context == null");mHandler = Preconditions.checkNotNull(handler, "handler == null");mWindowAnimations = windowAnimations;
}
FragmentActivity.java
final FragmentController mFragments = FragmentController.createController(new HostCallbacks());class HostCallbacks extends FragmentHostCallback<FragmentActivity> {public HostCallbacks() {super(FragmentActivity.this /*fragmentActivity*/);}...
}
小结:
- Fragment#getContext() 返回 Activity;
5. 从 View#getContext() 获得 Activity 对象
在很多场景中,经常需要通过 View 来获得 Activity 对象,经过前面几节内容的讨论,我们已经知道View#getContext()的返回值总共有以下五种情况:
Activity
ContextWrapper
Service 一般不会
Application 一般不会
ContextImpl 一般不会
那么,要获得 Activity 则只要不断得获取 Context 的被代理对象(基础对象),就可以获得 Activity;当然了,下面 Service & Application & ContextImpl几种情况是返回空的,所以我们用@Nullable修饰。
递归写法:
@Nullable
private static Activity findActivity(Context context) {if (context instanceof Activity) {return (Activity) context;} else if (context instanceof ContextWrapper) {return findActivity(((ContextWrapper) context).getBaseContext());} else {return null;}
}
迭代写法:
@Nullable
public static Activity findActivity(Context context){Context cur = context;while (true){if (cur instanceof Activity){return (Activity) cur;}if (cur instanceof ContextWrapper){ContextWrapper cw = (ContextWrapper) cur;cur = cw.getBaseContext();}else{return null;}}
}
6. 总结
- 应试建议
- 遇到此问题,答案应为:可能是Application、Service、ContextImpl、ContextWrapper、Activity的任何一个;
- 应该对Context类型、LayoutInflater 布局解析、View 体系等源码有一定熟悉度,不仅仅能够解答本文问题,更多有意思/深度的问题也能迎刃而解。