Tab选项卡实现多个分页之间的快速切换,每个分页可以显示不同的内容,在Android平台提供了TabHost组件实现Tab选项卡的功能,选项卡组件的主要功能是可以进行应用程序分类管理。
每个选项卡称为一个Tab,而包含这多个选项卡的容器称为TabHost。
1.TabHost的常用方法
- public TabHost (Context context): 创建TabHost类对象
- public void addTab(TabHost.TabSpec tabSpec):增加一个tab
- public TabHost.TabSpec newTabSpec(String tag):创建一个TabHost.TabSpec对象
- public void clearAllTabs():清除所有关联到当前TabHost的选项卡
- public View getCurrentView():取得当前的View对象
- public int getCurrentTab():获取当前选项卡的ID
- public String getCurrentTabTag():获得当前选项卡的Tag选项内容
- public View getCurrentTabView():获取当前选项卡的视图
- public TabHost.TabSpec newTabSpec(String tag):获取一个TabHost.TabSpec,并关联到当前TabHost
- public void setup():建立TabHost对象
- public void setCurrentTab(int index ):设置当前显示的Tab编号
- public void setCurrentTabByTag(String tag):设置当前显示的Tab名称
- public FrameLayout getTabContentView():获取并保存选项卡内容
- public void setOnTabChangedListener(TabHost.OnTabChangeListener l):设置选项改变时触发
- public void setup():使用findViewById()加载TabHost,在新增一个选项卡之前,需要调用它
如果要实现选项卡的显示界面,有两种实现途径:
1、直接让一个Activity程序继承TabActivity类;该方法已经废弃,不建议使用。
2、在布局文件中使用TabHost,无需继承TabActivity。
1) 在界面布局中定义TabHost组件,并为该组件定义选项卡内容
2 )使用findViewById ( )获取TabHost组件
3 )通过TabHost对象的方法来创建和添加选项卡
注意:
如果使用findViewById()方法取得TabHost组件,那么在新增一个选项卡之前,需要调用setup()方法来建立一个TabHost对象。
在TabActivity里使用getTabHost()方法获取TabHost组件,就不需要调用setup()方法。(废弃)
如果要增加一个选项卡,则需要使用方法addTab(TabHost tabhost, TabSpec tabspec),如果有多个选项就要增加多个TabHost. TabSpec对象。
TabHost. TabSpec是TabHost定义的内部类,如果要想取得此类的实例化对象,就需要依靠TabHost类的newTabSpec()来完成。
每个选项卡都包含一个选项卡指示符、内容和tag选项。
2.TabHost.TabSpec类定义的常用方法
- public TabHost.TabSpec setContent(int viewId):设置要显示的组件ID
- public TabHost.TabSpec setContent(Intent intent):指定一个加载activity的Intent对象作为选项卡内容
- public TabHost.TabSpec setContent(TabHost.TabContentFactory contentFactory):指定TabHost.TabContentFactory用于创建选项卡的内容
- public TabHost.TabSpec setIndicator(View view):指定一个视图作为选项卡指示符
- public TabHost.TabSpec setIndicator(CharSequence label ):设置一个选项
- public TabHost. setIndicator (ChaSequence label ,Drawable icon):为选项卡指定符指定一个选项和图标
- public String getTag():获取tag选项字符串
对配置文件的编写有以下要求。
(1)所有用于选项配置的布局文件,必须以“”为根节点。
(2)为保证选项页和选项内容显示正常,可以采用一个布局管理器进行布局。
(3)定义一个“< TagWidget >”组件,用于表示整个选项容器。该组件的android:id=“@android:id/tabs”。
(4)定义选项页必须使用FrameLayout布局,而后在布局中定义所需要的选项页组件, 且框架布局中必须引用tabcontent组件 (android:id=“@android:id/tabcontent”)。
TabHost是整个Tab的容器,包括两部分:TabWidget和FrameLayout。其中 TabWidget:每个Tab的选项,即Tab标签;
FrameLayout:用来显示每个Tab选项切换时具体显示的内容。
3.TabWidget类常用属性
- android: divider: 可绘制对象,被绘制在选项卡窗口间充当分割物
- android: tabStripEnabled :确定是否在选项卡中绘制
- android: tabStripLeft:用来绘制选项卡下面的分割线左边部分的可视化对象
- android:tabStripRight: 用来绘制选项卡下面的分割线右边部分的可视化对象
4.TabWidget 类常用方法
- public TabWidget (Context context ):创建TabWidget 实例
- public void addView(View child):向TabWidget增加组件
- public int getTabCount(): 返回选项卡的数量
- public void setEnabled(boolean enabled):配置是否启用
- public void focusCurrentTab(int index ):设置当前选项卡并且使其获得焦点
- public void setCurrentTab(int index):设置当前选项卡
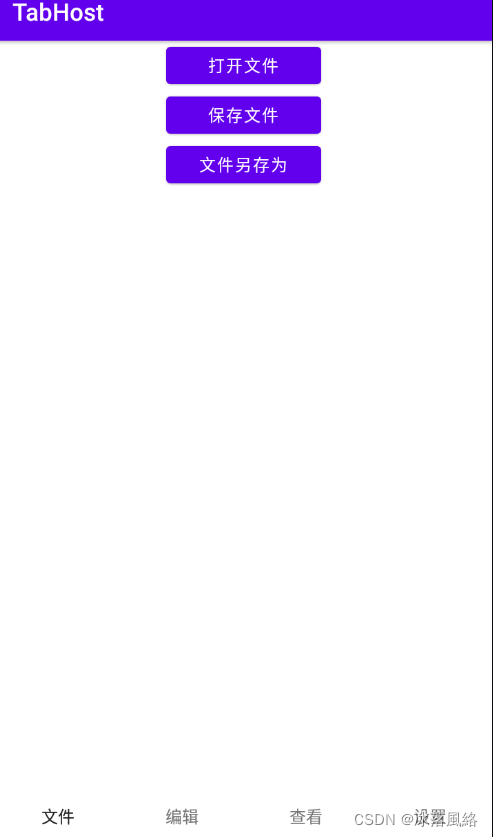
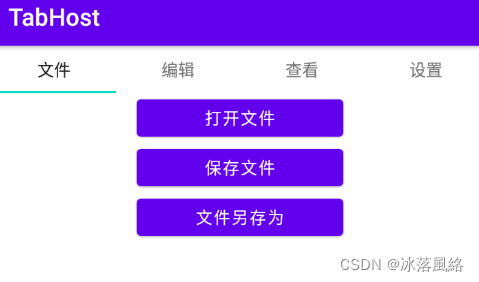
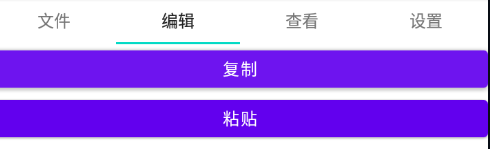
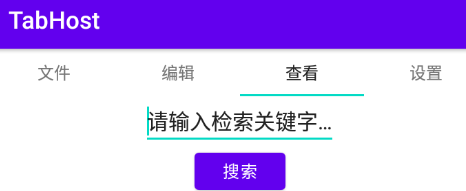
5.运行图
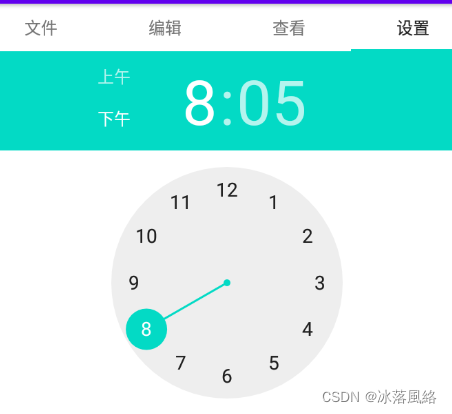
6.运行图
(1)activity_main.xml
<?xml version="1.0" encoding="utf-8"?>
<TabHost xmlns:android="http://schemas.android.com/apk/res/android"xmlns:app="http://schemas.android.com/apk/res-auto"xmlns:tools="http://schemas.android.com/tools"android:layout_width="match_parent"android:layout_height="match_parent"android:orientation="vertical"android:id="@+id/tabhost"tools:context=".MainActivity"><!--顶部导航--><LinearLayoutandroid:layout_width="match_parent"android:layout_height="match_parent"android:orientation="vertical"><!--     TabWidget   每个Tab的选项,即Tab标签--><TabWidgetandroid:layout_width="match_parent"android:layout_height="wrap_content"android:id="@android:id/tabs"android:layout_alignParentTop="true"/><FrameLayoutandroid:layout_width="match_parent"android:layout_height="match_parent"android:id="@android:id/tabcontent"><!--Tab页1--><LinearLayoutandroid:layout_width="match_parent"android:layout_height="match_parent"android:id="@+id/file"android:gravity="center_horizontal"android:orientation="vertical"><Buttonandroid:layout_width="200dp"android:layout_height="wrap_content"android:id="@+id/open"android:text="打开文件"/><Buttonandroid:layout_width="200dp"android:layout_height="wrap_content"android:id="@+id/save"android:text="保存文件"/><Buttonandroid:layout_width="200dp"android:layout_height="wrap_content"android:id="@+id/saveAs"android:text="文件另存为"/></LinearLayout><!--Tab页2--><LinearLayoutandroid:layout_width="match_parent"android:layout_height="match_parent"android:id="@+id/edit"android:gravity="center_horizontal"android:orientation="vertical"><Buttonandroid:layout_width="match_parent"android:layout_height="wrap_content"android:id="@+id/copy"android:text="复制"/><Buttonandroid:layout_width="match_parent"android:layout_height="wrap_content"android:id="@+id/paste"android:text="粘贴"/></LinearLayout><!--Tab页3--><LinearLayoutandroid:layout_width="match_parent"android:layout_height="match_parent"android:id="@+id/seek"android:gravity="center_horizontal"android:orientation="vertical"><EditTextandroid:layout_width="wrap_content"android:layout_height="wrap_content"android:id="@+id/edit1"android:text="请输入检索关键字…"android:textSize="18sp"/><Buttonandroid:layout_width="wrap_content"android:layout_height="wrap_content"android:id="@+id/seekbut1"android:text="搜索"/></LinearLayout><LinearLayoutandroid:layout_width="match_parent"android:layout_height="match_parent"android:id="@+id/time"android:gravity="center_horizontal"android:orientation="vertical"><TimePickerandroid:layout_width="wrap_content"android:layout_height="wrap_content"android:id="@+id/seekbut"android:text="设置时间"/></LinearLayout></FrameLayout></LinearLayout></TabHost>
(2)MainActivity.java
package com.example.progressdialog;import androidx.appcompat.app.AppCompatActivity;import android.os.Bundle;
import android.view.View;
import android.widget.Button;
import android.widget.TabHost;
import android.widget.Toast;public class MainActivity extends AppCompatActivity {private TabHost mytabHost; //定义TabHostprivate int[]layRes={R.id.file,R.id.edit,R.id.seek,R.id.time};//定义内嵌布局管理器IDprivate Button openButton,save,saveAs,copy,paste,seekbut1;@Overrideprotected void onCreate(Bundle savedInstanceState) {super.onCreate(savedInstanceState);setContentView(R.layout.activity_main); //调用默认布局管理器mytabHost=findViewById(R.id.tabhost);//取得TabHost对象mytabHost.setup(); //建立TabHost对象TabHost.TabSpec myTab1=mytabHost.newTabSpec("文件"); //定义TabSpecmyTab1.setIndicator("文件"); //设置选项文字myTab1.setContent(layRes[0]);  //设置显示的组件mytabHost.addTab(myTab1); //增加选项TabHost.TabSpec myTab2=mytabHost.newTabSpec("编辑");//定义TabSpecmyTab2.setIndicator("编辑").setContent(layRes[1]); //设置显示的组件mytabHost.addTab(myTab2);  //增加选项TabHost.TabSpec myTab3=mytabHost.newTabSpec("查看");//定义TabSpecmyTab3.setIndicator("查看").setContent(layRes[2]); //设置显示的组件mytabHost.addTab(myTab3);  //增加选项TabHost.TabSpec myTab4=mytabHost.newTabSpec("设置");//定义TabSpecmyTab4.setIndicator("设置").setContent(layRes[3]); //设置显示的组件mytabHost.addTab(myTab4);  //增加选项mytabHost.setCurrentTab(0);                //设置开始默认选项
//        myTabHost.setCurrentTabByTag("文件");openButton=findViewById(R.id.open);save=findViewById(R.id.save);saveAs=findViewById(R.id.saveAs);copy=findViewById(R.id.copy);paste=findViewById(R.id.paste);seekbut1=findViewById(R.id.seekbut1);openButton.setOnClickListener(new MyOnClickListener());save.setOnClickListener(new MyOnClickListener());saveAs.setOnClickListener(new MyOnClickListener());copy.setOnClickListener(new MyOnClickListener());paste.setOnClickListener(new MyOnClickListener());seekbut1.setOnClickListener(new MyOnClickListener());}private class MyOnClickListener implements View.OnClickListener {public void onClick(View v) {switch (v.getId()) {case R.id.open:Toast.makeText(MainActivity.this,"这是打开文件的按钮", Toast.LENGTH_SHORT).show();break;case R.id.save:Toast.makeText(MainActivity.this,"这是保存文件的按钮", Toast.LENGTH_SHORT).show();break;case R.id.saveAs:Toast.makeText(MainActivity.this,"这是文件另存为的按钮", Toast.LENGTH_SHORT).show();break;case R.id.copy:Toast.makeText(MainActivity.this,"这是复制的按钮", Toast.LENGTH_SHORT).show();break;case R.id.paste:Toast.makeText(MainActivity.this,"这是粘贴的按钮", Toast.LENGTH_SHORT).show();break;case R.id.seekbut1:Toast.makeText(MainActivity.this,"这是搜索的按钮", Toast.LENGTH_SHORT).show();break;}}}
}
实现底部导航运行图,再写一个布局文件,不妨命名为activity_second.xml,代码如下所示,在MainActivity.java中,将 setContentView(R.layout.activity_main);改为
setContentView(R.layout.activity_second)即可
(3)activity_second.xml
<?xml version="1.0" encoding="utf-8"?>
<TabHost xmlns:android="http://schemas.android.com/apk/res/android"android:id="@+id/tabhost"android:layout_width="match_parent"android:layout_height="match_parent"android:orientation="vertical"><!--实现底部导航--><LinearLayoutandroid:layout_width="match_parent"android:layout_height="match_parent"android:orientation="vertical"><FrameLayoutandroid:id="@android:id/tabcontent"android:layout_width="match_parent"android:layout_height="0dp"android:layout_weight="1"><LinearLayoutandroid:id="@+id/file"android:layout_width="match_parent"android:layout_height="match_parent"android:gravity="center_horizontal"android:orientation="vertical"><Buttonandroid:id="@+id/open"android:layout_width="150dp"android:layout_height="wrap_content"android:text="打开文件" /><Buttonandroid:id="@+id/save"android:layout_width="150dp"android:layout_height="wrap_content"android:text="保存文件" /><Buttonandroid:id="@+id/saveAs"android:layout_width="150dp"android:layout_height="wrap_content"android:text="文件另存为" /></LinearLayout><LinearLayoutandroid:id="@+id/edit"android:layout_width="match_parent"android:layout_height="match_parent"android:gravity="center_horizontal"android:orientation="vertical"><Buttonandroid:id="@+id/copy"android:layout_width="match_parent"android:layout_height="wrap_content"android:text="复制" /><Buttonandroid:id="@+id/paste"android:layout_width="match_parent"android:layout_height="wrap_content"android:text="粘贴" /></LinearLayout><LinearLayoutandroid:id="@+id/seek"android:layout_width="match_parent"android:layout_height="match_parent"android:gravity="center_horizontal"android:orientation="vertical"><EditTextandroid:id="@+id/edit1"android:layout_width="wrap_content"android:layout_height="wrap_content"android:text="请输入检索关键字..."android:textSize="18sp" /><Buttonandroid:id="@+id/seekbut1"android:layout_width="wrap_content"android:layout_height="wrap_content"android:text="搜索" /></LinearLayout><LinearLayoutandroid:id="@+id/time"android:layout_width="match_parent"android:layout_height="match_parent"android:gravity="center_horizontal"android:orientation="vertical"><TimePickerandroid:id="@+id/seekbut"android:layout_width="wrap_content"android:layout_height="wrap_content"android:text="设置时间" /></LinearLayout></FrameLayout><TabWidgetandroid:id="@android:id/tabs"android:layout_width="match_parent"android:layout_height="wrap_content"android:layout_alignParentTop="true"android:layout_weight="0" /></LinearLayout>
</TabHost>