今天介绍一下3D相册,用到了开源的FeatureCoverFlow控件,之前的几个作品用的也全都是开源的控件,为什么要用开源的控件呢,因为...他稳定啊!
1.准备
仍然是,去掉标题栏,然后导库:
implementation 'com.github.moondroid.coverflow:library:1.0' 导完库之后就会发现一个错误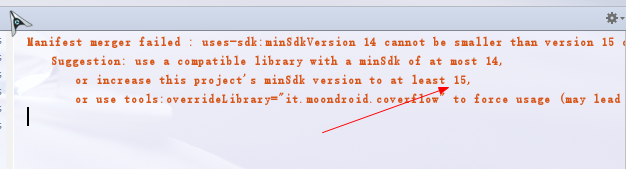
看见没,报错了,minSDK版本最小是15,我的才14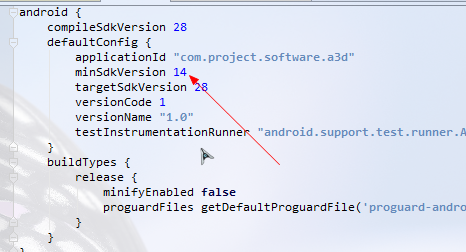
不过没关系,很简单,直接把14改成15就好了
在写程序之前,我们先导入我们所需要的相册中的图片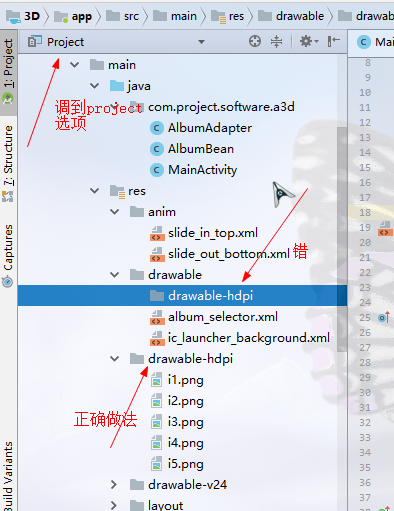
emmmmm,导入到drawable的hdpi目录下(高分辨率),不要搞错了,不懂的话参考我的这篇文章,虽然我什么也没写(此处有坏笑)
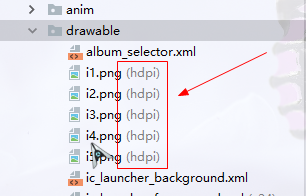
看,导入成功了!
2.布局文件
(1).主布局
<?xml version="1.0" encoding="utf-8"?>
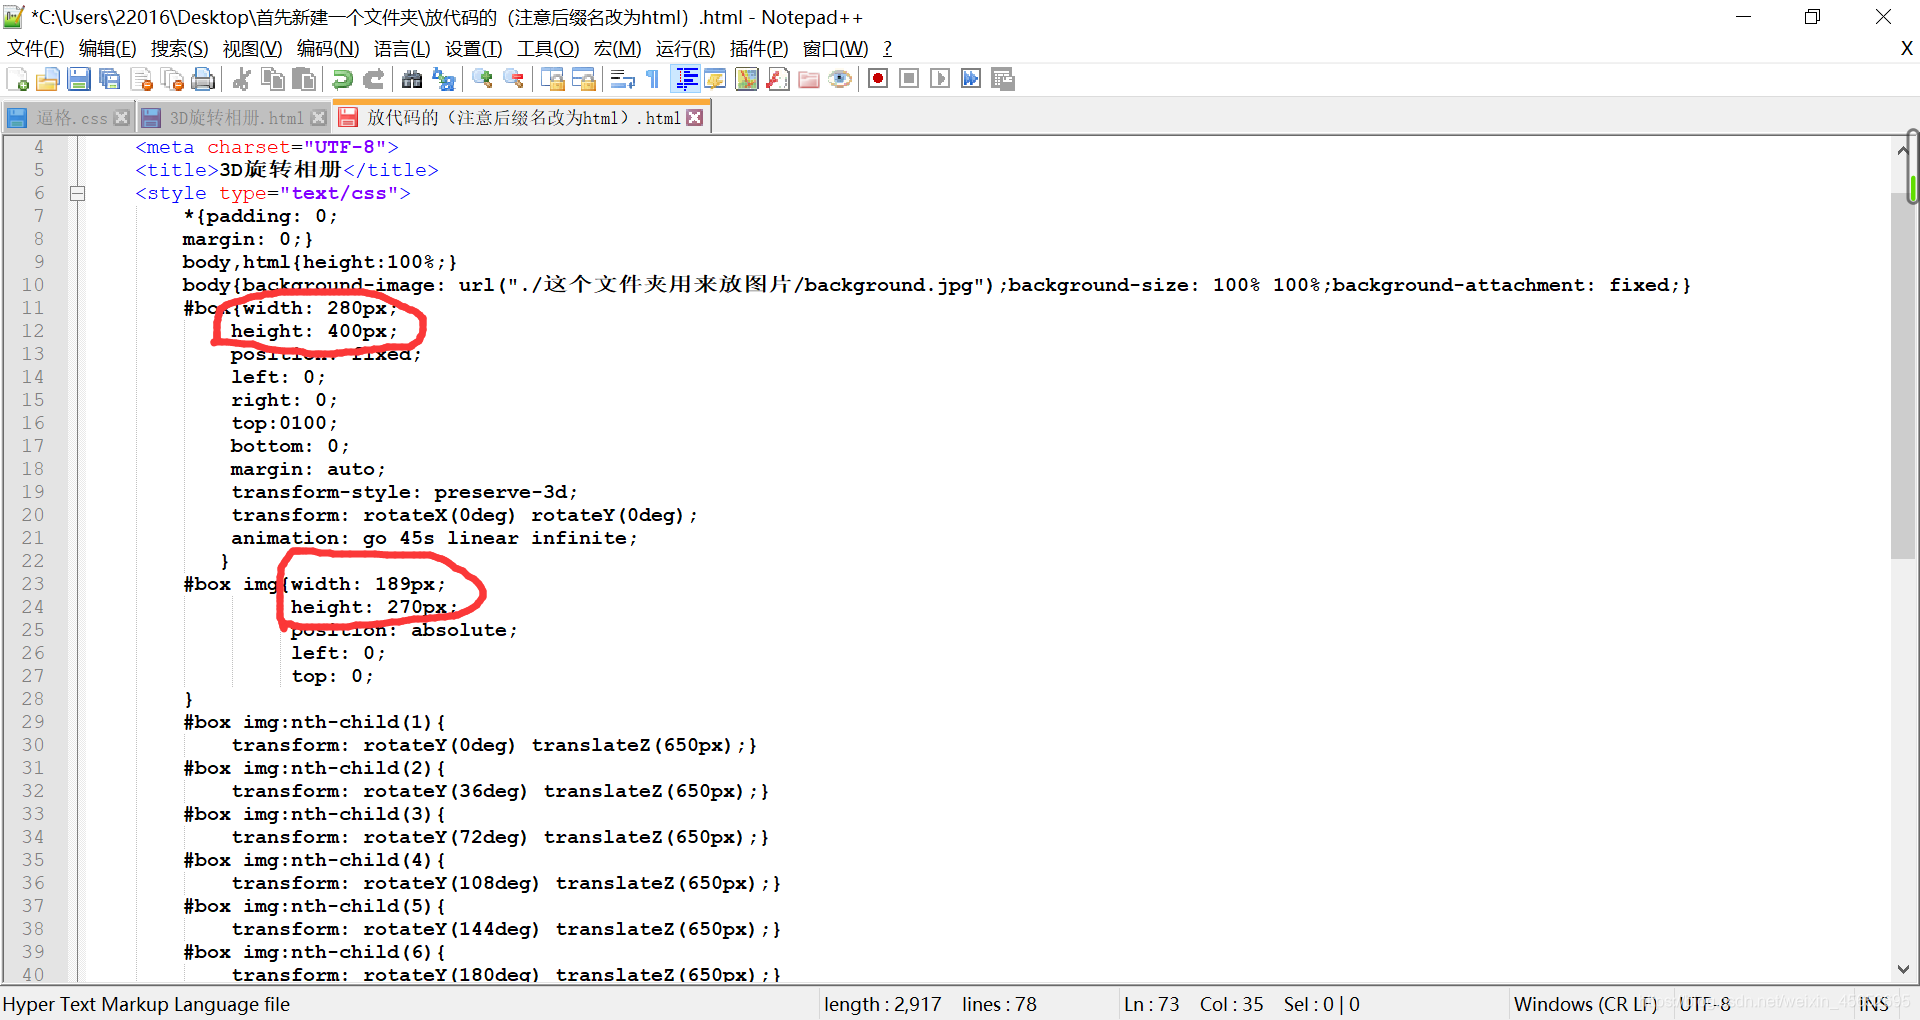
<android.support.constraint.ConstraintLayoutxmlns:android="http://schemas.android.com/apk/res/android"xmlns:coverflow="http://schemas.android.com/apk/res-auto"xmlns:tools="http://schemas.android.com/tools"android:layout_width="match_parent"android:layout_height="match_parent"android:background="@android:color/darker_gray"tools:context=".MainActivity"><it.moondroid.coverflow.components.ui.containers.FeatureCoverFlowandroid:id="@+id/coverflow"android:layout_width="match_parent"android:layout_height="match_parent"coverflow:coverHeight="180dp"coverflow:coverWidth="120dp"coverflow:maxScaleFactor="1.5"coverflow:reflectionGap="0dp"coverflow:rotationThreshold="0.5"coverflow:scalingThreshold="0.5"coverflow:spacing="0.6" /><TextSwitcherandroid:id="@+id/title"android:layout_width="match_parent"android:layout_height="wrap_content"android:layout_marginBottom="0dp"coverflow:layout_constraintBottom_toBottomOf="parent" />
</android.support.constraint.ConstraintLayout>这里采用的依旧是ConstraintLayout布局,里面放置了一个FeatureCoverFlow控件和一个TextSwitcher控件,其中FeatureCoverFlow控件用来显示相册,TextSwitcher用来显示图片的标题
(2) item_album.xml
由于相册界面使用的FeatureCoverFlow控件展示的是图片组合,因此我们要创建一个该组合的Item,Item界面主要显示一张图片,而不是一组图片。
在res/layout目录下新建item_album.xml文件,在文件中放置一个ImageView控件,用来显示当前正在查看的图片。
<?xml version="1.0" encoding="utf-8"?>
<android.support.constraint.ConstraintLayout
xmlns:android="http://schemas.android.com/apk/res/android"android:layout_width="120dp"android:layout_height="180dp"android:clickable="true"android:focusable="true"android:foreground="@drawable/album_selector"><ImageViewandroid:id="@+id/img"android:layout_width="match_parent"android:layout_height="match_parent"android:scaleType="centerCrop"/>
</android.support.constraint.ConstraintLayout>
(3) album_selector.xml
创建一个背景选择器,使得在相册界面,每次点击图片时,图片背景有明显变化。在drawable目录下新建Drawable resourse file,名字改为album_selector,当图片被按下时,显示图片背景为灰色(#96000000)
<?xml version="1.0" encoding="utf-8"?>
<selector xmlns:android="http://schemas.android.com/apk/res/android">
<item android:state_pressed="true"><color android:color="#96000000" />
</item>
<item><color android:color="@android:color/transparent" />
</item>
</selector>
(4) item_title.xml
还记得吗?由于我们在主界面放置了TextSwitcher控件,而该控件在实现ViewFactory接口中的makeView()方法时必须返回一个TextView控件,所以需要在res/layout目录下新建item_title.xml文件,文件中放置一个需要返回的TextView控件:
<?xml version="1.0" encoding="utf-8"?>
<TextView
xmlns:android="http://schemas.android.com/apk/res/android"android:layout_width="match_parent"android:layout_height="wrap_content"android:gravity="center"android:textAppearance="?android:textAppearanceLargeInverse"android:textColor="@android:color/white" />
(5).标题出入动画效果
为了更好的用户体验,决定在标题上做一些文章,使得在显示图片标题是,信息会从下向上缓缓进入界面,当标题消失时,信息会从上向下缓缓离开界面。在res文件夹中创建一个anim文件夹,然后分别创建slide_in_top.xml文件和slide_out_bottom.xml文件,以显示动画效果
1. slide_in_top.xml
<?xml version="1.0" encoding="utf-8"?>
<set xmlns:android="http://schemas.android.com/apk/res/android">
<translateandroid:duration="@android:integer/config_mediumAnimTime"android:fromYDelta="100%p"android:toYDelta="0" />
<alphaandroid:duration="@android:integer/config_mediumAnimTime"android:fromAlpha="0.0"android:toAlpha="1.0" />
</set>
2. slide_out_bottom.xml
<?xml version="1.0" encoding="utf-8"?>
<set xmlns:android="http://schemas.android.com/apk/res/android">
<translateandroid:duration="@android:integer/config_mediumAnimTime"android:fromYDelta="0"android:toYDelta="100%p" />
<alphaandroid:duration="@android:integer/config_mediumAnimTime"android:fromAlpha="1.0"android:toAlpha="0.0" /></set>
(6).标题
由于我们一共导入了5张图片,所以应该为他们赋予5个名字,在res/String文件夹下面的strings.xml中添加五个标题
<resources>
<string name="app_name">3D</string>
<string name="title1">GG</string>
<string name="title2">Spring Scenery</string>
<string name="title3">Summer Scenery</string>
<string name="title4">Autumn Scenery</string>
<string name="title5">Winter Scenery</string>
</resources>
3.界面逻辑
(1)AlbumBean.java
由于相册界面主要显示一组图片,每张图片都有自己的图片ID和标题ID的属性,所以为了方便起见,我们新建一个AlbumBean类来存放图片的这些属性
package com.project.software.a3d;public class AlbumBean {
public int imgResId;    //图片Id
public int titleResId; //图片标题Id
public AlbumBean(int imgResId, int titleResId) {this.imgResId = imgResId;this.titleResId = titleResId;
}
}
(2)适配器
由于相册界面显示的一组图片是通过FeatureCoverFlow控件实现的,因此需要创建一个数据适配器AlbumAdapter对该控件进行数据适配
package com.project.software.a3d;import android.content.Context;
import android.view.LayoutInflater;
import android.view.View;
import android.view.ViewGroup;
import android.widget.BaseAdapter;
import android.widget.ImageView;
import java.util.ArrayList;
public class AlbumAdapter extends BaseAdapter {
private ArrayList<AlbumBean> dataList = new ArrayList<>();
private Context mContext;
public AlbumAdapter(Context context) {mContext = context;
}
public void setData(ArrayList<AlbumBean> dataList) {this.dataList = dataList;
}
@Override
public int getCount() {return dataList.size();
}
@Override
public Object getItem(int position) {return dataList.get(position);
}
@Override
public long getItemId(int position) {return position;
}
@Override
public View getView(int position, View convertView, ViewGroup parent) {if (convertView == null) {LayoutInflater inflater = (LayoutInflater) mContext.getSystemService(Context.LAYOUT_INFLATER_SERVICE);convertView = inflater.inflate(R.layout.item_album, null);ViewHolder viewHolder = new ViewHolder();viewHolder.iv_img = (ImageView) convertView.findViewById(R.id.img);convertView.setTag(viewHolder);}ViewHolder holder = (ViewHolder) convertView.getTag();holder.iv_img.setImageResource(dataList.get(position).imgResId);return convertView;
}
public class ViewHolder {public ImageView iv_img;
}
}
在这个适配器中,1.创建一个AlbumAdapter类继承自BaseAdapter类,并重写getCount()、getItem()、getItemId()、getView()方法,并在getView()方法中通过inflate()方法加载相册界面的Item布局文件item_album.xml,然后将图片设置到界面控件上。2.创建一个ViewHolder类的Item界面上的图片控件对应的字段
(3)主逻辑
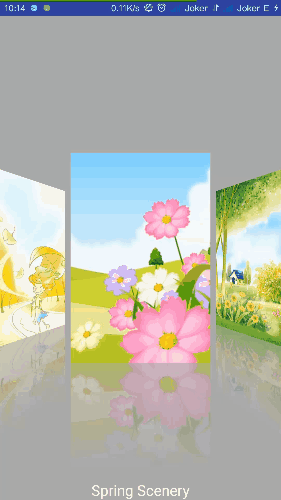
主界面显示一组图片,并可以通过左右滑动在进行切换,同时图片下方会显示该图片的标题,点击任意一张图片会显示该图片的标题信息:
package com.project.software.a3d;import android.os.Bundle;
import android.support.v7.app.AppCompatActivity;
import android.view.KeyEvent;
import android.view.LayoutInflater;
import android.view.View;
import android.view.animation.Animation;
import android.view.animation.AnimationUtils;
import android.widget.AdapterView;
import android.widget.TextSwitcher;
import android.widget.TextView;
import android.widget.Toast;
import android.widget.ViewSwitcher;
import java.util.ArrayList;import it.moondroid.coverflow.components.ui.containers.FeatureCoverFlow;public class MainActivity extends AppCompatActivity {
private FeatureCoverFlow coverFlow;
private AlbumAdapter adapter;
private ArrayList<AlbumBean> dataList;
private TextSwitcher mTitle;
@Override
protected void onCreate(Bundle savedInstanceState) {super.onCreate(savedInstanceState);setContentView(R.layout.activity_main);initData();initView();
}
/*** 初始化界面控件*/
private void initView() {mTitle = (TextSwitcher) findViewById(R.id.title);mTitle.setFactory(new ViewSwitcher.ViewFactory() {@Overridepublic View makeView() {LayoutInflater inflater = LayoutInflater.from(MainActivity.this);TextView title = (TextView) inflater.inflate(R.layout.item_title, null);return title;}});Animation in = AnimationUtils.loadAnimation(this, R.anim.slide_in_top);Animation out = AnimationUtils.loadAnimation(this, R.anim.slide_out_bottom);mTitle.setInAnimation(in);mTitle.setOutAnimation(out);coverFlow = (FeatureCoverFlow) findViewById(R.id.coverflow);adapter = new AlbumAdapter(this);adapter.setData(dataList);coverFlow.setAdapter(adapter);coverFlow.setOnItemClickListener(new AdapterView.OnItemClickListener() {@Overridepublic void onItemClick(AdapterView<?> parent, View view, int position, long id) {if (position < dataList.size()) {Toast.makeText(MainActivity.this,getResources().getString(dataList.get(position).titleResId),Toast.LENGTH_SHORT).show();}}});coverFlow.setOnScrollPositionListener(new FeatureCoverFlow.OnScrollPositionListener() {@Overridepublic void onScrolledToPosition(int position) {mTitle.setText(getResources().getString(dataList.get(position).titleResId));}@Overridepublic void onScrolling() {mTitle.setText("");}});
}
/*** 初始化界面数据*/
private void initData() {dataList = new ArrayList<>();dataList.add(new AlbumBean(R.drawable.i1, R.string.title1));dataList.add(new AlbumBean(R.drawable.i2, R.string.title2));dataList.add(new AlbumBean(R.drawable.i3, R.string.title3));dataList.add(new AlbumBean(R.drawable.i4, R.string.title4));dataList.add(new AlbumBean(R.drawable.i5, R.string.title5));
}
protected long exitTime;//记录第一次点击时的时间
@Override
public boolean onKeyDown(int keyCode, KeyEvent event) {if (keyCode == KeyEvent.KEYCODE_BACK&& event.getAction() == KeyEvent.ACTION_DOWN) {if ((System.currentTimeMillis() - exitTime) > 2000) {Toast.makeText(MainActivity.this, "再按一次退出3D相册",Toast.LENGTH_SHORT).show();exitTime = System.currentTimeMillis();} else {MainActivity.this.finish();System.exit(0);}return true;}return super.onKeyDown(keyCode, event);
}
}
在主逻辑中,1.创建一个initData()方法,在该方法中创建界面所需要的图片数据,并在该方法中重写onKeyDown()方法,判断两次点击'后退'键的时间间隔是否小于2s,如果小于2s则退出该程序,如果大于2秒,则提示“再按一次退出3D相册”。2.创建一个initView()方法 ,在该方法中获取相册界面的控件并设置相关的点击事件与滑动时间。
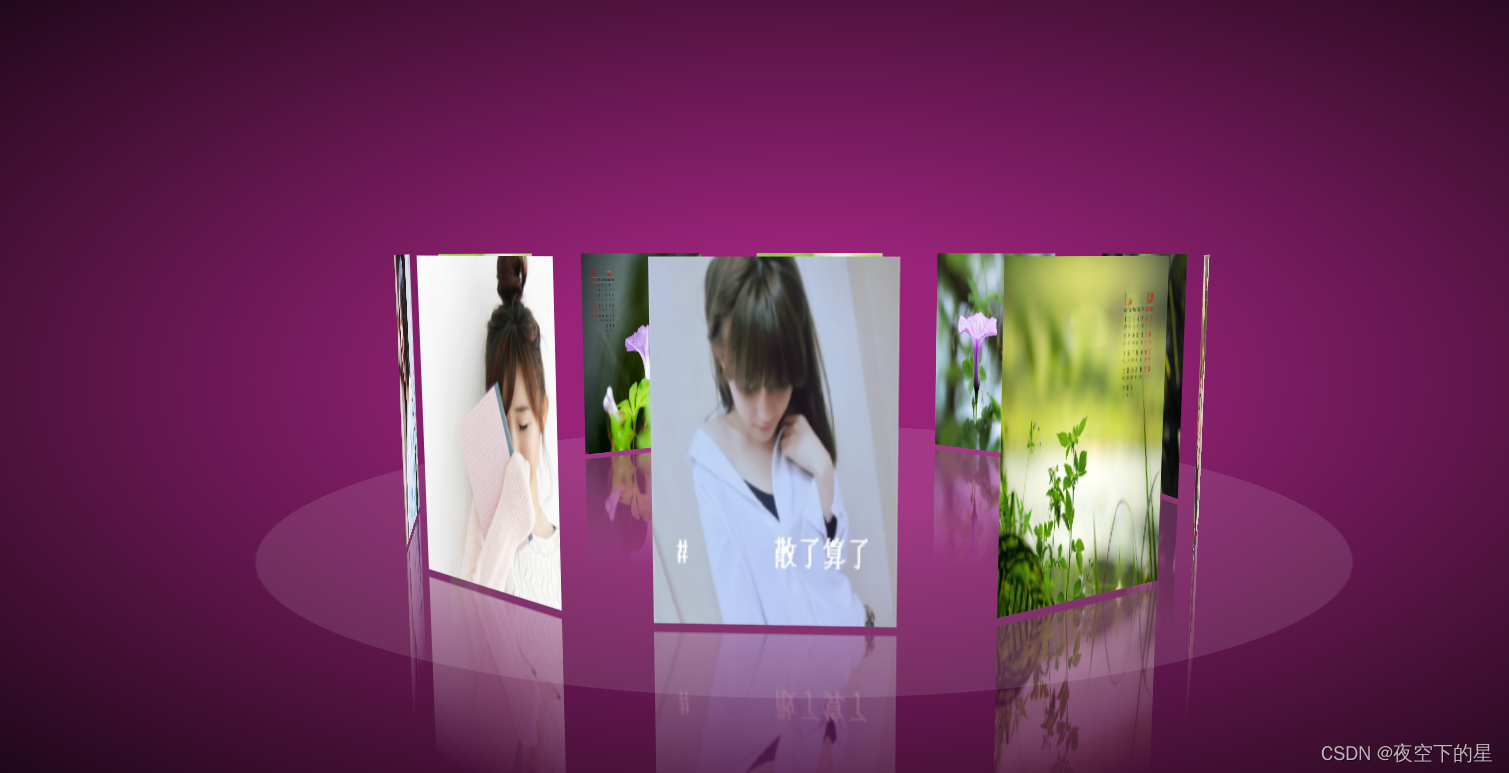
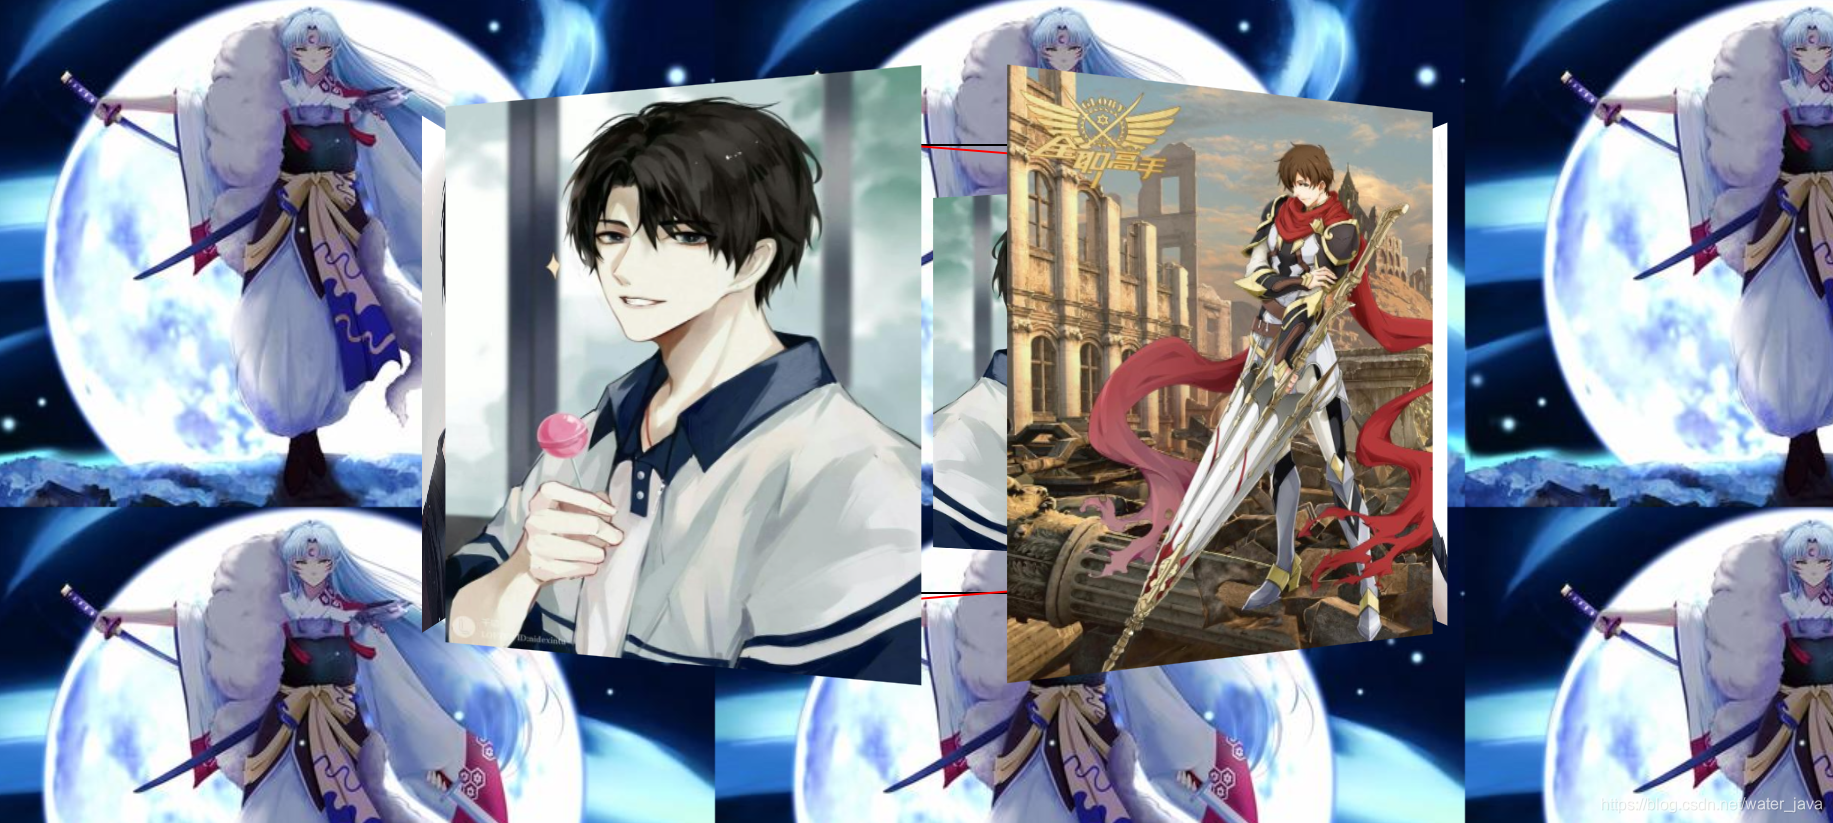
最后仍然是老规矩,放图:
Over