.. .-..—…-. -.—–..- (“I love you ”莫斯电码),这是逛知乎的时候看到程序员的表白情书,感觉我们码农情商好高啊!哈哈,好了开始搬砖。
上一篇介绍了音频的采集过程。之后产品经理找我谈了话,表示功能跟界面都凑合!但是(听到“但是”表示头皮发麻),需要再加一个功能,就是音频在录制的过程中,可以暂停,并且可以删除到上次暂停的地方(此刻内心亿万头草泥马飞奔而过,官大一级压死人啊!)。下面先对上次的音频采集过程中出现的bug进行一下简单的修改。
一、音频的标记操作
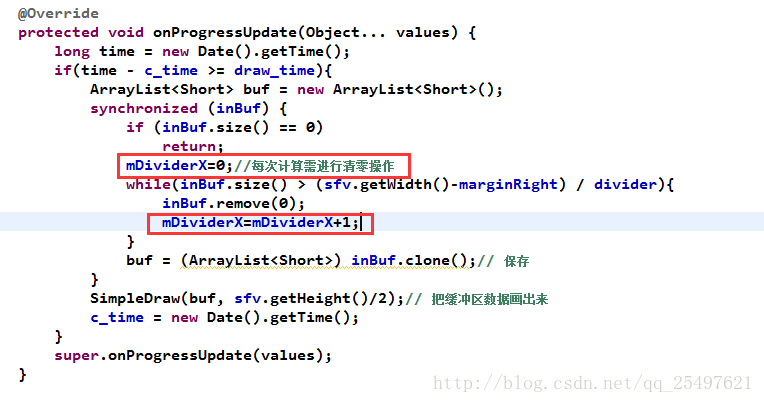
上次的操作标记的移动速度是固定的,也就是每次surfaceView进行绘制(每隔20ms)时,标记点位向左平移3个像素,这就导致标记点位的移动速度与波形图不能形成相同速度的平移,由于刷新的频率较高,所以标记点在以肉眼的可见的偏移量偏离标记的位置。
这就很尴尬了。做出的修改就是在,计算录音采集的字节数跟总的画布长度的时候,计算每次移除list集合的字节数,再进行标记点位移。
下面是源码截图,只需要加一个参数即可:

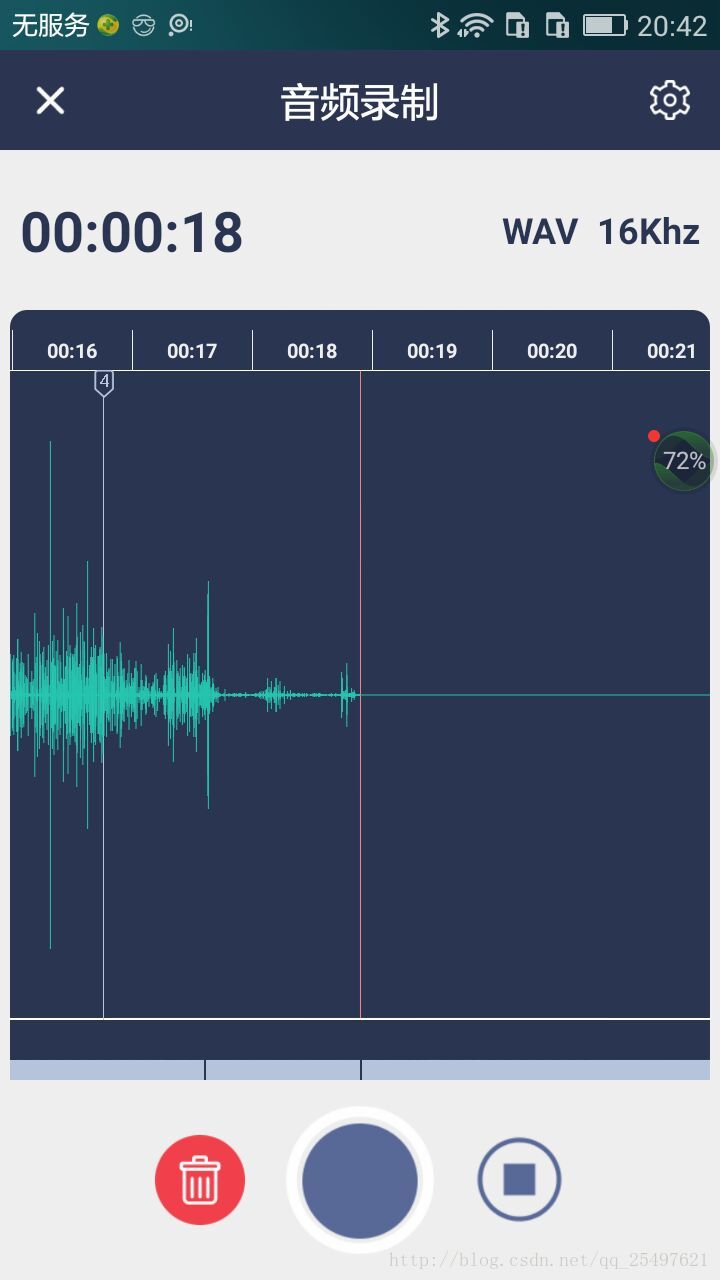
二、音频采集的回删操作,下面是定下来的界面:
主要的改变也只是在音频采集的下面加了一个跑动的条形,每次暂停的时候,会在在这个条上画一个分隔线,删除的时候,条向右移动,
录制的时候,条形是向左平移的,它的平移速度跟上面的时间刻度条是一致的。
回删的操作,其实是在录制完成后,剪辑形成合并形成的,所以请看下面。
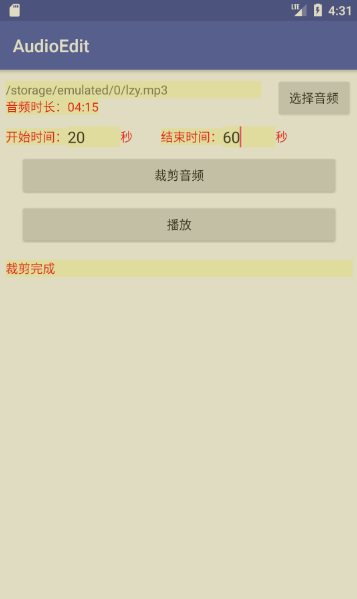
三、进入正题,音频的编辑。
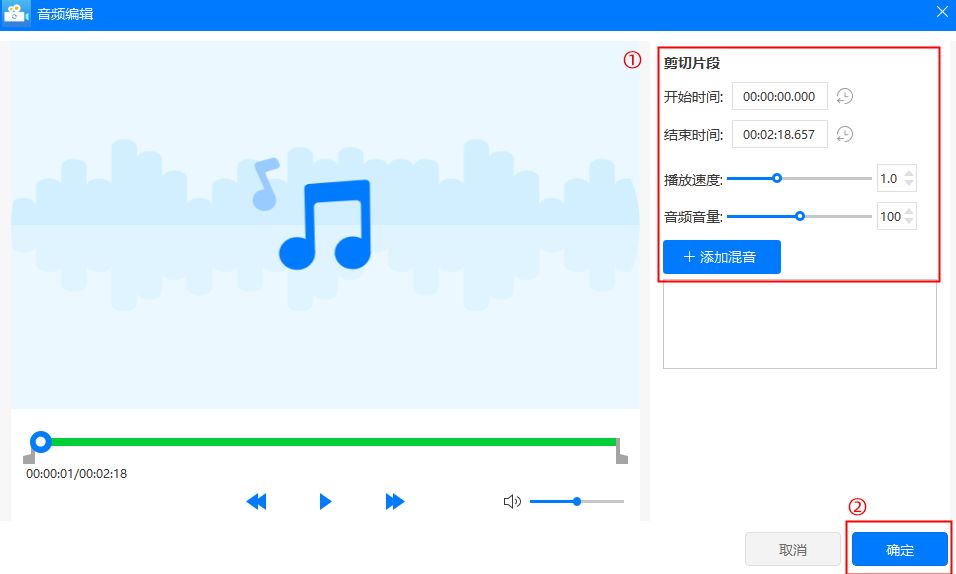
先看界面如下:
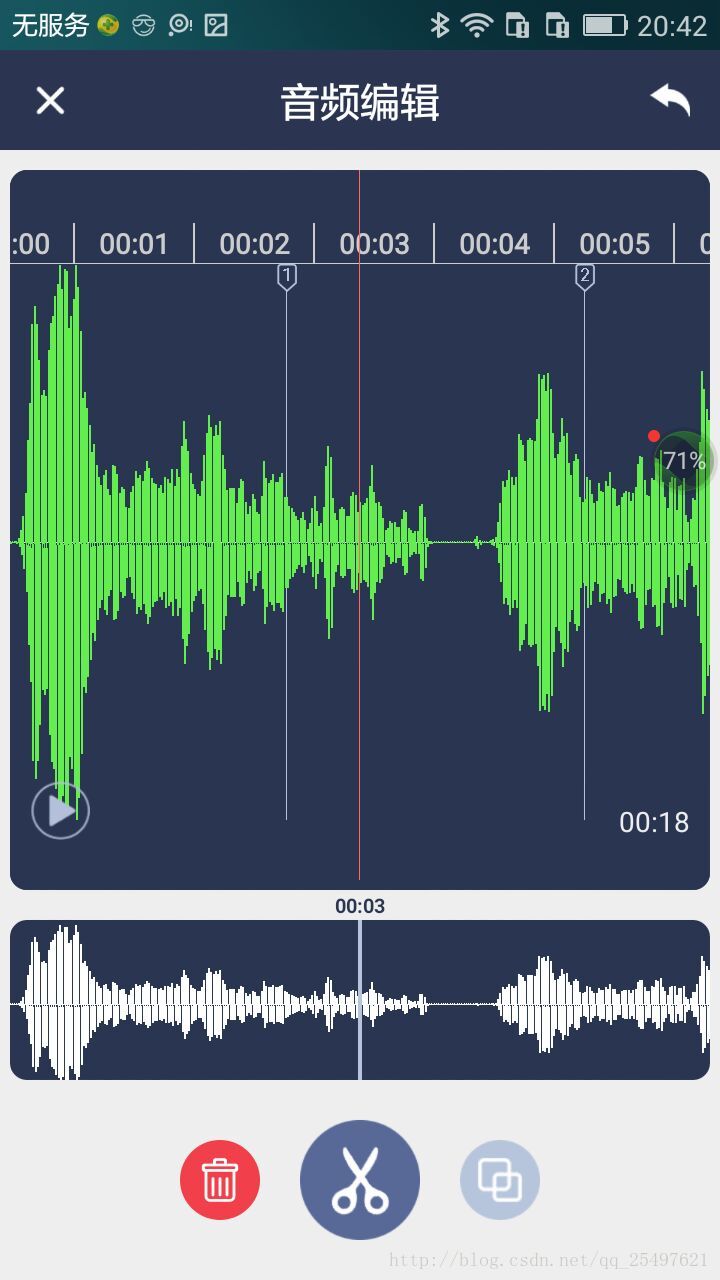
操作者可以在底部那个左右滑动,控制切割点的位置,时间轴的生成方式与编辑的时间轴是不一样的,这个时间轴是动态的,是用
linerLayout动态添加子View生成的,很简单,每个刻度我这里的是60dp,你自己可以根据需要更改,ll_wave_content是包裹
timeLine的父控件。代码如下:
/*** 音频的时间刻度*/private void timeSize() {timeLine = (LinearLayout)this.findViewById(R.id.ll_time_counter);tv_totalTime.setText(formatTime(totalTime)+"");timeLine.removeAllViews();totleLength = totalTime*DensityUtil.dip2px(60);
// timeLine1.removeAllViews();ll_wave_content1.setLayoutParams(new FrameLayout.LayoutParams(totalTime*DensityUtil.dip2px
(60),LayoutParams.MATCH_PARENT));ll_wave_content.setLayoutParams(new FrameLayout.LayoutParams(totalTime*DensityUtil.dip2px
(60),LayoutParams.MATCH_PARENT));timeLine1.setLayoutParams(new RelativeLayout.LayoutParams(totalTime*DensityUtil.dip2px
(60),LayoutParams.MATCH_PARENT));for(int i=0;i<totalTime;i++){LinearLayout line1=new LinearLayout(this);line1.setOrientation(LinearLayout.HORIZONTAL);line1.setLayoutParams(new LayoutParams(DensityUtil.dip2px
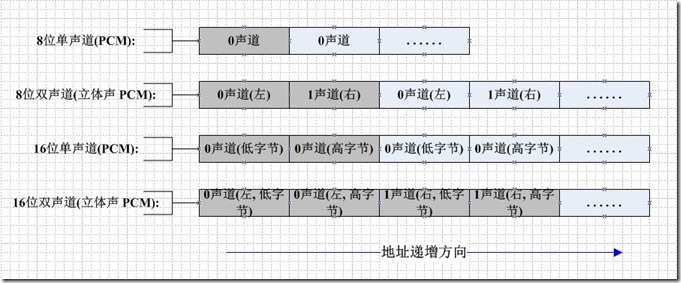
(60),LinearLayout.LayoutParams.WRAP_CONTENT));line1.setGravity(Gravity.CENTER);TextView timeText=new TextView(this);timeText.setText(formatTime(i));timeText.setWidth(DensityUtil.dip2px(60)-2);timeText.setGravity(Gravity.CENTER_HORIZONTAL);TextPaint paint = timeText.getPaint();paint.setFakeBoldText(true); //字体加粗设置timeText.setTextColor(Color.rgb(204, 204, 204));View line2=new View(this);line2.setBackgroundColor(Color.rgb(204, 204, 204));line2.setPadding(0, 10, 0, 0);line1.addView(timeText);line1.addView(line2);timeLine.addView(line1);}相对其他格式的音频文件,wav格式的相对比较简单,只是在pcm之上添加了头部,wav的头部格式如下:

好,看的不明白的同学可自行百度活谷歌,有很多文章介绍;
既然pcm格式加上wav的头部就可,那剪辑或者合成就很方便了,合成的方法奉上:
/*** merge *.wav files * @param target output file* @param paths the files that need to merge* @return whether merge files success*/public static boolean mergeAudioFiles(String target,List<String> paths) {try {FileOutputStream fos = new FileOutputStream(target); int size=0;byte[] buf = new byte[1024 * 1000];int PCMSize = 0;for(int i=0;i<paths.size();i++){FileInputStream fis = new FileInputStream(paths.get(i));size = fis.read(buf);while (size != -1){PCMSize += size;size = fis.read(buf);}fis.close();}PCMSize=PCMSize-paths.size()*44;WaveHeader header = new WaveHeader();header.fileLength = PCMSize + (44 - 8);header.FmtHdrLeth = 16;header.BitsPerSample = 16;header.Channels = 1;header.FormatTag = 0x0001;header.SamplesPerSec = 16000;header.BlockAlign = (short) (header.Channels * header.BitsPerSample / 8);header.AvgBytesPerSec = header.BlockAlign * header.SamplesPerSec;header.DataHdrLeth = PCMSize;byte[] h = header.getHeader();assert h.length == 44;fos.write(h, 0, h.length);for(int j=0;j<paths.size();j++){FileInputStream fis = new FileInputStream(paths.get(j));size = fis.read(buf);boolean isFirst=true;while (size != -1){if(isFirst){fos.write(buf, 44, size-44);size = fis.read(buf);isFirst=false;}else{fos.write(buf, 0, size);size = fis.read(buf);}}fis.close();}fos.close();} catch (Exception e) {e.printStackTrace();return false;}return true;}剪辑的类,注意的是,需要先将你操作的wav文件塞进去,进行头文件的格式解析,之后就可算出你需要删除的帧区间,之后就是相关的逻辑运算了,这里我就不一一啰嗦了:
public class CheapWAV extends CheapSoundFile {public static Factory getFactory() {return new Factory() {public CheapSoundFile create() {return new CheapWAV();}public String[] getSupportedExtensions() {return new String[] { "wav" };}};}// Member variables containing frame infoprivate int mNumFrames;private int[] mFrameOffsets;private int[] mFrameLens;private int[] mFrameGains;private int mFrameBytes;private int mFileSize;private int mSampleRate;private int mChannels;// Member variables used during initializationprivate int mOffset;public CheapWAV() {}public int getNumFrames() {return mNumFrames;}public int getSamplesPerFrame() {return mSampleRate / 50;}public int[] getFrameOffsets() {return mFrameOffsets;}public int[] getFrameLens() {return mFrameLens;}public int[] getFrameGains() {return mFrameGains;}public int getFileSizeBytes() {return mFileSize;        }public int getAvgBitrateKbps() {return mSampleRate * mChannels * 2 / 1024;}public int getSampleRate() {return mSampleRate;}public int getChannels() {return mChannels;}public String getFiletype() {return "WAV";}//    public int secondsToFrames(double seconds) {
//        return (int)(1.0 * seconds * mSampleRate / mSamplesPerFrame + 0.5);
//    }public void ReadFile(File inputFile)throws java.io.FileNotFoundException,java.io.IOException {super.ReadFile(inputFile);mFileSize = (int)mInputFile.length();if (mFileSize < 128) {throw new java.io.IOException("File too small to parse");}FileInputStream stream = new FileInputStream(mInputFile);byte[] header = new byte[12];stream.read(header, 0, 12);mOffset += 12;if (header[0] != 'R' ||header[1] != 'I' ||header[2] != 'F' ||header[3] != 'F' ||header[8] != 'W' ||header[9] != 'A' ||header[10] != 'V' ||header[11] != 'E') {throw new java.io.IOException("Not a WAV file");}mChannels = 0;mSampleRate = 0;while (mOffset + 8 <= mFileSize) {byte[] chunkHeader = new byte[8];stream.read(chunkHeader, 0, 8);mOffset += 8;int chunkLen =((0xff & chunkHeader[7]) << 24) |((0xff & chunkHeader[6]) << 16) |((0xff & chunkHeader[5]) << 8) |((0xff & chunkHeader[4]));if (chunkHeader[0] == 'f' &&chunkHeader[1] == 'm' &&chunkHeader[2] == 't' &&chunkHeader[3] == ' ') {if (chunkLen < 16 || chunkLen > 1024) {throw new java.io.IOException("WAV file has bad fmt chunk");}byte[] fmt = new byte[chunkLen];stream.read(fmt, 0, chunkLen);mOffset += chunkLen;int format =((0xff & fmt[1]) << 8) |((0xff & fmt[0]));mChannels =((0xff & fmt[3]) << 8) |((0xff & fmt[2]));mSampleRate =((0xff & fmt[7]) << 24) |((0xff & fmt[6]) << 16) |((0xff & fmt[5]) << 8) |((0xff & fmt[4]));if (format != 1) {throw new java.io.IOException("Unsupported WAV file encoding");}} else if (chunkHeader[0] == 'd' &&chunkHeader[1] == 'a' &&chunkHeader[2] == 't' &&chunkHeader[3] == 'a') {if (mChannels == 0 || mSampleRate == 0) {throw new java.io.IOException("Bad WAV file: data chunk before fmt chunk");}int frameSamples = (mSampleRate * mChannels) / 50;mFrameBytes = frameSamples * 2;mNumFrames = (chunkLen + (mFrameBytes - 1)) / mFrameBytes;mFrameOffsets = new int[mNumFrames];mFrameLens = new int[mNumFrames];mFrameGains = new int[mNumFrames];byte[] oneFrame = new byte[mFrameBytes];int i = 0;int frameIndex = 0;while (i < chunkLen) {int oneFrameBytes = mFrameBytes;if (i + oneFrameBytes > chunkLen) {i = chunkLen - oneFrameBytes;}stream.read(oneFrame, 0, oneFrameBytes);int maxGain = 0;for (int j = 1; j < oneFrameBytes; j += 4 * mChannels) {int val = java.lang.Math.abs(oneFrame[j]);if (val > maxGain) {maxGain = val;}}mFrameOffsets[frameIndex] = mOffset;mFrameLens[frameIndex] = oneFrameBytes;mFrameGains[frameIndex] = maxGain;frameIndex++;mOffset += oneFrameBytes;i += oneFrameBytes;if (mProgressListener != null) {boolean keepGoing = mProgressListener.reportProgress(i * 1.0 / chunkLen);if (!keepGoing) {break;}}}} else {stream.skip(chunkLen);mOffset += chunkLen;}}}public void WriteFile(File outputFile, int startFrame, int numFrames)throws java.io.IOException {outputFile.createNewFile();FileInputStream in = new FileInputStream(mInputFile);FileOutputStream out = new FileOutputStream(outputFile);long totalAudioLen = 0;for (int i = 0; i < numFrames; i++) {totalAudioLen += mFrameLens[startFrame + i];}long totalDataLen = totalAudioLen + 36;long longSampleRate = mSampleRate;long byteRate = mSampleRate * 2 * mChannels;byte[] header = new byte[44];header[0] = 'R';  // RIFF/WAVE headerheader[1] = 'I';header[2] = 'F';header[3] = 'F';header[4] = (byte) (totalDataLen & 0xff);header[5] = (byte) ((totalDataLen >> 8) & 0xff);header[6] = (byte) ((totalDataLen >> 16) & 0xff);header[7] = (byte) ((totalDataLen >> 24) & 0xff);header[8] = 'W';header[9] = 'A';header[10] = 'V';header[11] = 'E';header[12] = 'f';  // 'fmt ' chunkheader[13] = 'm';header[14] = 't';header[15] = ' ';header[16] = 16;  // 4 bytes: size of 'fmt ' chunkheader[17] = 0;header[18] = 0;header[19] = 0;header[20] = 1;  // format = 1header[21] = 0;header[22] = (byte) mChannels;header[23] = 0;header[24] = (byte) (longSampleRate & 0xff);header[25] = (byte) ((longSampleRate >> 8) & 0xff);header[26] = (byte) ((longSampleRate >> 16) & 0xff);header[27] = (byte) ((longSampleRate >> 24) & 0xff);header[28] = (byte) (byteRate & 0xff);header[29] = (byte) ((byteRate >> 8) & 0xff);header[30] = (byte) ((byteRate >> 16) & 0xff);header[31] = (byte) ((byteRate >> 24) & 0xff);header[32] = (byte) (2 * mChannels);  // block alignheader[33] = 0;header[34] = 16;  // bits per sampleheader[35] = 0;header[36] = 'd';header[37] = 'a';header[38] = 't';header[39] = 'a';header[40] = (byte) (totalAudioLen & 0xff);header[41] = (byte) ((totalAudioLen >> 8) & 0xff);header[42] = (byte) ((totalAudioLen >> 16) & 0xff);header[43] = (byte) ((totalAudioLen >> 24) & 0xff);out.write(header, 0, 44);byte[] buffer = new byte[mFrameBytes];int pos = 0;for (int i = 0; i < numFrames; i++) {int skip = mFrameOffsets[startFrame + i] - pos;int len = mFrameLens[startFrame + i];if (skip < 0) {continue;}if (skip > 0) {in.skip(skip);pos += skip;}in.read(buffer, 0, len);out.write(buffer, 0, len);pos += len;}in.close();out.close();}
};
好了,最近一段时间确实太忙了,其他项目的维护升级什么的,搞的头皮发麻。有什么问题可以留言交流。
声明:音频的裁剪这个类的原作者的一个开源小项目叫音乐快剪,我只是在其基础上进行了修改!其他格式的音频MP3的话还好,但是ACC或者M4a格式的裁剪就比较麻烦,需要进行重新编码,建议使用FFMPEG进行格式重新编码裁剪,至于FFMPEG的android平台移植,GITHUB上有很多,很多人的博客也有介绍,个人建议不要自己编译(您时间富裕除外),很多已经编译好了,直接使用即可。
Github地址(大家下载的时候顺便给个star也是对作者劳动成果的肯定,谢谢):
https://github.com/T-chuangxin/VideoMergeDemo