前面介绍了音频的基本原理,这篇文章继续来总结下音频的基本操作,包括裁剪,混音和音频和视频的混合操作。
一、裁剪
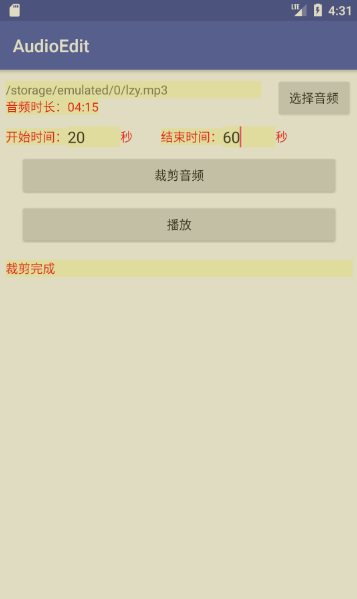
下面Demo将一段输入mp3文件,根据startTime和endTime,进行裁剪,先解码成PCM文件,然后转码成WAV
//解码成PCM文件
public void decodeToPCM(String musicPath, String outPath, int startTime, int endTime) throws Exception {if (endTime < startTime) {return;}MediaExtractor mediaExtractor = new MediaExtractor();mediaExtractor.setDataSource(musicPath);int audioTrack = selectTrack(mediaExtractor);mediaExtractor.selectTrack(audioTrack);mediaExtractor.seekTo(startTime, MediaExtractor.SEEK_TO_CLOSEST_SYNC);MediaFormat oriAudioFormat = mediaExtractor.getTrackFormat(audioTrack);int maxBufferSize = 100 * 1000;if (oriAudioFormat.containsKey(MediaFormat.KEY_MAX_INPUT_SIZE)) {maxBufferSize = oriAudioFormat.getInteger(MediaFormat.KEY_MAX_INPUT_SIZE);} else {maxBufferSize = 100 * 1000;}ByteBuffer buffer = ByteBuffer.allocateDirect(maxBufferSize);MediaCodec mediaCodec = MediaCodec.createDecoderByType(oriAudioFormat.getString((MediaFormat.KEY_MIME)));mediaCodec.configure(oriAudioFormat, null, null, 0);File pcmFile = new File(outPath);FileChannel writeChannel = new FileOutputStream(pcmFile).getChannel();mediaCodec.start();MediaCodec.BufferInfo info = new MediaCodec.BufferInfo();int outputBufferIndex = -1;while (true) {int decodeInputIndex = mediaCodec.dequeueInputBuffer(100000);if (decodeInputIndex >= 0) {long sampleTimeUs = mediaExtractor.getSampleTime();if (sampleTimeUs == -1) {break;} else if (sampleTimeUs < startTime) {// 不用了mediaExtractor.advance();continue;} else if (sampleTimeUs > endTime) {break;}
//                获取到压缩数据info.size = mediaExtractor.readSampleData(buffer, 0);info.presentationTimeUs = sampleTimeUs;info.flags = mediaExtractor.getSampleFlags();//                下面放数据到dsp解码byte[] content = new byte[buffer.remaining()];buffer.get(content);
//                输出文件  方便查看
//                FileUtils.writeContent(content);
//                解码ByteBuffer inputBuffer = mediaCodec.getInputBuffer(decodeInputIndex);inputBuffer.put(content);mediaCodec.queueInputBuffer(decodeInputIndex, 0, info.size, info.presentationTimeUs, info.flags);
//                释放上一帧的压缩数据mediaExtractor.advance();}outputBufferIndex = mediaCodec.dequeueOutputBuffer(info, 100_000);while (outputBufferIndex >= 0) {ByteBuffer decodeOutputBuffer = mediaCodec.getOutputBuffer(outputBufferIndex);writeChannel.write(decodeOutputBuffer);//MP3  1   pcm2mediaCodec.releaseOutputBuffer(outputBufferIndex, false);outputBufferIndex = mediaCodec.dequeueOutputBuffer(info, 100_000);}}writeChannel.close();mediaExtractor.release();mediaCodec.stop();mediaCodec.release();}//编码成WAV
public void convertPcmToWav(String inputPath, String outputPath) {
//采样率44.1khz, 立体声, 双通道, 量化位数16new PcmToWavUtil(44100, AudioFormat.CHANNEL_IN_STEREO,2, AudioFormat.ENCODING_PCM_16BIT).pcmToWav(inputPath, outputPath);
}private int selectTrack(MediaExtractor mediaExtractor) {
//获取每条轨道int numTracks = mediaExtractor.getTrackCount();for (int i = 0; i < numTracks; i++) {
//            数据      MediaFormatMediaFormat format = mediaExtractor.getTrackFormat(i);String mime = format.getString(MediaFormat.KEY_MIME);if (mime.startsWith("audio/")) {return i;}}return -1;
}
上面PCM转为WAV就是在文件头部写入44个固定字节数据。详细代码看最后提出的代码位置
二、混和音频
下面Demo将一段输入mp3文件和视频的音频,根据startTime和endTime,进行裁剪合成,先解码成PCM文件,然后转码成合成的WAV文件
public void mixAudioTrack(Context context,final String videoInput,final String audioInput,final String output,final Integer startTimeUs, final Integer endTimeUs,int videoVolume,//视频声音大小int aacVolume//音频声音大小
) throws Exception {final File videoPcmFile = new File(Environment.getExternalStorageDirectory(), "video.pcm");final File musicPcmFile = new File(Environment.getExternalStorageDirectory(), "music.pcm");decodeToPCM(videoInput, videoPcmFile.getAbsolutePath(), startTimeUs, endTimeUs);decodeToPCM(audioInput, musicPcmFile.getAbsolutePath(), startTimeUs, endTimeUs);final File mixPcmFile = new File(Environment.getExternalStorageDirectory(), "mix.pcm");mixPcm(videoPcmFile.getAbsolutePath(), musicPcmFile.getAbsolutePath(), mixPcmFile.getAbsolutePath(), videoVolume, aacVolume);new PcmToWavUtil(44100, AudioFormat.CHANNEL_IN_STEREO,2, AudioFormat.ENCODING_PCM_16BIT).pcmToWav(mixPcmFile.getAbsolutePath(), output);
}private static float normalizeVolume(int volume) {return volume / 100f * 1;
}public static void mixPcm(String pcm1Path, String pcm2Path, String toPath, int volume1, int volume2) throws IOException {float vol1 = normalizeVolume(volume1);float vol2 = normalizeVolume(volume2);//一次读取  2kbyte[] buffer1 = new byte[2048];byte[] buffer2 = new byte[2048];// 待输出数据byte[] buffer3 = new byte[2048];FileInputStream is1 = new FileInputStream(pcm1Path);FileInputStream is2 = new FileInputStream(pcm2Path);//输出PCM 的FileOutputStream fileOutputStream = new FileOutputStream(toPath);short temp2, temp1;//   两个short变量相加 会大于short   声音int temp;boolean end1 = false, end2 = false;while (!end1 || !end2) {if (!end1) {end1 = (is1.read(buffer1) == -1);
//            音乐的pcm数据 写入到 buffer3System.arraycopy(buffer1, 0, buffer3, 0, buffer1.length);}if (!end2) {end2 = (is2.read(buffer2) == -1);int voice = 0;//一个声音 2 个字节for (int i = 0; i < buffer2.length; i += 2) {
//将低字节放高字节前面				temp1 = (short) ((buffer1[i] & 0xff) | (buffer1[i + 1] & 0xff) << 8);temp2 = (short) ((buffer2[i] & 0xff) | (buffer2[i + 1] & 0xff) << 8);temp = (int) (temp1 * vol1 + temp2 * vol2);
//边界监测                if (temp > 32767) {temp = 32767;} else if (temp < -32768) {temp = -32768;}buffer3[i] = (byte) (temp & 0xFF);buffer3[i + 1] = (byte) ((temp >>> 8) & 0xFF);}fileOutputStream.write(buffer3);}}is1.close();is2.close();fileOutputStream.close();
}
上面涉及到音频的混合操作,首先会将输入的音频解码成PCM,并且提取视频中的音频转换成PCM,然后接着就是对两个PCM文件操作。
上面的音频混合部分是以16位双通道为例计算的。
三、混合音视频
下面Demo将一段输入mp3文件和视频,根据startTime和endTime,进行裁剪合成,先解码成PCM文件,然后转码成合成MP4文件
public void mixVideoAndAudioTrack(Context context,final String videoInput,final String audioInput,final String output,final Integer startTimeUs, final Integer endTimeUs,int videoVolume,//视频声音大小int aacVolume//音频声音大小
) throws Exception {File cacheDir = Environment.getExternalStorageDirectory();File aacPcmFile = new File(cacheDir, "audio" + ".pcm");final File videoPcmFile = new File(cacheDir, "video" + ".pcm");//        MediaMetadataRetriever mediaMetadataRetriever = new MediaMetadataRetriever();
//        mediaMetadataRetriever.setDataSource(audioInput);
//        读取音乐时间
//        final int aacDurationMs = Integer.parseInt(mediaMetadataRetriever.extractMetadata(MediaMetadataRetriever.METADATA_KEY_DURATION));
//        mediaMetadataRetriever.release();MediaExtractor audioExtractor = new MediaExtractor();audioExtractor.setDataSource(audioInput);decodeToPCM(videoInput, videoPcmFile.getAbsolutePath(),startTimeUs, endTimeUs);//        final int videoDurationMs = (endTimeUs - startTimeUs) / 1000;decodeToPCM(audioInput, aacPcmFile.getAbsolutePath(), startTimeUs, endTimeUs);File adjustedPcm = new File(cacheDir, "混合后的" + ".pcm");mixPcm(videoPcmFile.getAbsolutePath(), aacPcmFile.getAbsolutePath(),adjustedPcm.getAbsolutePath(), videoVolume, aacVolume);File wavFile = new File(cacheDir, adjustedPcm.getName() + ".wav");new PcmToWavUtil(44100, AudioFormat.CHANNEL_IN_STEREO,2, AudioFormat.ENCODING_PCM_16BIT).pcmToWav(adjustedPcm.getAbsolutePath(), wavFile.getAbsolutePath());//混音的wav文件   + 视频文件   ---》  生成mixVideoAndAudio(videoInput, output, startTimeUs, endTimeUs, wavFile);
}private void mixVideoAndAudio(String videoInput, String output, Integer startTimeUs, Integer endTimeUs, File wavFile) throws IOException {// 初始化一个视频封装容器MediaMuxer mediaMuxer = new MediaMuxer(output, MediaMuxer.OutputFormat.MUXER_OUTPUT_MPEG_4);MediaExtractor mediaExtractor = new MediaExtractor();mediaExtractor.setDataSource(videoInput);
// 拿到视频轨道的索引int videoIndex = selectTrack(mediaExtractor, false);
// 拿到音频轨道的索引int audioIndex = selectTrack(mediaExtractor, true);
//  视频配置MediaFormat videoFormat = mediaExtractor.getTrackFormat(videoIndex);
//开辟了一个轨道空的轨道,只有写数据,才会变真实mediaMuxer.addTrack(videoFormat);//视频中音频轨道   应该取自于原视频的音频参数MediaFormat audioFormat = mediaExtractor.getTrackFormat(audioIndex);int audioBitrate = audioFormat.getInteger(MediaFormat.KEY_BIT_RATE);audioFormat.setString(MediaFormat.KEY_MIME, MediaFormat.MIMETYPE_AUDIO_AAC);//添加一个空的轨道  轨道格式取自 视频文件,跟视频所有信息一样int muxerAudioIndex = mediaMuxer.addTrack(audioFormat);//音频轨道开辟好了,输出开始工作mediaMuxer.start();//音频的wavMediaExtractor pcmExtrator = new MediaExtractor();pcmExtrator.setDataSource(wavFile.getAbsolutePath());int audioTrack = selectTrack(pcmExtrator, true);pcmExtrator.selectTrack(audioTrack);MediaFormat pcmTrackFormat = pcmExtrator.getTrackFormat(audioTrack);//最大一帧的大小int maxBufferSize = 0;if (audioFormat.containsKey(MediaFormat.KEY_MAX_INPUT_SIZE)) {maxBufferSize = pcmTrackFormat.getInteger(MediaFormat.KEY_MAX_INPUT_SIZE);} else {maxBufferSize = 100 * 1000;}MediaFormat encodeFormat = MediaFormat.createAudioFormat(MediaFormat.MIMETYPE_AUDIO_AAC,44100, 2);//参数对应-> mime type、采样率、声道数encodeFormat.setInteger(MediaFormat.KEY_BIT_RATE, audioBitrate);//比特率
//            音质等级encodeFormat.setInteger(MediaFormat.KEY_AAC_PROFILE, MediaCodecInfo.CodecProfileLevel.AACObjectLC);
//            解码  那段encodeFormat.setInteger(MediaFormat.KEY_MAX_INPUT_SIZE, maxBufferSize);
//             解码 那MediaCodec encoder = MediaCodec.createEncoderByType(MediaFormat.MIMETYPE_AUDIO_AAC);
//            配置AAC 参数  编码 pcm   重新编码     视频文件变得更小encoder.configure(encodeFormat, null, null, MediaCodec.CONFIGURE_FLAG_ENCODE);encoder.start();
//            容器ByteBuffer buffer = ByteBuffer.allocateDirect(maxBufferSize);MediaCodec.BufferInfo info = new MediaCodec.BufferInfo();boolean encodeDone = false;while (!encodeDone) {int inputBufferIndex = encoder.dequeueInputBuffer(10000);if (inputBufferIndex >= 0) {long sampleTime = pcmExtrator.getSampleTime();if (sampleTime < 0) {
//               pts小于0  来到了文件末尾 通知编码器  不用编码了encoder.queueInputBuffer(inputBufferIndex, 0, 0, 0, MediaCodec.BUFFER_FLAG_END_OF_STREAM);} else {int flags = pcmExtrator.getSampleFlags();int size = pcmExtrator.readSampleData(buffer, 0);ByteBuffer inputBuffer = encoder.getInputBuffer(inputBufferIndex);inputBuffer.clear();inputBuffer.put(buffer);inputBuffer.position(0);encoder.queueInputBuffer(inputBufferIndex, 0, size, sampleTime, flags);pcmExtrator.advance();}}
//                获取编码完的数据int outputBufferIndex = encoder.dequeueOutputBuffer(info, TIMEOUT);while (outputBufferIndex >= 0) {if (info.flags == MediaCodec.BUFFER_FLAG_END_OF_STREAM) {encodeDone = true;break;}ByteBuffer encodeOutputBuffer = encoder.getOutputBuffer(outputBufferIndex);mediaMuxer.writeSampleData(muxerAudioIndex, encodeOutputBuffer, info);encodeOutputBuffer.clear();encoder.releaseOutputBuffer(outputBufferIndex, false);outputBufferIndex = encoder.dequeueOutputBuffer(info, TIMEOUT);}}//把音频添加好了if (audioTrack >= 0) {//解选中音频mediaExtractor.unselectTrack(audioTrack);}//选中视频mediaExtractor.selectTrack(videoIndex);mediaExtractor.seekTo(startTimeUs, MediaExtractor.SEEK_TO_PREVIOUS_SYNC);maxBufferSize = videoFormat.getInteger(MediaFormat.KEY_MAX_INPUT_SIZE);buffer = ByteBuffer.allocateDirect(maxBufferSize);//封装容器添加视频轨道信息while (true) {long sampleTimeUs = mediaExtractor.getSampleTime();if (sampleTimeUs == -1) {break;}if (sampleTimeUs < startTimeUs) {mediaExtractor.advance();continue;}if (endTimeUs != null && sampleTimeUs > endTimeUs) {break;}info.presentationTimeUs = sampleTimeUs - startTimeUs + 600;info.flags = mediaExtractor.getSampleFlags();info.size = mediaExtractor.readSampleData(buffer, 0);if (info.size < 0) {break;}mediaMuxer.writeSampleData(videoIndex, buffer, info);mediaExtractor.advance();}try {pcmExtrator.release();mediaExtractor.release();encoder.stop();encoder.release();mediaMuxer.release();} catch (Exception e) {}}
1、先将音频和视频中的音频合成
2、然后再让合成后的音频和视频混合
四、视频和视频拼接
下面Demo是拼接两个视频
public static boolean appendVideo(String inputPath1, String inputPath2, String outputPath) throws IOException {MediaMuxer mediaMuxer = new MediaMuxer(outputPath,MediaMuxer.OutputFormat.MUXER_OUTPUT_MPEG_4);MediaExtractor videoExtractor1 = new MediaExtractor();videoExtractor1.setDataSource(inputPath1);MediaExtractor videoExtractor2 = new MediaExtractor();videoExtractor2.setDataSource(inputPath2);int videoTrackIndex = -1;int audioTrackIndex = -1;long file1_video_duration = 0L;long file1_audio_duration = 0L;int sourceVideoTrack1 = -1;int sourceAudioTrack1 = -1;for (int index = 0; index < videoExtractor1.getTrackCount(); index++) {MediaFormat format = videoExtractor1.getTrackFormat(index);String mime = format.getString(MediaFormat.KEY_MIME);if (mime.startsWith("video/")) {sourceVideoTrack1 = index;videoTrackIndex = mediaMuxer.addTrack(format);file1_video_duration = format.getLong(MediaFormat.KEY_DURATION);} else if (mime.startsWith("audio/")) {sourceAudioTrack1 = index;audioTrackIndex = mediaMuxer.addTrack(format);file1_audio_duration = format.getLong(MediaFormat.KEY_DURATION);}}int sourceVideoTrack2 = -1;int sourceAudioTrack2 = -1;for (int index = 0; index < videoExtractor2.getTrackCount(); index++) {MediaFormat format = videoExtractor2.getTrackFormat(index);String mime = format.getString(MediaFormat.KEY_MIME);if (mime.startsWith("video/")) {sourceVideoTrack2 = index;} else if (mime.startsWith("audio/")) {sourceAudioTrack2 = index;}}if (mediaMuxer == null)return false;mediaMuxer.start();//1.write first video track into muxer.videoExtractor1.selectTrack(sourceVideoTrack1);MediaCodec.BufferInfo info = new MediaCodec.BufferInfo();info.presentationTimeUs = 0;ByteBuffer buffer = ByteBuffer.allocate(500 * 1024);int sampleSize = 0;while ((sampleSize = videoExtractor1.readSampleData(buffer, 0)) >= 0) {info.offset = 0;info.size = sampleSize;info.flags = videoExtractor1.getSampleFlags();info.presentationTimeUs = videoExtractor1.getSampleTime();mediaMuxer.writeSampleData(videoTrackIndex, buffer, info);videoExtractor1.advance();}//2.write first audio track into muxer.videoExtractor1.unselectTrack(sourceVideoTrack1);videoExtractor1.selectTrack(sourceAudioTrack1);info = new MediaCodec.BufferInfo();info.presentationTimeUs = 0;buffer = ByteBuffer.allocate(500 * 1024);sampleSize = 0;while ((sampleSize = videoExtractor1.readSampleData(buffer, 0)) >= 0) {info.offset = 0;info.size = sampleSize;info.flags = videoExtractor1.getSampleFlags();info.presentationTimeUs = videoExtractor1.getSampleTime();mediaMuxer.writeSampleData(audioTrackIndex, buffer, info);videoExtractor1.advance();}//3.write second video track into muxer.videoExtractor2.selectTrack(sourceVideoTrack2);info = new MediaCodec.BufferInfo();info.presentationTimeUs = 0;buffer = ByteBuffer.allocate(500 * 1024);sampleSize = 0;while ((sampleSize = videoExtractor2.readSampleData(buffer, 0)) >= 0) {info.offset = 0;info.size = sampleSize;info.flags = videoExtractor2.getSampleFlags();info.presentationTimeUs = videoExtractor2.getSampleTime() + file1_video_duration;mediaMuxer.writeSampleData(videoTrackIndex, buffer, info);videoExtractor2.advance();}//4.write second audio track into muxer.videoExtractor2.unselectTrack(sourceVideoTrack2);videoExtractor2.selectTrack(sourceAudioTrack2);info = new MediaCodec.BufferInfo();info.presentationTimeUs = 0;buffer = ByteBuffer.allocate(500 * 1024);sampleSize = 0;while ((sampleSize = videoExtractor2.readSampleData(buffer, 0)) >= 0) {info.offset = 0;info.size = sampleSize;info.flags = videoExtractor2.getSampleFlags();info.presentationTimeUs = videoExtractor2.getSampleTime() + file1_audio_duration;mediaMuxer.writeSampleData(audioTrackIndex, buffer, info);videoExtractor2.advance();}videoExtractor1.release();videoExtractor2.release();mediaMuxer.stop();mediaMuxer.release();return true;
}
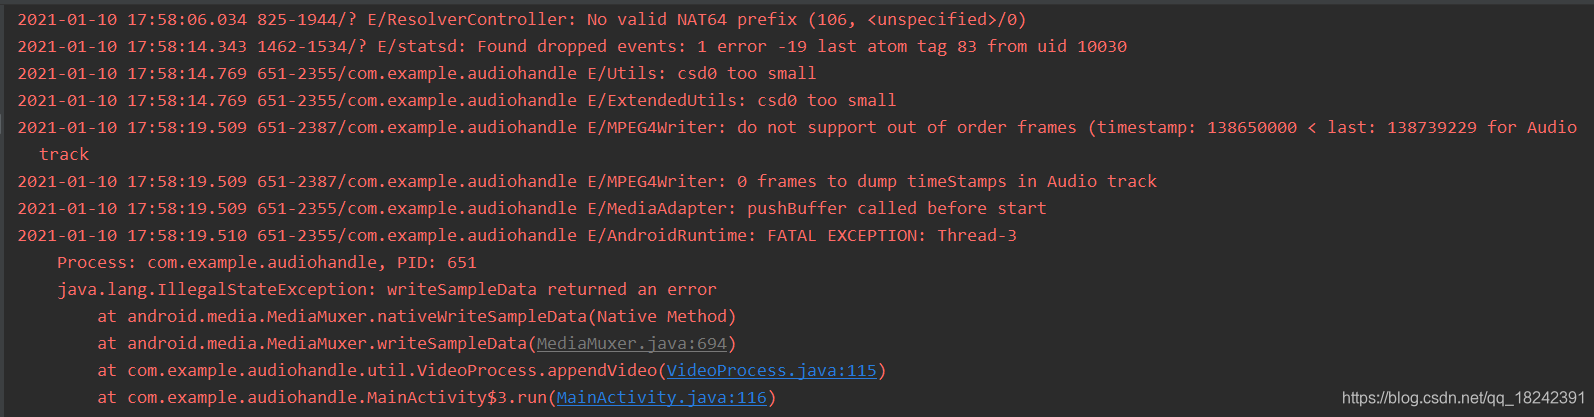
注意,上面音频和视频轨道pts需要分别记录,不然写入会报这样的错
详细代码