以Intel的D435I相机为例,我们可以使用python代码,进行深度图像、RGB图像的读取和点云的可视化:
import pyrealsense2 as rs
import numpy as np
import cv2import pcl
from pcl import pcl_visualizationcloud = pcl.PointCloud_PointXYZRGB()
def visual(visual_viewer, pt,color):length = len(pt)points = np.zeros((length, 4),dtype=np.float32)for i in range(length):points[i][0] = pt[i][0]points[i][1] = pt[i][1]points[i][2] = pt[i][2]points[i][3] = color[i][1]# pt = [list(i) for i in pt]# pt = np.array([*pt])# pt = np.hstack((pt, np.uint8(color)))cloud.from_array(points) #从array构建点云的方式visual_viewer.ShowColorCloud(cloud)v = True# while v:#     v = not (visual_viewer.WasStopped())if __name__ == "__main__":# Configure depth and color streamspipeline = rs.pipeline()config = rs.config()config.enable_stream(rs.stream.depth, 640, 480, rs.format.z16, 30)config.enable_stream(rs.stream.color, 640, 480, rs.format.bgr8, 30)# Start streamingpipeline.start(config)#深度图像向彩色对齐align_to_color=rs.align(rs.stream.color)pc = rs.pointcloud()points = rs.points()visual_viewer = pcl_visualization.CloudViewing()try:while True:# Wait for a coherent pair of frames: depth and colorframes = pipeline.wait_for_frames()frames = align_to_color.process(frames)depth_frame = frames.get_depth_frame()color_frame = frames.get_color_frame()if not depth_frame or not color_frame:continue# Convert images to numpy arraysdepth_image = np.asanyarray(depth_frame.get_data())color_image = np.asanyarray(color_frame.get_data())# Apply colormap on depth image (image must be converted to 8-bit per pixel first)depth_colormap = cv2.applyColorMap(cv2.convertScaleAbs(depth_image, alpha=0.03), cv2.COLORMAP_JET)# Stack both images horizontallyimages = np.hstack((color_image, depth_colormap))# Get point datacolorful=color_image.reshape(-1,3)pc.map_to(color_frame)points = pc.calculate(depth_frame)#获取顶点坐标vtx = np.asanyarray(points.get_vertices())visual(visual_viewer, vtx, colorful)# Show imagescv2.namedWindow('RealSense', cv2.WINDOW_AUTOSIZE)cv2.imshow('RealSense', images)key = cv2.waitKey(1)# Press esc or 'q' to close the image windowif key & 0xFF == ord('q') or key == 27:cv2.destroyAllWindows()breakfinally:# Stop streamingpipeline.stop()
若以racord的*.bag文件进行读取和可视化,有两种方案:
方案一:采用intel提供的库 pyrealsense2,从文件读取数据即可:
pipeline = rs.pipeline()# Create a config object
config = rs.config()# Tell config that we will use a recorded device from file to be used by the pipeline through playback.
rs.config.enable_device_from_file(config, file_path, repeat_playback=False)
pipeline.start(config)
其他就和上面用相机读取的时候一致了。
方案二:采用rosbag读取*.bag数据,并用cv_bridge转换数据:
import os
import cv2
import numpy as np
import rosbag
from cv_bridge import CvBridge
import sensor_msgs.point_cloud2 as pc2
from sensor_msgs.msg import PointCloud2import pcl
from pcl import pcl_visualization
import pyrealsense2 as rsimport numpy as np# 相机参数
depth_camera_metrix = np.array([[920.523,0.0,641.936],   [0.0, 919.243,351.036],   [0,0,1]])def depth2xyz(depth_map,depth_cam_matrix,flatten=False,depth_scale=1000):fx,fy = depth_cam_matrix[0,0],depth_cam_matrix[1,1]cx,cy = depth_cam_matrix[0,2],depth_cam_matrix[1,2]h,w=np.mgrid[0:depth_map.shape[0],0:depth_map.shape[1]]z=depth_map/depth_scalex=(w-cx)*z/fxy=(h-cy)*z/fyxyz=np.dstack((x,y,z)) if flatten==False else np.dstack((x,y,z)).reshape(-1,3)#xyz=cv2.rgbd.depthTo3d(depth_map,depth_cam_matrix)return xyzdef visual_pcl(visual, depth, color):xyz = depth2xyz(depth, depth_camera_metrix)# colorful = np.asanyarray(color.get_data())xyz = xyz.reshape(-1, 3)color=color.reshape(-1,3)# pc.map_to(color)# points = pc.calculate(depth)# vtx = np.asanyarray(points.get_vertices())cloud = pcl.PointCloud_PointXYZRGB()temp = np.zeros((len(xyz), 4), np.float32)length = len(xyz)for i in range(length):temp[i][0] = xyz[i][0] * 1000.0temp[i][1] = xyz[i][1] * 1000.0temp[i][2] = xyz[i][2] * 1000.0temp[i][3] = color[i][0]cloud.from_array(temp)visual.ShowColorCloud(cloud)if __name__ == "__main__":file_path = "./stairs.bag"visual = pcl_visualization.CloudViewing()pc = rs.pointcloud()points = rs.points()bag = rosbag.Bag(file_path, "r")bag_data = bag.read_messages()info = bag.get_type_and_topic_info()print(info)bridge = CvBridge()depth = None; points_tp = Nonefor topic, msg, t in bag_data:print(topic)if topic == "/cam_1/aligned_depth_to_color/image_raw/compressed":# # cv_img = bridge.imgmsg_to_cv2(msg, "16UC1")# bridge.encoding_to_dtype_with_channels("16UC1")depth = bridge.compressed_imgmsg_to_cv2(msg)print(depth.shape)# depth = pc2.read_points(msg)# points = np.asanyarray(depth)  # 如果bag中保存了该类格式,可用此种方法读取点cv2.imshow("Image window", depth)cv2.waitKey(3)print("here")elif topic == "cam_1/color/image_raw/compressed":cv_img = bridge.compressed_imgmsg_to_cv2(msg)colorful=cv_img.reshape(-1,3)# pc.map_to(cv_img)# points = pc.calculate(depth)# vtx = np.asanyarray(points.get_vertices())visual_pcl(visual, depth, colorful)cv2.imshow("Cam1", cv_img)cv2.waitKey(3)print("end")
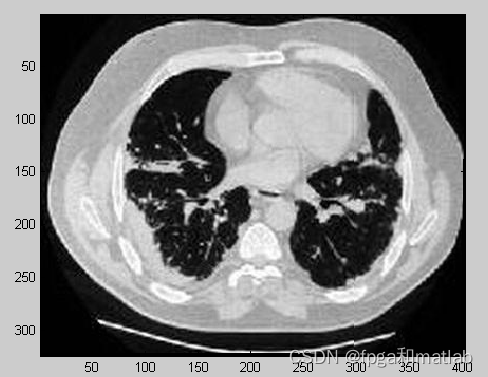
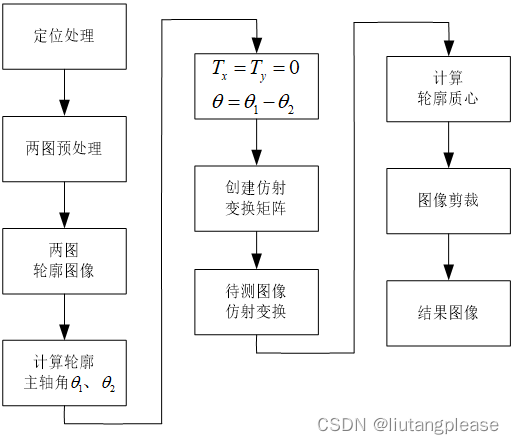
示例图片: