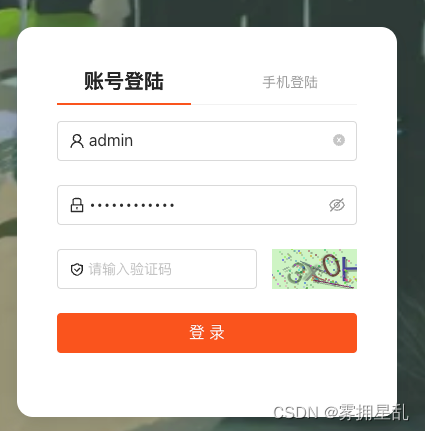
这种页面可能是大家常用的,但重写比较费时间,之前没有搜到完整的,在这里自己总结一下,方面复用
代码:
<LoginFormformRef={formRef}initialValues={{autoLogin: false}}onFinish={async values => {await handleSubmit(values as LoginParams)}}><Tabs activeKey={type} onChange={setType} style={{ color: '#999999', fontSize: '16px' }}><Tabs.TabPane key='account' tab={'账号登陆'} /><Tabs.TabPane key='mobile' tab={'手机登陆'} /></Tabs>
账号登陆:
{type === 'account' && (<><ProFormTextstyle={{ width: '60%' }}name='account'fieldProps={{size: 'large',prefix: <UserOutlined className={styles.prefixIcon} />}}placeholder={'用户名:admin'}rules={[{required: true,message: '请输入用户名'}]}/><ProFormText.Passwordname='password'fieldProps={{size: 'large',prefix: <LockOutlined className={styles.prefixIcon} />}}placeholder={'输入密码'}rules={[{required: true,message: '请输入密码'}]}/><div style={{ display: 'flex' }} className={styles.inputThree}><ProForm.Itemname='captimg'rules={[{required: true,message: '验证码不能为空!'},{validator(_, value) {if (!value) {return new Promise((resolve, reject) => {reject('')})} else {const status = childRef.current.validate(value)return status? Promise.resolve(): Promise.reject(new Error('验证码不正确'))}}}]}><Inputstyle={{ width: '200px', height: '40px', paddingLeft: '30px' }}width='xs'placeholder={'请输入验证码'}className='site-form-item-icon'/></ProForm.Item><CaptchaInput cRef={childRef} />// 验证码画布组件,注意不能写到ProForm组件内,会有影响<IconFont type='icon-yanzhengma' className={styles.verify} /></div></>)}验证码画布组件:
import * as React from 'react'const size = 4
const verifycode = {width: '32%',height: '40px',marginLeft: '5%',display: 'inline-block',top: '0',right: '0'
}export default ({ cRef }) => {const [options, setOptions] = React.useState({id: 'verifycode', // 容器IdcanvasId: 'verifyCanvas', // canvas的IDwidth: 150, // 默认canvas宽度height: 47, // 默认canvas高度type: 'blend', // 图形验证码默认类型blend:数字字母混合类型、number:纯数字、letter:纯字母code: '',numArr: '0,1,2,3,4,5,6,7,8,9'.split(','),letterArr: getAllLetter() })React.useImperativeHandle(cRef, () => ({validate: (value: any) => {const vcode = value?.toLowerCase()const v_code = options.code?.toLowerCase()if (vcode === v_code) {return true} else {return false}}}))React.useEffect(() => {_init()refresh()})function _init() {const con = document.getElementById(options.id)const canvas: any = document.createElement('canvas')options.width = con.offsetWidth > 0 ? con.offsetWidth : 150options.height = con.offsetHeight > 0 ? con.offsetHeight : 47canvas.id = options.canvasIdcanvas.width = options.widthcanvas.height = options.heightcanvas.style.cursor = 'pointer'canvas.innerHTML = '您的浏览器版本不支持canvas'con.appendChild(canvas)canvas.onclick = function() {refresh()}}function refresh() {options.code = ''const canvas: any = document.getElementById(options.canvasId)let ctx = nullif (canvas.getContext) {ctx = canvas.getContext('2d')} else {return}ctx.clearRect(0, 0, options.width, options.height)ctx.textBaseline = 'middle'ctx.fillStyle = randomColor(180, 240)ctx.fillStyle = 'rgba(206, 244, 196)'// 背景色ctx.fillRect(0, 0, options.width, options.height)if (options.type == 'blend') { // 判断验证码类型var txtArr = options.numArr.concat(options.letterArr)} else if (options.type == 'number') {var txtArr = options.numArr} else {var txtArr = options.letterArr}for (let i = 1; i <= size; i++) {const txt = txtArr[randomNum(0, txtArr.length)]options.code += txtctx.font = randomNum(options.height / 2, options.height) + 'px SimHei' // 随机生成字体大小ctx.fillStyle = randomColor(50, 160) // 随机生成字体颜色// ctx.fillStyle = "rgb(46, 137, 255)";//固定字体颜色ctx.shadowOffsetX = randomNum(-3, 3)ctx.shadowOffsetY = randomNum(-3, 3)ctx.shadowBlur = randomNum(-3, 3)ctx.shadowColor = 'rgba(0, 0, 0, 0.3)'const x = options.width / (size + 1) * iconst y = options.height / 2const deg = randomNum(-30, 30)/** 设置旋转角度和坐标原点**/ctx.translate(x, y)ctx.rotate(deg * Math.PI / 180)ctx.fillText(txt, 0, 0)/** 恢复旋转角度和坐标原点**/ctx.rotate(-deg * Math.PI / 180)ctx.translate(-x, -y)}/** 绘制干扰线**/for (let i = 0; i < 4; i++) {ctx.strokeStyle = randomColor(40, 180)ctx.beginPath()ctx.moveTo(randomNum(0, options.width), randomNum(0, options.height))ctx.lineTo(randomNum(0, options.width), randomNum(0, options.height))ctx.stroke()}// 绘制干扰点// for (let i = 0; i < 100; i++) {//   ctx.fillStyle = randomColor(0, 255)//   ctx.beginPath()//   ctx.arc(randomNum(0, options.width), randomNum(0, options.height), 1, 0, 2 * Math.PI)//   ctx.fill()// }}/** 生成字母数组**/function getAllLetter() {const letterStr = 'a,b,c,d,e,f,g,h,i,j,k,l,m,n,o,p,q,r,s,t,u,v,w,x,y,z,A,B,C,D,E,F,G,H,I,J,K,L,M,N,O,P,Q,R,S,T,U,V,W,X,Y,Z'return letterStr.split(',')}/** 生成一个随机数**/function randomNum(min: number, max: number) {return Math.floor(Math.random() * (max - min) + min)}/** 生成一个随机色**/function randomColor(min: number, max: number) {const r = randomNum(min, max)const g = randomNum(min, max)const b = randomNum(min, max)return 'rgb(' + r + ',' + g + ',' + b + ')'}return (<div id='verifycode' style={verifycode} />)
}
手机号登陆
方法:const sendFn = () => {(formRef.current as any).validateFields(['mobile']).then((value) => {pchildref.current._childFn()loginCodeRun.run({mobile: value.mobile,event: 'admin:login_by_mobile'})}).catch(() => {return})}渲染: {type === 'mobile' && (<><ProFormTextfieldProps={{size: 'large',prefix: <MobileOutlined className={styles.prefixIcon} />}}name='mobile'placeholder={'请输入手机号'}rules={[{required: true,message: '请输入手机号'},{pattern: /^1\d{10}$/,message: '手机号格式错误'}]}/><div style={{ display: 'flex' }} className={styles.inputThree}><ProForm.Itemname='captcha'rules={[{required: true,message: '请输入验证码'}]}><Inputstyle={{ width: '200px', height: '40px', paddingLeft: '30px' }}width='xs'placeholder={'请输入验证码'}className='site-form-item-icon'/></ProForm.Item><div onClick={sendFn}><CountDown ref={pchildref} codeStyle={codeStyle} /> // 倒计时计数器组件</div><IconFont type='icon-yanzhengma' className={styles.verify} /></div><ProForm.Item /></>)}倒计时计数器组件
import React, { useState, useEffect, useRef, forwardRef, useImperativeHandle } from 'react'
import { Button } from 'antd'type selfProps = {codeStyle: object;
};const CountDown: React.FC<selfProps> = (props, ref) => {const intervalRef = useRef<any>(null)const [count, changeCount] = useState(0)const { codeStyle } = props // 样式// 组件卸载时清除计时器useEffect(() => {return () => {clearInterval(intervalRef.current)}}, [])useEffect(() => {if (count === 59) {intervalRef.current = setInterval(() => {changeCount((preCount) => preCount - 1)}, 1000)} else if (count === 0) {clearInterval(intervalRef.current)}}, [count])// 暴露的子组件方法,给父组件调用useImperativeHandle(ref, () => {return {_childFn() {changeCount(59)}}})return (<Button disabled={!!count} style={ codeStyle }>{count ? `${count} s后重新发送` : '发送验证码'}</Button>)
}export default forwardRef(CountDown)