转自:链接:https://www.jianshu.com/p/39db0fa66c0e
指定截屏代码实现
全屏截图效果

全屏截图效果
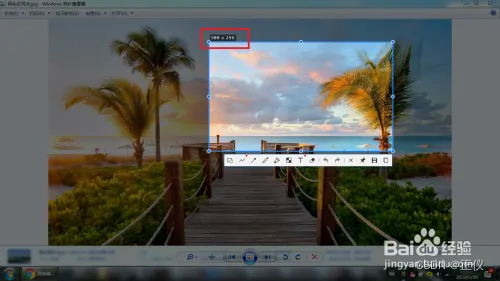
指定区域截屏效果

指定区域截屏效果
这里先上代码,代码后面有相关方法的解释
第一种方法
代码下载
 /**创建一个基于位图的上下文(context),并将其设置为当前上下文(context)@param size 参数size为新创建的位图上下文的大小。它同时是由UIGraphicsGetImageFromCurrentImageContext函数返回的图形大小@param opaque 透明开关,如果图形完全不用透明,设置为YES以优化位图的存储,我们得到的图片背景将会是黑色,使用NO,表示透明,图片背景色正常@param scale 缩放因子 iPhone 4是2.0,其他是1.0。虽然这里可以用[UIScreen mainScreen].scale来获取,但实际上设为0后,系统就会自动设置正确的比例了*/UIGraphicsBeginImageContextWithOptions([[UIScreen mainScreen] bounds].size, YES, 0.0);UIView * view = [[UIScreen mainScreen] snapshotViewAfterScreenUpdates:YES];
//把控制器View的内容绘制到上下文当中.
//layer是不能够直接绘制的.要用渲染的方法才能够让它绘制到上下文当中。UIGraphicsGetCurrentContext()[view.layer renderInContext:UIGraphicsGetCurrentContext()];
//从上下文当中生成一张图片UIImage *viewImage = UIGraphicsGetImageFromCurrentImageContext();
//关闭上下文.UIGraphicsEndImageContext();
/*
//image:要把图片转成二进制流,compressionQuality:可压缩质量.
NSData*data =UIImagePNGRepresentation(viewImage);*///上面我们获得了一个全屏的截图,下边的方法是对这个图片进行裁剪。CGImageRef imageRef =viewImage.CGImage;//这里要特别注意,这里的宽度 CGImageGetWidth(imageRef) 是图片的像素宽(高度同解),所以计算截图区域时需要按比例来;
//这里举的例子是宽高屏幕1/2位置在中心CGRect rect =  CGRectMake(CGImageGetWidth(imageRef)/4, CGImageGetHeight(imageRef)/2-CGImageGetWidth(imageRef)/2, CGImageGetWidth(imageRef)/2, CGImageGetWidth(imageRef)/2);//这里可以设置想要截图的区域CGImageRef imageRefRect =CGImageCreateWithImageInRect(imageRef, rect);UIImage *sendImage =[[UIImage alloc] initWithCGImage:imageRefRect];
第二种方法
代码下载
//设置边框宽度CGFloat borderWH = 5;//图片宽度(像素)CGFloat imageWH = self.baseImageView.image.size.width;NSLog(@"=========%f",imageWH);//开启一个位图上下文(W = imageWH + 2 * border H = imageWH + 2 * border)CGSize size =CGSizeMake(imageWH + 2*borderWH, imageWH + 2*borderWH);UIGraphicsBeginImageContextWithOptions(size,NO,0);//绘制一个圆形的形状.UIBezierPath*path = [UIBezierPath bezierPathWithOvalInRect:CGRectMake(0,0, size.width, size.height)];//边框颜色UIColor *color = [UIColor redColor];[color set];[path fill];//设置一个小圆,并设置成裁剪区域path = [UIBezierPath bezierPathWithOvalInRect:CGRectMake(borderWH, borderWH, imageWH, imageWH)];//把路径设置成裁剪区域[path addClip];//把图片绘制到上下文当中.[self.baseImageView.image drawAtPoint:CGPointMake(borderWH, borderWH)];//从上下文当中生成一张图片UIImage*newImage =UIGraphicsGetImageFromCurrentImageContext();//关闭上下文.UIGraphicsEndImageContext();self.bottonImageView.image = newImage;相关知识详解
UIGraphicsBeginImageContext创建一个基于位图的上下文(context),并将其设置为当前上下文(context)。方法声明如下:
void UIGraphicsBeginImageContext(CGSize size);
参数size为新创建的位图上下文的大小。它同时是UIGraphicsGetImageFromCurrentImageContext函数返回的图形大小。
该函数的功能同UIGraphicsBeginImageContextWithOptions的功能相同,相当与UIGraphicsBeginImageContextWithOptions的opaque参数为NO,scale因子为1.0。
UIGraphicsBeginImageContextWithOptions函数原型为:
void UIGraphicsBeginImageContextWithOptions(CGSize size, BOOL opaque, CGFloat scale);
size——同UIGraphicsBeginImageContext
opaque—透明开关,如果图形完全不用透明,设置为YES以优化位图的存储。
scale—–缩放因子 iPhone 4是2.0,其他是1.0。虽然这里可以用[UIScreen mainScreen].scale来获取,但实际上设为0后,系统就会自动设置正确的比例了。
其他的截屏方法
第二种
这是在比较常见的截图方法,不过不支持Retina屏幕。
UIGraphicsBeginImageContext(self.view.frame.size);[self.view.layer renderInContext:UIGraphicsGetCurrentContext()];UIImage *image = UIGraphicsGetImageFromCurrentImageContext();UIGraphicsEndImageContext();return image;第三种
从iPhone 4、iPod Touch 4开始,Apple逐渐采用Retina屏幕,于是在iOS 4的SDK中我们有了,上面的截图方法也自然变成了这样。
UIGraphicsBeginImageContextWithOptions(self.view.frame.size, NO, 0.0);[self.view.layer renderInContext:UIGraphicsGetCurrentContext()];UIImage *image = UIGraphicsGetImageFromCurrentImageContext();UIGraphicsEndImageContext();return image;
第四种
或许你会说有时Hook的是一个按钮的方法,用第三个方法的话,根本找不到view来传值,不过还好,iOS 7又提供了一些UIScreen的API。
UIView * view = [[UIScreen mainScreen] snapshotViewAfterScreenUpdates:YES];UIGraphicsBeginImageContextWithOptions(view.frame.size, NO, 0.0);[view.layer renderInContext:UIGraphicsGetCurrentContext()];UIImage *image = UIGraphicsGetImageFromCurrentImageContext();UIGraphicsEndImageContext();return image;
作者:山水域
链接:https://www.jianshu.com/p/39db0fa66c0e
来源:简书
简书著作权归作者所有,任何形式的转载都请联系作者获得授权并注明出处。


![[NLP自然语言处理]谷歌BERT模型深度解析](https://img-blog.csdn.net/20181021135853817?watermark/2/text/aHR0cHM6Ly9ibG9nLmNzZG4ubmV0L3FxXzM5NTIxNTU0/font/5a6L5L2T/fontsize/400/fill/I0JBQkFCMA==/dissolve/70)