文章目录
- systemd 简介
- WSL systemd
- systemctl
- journalctl
- hello service
- Sleep 与 Timeout 测试
- Requires 测试
- After 测试
systemd 简介

Linux 从关闭到运行, 完整的启动和启动过程有三个主要部分:
- 硬件启动(Hardware boot): 初始化系统硬件
- Linux 引导(Linux boot): 加载 Linux 内核,然后加载 systemd
- Linux 启动(Linux startup): systemd为主机做好生产性工作的准备
systemd 是一个软件套件, 充当系统和服务管理器, 软件平台, 以及作为应用程序和内核之间的粘合剂. 一般作为 PID 1 运行, 是引导期间启动的第一个进程, 也是关机期间终止的最后一个进程. 常见的发行版 Arch Linux, Debian, Ubuntu, Dedora 等都启用了 systemd.
- System and Service Manager (systemd.io)
- systemd/systemd: The systemd System and Service Manager (github.com), 目前最新的版本为v252
- systemd - Wikipedia
流传较广的一个 systemd architecture 的简化示意图 (Learning to love systemd | Opensource.com)

但 systemd 主要作者的 Peottering 说过 systemd 的开发是 never finished, never complete, but tracking progress of technology, 因此组件或架构也在不断变化着, 如现在的12种Unit类型:
- .service
- .socket
- .device (automatically initiated by systemd)
- .mount
- .automount
- .swap
- .target
- .path
- .timer (which can be used as a cron-like job scheduler)
- .snapshot
- .slice (used to group and manage processes and resources)
- .scope (used to group worker processes, isn’t intended to be configured via unit files)
查看 systemd 版本
$ systemd --version
systemd 245 (245.4-4ubuntu3.18)
+PAM +AUDIT +SELINUX +IMA +APPARMOR +SMACK +SYSVINIT +UTMP +LIBCRYPTSETUP +GCRYPT +GNUTLS +ACL +XZ +LZ4 +SECCOMP +BLKID +ELFUTILS +KMOD +IDN2 -IDN +PCRE2 default-hierarchy=hybrid
WSL systemd
WSL默认使用 init 作为系统和服务管理器, 使用 pstree 命令查看进程树:
$ pstree
init─┬─init───{init}├─init───init───bash───pstree└─{init}
这里 init 是 Linux 内核启动时创建的第一个进程(PID 1)
$ ps ax | grep init1 ? Sl 0:00 /init8 ? Ss 0:00 /init9 ? S 0:00 /init100 pts/0 S+ 0:00 grep --color=auto init
WSL 从0.76.6 预览版及更高版本开始支持手动开启 systemd, 即把 systemd 作为 PID 1, 让 init 进程成为 systemd 的子进程. 先在 PowerShell 中查看当前WSL的版本
# wsl update
> wsl --version
WSL 版本: 1.0.3.0
内核版本: 5.15.79.1
WSLg 版本: 1.0.47
MSRDC 版本: 1.2.3575
Direct3D 版本: 1.606.4
DXCore 版本: 10.0.25131.1002-220531-1700.rs-onecore-base2-hyp
Windows版本: 10.0.22623.1037
WSL 版本: 1.0.3.0 支持手动开启 systemd, 编辑WSL系统中的 /etc/wsl.conf 文件添加[boot]选项来启用 systemd:
$ sudo vi /etc/wsl.conf
[boot]
systemd=true
然后就可以 PowerShell 中关掉 WSL
> wsl --shutdown
重新打开 WSL, 会发现启动变慢了一些, 因为现在除了 init 进程, 还要开一堆 systemd 的进程, 启动后, 发现 systemd 已经是 PID 1 了, 而 init 进程成了 systemd 的子进程
$ pstree
systemd─┬─ModemManager───2*[{ModemManager}]├─NetworkManager───2*[{NetworkManager}]├─accounts-daemon───2*[{accounts-daemon}]├─agetty├─anacron───sh───run-parts───mlocate───flock───updatedb.mlocat├─atd├─avahi-daemon───avahi-daemon├─cron├─cups-browsed───2*[{cups-browsed}]├─cupsd───dbus├─dbus-daemon├─gdm3───2*[{gdm3}]├─init─┬─init───{init}│      ├─init───init───bash───pstree│      ├─login───bash│      └─{init}├─2*[kerneloops]├─networkd-dispat├─polkitd───2*[{polkitd}]├─rsyslogd───3*[{rsyslogd}]├─rtkit-daemon───2*[{rtkit-daemon}]├─snapd───21*[{snapd}]├─3*[snapfuse]├─sshd├─switcheroo-cont───2*[{switcheroo-cont}]├─systemd─┬─(sd-pam)│         ├─dbus-daemon│         └─pulseaudio───2*[{pulseaudio}]├─systemd-journal├─systemd-logind├─systemd-network├─systemd-resolve├─systemd-udevd├─udisksd───4*[{udisksd}]├─unattended-upgr───{unattended-upgr}├─whoopsie───2*[{whoopsie}]└─wpa_supplicant
但用 ps ax 命令发现 PID 1 是 /sbin/init, 这是什么套娃操作?
$ ps axPID TTY STAT TIME COMMAND1 ? Ss 0:00 /sbin/init2 ? Sl 0:00 /init5 ? Sl 0:00 plan9 --control-socket 6 --log-level 4 --server-fd 7 --pipe-fd 9 --log-truncate51 ? S<s 0:06 /lib/systemd/systemd-journald77 ? Ss 0:00 /lib/systemd/systemd-udevd
systemctl
systemctl 是 控制systemd系统和服务管理器的主要工具.
常见 Unit 的概念:
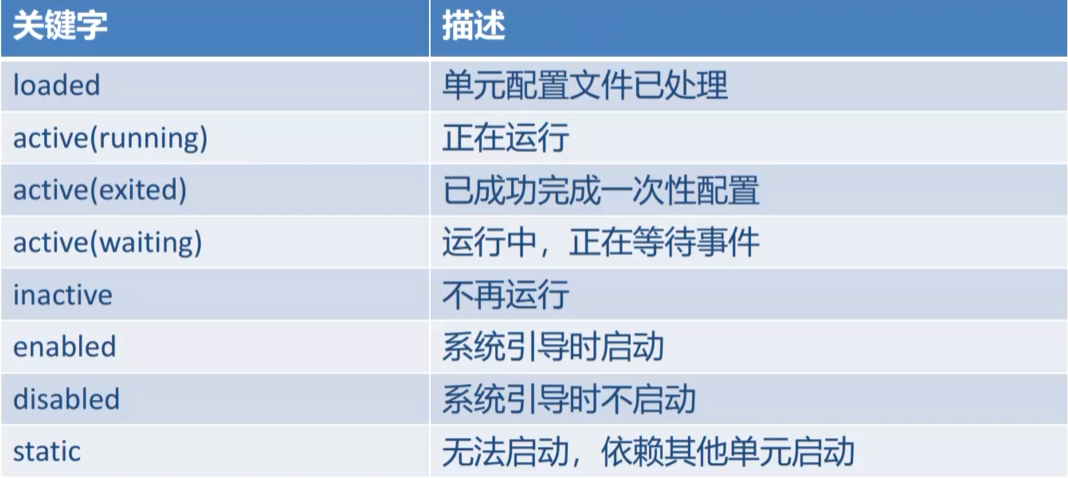
- LOAD = Reflects whether the unit definition was properly loaded. 反映Unit是否正确加载: loaded 或 not-found
- ACTIVE = The high-level unit activation state, i.e. generalization of SUB. 高级Unit活动状态: active, inactive 或 failed
- SUB = The low-level unit activation state, values depend on unit type. 低级Unit活动状态, 值取决于Unit类型: running, dead, exited, waiting, mounted, plugged, listening, failed, active等
常用命令
# 列出正在运行的Unit, systemctl list-units 或者直接
systemctl# 列出所有Unit
systemctl list-units --all
# 列出加载失败的Unit, 类型为12种里面的service
systemctl list-units --failed --type=service
# 列出所有ACTIVE   状态为 inactive 的Unit
systemctl list-units --all --state=inactive# 启动服务
systemctl start xxx.service
# 停止服务
systemctl stop xxx.service
# 重启服务(热启动)
systemctl restart xxx.service
# 重载服务(冷启动)
systemctl reload xxx.service
# 查看状态
systemctl status xxx# 使能(创建符号链接, 开机启动)
systemctl enable xxx
# 禁止(删除符号链接)
systemctl disable xxx
# 查看是否使能
systemctl is-enabled xxx
journalctl
systemd 日志配置文件为 /etc/systemd/journald.conf, 可以直接查看或者通过以下命令查看
$ systemd-analyze cat-config systemd/journald.conf
可以通过修改配置文件来设置 是否永久存储日志, 最大的文件大小/数量/时间, 最大的行数, 指定日志级别 等
日志默认的保存目录是 /var/log/journal/(持久性存储persistent) 或 /run/log/journal(易失性存储volatile) , 里面默认存的是二进制日志以节省空间, 除了记录日志本身外, 还会记录大量元数据, 可以用 journalctl 工具查看日志文本, 然后再配合其它命令筛选, 查询或导出
journalctl, Query the journal. 用于查询日志
# 从旧到新打印系统日志 journalctl --system 或者
journalctl
# 从新到旧
journalctl -r# 打印当前用户的日志, 一般开机自启程序当前用户指的root
journalctl --user# 查看指定服务的日志
journalctl -u xxx# 查看指定服务的日志, 不分页
journalctl --no-paper -u xxx# 持续跟踪指定服务的日志
journalctl -f -u xxx
journalctl -f -u xxx -u yyy# 查看日志占用磁盘空间
journalctl --disk-usage# 按照 大小 数量 时间 设置/清理日志 1G 1years
journalctl--vacuum-size=BYTES     Reduce disk usage below specified size--vacuum-files=INT      Leave only the specified number of journal files--vacuum-time=TIME      Remove journal files older than specified time# 验证日志文件的完整性
journalctl --verify# 查看某个时间段的日志, --since today 或者
journalctl --since "2023-01-05 16:50:00" --until "2023-01-05 16:51:00"# 查看本次启动后的日志, -b 或
journalctl --boot
# 查看记录的过往启动的简明信息, 如 -9~0
journalctl -list-boots
# 查看上次启动的日志
journalctl --boot=-1
# 查看最新的10行日志
journalctl --boot --lines=10# 日志级别
# 0	emerg Emerge系统不可用
# 1	alert Alert必须立即采取行动
# 2 crit Crit紧急情况
# 3	err Err非紧急的错误
# 4	warning Warnning警告
# 5	notice Notice普通但值得注意的事件
# 6	info Info信息
# 7	debug Debug调试# 指定日志级别查看
journalctl -p err --lines=10
journalctl -p 3 -u xxx.service
# 查看上次启动的err信息
journalctl -b -1 -p err
# 查看上次启动的err信息的最后10行
journalctl -b -1 -p err -n 10# json 输出
journalctl -b -u xxx.service -o json
journalctl -b -u xxx.service -o json-pretty# 查看内核日志, 和 dmesg 打印出的类似
journalctl -k
hello service
systemd 常见的两个目录:
/etc/systemd/system/, systemd默认从这里读取配置文件, 但用ls -la可以看出, 里面的service基本都是符号链接, 指向/lib/systemd/system, 但直接把配置文件.service 放在这个目录也是可以的/lib/systemd/system, 可以放置真正的配置文件
下面给出一个简单的service示例, 1s打印一次
$ sudo vi /lib/systemd/system/hello.service
[Unit]
Description=Hello World Service
After=network.target[Service]
Type=simple
ExecStart=/bin/bash -c 'while true; do echo "Hello World"; sleep 1; done'
Restart=on-failure[Install]
WantedBy=multi-user.target
可以直接运行
$ sudo systemctl status hello.service# 因为是后台进程, 默认终端无显示, dmeg里也没有, 可以用status
$ sudo systemctl status hello.service
● hello.service - Hello World ServiceLoaded: loaded (/lib/systemd/system/hello.service; disabled; vendor preset: enabled)Active: active (running) since Thu 2023-01-05 15:12:53 CST; 36s agoMain PID: 1508 (bash)Tasks: 2 (limit: 38477)Memory: 864.0KCGroup: /system.slice/hello.service├─1508 /bin/bash -c while true; do echo "Hello World"; sleep 1; done└─1560 sleep 1Jan 05 15:13:20 U20 bash[1508]: Hello World
Jan 05 15:13:21 U20 bash[1508]: Hello World
Jan 05 15:13:22 U20 bash[1508]: Hello World
Jan 05 15:13:23 U20 bash[1508]: Hello World
得益于配置文件里写了 Restart=on-failure, 假设我们不小心杀掉了进程, systemd 会帮我们重新拉起来
# PID号参考上方 Main PID: 1508 (bash)
$ sudo kill -9 1508# 可以看到进程被重新拉了起来, PID号已经变了
$ sudo systemctl status hello
● hello.service - Hello World ServiceLoaded: loaded (/lib/systemd/system/hello.service; disabled; vendor preset: enabled)Active: active (running) since Thu 2023-01-05 15:18:03 CST; 1s agoMain PID: 1854 (bash)Tasks: 2 (limit: 38477)Memory: 948.0KCGroup: /system.slice/hello.service├─1854 /bin/bash -c while true; do echo "Hello World"; sleep 1; done└─1856 sleep 1Jan 05 15:18:03 U20 systemd[1]: Started Hello World Service.
Jan 05 15:18:03 U20 bash[1854]: Hello World
Jan 05 15:18:04 U20 bash[1854]: Hello World# 持续跟踪服务
$ journalctl -f -u hello
如果系统关掉, 重新打开, 服务并不在运行
$ sudo systemctl status hello.service
● hello.service - Hello World ServiceLoaded: loaded (/lib/systemd/system/hello.service; disabled; vendor preset: enabled)Active: inactive (dead)
可以使用 enable 来创建符号链接, 因为配置文件中 WantedBy=multi-user.target, 会创建链接到 /etc/systemd/system/multi-user.target.wants, 而 sudo systemctl status multi-user.target 可以看到是开机启动的, 那么 hello.service 再下次系统启动时会连带着起来.
$ sudo systemctl enable hello.service
Created symlink /etc/systemd/system/multi-user.target.wants/hello.service → /lib/systemd/system/hello.service.
再次重启系统, 就可以看到服务开机启动了
$ sudo systemctl status hello
● hello.service - Hello World ServiceLoaded: loaded (/lib/systemd/system/hello.service; enabled; vendor preset: enabled)Active: active (running) since Thu 2023-01-05 15:29:56 CST; 17s agoMain PID: 372 (bash)Tasks: 2 (limit: 38477)Memory: 768.0KCGroup: /system.slice/hello.service├─372 /bin/bash -c while true; do echo "Hello World"; sleep 1; done└─949 sleep 1Jan 05 15:30:04 U20 bash[372]: Hello World
Jan 05 15:30:05 U20 bash[372]: Hello World
小结一下
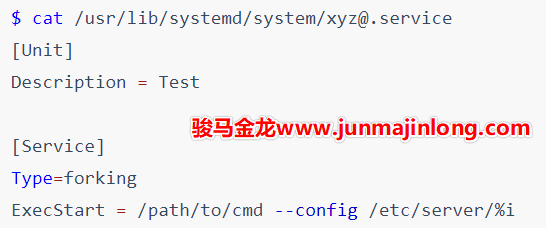
# 编写配置文件, vi 或者 nano编辑器的 sudo systemctl edit --force --full xxx.service
sudo vi /lib/systemd/system/xxx.service
# 立即运行服务
sudo systemctl start xxx
# 设置开机启动(创建符号链接到 yyy.target.wants 或 yyy.target.requires)
sudo systemctl enable xxx
如果更改了配置文件想要重启服务
# 配置文件修改需要 reload units, 但还不会打断之前服务的运行
sudo systemctl daemon-reload
# 重启服务
sudo systemctl restart xxx
如果想要彻底停止并删掉服务
# 停止当前的运行
sudo systemctl stop xxx
# 禁止开机自启(删掉符号链接)
sudo systemctl disable xxx
# 删掉配置文件
sudo rm -f /lib/systemd/system/xxx.service
Sleep 与 Timeout 测试
服务配置文件中 Restart=on-failure 的默认超时时间是 90s, 也就是 90s 内不返回结果就会认为失败了, 特别是调试的时候, 经常会直接 sleep 一段时间再启动, 如GNSS冷启动超级慢, 有时候 sleep 超过了 90s, sleep 的位置不对会出问题, 下面就演示一下
$ sudo vi /lib/systemd/system/hellox.service
[Unit]
Description=Hello World Service
After=network.target[Service]
Type=simple
ExecStartPre=/bin/sleep 100
ExecStart=/bin/bash -c 'while true; do echo "Hellox"; sleep 1; done'
Restart=on-failure[Install]
WantedBy=multi-user.target
运行测试发现一直失败, 显示 Failed with result 'timeout'
$ sudo systemctl daemon-reload
$ sudo systemctl restart hellox$ journalctl -f -u hellox
Jan 05 17:38:04 U20 systemd[1]: hellox.service: start-pre operation timed out. Terminating.
Jan 05 17:38:04 U20 systemd[1]: hellox.service: Control process exited, code=killed, status=15/TERM
Jan 05 17:38:04 U20 systemd[1]: hellox.service: Failed with result 'timeout'.
Jan 05 17:38:04 U20 systemd[1]: Failed to start Hellox Service.
Jan 05 17:38:04 U20 systemd[1]: hellox.service: Scheduled restart job, restart counter is at 1.
Jan 05 17:38:04 U20 systemd[1]: Stopped Hellox Service.
Jan 05 17:38:04 U20 systemd[1]: Starting Hellox Service...Jan 05 17:39:34 U20 systemd[1]: hellox.service: start-pre operation timed out. Terminating.
Jan 05 17:39:34 U20 systemd[1]: hellox.service: Control process exited, code=killed, status=15/TERM
Jan 05 17:39:34 U20 systemd[1]: hellox.service: Failed with result 'timeout'.
Jan 05 17:39:34 U20 systemd[1]: Failed to start Hellox Service.
Jan 05 17:39:35 U20 systemd[1]: hellox.service: Scheduled restart job, restart counter is at 2.
Jan 05 17:39:35 U20 systemd[1]: Stopped Hellox Service.
Jan 05 17:39:35 U20 systemd[1]: Starting Hellox Service...
如果确实非要 sleep, 有下面几种解决办法
- 删掉
ExecStartPre=/bin/sleep 100, 把sleep 100放到ExecStart=/bin/bash -c 'sleep 100; while true; do echo "Hellox"; sleep 1; done', 建议用这种方法, restart 服务会立即返回 - 修改超时时间, 如修改为120s,
TimeoutSec=120, 或者不限制TimeoutSec=0, 这会导致 restart 的时候卡ExecStartPre=/bin/sleep 100这个100s, 所以不太建议这种方法, 可以使用--no-block参数规避 sudo systemctl --no-block restart hellox, 让systemctl跳过等待, 也就没有Timeout了, 比较危险, 慎用- sleep 往往并不靠谱, 建议不用, 可以试试 After 或者 Requires, 或者修改程序
Requires 测试
本服务启动时, Requires后面的服务也会同时被启动(不会因为sleep迟滞), Requires后的服务失败, 本服务也会终止
修改 hellox.service, 让 hello.service 成为 hellox 的 Requiers
$ sudo vi /lib/systemd/system/hellox.service
[Unit]
Description=Hellox Service
Requires=hello.service[Service]
Type=simple
ExecStart=/bin/bash -c 'while true; do echo "Hellox"; sleep 1; done'
Restart=on-failure[Install]
WantedBy=multi-user.target
此时 hello.service 没有运行, 启动 hellox, 发现hello也被同时启动了
$ sudo systemctl stop hello hellox
$ sudo systemctl daemon-reload
$ sudo systemctl start hellox
$ journalctl -f -u hello -u hellox
Jan 05 18:59:46 U20 systemd[1]: Started Hello World Service.
Jan 05 18:59:46 U20 systemd[1]: Started Hellox Service.
Jan 05 18:59:46 U20 bash[2535]: Hello World
Jan 05 18:59:46 U20 bash[2536]: Hellox
Jan 05 18:59:47 U20 bash[2535]: Hello World
Jan 05 18:59:47 U20 bash[2536]: Hellox
终止 hello, 发现 hellox 也被牵连终止了. (反过来不会)
$ sudo systemctl stop hello
$ journalctl -f -u hello -u hellox
Jan 05 19:00:53 U20 bash[2558]: Hellox
Jan 05 19:00:53 U20 bash[2557]: Hello World
Jan 05 19:00:53 U20 systemd[1]: Stopping Hello World Service...
Jan 05 19:00:53 U20 systemd[1]: Stopping Hellox Service...
Jan 05 19:00:53 U20 systemd[1]: hello.service: Succeeded.
Jan 05 19:00:53 U20 systemd[1]: Stopped Hello World Service.
Jan 05 19:00:53 U20 systemd[1]: helloy.service: Succeeded.
Jan 05 19:00:53 U20 systemd[1]: Stopped Hellox Service.
After 测试
配置文件中的 After 表示该服务在什么服务启动之后再启动, 其它服务在启动中或者未启动完成则本服务等待, 典型应用如:
- 许多程序需要联网才能使用, 可以等到网络服务启动后再启动
- ros应用 依赖 roscore , 可以在roscore服务启动后再启动ros应用
- 很多日志以时间为log名, 但是嵌入式系统等很多没有后备电池, 需要通过GNSS或者网络NTP, PTP等授时后, 系统时间才会准确, 其它的服务可以等待时间同步的服务完成后再开始运行
修改 hellox.service, 在 hello.service 启动之后再启动, 即 After=hello.service
$ sudo vi /lib/systemd/system/hellox.service
[Unit]
Description=Hellox Service
After=hello.service[Service]
Type=simple
ExecStart=/bin/bash -c 'while true; do echo "Hellox"; sleep 1; done'
Restart=on-failure[Install]
WantedBy=multi-user.target
现在 hello.service 没有运行, 先启动 hellox:
$ sudo systemctl start hellox# 发现可以直接运行
$ sudo systemctl status hellox
● hellox.service - Hellox ServiceLoaded: loaded (/lib/systemd/system/hellox.service; disabled; vendor preset: enabled)Active: active (running) since Thu 2023-01-05 15:47:16 CST; 4s agoMain PID: 1328 (bash)Tasks: 2 (limit: 38477)Memory: 796.0KCGroup: /system.slice/hellox.service├─1328 /bin/bash -c while true; do echo "Hellox"; sleep 1; done└─1333 sleep 1Jan 05 15:47:16 U20 systemd[1]: Started Hellox Service.
Jan 05 15:47:16 U20 bash[1328]: Hellox
Jan 05 15:47:17 U20 bash[1328]: Hellox# 停掉hellox
sudo systemctl stop hellox
修改 hello.service, 加上89s的延时
$ sudo vi /lib/systemd/system/hello.service
[Unit]
Description=Hello World Service
After=network.target[Service]
Type=simple
ExecStartPre=/bin/sleep 89
ExecStart=/bin/bash -c 'while true; do echo "Hello World"; sleep 1; done'
Restart=on-failure[Install]
WantedBy=multi-user.target
把 hello.service 先运行起来, 然后趁着89s还没有走完, 运行 hellox.service发现 hellox.service被卡住直到 hello.service 启动完
$ sudo systemctl start hello
# 另一个窗口
$ sudo systemctl start hellox$ journalctl -f -u hello -u hellox
Jan 05 19:08:30 U20 systemd[1]: Starting Hello World Service...
Jan 05 19:09:59 U20 systemd[1]: Started Hello World Service.	# 89s后hello起来了
Jan 05 19:09:59 U20 bash[2981]: Hello World
Jan 05 19:09:59 U20 systemd[1]: Started Hellox Service.	# hellox 在这里起来了
Jan 05 19:09:59 U20 bash[2983]: Hellox
Jan 05 19:10:00 U20 bash[2981]: Hello World
Jan 05 19:10:00 U20 bash[2983]: Hellox
Jan 05 19:10:01 U20 bash[2981]: Hello World
两个服务都enable, 然后重启系统, 也能看到类似的效果. 按名字顺序, helloy 的PID在hello的后面, 但如果调换两个service的内容(让hello中After=helloy, 让helloy去sleep 89), 就没有After的效果了.


![[2020.1.10]systemd介绍](https://img-blog.csdnimg.cn/20210412223013437.png)