Python爬虫——新闻热点爬取
显示更多
可以看到相关的数据接口,里面有新闻标题以及新闻详情的url地址
如何提取url地址
1、转成json,键值对取值;
2、用正则表达式匹配url地址;
根据接口数据链接中的pager 变化进行翻页,其对应的就是页码。
详情页可以看到新闻内容都是在 div标签里面 p 标签内,按照正常的解析网站即可获取新闻内容。
保存方式
txt文本形式
PDF形式
 整体爬取思路总结
在栏目列表页中,点击更多新闻内容,获取接口数据url接口数据url中返回的数据内容中匹配新闻详情页url使用常规解析网站操作(re、css、xpath)提取新闻内容保存数据
 import parsel
import requests
import re#### 获取网页源代码
def get_html(html_url):"""获取网页源代码 response:param html_url: 网页url地址:return: 网页源代码"""headers = {"User-Agent": "Mozilla/5.0 (Macintosh; Intel Mac OS X 10_15_6) AppleWebKit/537.36 (KHTML, like Gecko) Chrome/84.0.4147.135 Safari/537.36","Accept": "text/html,application/xhtml+xml,application/xml;q=0.9,image/webp,image/apng,*/*;q=0.8,application/signed-exchange;v=b3;q=0.9", }response = requests.get(url=html_url, headers=headers)return response#### 获取每篇新闻url地址
def get_page_url(html_data):"""获取每篇新闻url地址:param html_data: response.text:return:  每篇新闻的url地址"""page_url_list = re.findall('"url":"(.*?)"', html_data)return page_url_list#### 文件保存命名不能含有特殊字符,需要对新闻标题进行处理
def file_name(name):"""文件命名不能携带 特殊字符:param name:  新闻标题:return: 无特殊字符的标题"""replace = re.compile(r'[\\\/\:\*\?\"\<\>\|]')new_name = re.sub(replace, '_', name)return new_name####保存数据
def download(content, title):"""with open 保存新闻内容 txt:param content:  新闻内容:param title:   新闻标题:return:"""path = '新闻\\' + title + '.txt'with open(path, mode='a', encoding='utf-8') as f:f.write(content)print('正在保存', title)### 主函数def main(url):"""主函数:param url:  新闻列表页 url地址:return:"""html_data = get_html(url).text   # 获得接口数据response.textlis = get_page_url(html_data)   # 获得新闻url地址列表for li in lis:page_data = get_html(li).content.decode('utf-8', 'ignore')  # 新闻详情页 response.textselector = parsel.Selector(page_data)title = re.findall('<title>(.*?)</title>', page_data, re.S)[0]  # 获取新闻标题new_title = file_name(title)new_data = selector.css('#cont_1_1_2 div.left_zw p::text').getall()content = ''.join(new_data)download(content, new_title)if __name__ == '__main__':for page in range(1, 101):url_1 = 'https://channel.chinanews.com/cns/cjs/gj.shtml?pager={}&pagenum=9&t=5_58'.format(page)main(url_1)
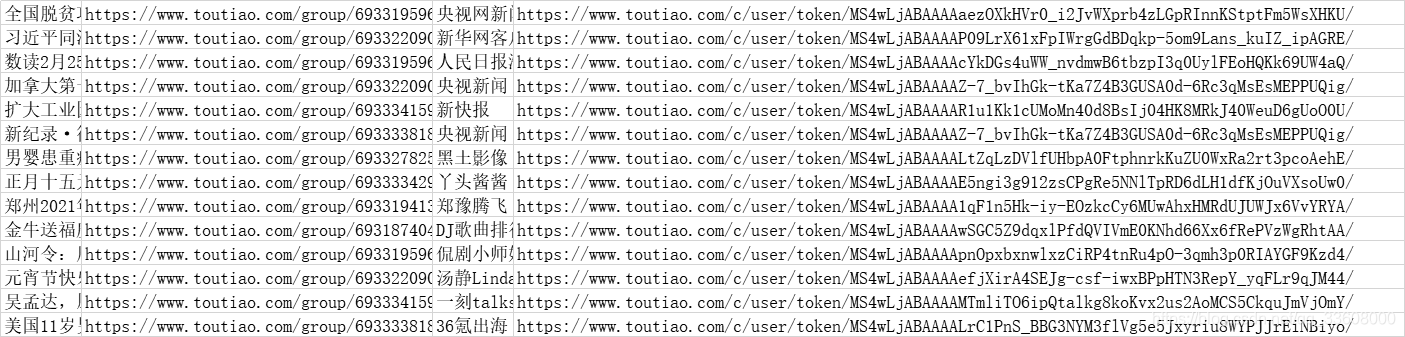
在浏览器开发者模式network下很快能找到一个‘?category=new_hot…’字样的文件,查看该文件发现新闻内容的数据全部存储在data里面,且能发现数据类型为json;
只要找到这个文件的requests url即可通过python requests来爬取网页了;
查看请求的url,
发现链接为:https://www.toutiao.com/api/pc/feed/?category=news_hot&utm_source=toutiao&widen=1&max_behot_time=0&max_behot_time_tmp=0&tadrequire=true&as=A1B5AC16548E0FA&cp=5C647E601F9AEE1&_signature=F09fYAAASzBjiSc9oUU9MxdPX3
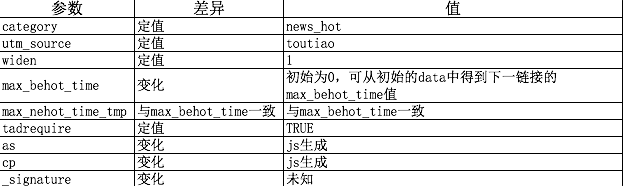 其中max_behot_time在获取的json数据中获得 :
在网上找了下大神对as和cp算法的分析,
发现两个参数在js文件:home_4abea46.js中有,具体算法如下代码:
 !function(t) {var e = {};e.getHoney = function() {var t = Math.floor((new Date).getTime() / 1e3), e = t.toString(16).toUpperCase(), i = md5(t).toString().toUpperCase();if (8 != e.length)return {as: "479BB4B7254C150",cp: "7E0AC8874BB0985"};for (var n = i.slice(0, 5), a = i.slice(-5), s = "", o = 0; 5 > o; o++)s += n[o] + e[o];for (var r = "", c = 0; 5 > c; c++)r += e[c + 3] + a[c];return {as: "A1" + s + e.slice(-3),cp: e.slice(0, 3) + r + "E1"}},t.ascp = e
}(window, document),
python获取as和cp值的代码如下:(代码参考blog:https://www.cnblogs.com/xuchunlin/p/7097391.html)
def get_as_cp(): # 该函数主要是为了获取as和cp参数,程序参考今日头条中的加密js文件:home_4abea46.jszz = {}now = round(time.time())print(now) # 获取当前计算机时间e = hex(int(now)).upper()[2:] #hex()转换一个整数对象为16进制的字符串表示print('e:', e)a = hashlib.md5() #hashlib.md5().hexdigest()创建hash对象并返回16进制结果print('a:', a)a.update(str(int(now)).encode('utf-8'))i = a.hexdigest().upper()print('i:', i)if len(e)!=8:zz = {'as':'479BB4B7254C150','cp':'7E0AC8874BB0985'}return zzn = i[:5]a = i[-5:]r = ''s = ''for i in range(5):s= s+n[i]+e[i]for j in range(5):r = r+e[j+3]+a[j]zz ={'as':'A1'+s+e[-3:],'cp':e[0:3]+r+'E1'}print('zz:', zz)return zz
这样完整的链接就构成了,另外提一点就是:_signature参数去掉也是可以获取到json数据的,
 import requests
import json
from openpyxl import Workbook
import time
import hashlib
import os
import datetimestart_url = 'https://www.toutiao.com/api/pc/feed/?category=news_hot&utm_source=toutiao&widen=1&max_behot_time='
url = 'https://www.toutiao.com'headers={'user-agent':'Mozilla/5.0 (Macintosh; Intel Mac OS X 10_12_3) AppleWebKit/537.36 (KHTML, like Gecko) Chrome/71.0.3578.98 Safari/537.36'
}
cookies = {'tt_webid':'6649949084894053895'} # 此处cookies可从浏览器中查找,为了避免被头条禁止爬虫max_behot_time = '0'   # 链接参数
title = []       # 存储新闻标题
source_url = []  # 存储新闻的链接
s_url = []       # 存储新闻的完整链接
source = []      # 存储发布新闻的公众号
media_url = {}   # 存储公众号的完整链接def get_as_cp():  # 该函数主要是为了获取as和cp参数,程序参考今日头条中的加密js文件:home_4abea46.jszz = {}now = round(time.time())print(now) # 获取当前计算机时间e = hex(int(now)).upper()[2:] #hex()转换一个整数对象为16进制的字符串表示print('e:', e)a = hashlib.md5()  #hashlib.md5().hexdigest()创建hash对象并返回16进制结果print('a:', a)a.update(str(int(now)).encode('utf-8'))i = a.hexdigest().upper()print('i:', i)if len(e)!=8:zz = {'as':'479BB4B7254C150','cp':'7E0AC8874BB0985'}return zzn = i[:5]a = i[-5:]r = ''s = ''for i in range(5):s= s+n[i]+e[i]for j in range(5):r = r+e[j+3]+a[j]zz ={'as':'A1'+s+e[-3:],'cp':e[0:3]+r+'E1'}print('zz:', zz)return zzdef getdata(url, headers, cookies):  # 解析网页函数r = requests.get(url, headers=headers, cookies=cookies)print(url)data = json.loads(r.text)return datadef savedata(title, s_url, source, media_url):  # 存储数据到文件# 存储数据到xlxs文件wb = Workbook()if not os.path.isdir(os.getcwd()+'/result'):   # 判断文件夹是否存在os.makedirs(os.getcwd()+'/result') # 新建存储文件夹filename = os.getcwd()+'/result/result-'+datetime.datetime.now().strftime('%Y-%m-%d-%H-%m')+'.xlsx' # 新建存储结果的excel文件ws = wb.activews.title = 'data'   # 更改工作表的标题ws['A1'] = '标题'   # 对表格加入标题ws['B1'] = '新闻链接'ws['C1'] = '头条号'ws['D1'] = '头条号链接'for row in range(2, len(title)+2):   # 将数据写入表格_= ws.cell(column=1, row=row, value=title[row-2])_= ws.cell(column=2, row=row, value=s_url[row-2])_= ws.cell(column=3, row=row, value=source[row-2])_= ws.cell(column=4, row=row, value=media_url[source[row-2]])wb.save(filename=filename)  # 保存文件def main(max_behot_time, title, source_url, s_url, source, media_url):   # 主函数for i in range(3):   # 此处的数字类似于你刷新新闻的次数,正常情况下刷新一次会出现10条新闻,但夜存在少于10条的情况;所以最后的结果并不一定是10的倍数ascp = get_as_cp()    # 获取as和cp参数的函数demo = getdata(start_url+max_behot_time+'&max_behot_time_tmp='+max_behot_time+'&tadrequire=true&as='+ascp['as']+'&cp='+ascp['cp'], headers, cookies)print(demo)# time.sleep(1)for j in range(len(demo['data'])):# print(demo['data'][j]['title'])if demo['data'][j]['title'] not in title:title.append(demo['data'][j]['title'])  # 获取新闻标题source_url.append(demo['data'][j]['source_url'])  # 获取新闻链接source.append(demo['data'][j]['source'])  # 获取发布新闻的公众号if demo['data'][j]['source'] not in media_url:media_url[demo['data'][j]['source']] = url+demo['data'][j]['media_url']  # 获取公众号链接print(max_behot_time)max_behot_time = str(demo['next']['max_behot_time'])  # 获取下一个链接的max_behot_time参数的值for index in range(len(title)):print('标题:', title[index])if 'https' not in source_url[index]:s_url.append(url+source_url[index])print('新闻链接:', url+source_url[index])else:print('新闻链接:', source_url[index])s_url.append(source_url[index])# print('源链接:', url+source_url[index])print('头条号:', source[index])print(len(title))   # 获取的新闻数量if __name__ == '__main__':main(max_behot_time, title, source_url, s_url, source, media_url)savedata(title, s_url, source, media_url)
Python爬虫——使用Python爬取代理数据
结构的分析以及网页数据的提取
/2 首页分析及提取/
简单分析下页面,
其中后面的 1 是页码的意思,分析后发现每一页有100 多条数据,
然后网站底部总共有 2700+页 的链接,
所以总共ip 代理加起来超过 27 万条数据,
但是后面的数据大部分都是很多年前的数据了,比如 2012 年,
大概就前 5000 多条是最近一个月的,所以决定爬取前面100 页。
通 过网站 url 分析,可以知道这 100 页的 url 为:

规律显而易见,在程序中,我们使用一个 for 循环即可完整这个操作:

其中 scrapy 函数是爬取的主要逻辑,对应的代码为:

通过这个方式,我们可以得到每一页的数据
/3 网页元素分析及提取/
接下来就是对页面内的元素进行分析,提取其中的代理信息。


如上图,我们目的是进行代理地域分布分析,
同时,在爬取过程中需要使用爬取的数据进行代 理更新,
所以需要以下几个字段的信息:
Ip 地址、端口、服务器位置、类型
为此,先构建一个类,用于保存这些信息:

这样,每爬取一条信息,只要实例化一个 ProxyBean 类即可,非常方便。
接下来就是提取元素过程了,
在这个过程我使用了正则表达式和  BeautifulSoup 库进行关键数据提取。首先,通过分析网页发现,所有的条目实际上都是放在一个<table>标签中。

该便签内容如下:
<table id="ip_list">……</table>
我们首先通过正则表达式将该标签的内容提取出来:正则表达式为:<table id="ip_list">([\S\s]*)</table>,
表示搜索<table id="ip_list">到</table>之 间的任意字符组成的数据。
Python 中的实现如下:

其中得到的 data 就是这个标签的内容了。下面进一步分析。
进入到 table 中,发现每一个代理分别站 table 的一列<tr>,
但是这些<tr>标签分为两类,一 类包含属性 class="odd", 另一类不包含


通过这种方式,就能获取到每一个列的列表了。
接下来就是从每个列中获取 ip、端口、位置、类型等信息了。进一步分析页面:

我们使用正则表达式对 IP 进行解析,IP 正则如下:
** (2[0-5]{2}|[0-1]?\d{1,2})(.(2[0-5]{2}|[0-1]?\d{1,2})){3}**

2、 端口字段
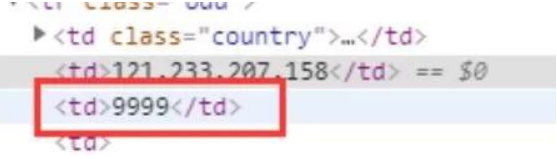
端口由包裹,并且中间全部是数字,故可构造如下正则进行提取:
<td>([0-9]+)</td>

3、 位置字段
位置字段如下:

由 便签包裹,构造如下正则即可提取:
<a href="([^>]*)>([^<]*)</a>

4、类型字段
类型字段如下:
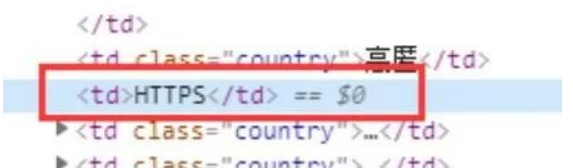
由包裹,中间为字母,构造正则如下:
<td>([A-Za-z]+)</td>

数据全部获取完之后,将其保存到文件中即可:


/4 小结/
本次任务主要爬取了代理网站上的代理数据。主要做了以下方面的工作:
学习 requests 库的使用以及爬虫程序的编写;
学习使用反爬虫技术手段,并在实际应用中应用这些技术,如代理池技术;
学习使用正则表达式,并通过正则表达式进行网页元素提取;
学习使用 beautifulsoup 库,并使用该库进行网页元素的提取。
IP代理池
import urllib.request
import urllib
import requests
import re
import time
import randomproxys = []def show_interface():choice=input("请选择功能:1.显示可用代理;2.显示可用代理并生成文本;3.退出系统:")return choicedef get_proxyIP():ip_title=[]#IP列表try:page_num=input('想要爬取多少个代理IP页面(注:每个页面包含100个IP地址,输入数值大于等于2,小于等于705):')if int(page_num)<2 or int(page_num)>705:print(">>>>>已经说明清楚了,再乱输的是傻逼   o -_-)=○)°O°) 给你一拳!")return ip_titleelse:for i in range(1,int(page_num)):url='http://www.xicidaili.com/nt/'+str(i)headers={"User-Agent":"Mozilla/5.0 (Windows NT 10.0; WOW64)"}request=urllib.request.Request(url=url,headers=headers)response=urllib.request.urlopen(request)content=response.read().decode('utf-8')pattern=re.compile('<td>(\d.*?|HTTP|HTTPS)</td>')ip_page=re.findall(pattern,str(content))ip_title.extend(ip_page)time.sleep(random.choice(range(1,3)))print('代理IP地址              ','\t','端口','\t','类型','\t\t\t','存活时间','\t\t','验证时间')for i in range(0,len(ip_title),5):if len(ip_title[i])<14 and len(ip_title[i])>10:print(ip_title[i],'           ','\t',ip_title[i+1],'\t',ip_title[i+2],'\t\t\t',ip_title[i+3],'\t\t',ip_title[i+4])elif len(ip_title[i])<=10:print(ip_title[i], '             ', '\t', ip_title[i + 1],'\t', ip_title[i + 2],'\t\t\t', ip_title[i + 3],'\t\t',ip_title[i+4])else:print(ip_title[i],'          ','\t',ip_title[i+1],'\t',ip_title[i+2],'\t\t\t',ip_title[i+3],'\t\t',ip_title[i+4])return ip_titleexcept ValueError:print(">>>>>已经说明清楚了,再乱输的是傻逼   o -_-)=○)°O°) 给你一拳!")return ip_titleproxy_ip=open('proxy_ip.txt','w')#新建文档存储有效IPdef effective_IP(ip_title):socket.setdefaulttimeout(5)#设置全局超时时间url='https://www.cnblogs.com/sjzh/p/5990152.html'try:for i in range(0,len(ip_title),5):ip={ip_title[i+2]:ip_title[i]+":"+ip_title[i+1]}proxy_support=urllib.request.ProxyHandler(ip)opener=urllib.request.build_opener(proxy_support)opener.addheaders=[('User-Agent','Mozilla/5.0 (Windows NT 10.0; WOW64)')]urllib.request.install_opener(opener)res=urllib.request.urlopen(url).read()print(ip_title[i]+':'+ip_title[i+1],'is OK')proxy_ip.write('%s\n'%str('\''+ip_title[i+2]+'\''+':'+'\''+ip_title[i]+':'+ip_title[i+1]+'\''))#写入IPprint('总共爬取了'+str(len(ip_title)/5)+'个有效IP')except Exception as e:print(i,e)if __name__=='__main__':print('                                                                                                                      ')print('                                                                                                                      ')print('        ◆◆     ◆◆◆◆◆             ◆◆◆◆◆◆◆◆◆◆◆◆◆◆                                                  ')print('        ◆◆      ◆◆  ◆◆◆              ◆    ◆◆    ◆      ◆          ◆◆◆◆        ◆◆◆◆◆◆◆          ')print('        ◆◆        ◆      ◆◆            ◆    ◆      ◆      ◆           ◆◆◆           ◆◆◆◆◆◆◆◆      ')print('      ◆◆◆        ◆      ◆◆◆          ◆    ◆◆◆◆◆◆◆◆◆            ◆◆            ◆◆    ◆◆◆◆      ')print('      ◆◆◆◆◆◆◆◆◆◆◆◆◆◆          ◆    ◆      ◆      ◆            ◆◆            ◆◆      ◆◆◆      ')print('    ◆◆◆          ◆◆                    ◆    ◆      ◆      ◆            ◆◆            ◆◆    ◆◆◆◆      ')print('    ◆◆◆          ◆◆                ◆◆◆◆◆◆◆    ◆    ◆◆            ◆◆            ◆◆◆◆◆◆◆        ')print('    ◆  ◆          ◆◆                    ◆    ◆◆◆◆◆◆◆◆◆            ◆◆            ◆◆◆◆◆◆          ')print('        ◆          ◆◆                    ◆            ◆                    ◆◆            ◆◆                  ')print('        ◆            ◆◆                  ◆            ◆                    ◆◆            ◆◆                  ')print('        ◆            ◆◆      ◆          ◆    ◆◆◆◆◆◆◆◆◆            ◆◆            ◆◆                  ')print('        ◆            ◆◆◆  ◆◆          ◆◆◆        ◆                ◆◆◆◆◆      ◆◆◆◆◆◆              ')print('        ◆              ◆◆  ◆◆        ◆◆◆◆        ◆                                                          ')print('        ◆                ◆◆◆◆    ◆◆◆◆  ◆◆◆◆◆◆◆◆◆◆◆                                                ')print('        ◆                  ◆◆                                                                                      ')print('')print('')choice = show_interface()while True:if choice=='1':get_proxyIP()i=input(">>>>>还想继续使用该系统?(Y/N):")if i=='Y' or i=='y':choice=show_interface()else:print('>>>>>欢迎再次使用*_*,我也要睡觉觉了(-_-)ZZZ')breakif choice=='2':ip_title=get_proxyIP()effective_IP(ip_title)i = input(">>>>>还想继续使用该系统?(Y/N):")if i == 'Y' or i == 'y':choice = show_interface()else:print('>>>>>欢迎再次使用*_*,我也要睡觉觉了(-_-)ZZZ')breakif choice=='3':print('>>>>>欢迎再次使用*_*,我也要睡觉觉了(-_-)ZZZ')break
 import requests
import parsel
import timedef check_ip(proxies_list):"""检测ip的方法"""headers = {'User-Agent': 'Mozilla/5.0 (Windows NT 10.0; Win64; x64) AppleWebKit/537.36 (KHTML, like Gecko) Chrome/79.0.3945.79 Safari/537.36'}can_use = []for proxy in proxies_list:try:response = requests.get('http://www.baidu.com', headers=headers, proxies=proxy, timeout=0.1)  # 超时报错if response.status_code == 200:can_use.append(proxy)except Exception as error:print(error)return can_use
import requests
import parsel# 1、确定爬取的url路径,headers参数
base_url = 'https://www.kuaidaili.com/free/'
headers = {'User-Agent': 'Mozilla/5.0 (Windows NT 10.0; Win64; x64) AppleWebKit/537.36 (KHTML, like Gecko) Chrome/79.0.3945.79 Safari/537.36'}# 2、发送请求 -- requests 模拟浏览器发送请求,获取响应数据
response = requests.get(base_url, headers=headers)
data = response.text
# print(data)# 3、解析数据 -- parsel  转化为Selector对象,Selector对象具有xpath的方法,能够对转化的数据进行处理
# 3、1 转换python可交互的数据类型
html_data = parsel.Selector(data)
# 3、2 解析数据
parse_list = html_data.xpath('//table[@class="table table-bordered table-striped"]/tbody/tr') # 返回Selector对象
# print(parse_list)# 免费 IP  {"协议":"IP:port"}
# 循环遍历,二次提取
proxies_list = []
for tr in parse_list:proxies_dict = {}http_type = tr.xpath('./td[4]/text()').extract_first()ip_num = tr.xpath('./td[1]/text()').extract_first()port_num = tr.xpath('./td[2]/text()').extract_first()# print(http_type, ip_num, port_num)# 构建代理ip字典proxies_dict[http_type] = ip_num + ':' + port_num# print(proxies_dict)proxies_list.append(proxies_dict)print(proxies_list)
print("获取到的代理ip数量:", len(proxies_list), '个')# 检测代理ip可用性
can_use = check_ip(proxies_list)
print("能用的代理:", can_use)
print("能用的代理数量:", len(can_use))

环境搭建


- 打开 安装

- 找到 可执行文件路径 (便于配置虚拟环境)
linux 环境配置
安装系统依赖包
sudo apt-get install libssl1.0.0 libssl-dev tcl tk sqlite sqlite3 libbz2-1.0 libbz2-dev libexpat1 libexpat1-dev libgdbm3 libgdbm-dev libreadline5 libreadline6 libreadline-dev libreadline6-dev libsqlite0 libsqlite0-dev libsqlite3-0 libsqlite3-dev openssl
上面的依赖包是ubuntu的安装源的包名,不同版本的linux包名可能不一样
下载源码包并解压
wget https://www.python.org/ftp/python/3.6.8/Python-3.6.8.tgz
tar -xzvf Python-3.6.8.tgz -C  /tmp
cd  /tmp/Python-3.6.8/
把Python3.6安装到 /usr/local 目录
./configure --prefix=/usr/local
make
make altinstall
上面操作执行完成以后就可以执行:
python3.6
就可以进入python的交互环境了
注:
很多linux操作系统会默认安装python和python3,大家可以在终端中输入python或者python3就能查看是否默认安装了py2和py3的版本,如果没有安装可以使用
ln -s /usr/local/bin/python3.6 /usr/bin/python
或者
ln -s /usr/local/bin/python3.6 /usr/bin/python3
生成python或者python3直接运行的python3.6的软连接
安装pip
python3对应的pip很多linux操作系统没有默认安装, 可以通过
sudo apt-get install python3-pip
安装python3的pip
安装完成以后可以终端中输入: pip3 查看是否安装成功
后续的所有的关于pip中安装的命令,这里都使用 pip3 install XXX
#虚拟环境搭建#
- 不同项目 不同依赖包
- python 版本不一样
- 所以需要 隔离的 py环境
我们使用 virtualenvwrapper (包装的env)

- win 可以直接使用
- linux mac 配置
- sudo apt-get install python3.6

- centos

- 再安装pip
-
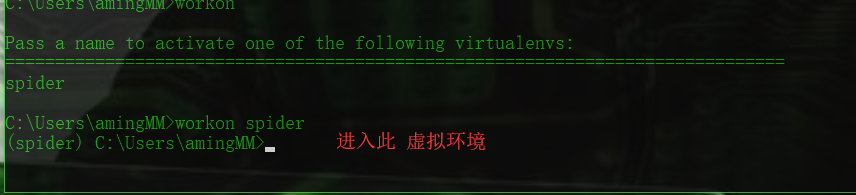
mkvirtualenv spider (基于系统py全局)


-
按住shift 按键 右击鼠标

-
可以基于任何 python 来建立生产环境


-
退出环境

-
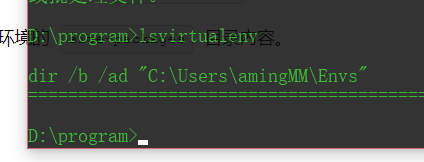
方便 就可以在 那个Envs 把 对应的 目录删除即可
-
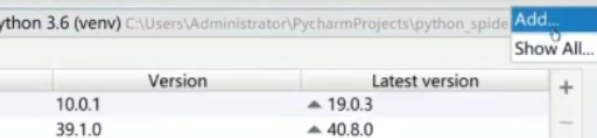
如果在pycharm 里可用这么 看虚拟环境 setting 里

-
pycharm自带虚拟环境
-
更换虚拟环境


-
linux 自己设置

-
我用的 是IDEA 插件


-
win+ e


virtualenv
pip install virtualenv


-
删除 虚拟环境

-
查看所有 env
-


python爬虫——入门(1)


- pymysql orm 保存数据
- html解析方法 分析
- 抓取 静态网页 论坛
- 动态网站 电商类
- 模拟登陆cookie 社区类
- 验证突破
- 反爬虫突破
- 多线程 线程池
- scrapy
- 通用分布式爬虫框架模块
- 更新迭代采集
- 通用解析方法
- 分布存储
#认识爬虫#
- 搜索引擎 之前 输入域名访问
- 搜索引擎 主动查询代替 被动浏览
- 怎么获取所有数据(我们关心的内容)
- 产生爬虫 爬取 索引

-
采集网络数据
-
自动化测试 (接口 请求 验证数据)selenium
-
脱离手动 (抢票 , 微信助手,爱聊,注册账号,登陆,获取资料)
-
灰产业 (撸羊毛,网络水军,攻击)
-
数据产品 数据聚合(新闻 ,头条)
-
搜索产品
-
数据分析、人工智能元数据
-
特定领域 数据服务(二手车估价,天气预报,团购,去哪儿)
#知识储备#
- 计算机网络 (http/https协议,tcp/ip协议,socket编程)
- 前端基础
- 正则表达式(数据处理)xpath css选择器
- 数据分布式存储

- 并发处理,多线程池,协程
- 图像识别(处理反扒,验证码)
- 机器学习算法(验证码,数据解析)
#学习问题#
- 大型爬虫 采集更新策略
- 解决 数据反爬虫 机制(多变)
- 数据解析
- 数据存储
- 模拟登陆(验证码识别)
- 爬虫监控 部署
- 数据去重
#爬虫正能量#
- 注意节制 限速/代理/线程 控制 减少频率
- 数据安全 robots.txt协议
- 法律问题 (2019.11.30 并不成熟)
- 可显数据
- 反扒策略
#robots协议#


-
user-agent : 爬虫名称


一般放在末尾 -
allow:爬虫可以访问得url (根路径下) /$为首页
-
disallow:不可以爬取 一般加入 /