目录
- 论文精读
- 四种版本网络的对比
- v1
- v2
- v3
- v3+
- 先验知识
- 分辨率的损失
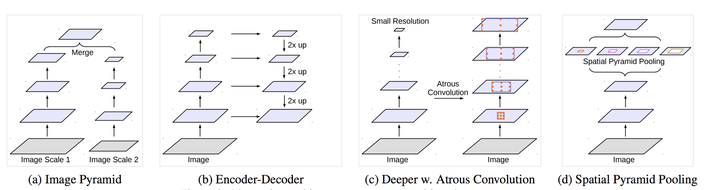
- 多尺度特征(multi-scale features)
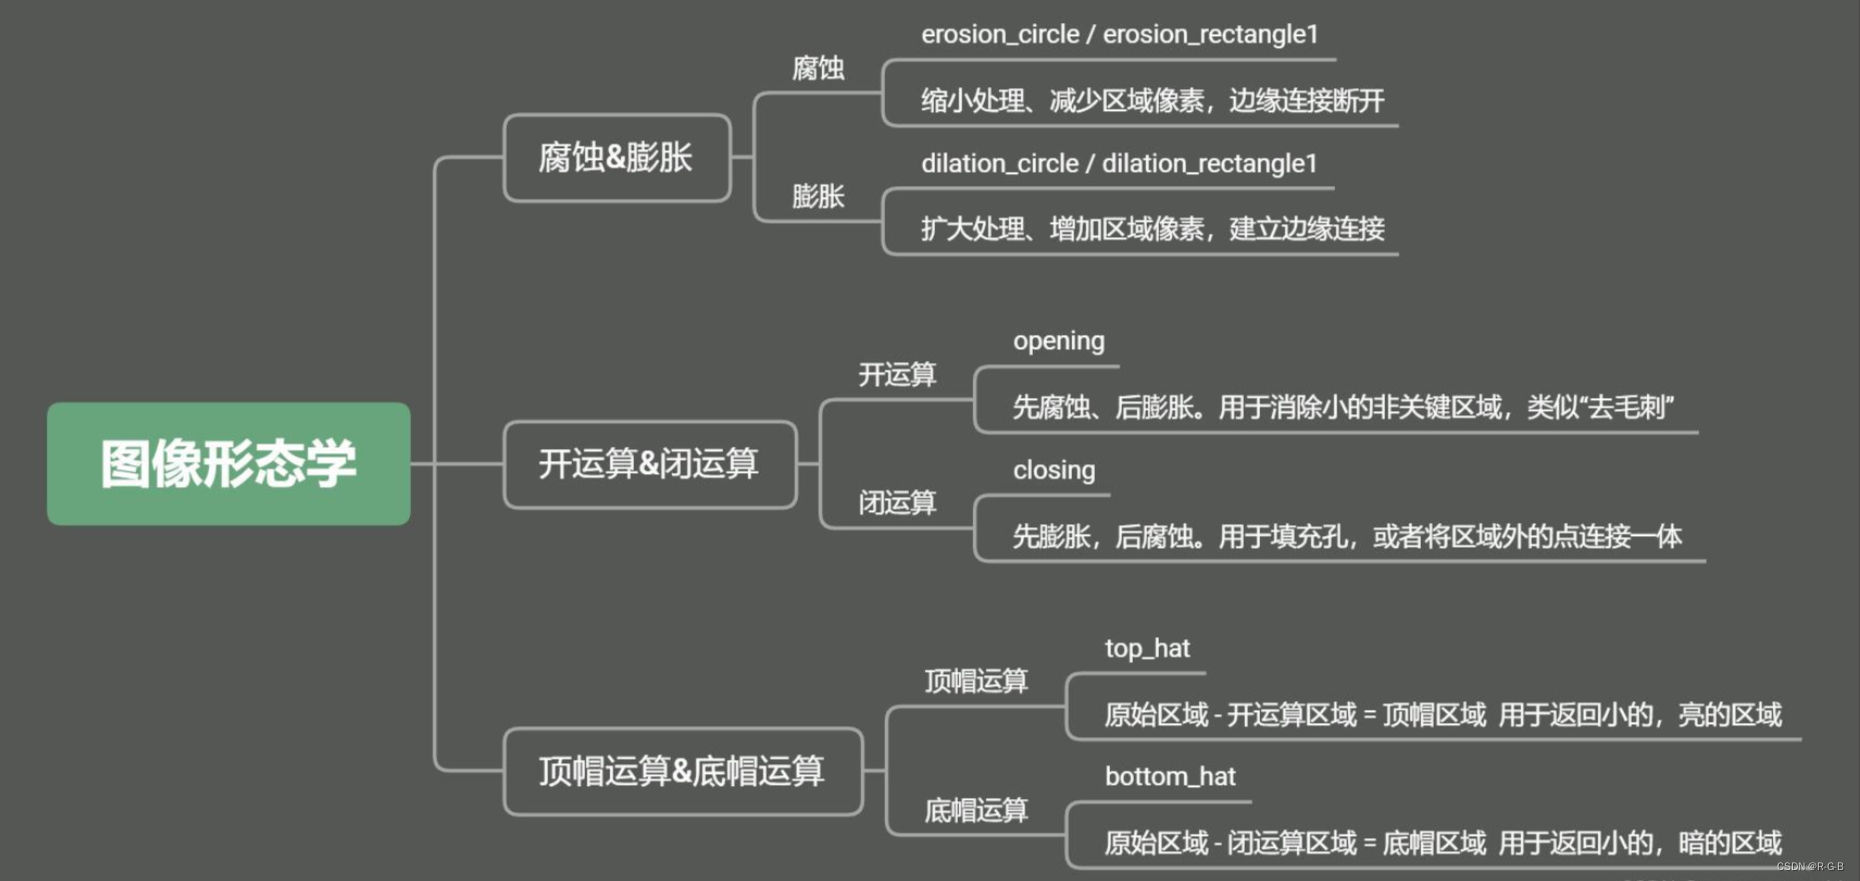
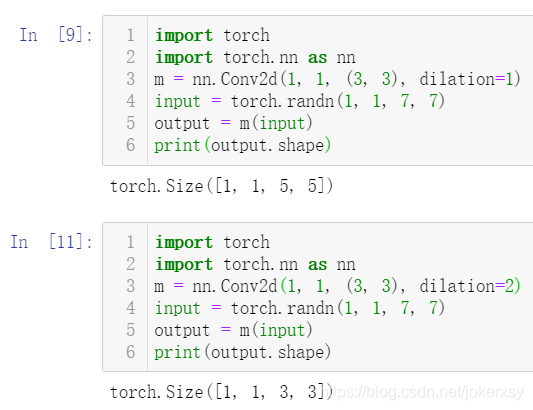
- 空洞卷积(Dilated/Atrous Convolution)
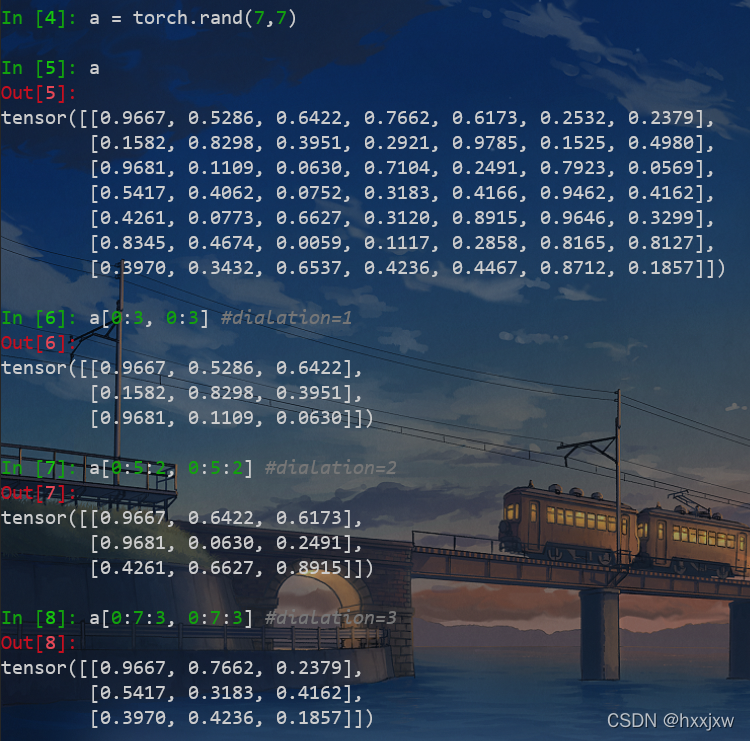
- 标准卷积与空洞卷积
- 空洞卷积的作用
- 为了保证输出图像尺寸不变时,padding的设定值
- DeepLab v3+
- 深度可分离卷积(depthwise separable convolution)
- 在Pytorch中的实现
- 算法架构
- 算法实现
- 导入包
- Xception
- fixed_padding()
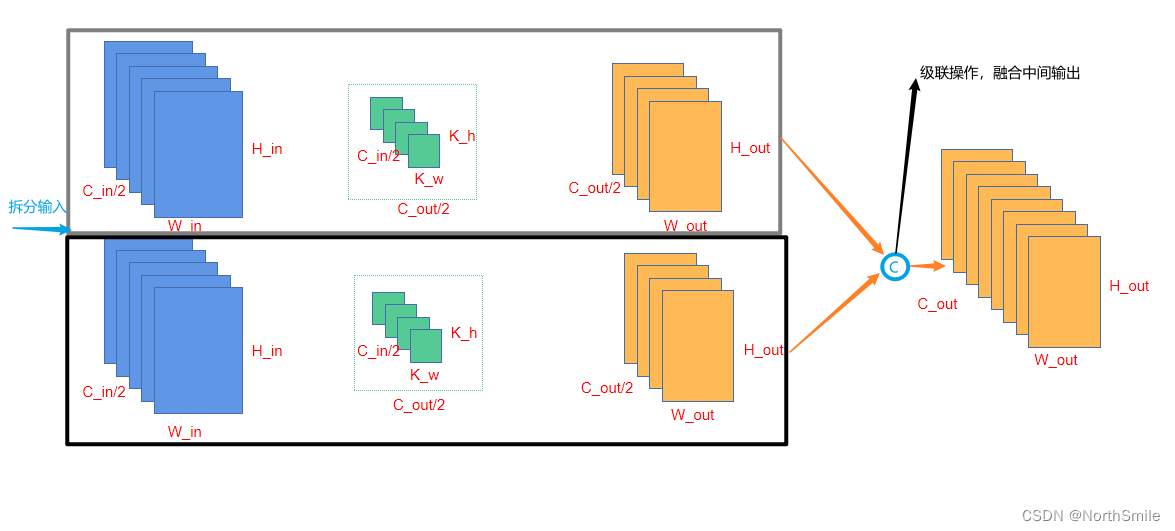
- 深度可分离卷积
- 含跳跃连接的块
- Xception的主体网络
- ASPP模块
- DeepLab v3+主体类
论文精读
四种版本网络的对比
v1
- 修改 VGG16
- 空洞卷积
- CRF 作为后处理
v2
- 设计 ASPP 模块,将空洞卷积的性能发挥到最大
- 沿用 VGG16 作为主网络
- 尝试使用 ResNet-101 进行对比实验
- CRF 作为后处理
v3
- 以 ResNet 作为主网络
- 设计了一种串行和一种并行的 DCNN 网络
- 微调 ASPP 模块
- 取消 CRF
v3+
- 以 ResNet 或 Xception为主网络
- 加入了编解码结构
- 取消 CRF
先验知识
分辨率的损失
- 连续的池化和下采样会导致图像分辨率大幅下降,丢失原始信息,且在上采样过程中难以恢复
- 为了减少分辨率损失,可以采样空洞卷积或步长为2的卷积操作代替池化
多尺度特征(multi-scale features)
- 由于图片中的目标大小不同、远近不同,可能会导致分割效果不尽人意
- 通过设置不同的不同参数大小的池化层或卷积层,提取到不同尺度的特征
- 再将这些特征图送入到网络中融合,对网络的性能提升很大
空洞卷积(Dilated/Atrous Convolution)
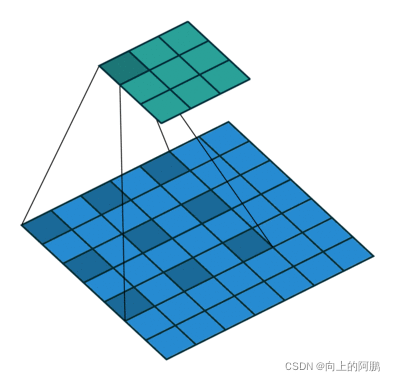
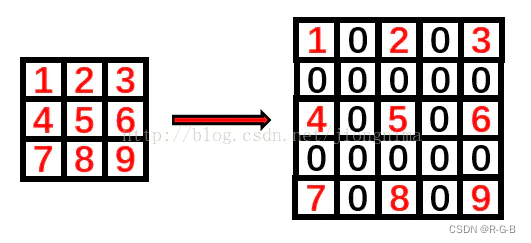
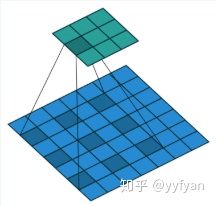
标准卷积与空洞卷积
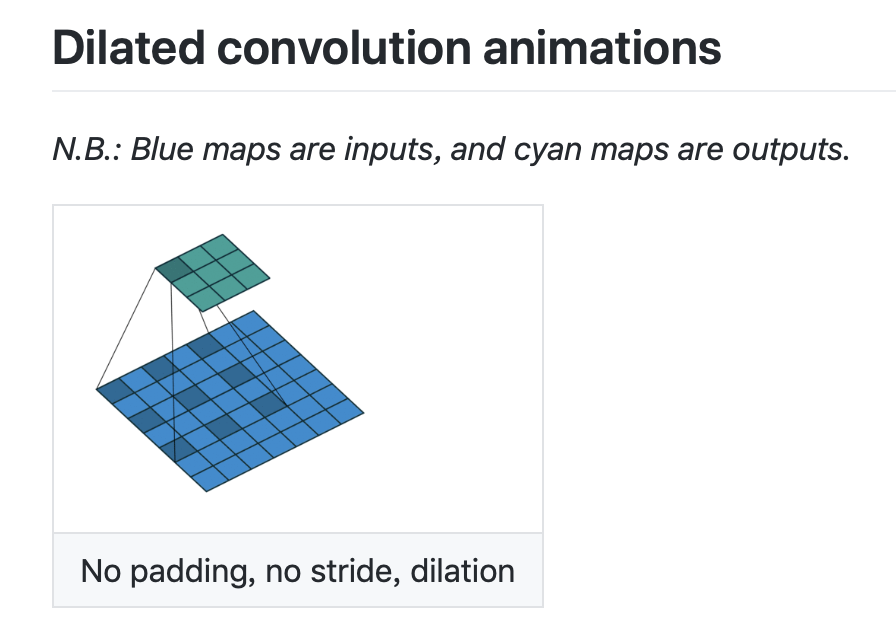
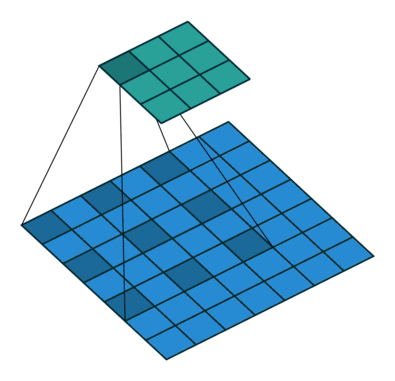
标准卷积如下图所示:
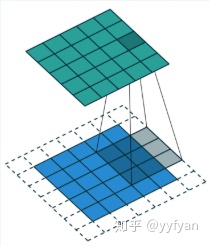
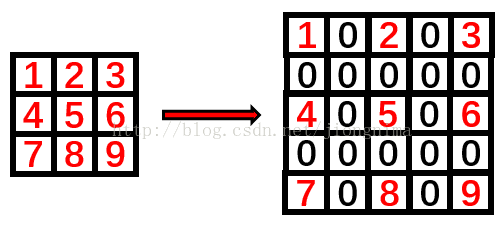
空洞卷积就是在标准卷积核中间填充0,如下图所示:
空洞卷积的作用
- 在尽量不丢失分辨率的情况下扩大感受野
- 通过设定不同参数捕获上下文多尺度信息
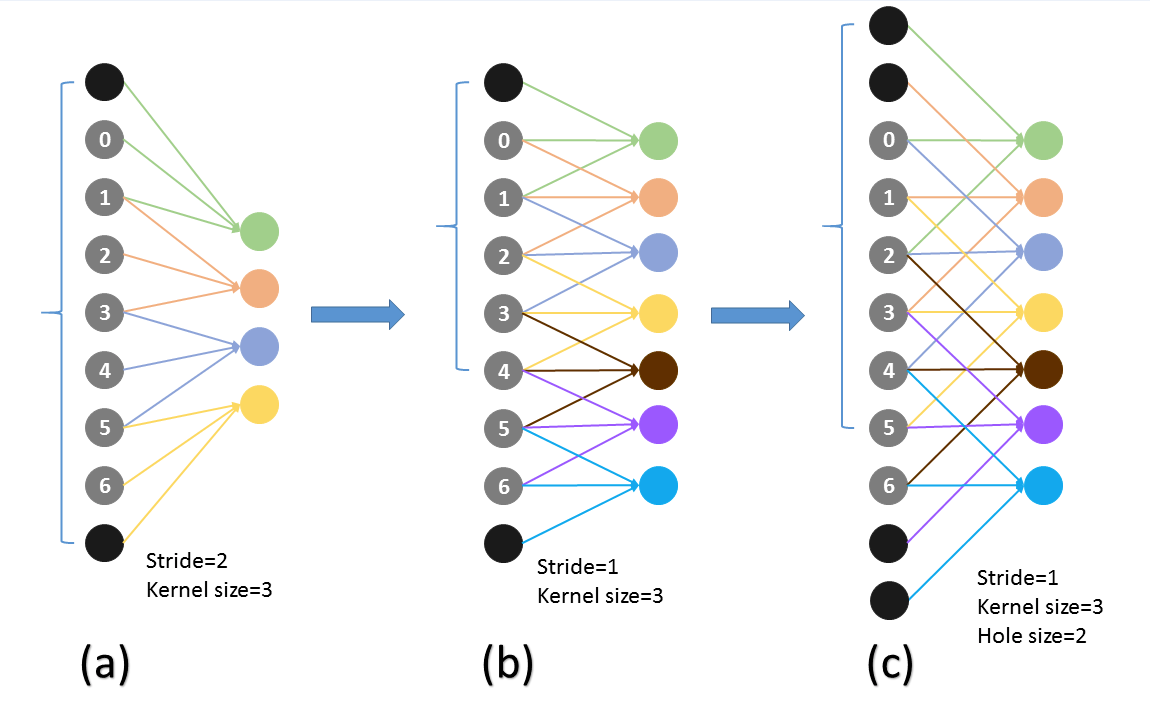
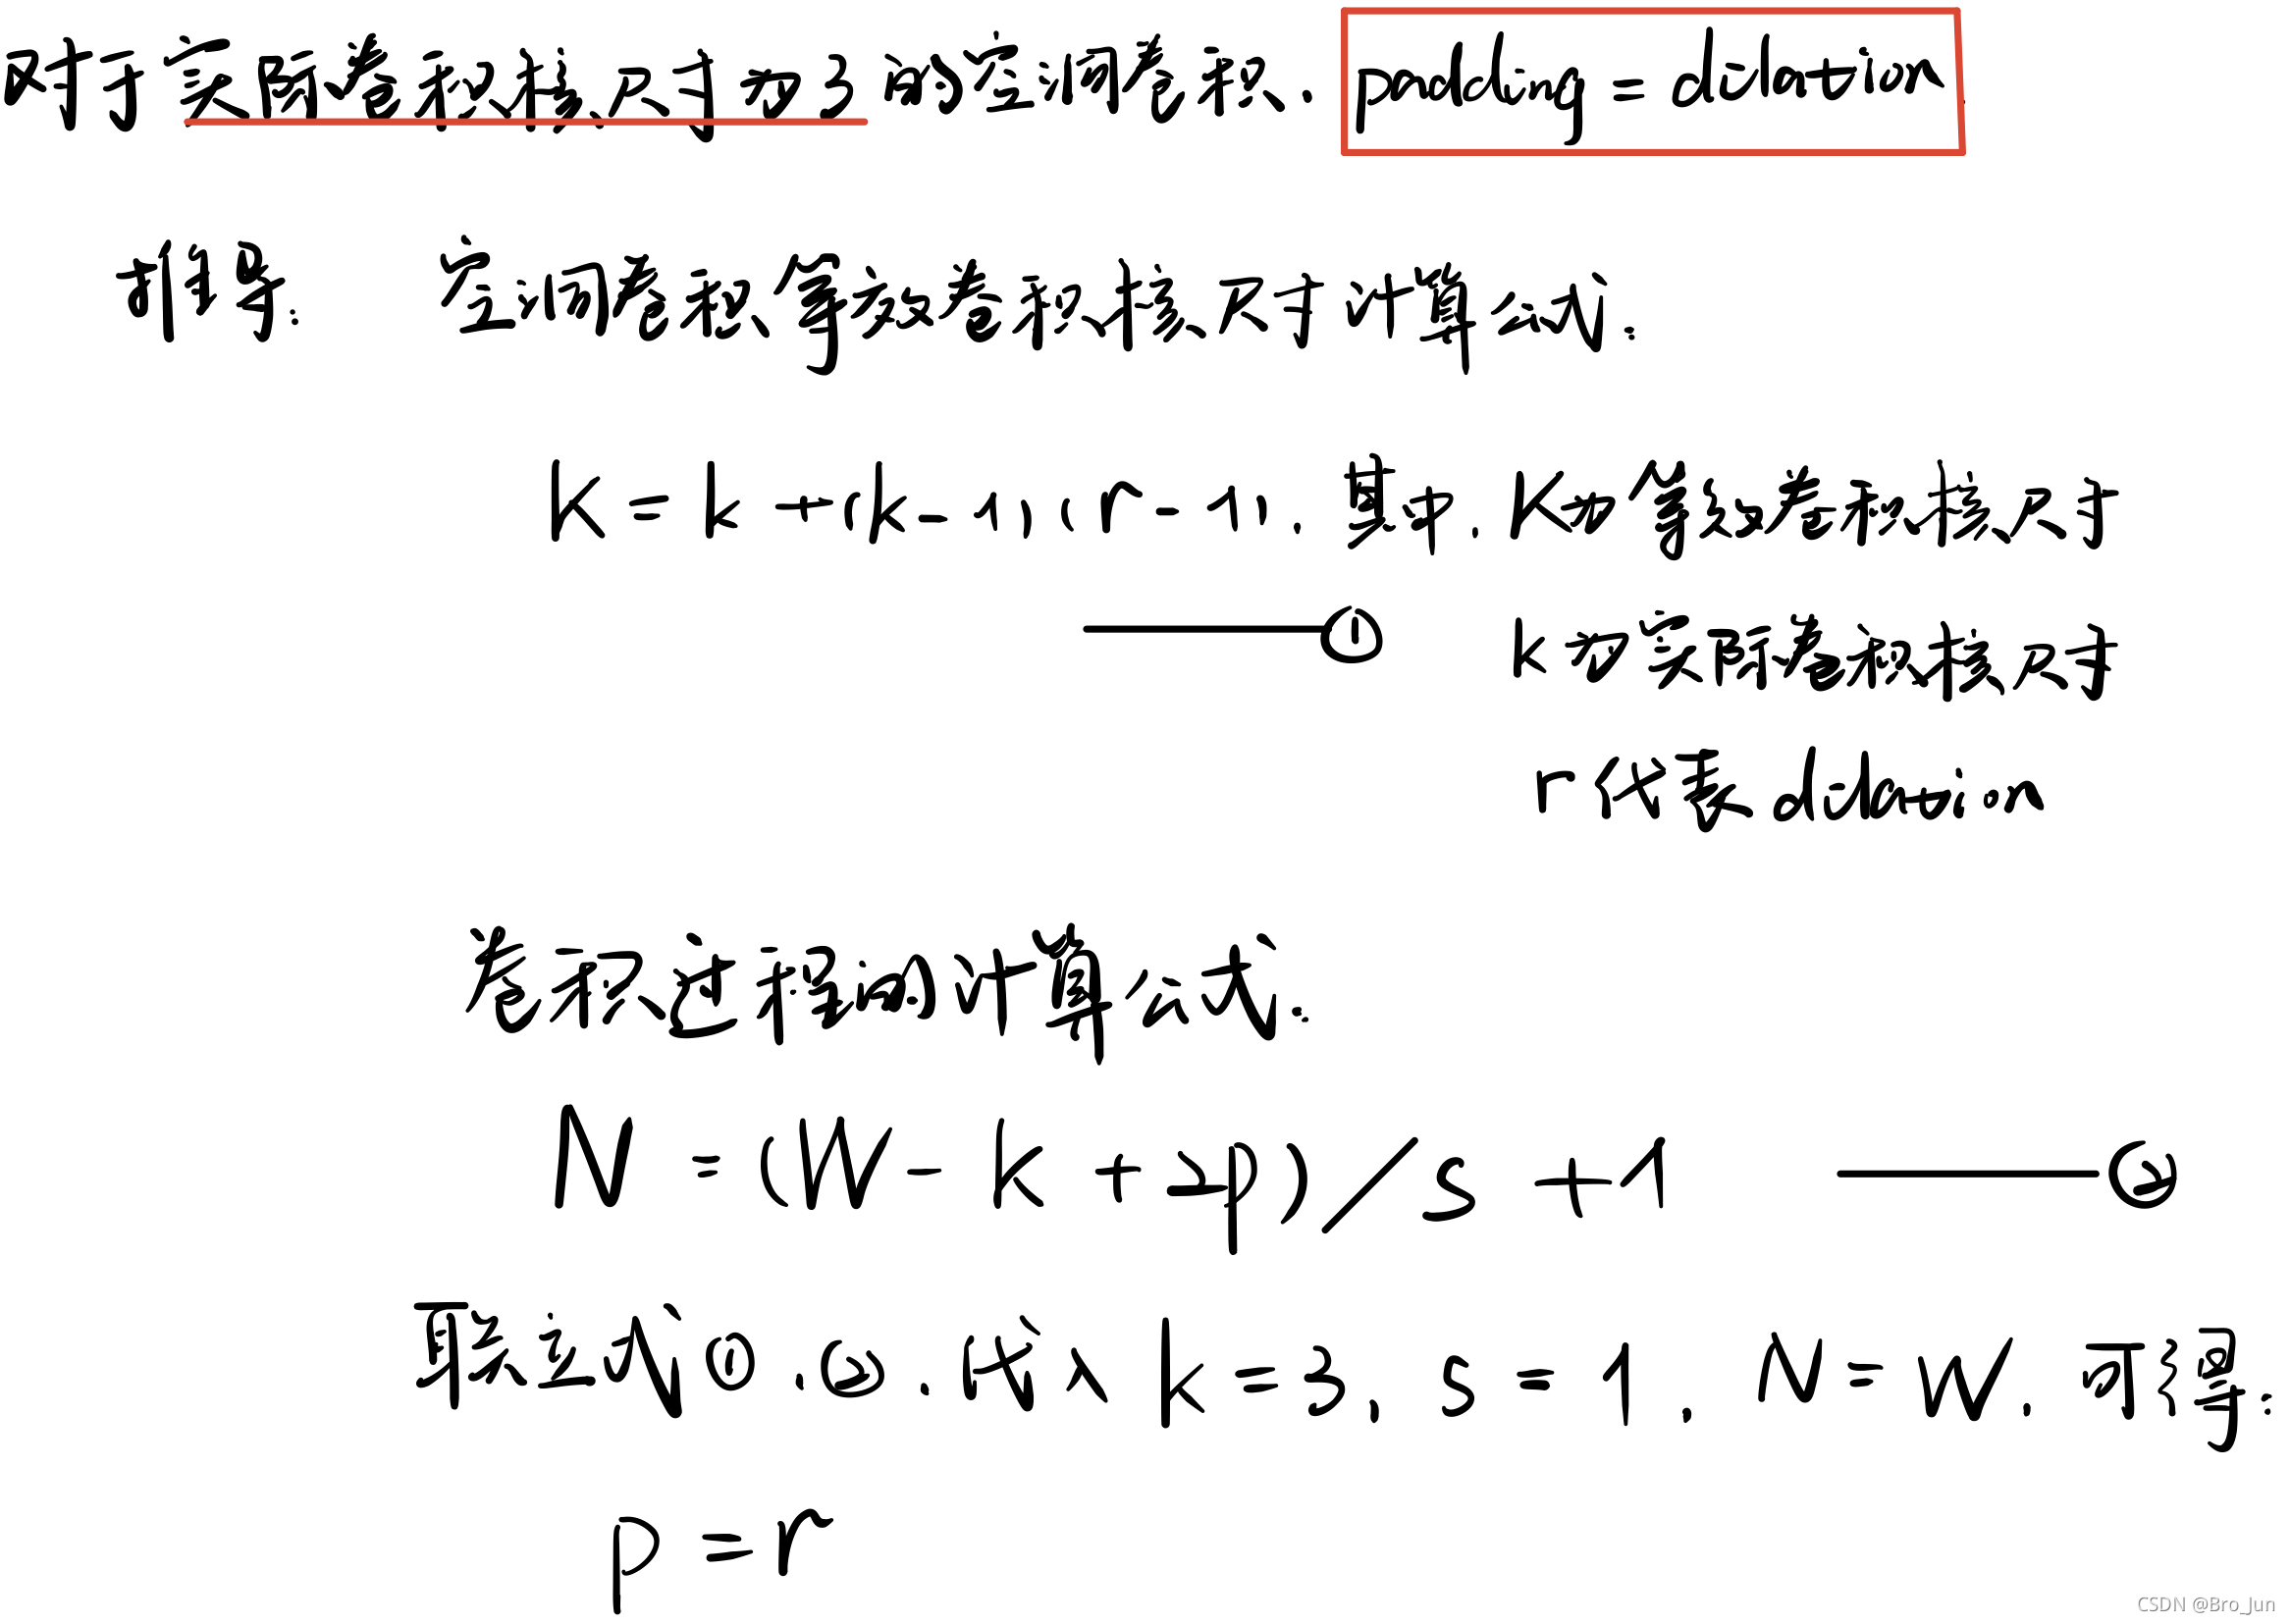
为了保证输出图像尺寸不变时,padding的设定值
以实际卷积核尺寸为3为例:
DeepLab v3+
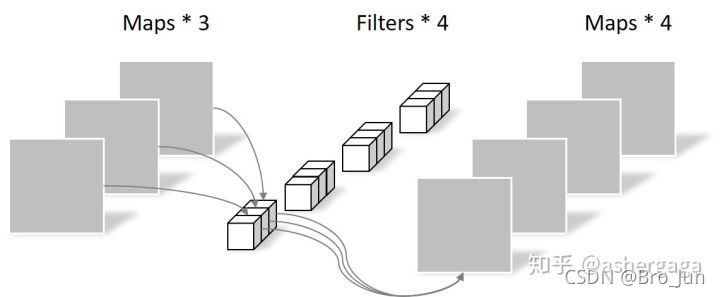
深度可分离卷积(depthwise separable convolution)
深度可分离卷积可以大大减少参数量,而效果与常规卷积几乎无异甚至要略好
方法:逐通道卷积 + 逐点卷积
逐通道卷积中,一个卷积核负责一个通道,如下图所示:
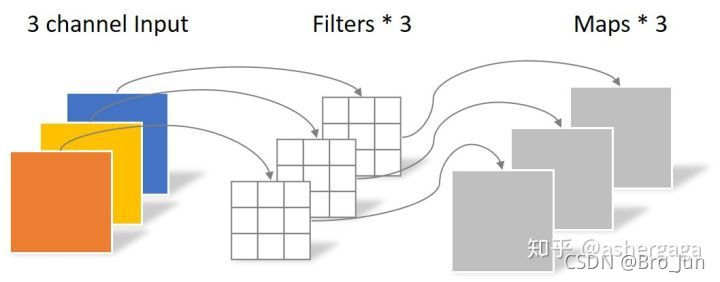
逐点卷积类似常规卷积,卷积核尺寸为 1×1×M,M 为上一层的通道数,如下图所示:
在Pytorch中的实现
分两个
算法架构
架构总览:
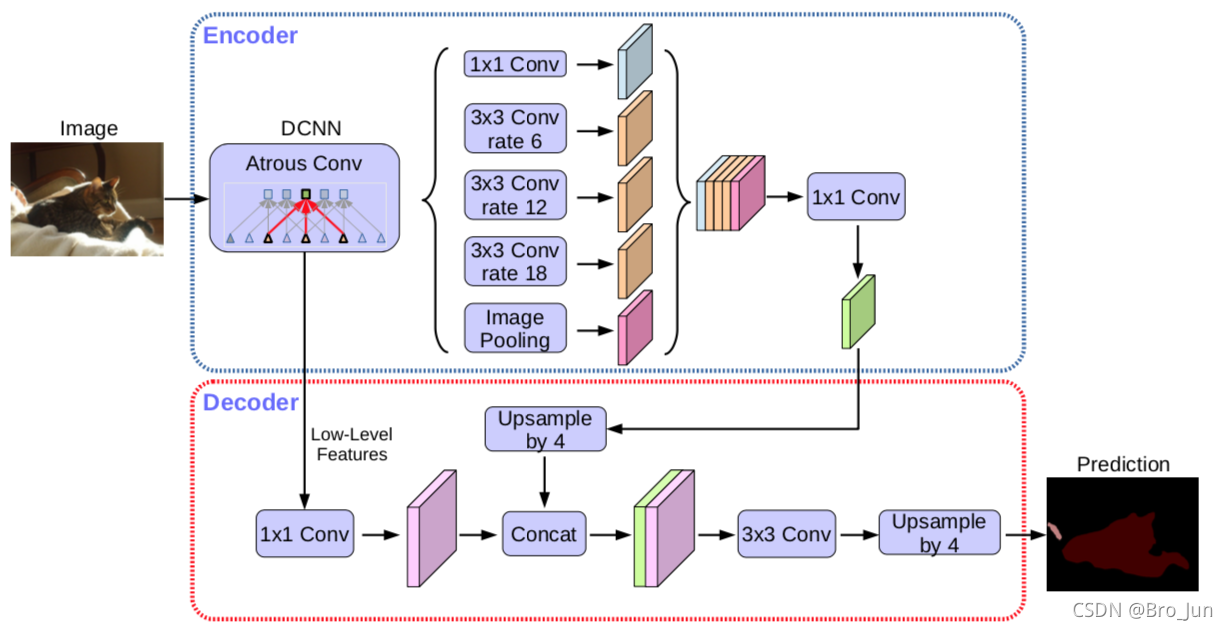
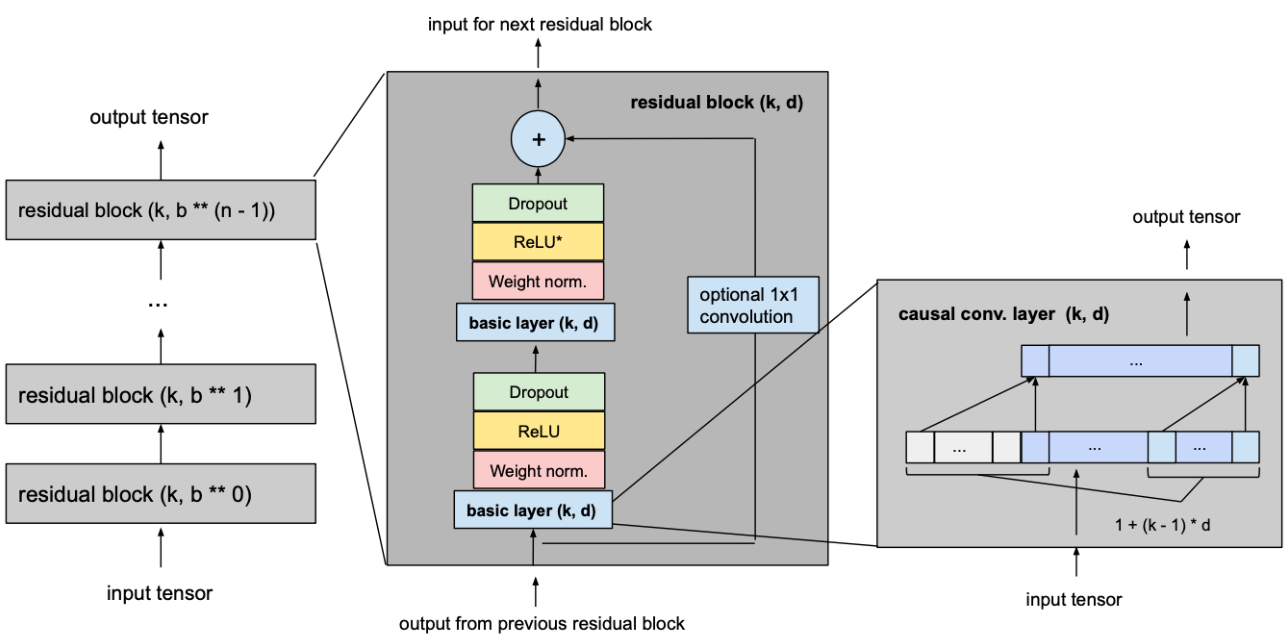
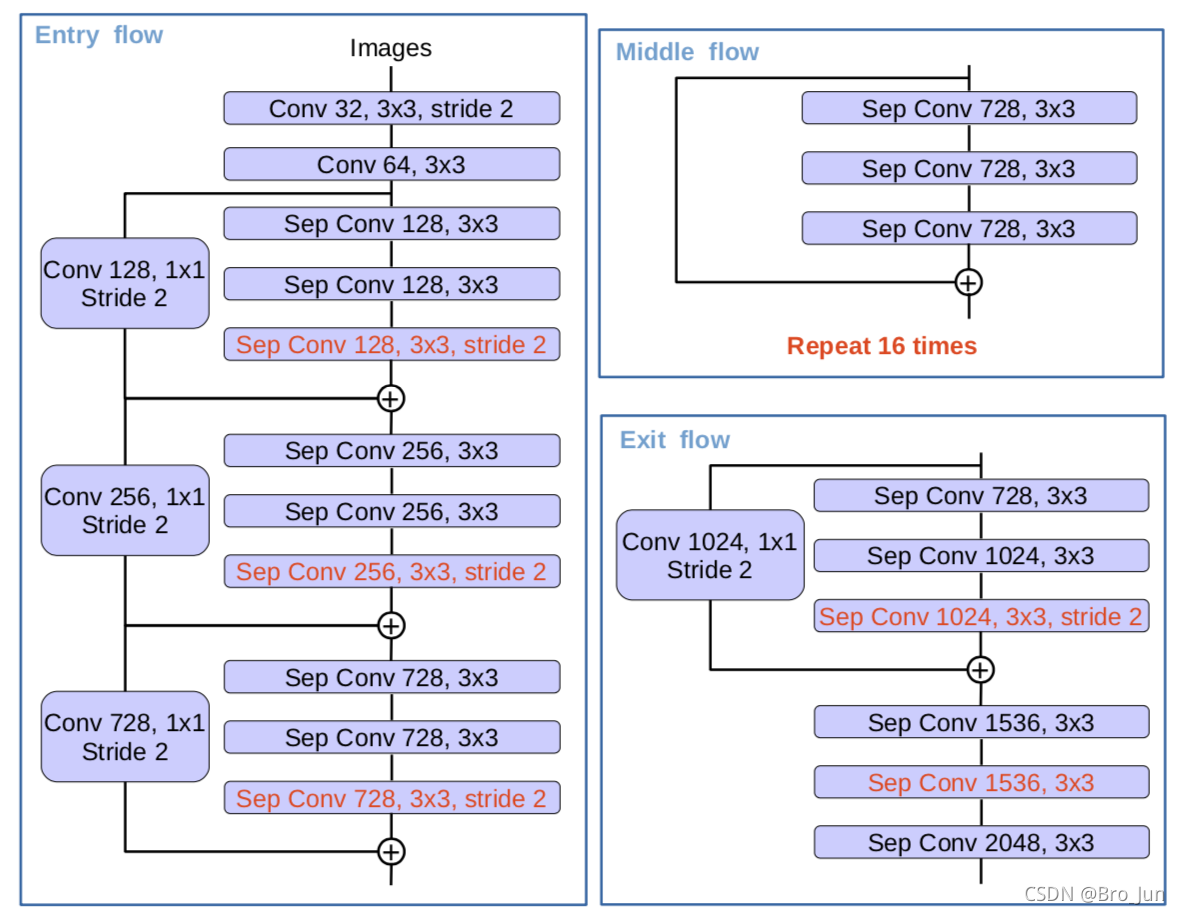
其中,DCNN 为 Xception 网络,如下图所示:
注意:最后一个Res块的最后一个卷积以及跳跃连接的卷积的步长应为1,因为在本次代码中想在下采样最终获得1/8或1/16的尺寸(通过改变Entry_Block3卷积层的步长)
算法实现
导入包
import math
import torch
import torch.nn as nn
import torch.nn.functional as F
Xception
fixed_padding()
该函数是对图像进行padding,以保证在步长为1的卷积中,其尺寸不变
torch.nn.functional.pad() 用法
根据下图所示公式:
def fixed_padding(inputs, kernel_size, dilation):kernel_size_effective = kernel_size + (kernel_size - 1) * (dilation - 1) # 有效kernel_size的公式pad_total = kernel_size_effective - 1pad_beg = pad_total // 2pad_end = pad_total - pad_begpadded_inputs = F.pad(inputs, (pad_beg, pad_end, pad_beg, pad_end)) # 上下左右补零未必是对称的return padded_inputs
深度可分离卷积
此处定义的是流程图中每一个Res小块中相同的、可重复使用的深度可分离卷积
方法:逐通道卷积 + 逐点卷积
torch.nn.Conv2d() 中关于groups参数的说明
class SeparableConv2d_same(nn.Module):def __init__(self, inplanes, planes, kernel_size=3, stride=1, dilation=1, bias=False):super(SeparableConv2d_same, self).__init__()self.conv1 = nn.Conv2d(inplanes, inplanes, kernel_size, stride, 0, dilation,groups=inplanes, bias=bias)self.pointwise = nn.Conv2d(inplanes, planes, 1, 1, 0, 1, 1, bias=bias)def forward(self, x):x = fixed_padding(x, self.conv1.kernel_size[0], dilation=self.conv1.dilation[0]) x = self.conv1(x) x = self.pointwise(x) return x
含跳跃连接的块
ReLU() 中的inplace参数的含义
*放在实参前时的用法
class Block(nn.Module):# reps: 重复的卷积层的数量 stride: Block中最大的stridedef __init__(self, inplanes, planes, reps, stride=1, dilation=1, start_with_relu=True, grow_first=True, is_last=False):super(Block, self).__init__()# 跳跃连接的路径上是否有卷积块 (判断条件:通道数发声改变 或 尺寸减半)if planes != inplanes or stride != 1:self.skip = nn.Conv2d(inplanes, planes, 1, stride=stride, bias=False)self.skipbn = nn.BatchNorm2d(planes)else:self.skip = Noneself.relu = nn.ReLU(inplace=True)rep = [] # 建立一个空列表,后续解包后放入Sequence函数中filters = inplanes# 通道数是否在第一个卷积增加if grow_first:rep.append(self.relu)rep.append(SeparableConv2d_same(inplanes, planes, 3, stride=1, dilation=dilation))rep.append(nn.BatchNorm2d(planes))filters = planes # 在第一个卷积后把filter设为输出通道数for i in range(reps - 1):rep.append(self.relu)rep.append(SeparableConv2d_same(filters, filters, 3, stride=1, dilation=dilation))rep.append(nn.BatchNorm2d(filters))# (对于最后一个块)第二个卷积才增加通道数if not grow_first:rep.append(self.relu)rep.append(SeparableConv2d_same(inplanes, planes, 3, stride=1, dilation=dilation))rep.append(nn.BatchNorm2d(planes))# (对于第一个块)开头没有ReLUif not start_with_relu:rep = rep[1:]# (对于第一、二、三个块)最后一个卷积要增加通道数if stride != 1:rep.append(SeparableConv2d_same(planes, planes, 3, stride=2))# 最后一块的最后一层的卷积步长为1if stride == 1 and is_last:rep.append(SeparableConv2d_same(planes, planes, 3, stride=1))self.rep = nn.Sequential(*rep) # 此处*的作用是解包def forward(self, inp):x = self.rep(inp)if self.skip is not None:skip = self.skip(inp)skip = self.skipbn(skip)else:skip = inpx += skipreturn x
Xception的主体网络
torch.nn.init 对应的多种参数初始化方法
class Xception(nn.Module):"""Modified Alighed Xception"""def __init__(self, inplanes=3, os=16):super(Xception, self).__init__()if os == 16:entry_block3_stride = 2middle_block_dilation = 1exit_block_dilations = (1, 2)elif os == 8:entry_block3_stride = 1middle_block_dilation = 2exit_block_dilations = (2, 4)else:raise NotImplementedError# Entry flowself.conv1 = nn.Conv2d(inplanes, 32, 3, stride=2, padding=1, bias=False)self.bn1 = nn.BatchNorm2d(32)self.relu = nn.ReLU(inplace=True)self.conv2 = nn.Conv2d(32, 64, 3, stride=1, padding=1, bias=False)self.bn2 = nn.BatchNorm2d(64)self.block1 = Block(64, 128, reps=2, stride=2, start_with_relu=False)self.block2 = Block(128, 256, reps=2, stride=2, start_with_relu=True, grow_first=True)self.block3 = Block(256, 728, reps=2, stride=entry_block3_stride, start_with_relu=True, grow_first=True,is_last=True)# Middle flowself.block4 = Block(728, 728, reps=3, stride=1, dilation=middle_block_dilation, start_with_relu=True, grow_first=True)self.block5 = Block(728, 728, reps=3, stride=1, dilation=middle_block_dilation, start_with_relu=True, grow_first=True)self.block6 = Block(728, 728, reps=3, stride=1, dilation=middle_block_dilation, start_with_relu=True, grow_first=True)self.block7 = Block(728, 728, reps=3, stride=1, dilation=middle_block_dilation, start_with_relu=True, grow_first=True)self.block8 = Block(728, 728, reps=3, stride=1, dilation=middle_block_dilation, start_with_relu=True, grow_first=True)self.block9 = Block(728, 728, reps=3, stride=1, dilation=middle_block_dilation, start_with_relu=True, grow_first=True)self.block10 = Block(728, 728, reps=3, stride=1, dilation=middle_block_dilation, start_with_relu=True, grow_first=True)self.block11 = Block(728, 728, reps=3, stride=1, dilation=middle_block_dilation, start_with_relu=True, grow_first=True)self.block12 = Block(728, 728, reps=3, stride=1, dilation=middle_block_dilation, start_with_relu=True, grow_first=True)self.block13 = Block(728, 728, reps=3, stride=1, dilation=middle_block_dilation, start_with_relu=True, grow_first=True)self.block14 = Block(728, 728, reps=3, stride=1, dilation=middle_block_dilation, start_with_relu=True, grow_first=True)self.block15 = Block(728, 728, reps=3, stride=1, dilation=middle_block_dilation, start_with_relu=True, grow_first=True)self.block16 = Block(728, 728, reps=3, stride=1, dilation=middle_block_dilation, start_with_relu=True, grow_first=True)self.block17 = Block(728, 728, reps=3, stride=1, dilation=middle_block_dilation, start_with_relu=True, grow_first=True)self.block18 = Block(728, 728, reps=3, stride=1, dilation=middle_block_dilation, start_with_relu=True, grow_first=True)self.block19 = Block(728, 728, reps=3, stride=1, dilation=middle_block_dilation, start_with_relu=True, grow_first=True)# Exit flowself.block20 = Block(728, 1024, reps=2, stride=1, dilation=exit_block_dilations[0],start_with_relu=True, grow_first=False, is_last=True)self.conv3 = SeparableConv2d_same(1024, 1536, 3, stride=1, dilation=exit_block_dilations[1])self.bn3 = nn.BatchNorm2d(1536)self.conv4 = SeparableConv2d_same(1536, 1536, 3, stride=1, dilation=exit_block_dilations[1])self.bn4 = nn.BatchNorm2d(1536)self.conv5 = SeparableConv2d_same(1536, 2048, 3, stride=1, dilation=exit_block_dilations[1])self.bn5 = nn.BatchNorm2d(2048)# Init weightsself._init_weight()def forward(self, x):# Entry flowx = self.conv1(x)x = self.bn1(x)x = self.relu(x)x = self.conv2(x)x = self.bn2(x)x = self.relu(x)x = self.block1(x)# 观察DeepLab v3+的结构图可知:有一个1/4尺寸的特征图被送入decoderlow_level_feat = xx = self.block2(x)x = self.block3(x)# Middle flowx = self.block4(x)x = self.block5(x)x = self.block6(x)x = self.block7(x)x = self.block8(x)x = self.block9(x)x = self.block10(x)x = self.block11(x)x = self.block12(x)x = self.block13(x)x = self.block14(x)x = self.block15(x)x = self.block16(x)x = self.block17(x)x = self.block18(x)x = self.block19(x)# Exit flowx = self.block20(x)x = self.conv3(x)x = self.bn3(x)x = self.relu(x)x = self.conv4(x)x = self.bn4(x)x = self.relu(x)x = self.conv5(x)x = self.bn5(x)x = self.relu(x)return x, low_level_featdef _init_weight(self):for m in self.modules():if isinstance(m, nn.Conv2d):n = m.kernel_size[0] * m.kernel_size[1] * m.out_channelsm.weight.data.normal_(0, math.sqrt(2. / n))elif isinstance(m, nn.BatchNorm2d):m.weight.data.fill_(1)m.bias.data.zero_()
ASPP模块
torch.nn.functional.interpolate() 用法
class ASPP_module(nn.Module):def __init__(self, inplanes, planes, os): # inplanes: 输入通道 planes: 输出通道 os:output_stridesuper(ASPP_module, self).__init__()# 不同的output_stride对应不同的空洞率组合if os == 16:dilations = [1, 6, 12, 18]elif os == 8:dilations = [1, 12, 24, 36]self.aspp1 = nn.Sequential(nn.Conv2d(inplanes, planes, kernel_size=1, stride=1,padding=0, dilation=dilations[0], bias=False),nn.BatchNorm2d(planes),nn.ReLU())self.aspp2 = nn.Sequential(nn.Conv2d(inplanes, planes, kernel_size=3, stride=1,padding=dilations[1], dilation=dilations[1], bias=False),nn.BatchNorm2d(planes),nn.ReLU())self.aspp3 = nn.Sequential(nn.Conv2d(inplanes, planes, kernel_size=3, stride=1,padding=dilations[2], dilation=dilations[2], bias=False),nn.BatchNorm2d(planes),nn.ReLU())self.aspp4 = nn.Sequential(nn.Conv2d(inplanes, planes, kernel_size=3, stride=1,padding=dilations[3], dilation=dilations[3], bias=False),nn.BatchNorm2d(planes),nn.ReLU())self.global_avg_pool = nn.Sequential(nn.AdaptiveAvgPool2d((1, 1)),nn.Conv2d(inplanes, planes, 1, stride=1, bias=False),nn.BatchNorm2d(planes),nn.ReLU())self.conv1 = nn.Conv2d(1280, 256, 1, bias=False) # 1280? 五个特征图concatenate后得到的,即256*5self.bn1 = nn.BatchNorm2d(256)self._init_weight()def forward(self, x):x1 = self.aspp1(x)x2 = self.aspp2(x)x3 = self.aspp3(x)x4 = self.aspp4(x)x5 = self.global_avg_pool(x)# 全局池化后特征图尺寸为(batch_size, channels, 1, 1),这里选择双线性插值来恢复尺寸,使其与其他四张特征图一致x5 = F.interpolate(x5, size=x4.size()[2:], mode='bilinear', align_corners=True)x = torch.cat((x1, x2, x3, x4, x5), dim=1)return xdef _init_weight(self):for m in self.modules():if isinstance(m, nn.Conv2d):n = m.kernel_size[0] * m.kernel_size[1] * m.out_channelsm.weight.data.normal_(0, math.sqrt(2. / n))elif isinstance(m, nn.BatchNorm2d):m.weight.data.fill_(1)m.bias.data.zero_()
DeepLab v3+主体类
class DeepLabv3_plus(nn.Module):def __init__(self, nInputChannels=3, n_classes=21, os=16, _print=True):if _print:print("Constructing DeepLabv3+ model...")print("Backbone: Xception")print("Number of classes: {}".format(n_classes))print("Output stride: {}".format(os))print("Number of Input Channels: {}".format(nInputChannels))super(DeepLabv3_plus, self).__init__()# Atrous Convself.xception_features = Xception(nInputChannels, os)self.ASPP = ASPP_module(2048, 256, 16)self.conv1 = nn.Conv2d(1280, 256, 1, bias=False)self.bn1 = nn.BatchNorm2d(256)self.relu = nn.ReLU()# adopt [1x1, 48] for channel reduction.self.conv2 = nn.Conv2d(128, 48, 1, bias=False)self.bn2 = nn.BatchNorm2d(48)self.last_conv = nn.Sequential(nn.Conv2d(304, 256, kernel_size=3, stride=1, padding=1, bias=False), # 403 = 256+48nn.BatchNorm2d(256),nn.ReLU(),nn.Conv2d(256, 256, kernel_size=3, stride=1, padding=1, bias=False),nn.BatchNorm2d(256),nn.ReLU(),nn.Conv2d(256, n_classes, kernel_size=1, stride=1))def forward(self, input):x, low_level_features = self.xception_features(input)x = self.ASPP(x)x = self.conv1(x)x = self.bn1(x)x = self.relu(x)x = F.interpolate(x, size=(int(math.ceil(input.size()[-2]/4)),int(math.ceil(input.size()[-1]/4))), mode='bilinear', align_corners=True) # math.ceil(): 向上取整,因为size参数只接受intlow_level_features = self.conv2(low_level_features)low_level_features = self.bn2(low_level_features)low_level_features = self.relu(low_level_features)x = torch.cat((x, low_level_features), dim=1)x = self.last_conv(x)x = F.interpolate(x, size=input.size()[2:], mode='bilinear', align_corners=True)return xdef _init_weight(self):for m in self.modules():if isinstance(m, nn.Conv2d):n = m.kernel_size[0] * m.kernel_size[1] * m.out_channelsm.weight.data.normal_(0, math.sqrt(2. / n))elif isinstance(m, nn.BatchNorm2d):m.weight.data.fill_(1)m.bias.data.zero_()