android ListView几个比较特别的属性
由于这两天在做listView的东西,所以整理出来一些我个人认为比较特别的属性,通过设置这样的属性可以做出更加美观的列表
首先是stackFromBottom属性,这只该属性之后你做好的列表就会显示你列表的最下面,值为true和false
android:stackFromBottom="true"
第二是 transciptMode属性,需要用ListView或者其它显示大量Items的控件实时跟踪或者查看信息,并且希望最新的条目可以自动滚动到可视范围内。通过设置的控件transcriptMode属性可以将Android平台的控件(支持ScrollBar)自动滑动到最底部。
android:transcriptMode="alwaysScroll"
第三cacheColorHint属性,很多人希望能够改变一下它的背景,使他能够符合整体的UI设计,改变背景背很简单只需要准备一张图片然后指定属性 android:background="@drawable/bg",不过不要高兴地太早,当你这么做以后,发现背景是变了,但是当你拖动,或者点击list空白位置的时候发现ListItem都变成黑色的了,破坏了整体效果。
如果你只是换背景的颜色的话,可以直接指定android:cacheColorHint为你所要的颜色,如果你是用图片做背景的话,那也只要将android:cacheColorHint指定为透明(#00000000)就可以了
第四divider属性,该属性作用是每一项之间需要设置一个图片做为间隔,或是去掉item之间的分割线
android:divider="@drawable/list_driver" 其中 @drawable/list_driver 是一个图片资源,如果不想显示分割线则只要设置为android:divider="@drawable/@null" 就可以了
第五fadingEdge属性,上边和下边有黑色的阴影
android:fadingEdge="none" 设置后没有阴影了~
第五scrollbars属性,作用是隐藏listView的滚动条,
android:scrollbars="none"与setVerticalScrollBarEnabled(true);的效果是一样的,不活动的时候隐藏,活动的时候也隐藏
第六fadeScrollbars属性,android:fadeScrollbars="true" 配置ListView布局的时候,设置这个属性为true就可以实现滚动条的自动隐藏和显示。
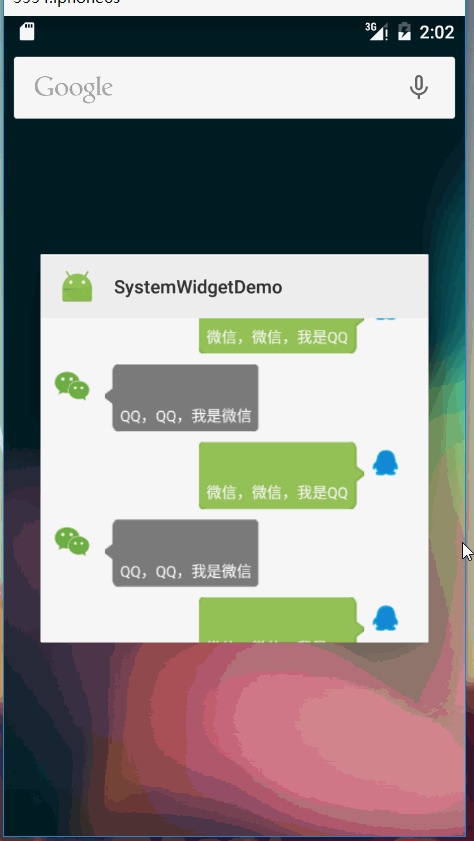
需求:实现聊天模式
实现的效果
键盘弹起来的时候,ListView的内容整体平移,像QQ一样
存在问题
1)ListView的内容整体平移
2)窗口整体上移了
activity属性:
ListView 的属性:
这样我们就可以使用android:transcriptMode + listivew.setSelection(position),来实现我们的效果。
如果加入android:stackFromBottom="true"将会一直保持在底部。
在我们的日常开发中,ListView是一个最常用的组件,所以我们非常有必要对它的属性进行全面的了解。现在就以一个简单的实例,对ListView的属性做一个简单的讲解。
首先我们给出简单的布局文件,就一个简单的ListView列表:
- <LinearLayout xmlns:android="http://schemas.android.com/apk/res/android"
- xmlns:tools="http://schemas.android.com/tools"
- android:layout_width="match_parent"
- android:layout_height="match_parent"
- android:background="#FFE1FF"
- android:orientation="vertical" >
- <ListView
- android:id="@+id/listView1"
- android:layout_width="match_parent"
- android:layout_height="match_parent" />
- </LinearLayout>
Activity文件,使用ArrayAdapter对列表进行填充:
- public class MainActivity extends Activity {
- private ListView listView;
- @Override
- protected void onCreate(Bundle savedInstanceState) {
- super.onCreate(savedInstanceState);
- listView = (ListView) findViewById(R.id.listView1);
- final List<String> adapterData = new ArrayList<String>();
- for (int i = 0; i < 20; i++) {
- adapterData.add("ListItem" + i);
- }
- ArrayAdapter<String> adapter = new ArrayAdapter<String>(this,
- android.R.layout.simple_list_item_1, adapterData);
- listView.setAdapter(adapter);
- }
- }
运行效果如下:

接下来我们在布局的ListView中添加如下属性,并演示其效果。
1.android:stackFromBottom属性:在ListView和GridView中使用,使它们的内容从底部开始显示。
布局文件修改如下:
- <ListView
- android:id="@+id/listView1"
- android:layout_width="match_parent"
- android:layout_height="match_parent"
- android:stackFromBottom="true" />
运行效果如下,列表在开始的时候,内容就从底部开始显示:

2.android:transcriptMode属性:设置列表的transcriptMode模式,该模式指定列表添加新的选项的时候,是否自动滑动到底部,显示新的选项。
disabled:取消transcriptMode模式,默认的
normal:当接受到数据集合改变的通知,并且仅仅当最后一个选项已经显示在屏幕的时候,自动滑动到底部。
alwaysScroll:无论当前列表显示什么选项,列表将会自动滑动到底部显示最新的选项。
布局修改如下:
- <ListView
- android:id="@+id/listView1"
- android:layout_width="match_parent"
- android:layout_height="match_parent"
- android:stackFromBottom="true"
- android:transcriptMode="alwaysScroll" />
Activity文件代码如下:
- public class MainActivity extends Activity {
- private ListView listView;
- @Override
- protected void onCreate(Bundle savedInstanceState) {
- super.onCreate(savedInstanceState);
- setContentView(R.layout.activity_main);
- listView = (ListView) findViewById(R.id.listView1);
- final List<String> adapterData = new ArrayList<String>();
- for (int i = 0; i < 20; i++) {
- adapterData.add("ListItem" + i);
- }
- final ArrayAdapter<String> adapter = new ArrayAdapter<String>(this,
- android.R.layout.simple_list_item_1, adapterData);
- listView.setAdapter(adapter);
- //定时给列表添加新的选项,并通知列表更新
- final Handler handler = new Handler();
- Timer timer = new Timer();
- timer.scheduleAtFixedRate(new TimerTask() {
- @Override
- public void run() {
- adapterData.add("New ListItem");
- handler.post(new Runnable() {
- @Override
- public void run() {
- adapter.notifyDataSetChanged();
- }
- });
- }
- }, 3000, 3000);
- }

6秒后的结果(每当添加新的表项的时候,列表自动滑动的底部显示最新的表项)

其它两个normal和disable属性就不在演示,如上已经解释的比较清楚,大家可以自己试验感受一下。
3.android:cacheColorHint属性:该属性在官方文档和个资料中找不到比较好的描述;根据实际的体验,当你设置的ListView的背景时,应该设置该属性为“#00000000”(透明),不然在滑动的时候,列表的颜色会变黑或者背景图片小时的情况!
4.android:divider属性:列表之间绘制的颜色或者图片。一般开发中用于分隔表项。
在实际开发过程中,如果你不想要列表之间的分割线,可以设置属性为@null,布局文件如下:
- <ListView
- android:id="@+id/listView1"
- android:layout_width="match_parent"
- android:layout_height="match_parent"
- android:divider="@null" />
运行结果如下:

5.android:fadingEdge属性:设置列表的阴影
布局文件如下:
- <ListView
- android:id="@+id/listView1"
- android:layout_width="match_parent"
- android:layout_height="match_parent"
- android:background="@drawable/ic_launcher"
- android:cacheColorHint="#000000ff"
- android:fadingEdge="vertical"
- android:fadingEdgeLength="40dp"/>
运行效果如下:

6.android:fastScrollEnabled属性:启用快速滑动条,它能快速的滑动列表。但在实际的测试中发现,当你的数据比较小的时候,是不会显示快速滚动条。
布局文件如下:
- <ListView
- android:id="@+id/listView1"
- android:layout_width="match_parent"
- android:layout_height="match_parent"
- android:fastScrollEnabled="true" />
运行结果如下(当你快速滑动列表的时候,就出现如下快速滑动滚动条):

7.android:listSelector属性:用来指明列表当前选中的选项的图片
布局文件如下:
- <ListView
- android:id="@+id/listView1"
- android:layout_width="match_parent"
- android:layout_height="match_parent"
- android:listSelector="@drawable/ic_launcher" />
运行结果如下(当用手指点击ListItem3的时候,出现如下效果,图片显示在ListItem3的底部,并未遮挡ListItem3):

8.android:drawSelectorOnTop属性:当设置为true时候,listSelector的图片将会被绘制在被选中的选项之上。
布局文件如下:
- <ListView
- android:id="@+id/listView1"
- android:layout_width="match_parent"
- android:layout_height="match_parent"
- <span style="color:#ff0000;"> </span> android:drawSelectorOnTop="true"
- android:listSelector="@drawable/ic_launcher" />
运行结果如下(对比上面,发现图片遮挡了ListItem3的显示):

9.android:choiceMode属性:定义了列表的选择行为,默认的情况下,列表没有选择行为。
none:正常不指定选择的列表
singleChoice:列表允许一个选择
multipleChoice:列表允许选择多个
mutipleChoiceModal:
布局文件如下:
- <ListView
- android:id="@+id/listView1"
- android:layout_width="match_parent"
- android:layout_height="match_parent"
- android:choiceMode="multipleChoice" />
Activity文件如下:
- public class MainActivity extends Activity {
- private ListView listView;
- @Override
- protected void onCreate(Bundle savedInstanceState) {
- super.onCreate(savedInstanceState);
- setContentView(R.layout.activity_main);
- listView = (ListView) findViewById(R.id.listView1);
- final List<String> adapterData = new ArrayList<String>();
- for (int i = 0; i < 40; i++) {
- adapterData.add("ListItem" + i);
- }
- //只有使用支持选择的布局才能选择多项
- ArrayAdapter<String> adapter = new ArrayAdapter<String>(this,
- android.R.layout.simple_list_item_checked, adapterData);
- listView.setAdapter(adapter);
- listView.setFastScrollEnabled(true);
- }
- }
运行结果如下(点击多个选项),关于nono和singleChoice可以自己尝试一下: