ListView用法

article/2025/9/26 10:05:13

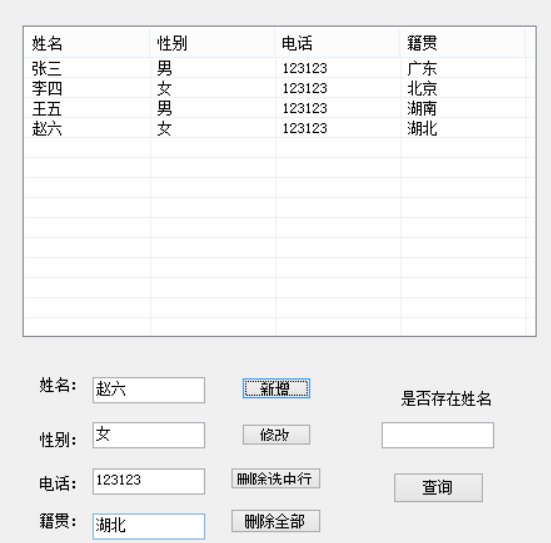
ListView是用于显示数据的,先在窗体中拉一个lisview控件,还有一些新增、修改、删除、查询按钮和文本框,控件名称为listview,按钮为btnInsert,btnUpate,btnDeleteOne,btnDelete,btnSelect,文本框的名称为txtName,txtSex,txtPhone,txtAddress,设计如下图所示:

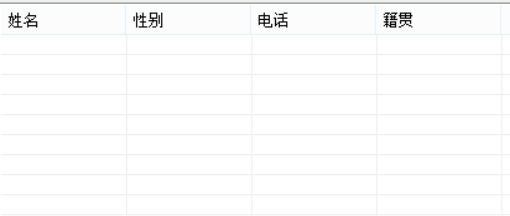
写完这些后,先设置listView的一些属性和列标头,如图所示

具体代码如下:

using System;
using System.Collections.Generic;
using System.ComponentModel;
using System.Data;
using System.Drawing;
using System.Linq;
using System.Text;
using System.Threading.Tasks;
using System.Windows.Forms;

namespace TestGame
{
    public partial class ListViewForm : Form
    {
        public ListViewForm()
        {
            InitializeComponent();
        }
        /// <summary>
        /// 窗体加载时调用初始化的Listview方法
        /// </summary>
        /// <param name="sender"></param>
        /// <param name="e"></param>
        private void ListViewForm_Load(object sender, EventArgs e)
        {
            InitListView(this.listView);
        }
        /// <summary>
        /// 当点击新增时调用的方法
        /// </summary>
        /// <param name="sender"></param>
        /// <param name="e"></param>
        private void btnInsert_Click(object sender, EventArgs e)
        {
            InsertListView(this.listView);
                     
        }
        /// <summary>
        /// 当点击修改时调用的方法
        /// </summary>
        /// <param name="sender"></param>
        /// <param name="e"></param>
        private void btnUpdate_Click(object sender, EventArgs e)
        {
            UpdateListView(this.listView);
        }
        /// <summary>
        /// 新增方法
        /// </summary>
        /// <param name="lv"></param>
        /// <returns></returns>
        public ListView InsertListView(ListView lv) {
            //获取文本框中的值
            string name = this.txtName.Text;
            string sex = this.txtSex.Text;
            string phone = this.txtPhone.Text;
            string address = this.txtAddress.Text;
            //创建行对象
            ListViewItem li = new ListViewItem(name);
            //添加同一行的数据
            li.SubItems.Add(sex);
            li.SubItems.Add(phone);
            li.SubItems.Add(address);
            //将行对象绑定在listview对象中
            lv.Items.Add(li);

    MessageBox.Show("新增数据成功!");
            return lv;
        }
       
        /// <summary>
        /// 初始化ListView的方法
        /// </summary>
        /// <param name="lv"></param>
        public void InitListView(ListView lv) {
            //添加列名
            ColumnHeader c1 = new ColumnHeader();
            c1.Width = 100;
            c1.Text = "姓名";
            ColumnHeader c2 = new ColumnHeader();
            c2.Width = 100;
            c2.Text = "性别";
            ColumnHeader c3 = new ColumnHeader();
            c3.Width = 100;
            c3.Text = "电话";
            //设置属性
            lv.GridLines = true;  //显示网格线
            lv.FullRowSelect = true;  //显示全行
            lv.MultiSelect = false;  //设置只能单选
            lv.View = View.Details;  //设置显示模式为详细
            lv.HoverSelection = true;  //当鼠标停留数秒后自动选择
            //把列名添加到listview中
            lv.Columns.Add(c1);
            lv.Columns.Add(c2);
            lv.Columns.Add(c3);
            lv.Columns.Add("籍贯", 100);  //相当于上面的添加列名的步骤
        }
        
        /// <summary>
        /// 修改的方法
        /// </summary>
        /// <param name="lv"></param>
        /// <returns></returns>
        public ListView UpdateListView(ListView lv){
            if (lv.SelectedItems.Count > 0) {

      //把修改后的文本框内容添加到listview中
                lv.SelectedItems[0].SubItems[0].Text = this.txtName.Text;
                lv.SelectedItems[0].SubItems[1].Text = this.txtSex.Text;
                lv.SelectedItems[0].SubItems[2].Text = this.txtPhone.Text;
                lv.SelectedItems[0].SubItems[3].Text = this.txtAddress.Text;
                MessageBox.Show("修改数据成功!");
            }
            return lv;
        }
       
        /// <summary>
        /// 当listview选中状态改变时调用的方法
        /// </summary>
        /// <param name="sender"></param>
        /// <param name="e"></param>
        private void listView_SelectedIndexChanged(object sender, EventArgs e)
        {

    //当有选择行的数据时
            if (this.listView.SelectedItems.Count > 0) {

      //把选择的信息显示在相应的文本框中
                this.txtName.Text = this.listView.SelectedItems[0].SubItems[0].Text;
                this.txtSex.Text = this.listView.SelectedItems[0].SubItems[1].Text;
                this.txtPhone.Text = this.listView.SelectedItems[0].SubItems[2].Text;
                this.txtAddress.Text = this.listView.SelectedItems[0].SubItems[3].Text;
            }
        }
       
        /// <summary>
        /// 移除选中行的方法
        /// </summary>
        /// <param name="sender"></param>
        /// <param name="e"></param>
        private void btnDeleteOne_Click(object sender, EventArgs e)
        {
            if (this.listView.SelectedItems.Count > 0) {
                //移除整一行
                this.listView.SelectedItems[0].Remove();
            }
        }
       
        /// <summary>
        /// 移除所有行的方法
        /// </summary>
        /// <param name="sender"></param>
        /// <param name="e"></param>
        private void btnDeleteAll_Click(object sender, EventArgs e)
        {    
                //清空整个listview中的行
                this.listView.Items.Clear();
        }


        private void btnSelect_Click(object sender, EventArgs e)
        {
            SelectListView(this.listView);
        }

        public void SelectListView(ListView lv) {
            //列表有数据
            if (lv.Items.Count > 0)
            {
                foreach (ListViewItem li in lv.Items)
                {
                    if (li.SubItems[0].Text == this.txtExitName.Text)
                    {
                        MessageBox.Show("存在该名称");
                        return;
                    }
                }
                MessageBox.Show("没有找到该姓名");
            }
            else {
                MessageBox.Show("未输入列表数据");
            }
        }
    }
}
 

最后运行效果是这样的,这是新增数据时的效果
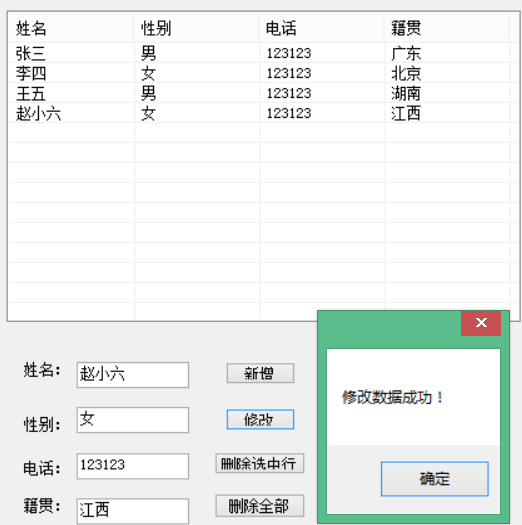
这是修改数据后的效果:

这是查询是否存在这个名字的效果:


http://chatgpt.dhexx.cn/article/Tbmc6Iw3.shtml

相关文章

ListView的基础用法

最近学到ListView和RecyclerView&#xff0c;感觉有点难理解&#xff0c;于是自己找到了篇文章&#xff0c;感觉写的挺详细的&#xff08;文章链接在文末&#xff09;&#xff0c;然后自己再整理敲了跑了一遍&#xff0c;总结了一下&#xff0c;方便自己以后回头温习。 一个Li…

Android(14) ArrayAdapter(数组适配器)的三种方法

ArrayAdapter数组适配器用于绑定格式单一的数据&#xff0c;数据源可以是集合或者数组 列表视图(ListView)以垂直的形式列出需要显示的列表项。 实现过程&#xff1a;新建适配器->添加数据源到适配器->视图加载适配器 第一种&#xff1a;直接用ListView组件创建 列表…

Android——列表视图(ListView)

1、什么是ListView&#xff1f;它可以实现怎样的功能&#xff1f; 列表视图是android中最常用的一种视图组件&#xff0c;它以垂直列表的形式列出需要显示的列表项。手机屏幕空间有限&#xff0c;能显示的内容不多。可以借助ListView来显示更多、更丰富的内容。ListView允许用…

ListView详细介绍与使用

前言介绍&#xff1a; 关于 ListView 我们大家都应该是非常的熟悉了&#xff0c;在 Android 开发中是经常用到的&#xff0c;今天就再来回顾一下&#xff0c;ListView 的使用方法&#xff0c;和一些需要优化注意的地方&#xff0c;还有日常开发过程中的一些小技巧和经验。 Li…

Android最常用的控件ListView(详解)

一.ListView简介 在Android开发中&#xff0c;ListView是一个比较常用的控件。它以列表的形式 展示具体数据内容&#xff0c;并且能够根据数据的长度自适应屏幕显示。 二.ListView简单用法 代码部分 1.布局界面 activity_main.xml 代码&#xff1a; <?xml version"1…

ListView的用法

一、 ListView的使用 <ListView>:用于展示大量数据的一种列表视图,通过上下滑动的方式将屏幕外的数据滚动到屏幕内。 数据无法直接传递给ListView,需要适配器 Adapter:作用是将各种数据以合适的形式展示到View上 实例&#xff1a; Food.java: public class Food {priv…

Android原生AlertDialog修改标题,内容,按钮颜色,字体大小等

private void showAlerDialog() {AlertDialog dialog new AlertDialog.Builder(this).setTitle("AlerDialog").setMessage("这是一个AlertDialog").setPositiveButton("确定",null).setNegativeButton("取消",null).create();dialog.…

【android学习】Dialog对话框

1&#xff0c;Dialog 1&#xff09;onCreateDialog(int) 2&#xff09;showDialog(int) 第一次请求时&#xff0c;会从Activity中调用onCreateDialog。 3&#xff09;onPrepareDialog(int,Dialog) 在每次打开对话框时被调用。 4&#xff09;dismissDialog(int) 关闭对话…

Android Dialog使用详解

对话框是提示用户作出决定或输入额外信息的小窗口&#xff0c;通常不会填充整个屏幕&#xff0c;用于进行一些额外交互 Dialog 类是对话框的基类&#xff0c;但应该避免直接实例化 Dialog&#xff0c;而应使用其子类&#xff0c;比如 AlertDialog 此对话框可显示标题、提示信…

Android 修改AlertDialog原生setPositiveButton的字体颜色背景颜色大小边距位置

看效果图&#xff1a; public void lanyaClick(View v) {//点击确定之后转向登陆框LayoutInflater factory LayoutInflater.from(Beforestart.this);//得到自定义对话框final View DialogView factory.inflate(R.layout.item_alert_dialog, null);//创建对话框android.app.Al…

setPositiveButton和setNegativeButton的区别

setPositiveButton和setNegativeButton的区别和setNeutralButton的区别 三者都是AlertDialog弹出框的按钮&#xff0c;都是封装好的button&#xff0c;只是显示的位置不同&#xff0c;项目中可根据情况选择使用&#xff0c;setNegativeButton一般用于确认&#xff0c;setNegat…

GPS(rinex格式)数据解析详细解读

RINEX格式现如今已成为GPS测量应用中的标准数据格式&#xff0c;目前应用最为广泛、最普遍的是RINEX格式的第2个版本&#xff0c;该版本能够用于包括静态和动态GPS测量在内的不同观测模式数据。在该版本中定义了6种不同类型的数据文件&#xff0c;分别用于存放不同类型的数据&a…

2020/10/23 GPS的数据格式学习

GPS的数据格式学习 一、在使用GPS的通过串口向电脑发送数据的时候&#xff0c;要注意GPS数据线的连接&#xff1b; 1.1 VCC接VCC&#xff1b;&#xff08;VCC表示接电源正极&#xff09; 1.2 GND接GND&#xff1b;&#xff08;GND表示接地或接电源负极&#xff09; 1.3 TX接RX…

GPS数据包格式+数据解析

GPS数据包格式数据解析 一、全球时区的划分&#xff1a; 每个时区跨15经度。以0经线为界向东向西各划出7.5经度&#xff0c;作为0时区。即0时区的经度范围是7.5W——7.5E。从7.5E与7.5W分别向东、向西每15经度划分为一个时区&#xff0c;直到东11区和西11区。东11区最东部的经度…

GPS研究---GPS 数据格式

GPS 数据处理时所采用的观测数据是来自观测的 GPS 接收机。由于接收机的型号很多&#xff0c;厂商设计的数据格式各不相同&#xff0c;国际上为了能统一使用不同接收机的数据&#xff0c; 设计了一种与接收机无关的 RINEX(The Receiver Independent Exchange Format)格式&#…

GPS数据格式的分析

文章目录 前言一、数据格式解析1、GPGGA2、GPRMC3、GPCHC4、Kitti数据集oxts数据 二、驱动1、功能包1.1 解析GPGGA1.2 华测GPCHC 2、ROS相关消息类型2.1 sensor_msgs::NavSatFix2.2 gps_common::GPSFix2.3 sensor_msgs::Imu 3、驱动思路 三、时间1、UTC时间2、时间戳 前言 GPS…

GPS GLONASS数据文件类型解析

GPS & GLONASS数据文件类型解析 一、GPS数据格式 RINEX格式现如今已成为GPS测量应用中的标准数据格式&#xff0c;目前应用最为广泛、最普遍的是RINEX格式的第2个版本&#xff0c;该版本能够用于包括静态和动态GPS测量在内的不同观测模式数据。在该版本中定义了6种不同类…

GPS的数据格式介绍

GPRMC&#xff08;建议使用最小GPS数据格式&#xff09; $GPRMC,<1>,<2>,<3>,<4>,<5>,<6>,<7>,<8>,<9>,<10>,<11><CR><LF> 1) 标准定位时间&#xff08;UTC time&#xff09;格式&#xff1a…

Android ExpandableListView

ExpandableListView可以显示一个视图垂直滚动显示两级列表中的条目&#xff0c;这不同于列表视图&#xff08;ListView&#xff09;。ExpandableListView允许有两个层次&#xff1a;一级列表中有二级列表。 比如在手机设置中&#xff0c;对于分类&#xff0c;有很好的效果。手机…

ExpandableListView用法

先上个效果图&#xff1a; 1&#xff0c;我用的fragment import java.util.ArrayList; import java.util.Collections; import java.util.List; import com.dami.student.ui.chatui.adapter.ContactsExpandableListAdapter; import com.dami.student.R; import android.conten…