1. 闭锁(countDownLatch)
1.1. 作用:
相当于一扇门,在闭锁到达结束状态之前,这扇门是关着的,所以的线程都不允许通过,当闭锁到达结束状态,这扇门打开并允许所有的线程通过。在闭锁达到结束状态后,将不会再改变状态,这扇门永远处于打开状态。
1.2. 闭锁使用场景
1) 确保某个计算在其所有资源都被初始化之后才继续执行;
2) 确保某个服务在其所有所依赖的服务都已经启动后在启动;
3) 等待某个操作的所有参与者都就绪再继续执行(例如王者荣耀匹配成功后需等待所有玩家确认后才能进行选英雄)。
1.3. 闭锁的简单使用
CountDownLatch是一种灵活的闭锁实现,上述场景都可以均可使用。该类的简单用法如下:


public class SysUtil {final CountDownLatch startGate;final CountDownLatch endGate;public static void main(String[] args) throws InterruptedException {int num = 20;SysUtil sysUtil = new SysUtil(1, num);for (int i = 0; i < num; i++) {Thread thread = new Thread(sysUtil.new Worker());thread.start();}long time = System.currentTimeMillis();System.out.println("准备好所需的资源");// doPreparedResource()// open the door
sysUtil.startGate.countDown();try {// 等待所有线程执行完成
sysUtil.endGate.await();} catch (InterruptedException e) {e.printStackTrace();}long endTime = System.currentTimeMillis();System.out.println(endTime - time);}public SysUtil(int start, int end) {startGate = new CountDownLatch(start);endGate = new CountDownLatch(end);}class Worker implements Runnable{private final CountDownLatch startSignal;private final CountDownLatch doSignal;public Worker() {this.startSignal = startGate;this.doSignal = endGate;}@Overridepublic void run() {try {startSignal.await();} catch (InterruptedException e) {e.printStackTrace();}System.out.println(Thread.currentThread().getName() +": i through the startGate");doSignal.countDown();}}}
上面代码使用了两个闭锁,分别表示“起始门”和“结束门”,起始门初始值设置为1,结束门设置为工作线程数量。在资源未完成加载之前(doPreparedResource()),所有线程被拒之起始门外,加载完资源后,大门打开,线程进入办公楼开始干活,等到下班时间了,办公大楼就可以打开结束门放线程回家。
2. FutureTask
2.1. 简介
FutureTask实现了Future语义,表示一直抽象的可生成结果的计算。FutureTask表示的计算是通过Callable来实现的。计算结果通过get()方法获得,如果任务已经完成,那么get方法会立即返回结果,否则get方法将阻塞直到任务进入完成状态(包括正常结束、由于取消而结束及由于异常而结束),然后返回结果或抛出异常。
public class FutureTask<V> implements RunnableFuture<V>
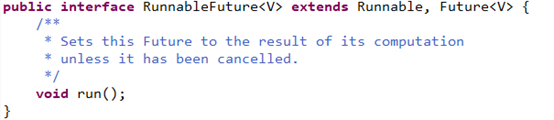
public interface RunnableFuture<V> extends Runnable, Future<V>
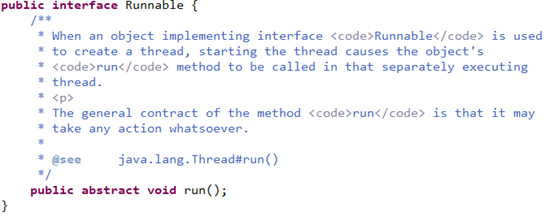
Runable接口我们熟悉只有一个run()方法
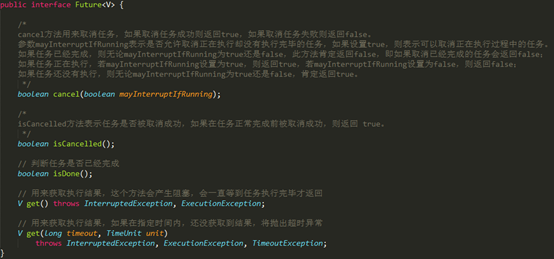
Future接口方法如下:
2.2. FutureTask的简单使用
public class FutureTaskTest {@Testpublic void test() throws InterruptedException, ExecutionException {FutureTask<Integer> futureTask = new FutureTask<>(new Task());Thread thread = new Thread(futureTask);long startTime = System.currentTimeMillis();thread.start();System.out.println("result: " + futureTask.get());long endTime = System.currentTimeMillis();System.out.println("花费时间:" + (endTime - startTime));}class Task implements Callable<Integer>{@Overridepublic Integer call() throws Exception {System.out.println("--------线程执行中------------");int sum = 0;for (int i = 0; i < 100; i++) {Thread.sleep(10);sum += i;}return sum;}}}
3. 信号量(Semaphore)
3.1. 简介
计数信号量用来控制同时访问某个特定资源的操作数量,或者同时执行某个指定操作的数量。另外信号量还可以用来实现某种资源池,或对容器施加边界。
Semaphore中管理着一组虚拟许可(permit),许可的初始数量可通过构造函数来指定,在执行操作之前首先获得(acquire)许可,在使用后释放许可。如果没有许可,那么acquire将阻塞直到有permit(或者直到被中断或操作超时)。Release方法将返回一个许可给信号量。
3.2. 简单使用
/** 利用信号量对set设置边界*/public class SemephoreTest<T> {private final Set<T> set;private final Semaphore semaphore;public SemephoreTest(int boundNum) {this.set = Collections.synchronizedSet(new HashSet<>());// 创建一定数量的许可this.semaphore = new Semaphore(boundNum);}public boolean add(T o) {boolean wadAdd = false;try {// 请求许可
semaphore.acquire();wadAdd = set.add(o);return wadAdd;} catch (InterruptedException e) {e.printStackTrace();}finally {// 元素添加失败,释放许可if (!wadAdd) {semaphore.release();}}return wadAdd;}public boolean remove(T o) {boolean wasRemoved = set.remove(o);if (wasRemoved) {semaphore.release();}return wasRemoved;}}
4. 栅栏(barrier)
4.1. 简介
栅栏类似于闭锁,它能阻塞一组线程直到某个事件发生。栅栏和闭锁的区别在于,所有线程必须都到达栅栏位置了,才能继续执行。闭锁用于等待事件,而栅栏用于等待其他线程。
CyclicBarrier可以使一定的数量的参与方反复地在栅栏处汇集,在并行迭代算法中非常有用。但线程到达栅栏处时将调用栅栏的await方法,该方法会阻塞当前线程直到所有的线程都到达了栅栏处。如果所有的线程都到达了栅栏处,栅栏将会打开,此时所有的线程都会被释放,而栅栏将被重置以便下次使用(闭锁不可被重置)。如果await调用超时或者阻塞的线程被中断,所有的await调用都终止并抛出BrokenBarrierException。如果成功通过栅栏,await将为每个线程返回唯一的到达索引号。
4.2. 简单使用
public class BarrierTest {private final CyclicBarrier cyclicBarrier;private Worker[] workers;public BarrierTest() {int count = Runtime.getRuntime().availableProcessors() * 2;count = 10;cyclicBarrier = new CyclicBarrier(count, new Runnable() {@Overridepublic void run() {System.out.println("open the barrier");}});this.workers = new Worker[count];for (int i = 0; i < workers.length; i++) {workers[i] = new Worker();}}class Worker implements Runnable{@Overridepublic void run() {System.out.println(Thread.currentThread().getName() + ":我到了,等人齐");try {cyclicBarrier.await();} catch (InterruptedException e) {e.printStackTrace();} catch (BrokenBarrierException e) {e.printStackTrace();}System.out.println(Thread.currentThread().getName() + "冲啊");}}public void start() {for (int i = 0; i < workers.length; i++) {new Thread(workers[i]).start();}}// 不可使用Junit进行多线程的测试,Junit中是将当前 test作为参数,放入到 Junit TestRunner中的main函数// 作为一个子线程运行,当测试线程运行成功,将把jvm停止。具体看下面代码/*public static void main(String args[]) {TestRunner aTestRunner = new TestRunner();try {TestResult r = aTestRunner.start(args);if (!r.wasSuccessful())System.exit(FAILURE_EXIT);System.exit(SUCCESS_EXIT);} catch (Exception e) {System.err.println(e.getMessage());System.exit(EXCEPTION_EXIT);}}*/@Testpublic void test() {new BarrierTest().start();}public static void main(String[] args) {new BarrierTest().start();}}
5. Exchanger(两方栅栏)
5.1. 简介
Exchanger类可用于两个线程之间交换信息,是一种两方栅栏。可简单地将Exchanger对象理解为一个包含两个格子的容器,通过exchanger方法可以向两个格子中填充信息。当两个格子中的均被填充时,该对象会自动将两个格子的信息交换,然后返回给线程,从而实现两个线程的信息交换。
另外需要注意的是,Exchanger类仅可用作两个线程的信息交换,当超过两个线程调用同一个exchanger对象时,得到的结果是随机的,未得到配对的线程,则会被阻塞,永久等待,直到与之配对的线程到达位置,exchanger对象仅关心其包含的两个“格子”是否已被填充数据,当两个格子都填充数据完成时,该对象就认为线程之间已经配对成功,然后开始执行数据交换操作。
5.2. 简单使用
public class ExchangerTest {public static void main(String[] args) {Exchanger<String> barrier = new Exchanger<>();Comsumer comsumer = new ExchangerTest(). new Comsumer(barrier);Producer prodecer = new ExchangerTest(). new Producer(barrier);Thread thread1 = new Thread(comsumer);Thread thread2 = new Thread(prodecer);thread1.start();thread2.start();}class Comsumer implements Runnable{private Exchanger<String> changer;public Comsumer(Exchanger<String> exchanger) {this.changer = exchanger;}@Overridepublic void run() {String changes = null;try {changes = changer.exchange("money");} catch (InterruptedException e) {// TODO Auto-generated catch block
e.printStackTrace();}System.out.println("Consumer recieve:" + changes);}}class Producer implements Runnable{private Exchanger<String> changer;public Producer(Exchanger<String> exchanger) {this.changer = exchanger;}@Overridepublic void run() {String changes = null;try {changes = changer.exchange("products");} catch (InterruptedException e) {// TODO Auto-generated catch block
e.printStackTrace();}System.out.println("Producer recieve:" + changes);}}}


![[Ansys Workbench] Mechanical 界面显示模型树窗口和详细信息窗口](https://img-blog.csdnimg.cn/a14d47d299994130825df7a7beb0c7c7.png?x-oss-process=image/watermark,type_d3F5LXplbmhlaQ,shadow_50,text_Q1NETiBA5buJ5Lu35Za1,size_20,color_FFFFFF,t_70,g_se,x_16#pic_center)


