什么是JUC
JUC的意思是java并发编程工具包,是java.util.concurrent包的简称。目的就是为了更好的支持高并发任务,让开发者利用这个包进行的多线程开发时,可以有效的减少竞争条件和死锁线程。
异步编程
模拟用户下单操作。。。
1、根据地址id查询地址信息 -- > 0.5s
2、查询用户购物车的数据 -- >0.5s
3、查询购物车中的商品信息 -- > 1s
4、创建订单 -- > 0.5s
5、创建订单详情 --> 0.5s
用户创建要给一个订单总共耗时3s,没给操作都是同步执行的。如果变成异步是否会提高性能?
CompletableFuture
Java8新增了CompletableFuture 提供对异步计算的支持,可以通过回调的方式处理计算结果。
runAsync 和 supplyAsync方法
public static CompletableFuture<Void> runAsync(Runnable runnable)
public static CompletableFuture<Void> runAsync(Runnable runnable, Executor executor)
public static <U> CompletableFuture<U> supplyAsync(Supplier<U> supplier)
public static <U> CompletableFuture<U> supplyAsync(Supplier<U> supplier, Executor executor)
CompletableFuture 提供了四个静态方法来创建一个异步操作。
没有指定Executor的方法会使用ForkJoinPool.commonPool() 作为它的线程池执行异步代码。如果指定线程池,则使用指定的线程池运行。以下所有的方法都类同。
runAsync方法不支持返回值。
supplyAsync可以支持返回值。
使用默认和指定的线程池
// 创建一个线程池ExecutorService executorService = Executors.newFixedThreadPool(10);System.out.println("线程开始。。。");// 使用默认的线程池CompletableFuture.runAsync(() -> {System.out.println("任务开始执行。。");});// 使用指定的线程池CompletableFuture.runAsync(() ->{System.out.println("任务2开始执行。。。");},executorService);System.out.println("线程结束");线程执行完后有返回值
// 创建一个线程池ExecutorService executorService = Executors.newFixedThreadPool(10);System.out.println("线程开始。。。");// 使用指定线程池运行一个任务CompletableFuture<Integer> integerCompletableFuture = CompletableFuture.supplyAsync(() -> {Integer sum = 0;for (int i = 1; i <=5; i++) {try {Thread.sleep(200);} catch (InterruptedException e) {e.printStackTrace();}sum += i;}return sum;}, executorService);// get()阻塞等结果System.out.println("sum:"+voidCompletableFuture.get());System.out.println("线程结束");计算结果完成时的回调方法
当CompletableFuture的计算结果完成,或者抛出异常的时候,可以执行特定的Action。主要是下面的方法:
public CompletableFuture<T> whenComplete(BiConsumer<? super T,? super Throwable> action)
public CompletableFuture<T> whenCompleteAsync(BiConsumer<? super T,? super Throwable> action)
public CompletableFuture<T> whenCompleteAsync(BiConsumer<? super T,? super Throwable> action, Executor executor)
public CompletableFuture<T> exceptionally(Function<Throwable,? extends T> fn)
可以看到Action的类型是BiConsumer<? super T,? super Throwable>它可以处理正常的计算结果,或者异常情况。
whenComplete 和 whenCompleteAsync 的区别:
whenComplete:是执行当前任务的线程继续执行 whenComplete 的任务。
whenCompleteAsync:是执行把 whenCompleteAsync 这个任务继续提交给线程池来进行执行。
exceptionally:任务运行出现异常后调用,在这个方法里面可以改变任务的返回值(降级)。
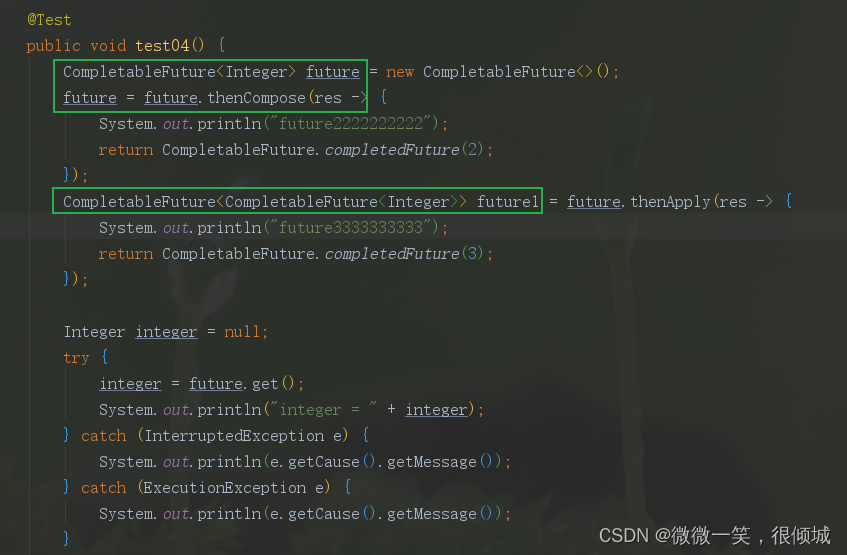
        CompletableFuture<Integer> integerCompletableFuture = CompletableFuture.supplyAsync(() -> {System.out.println("任务线程:"+Thread.currentThread().getName());Integer sum = 0;for (int i = 1; i <= 5; i++) {try {Thread.sleep(100);} catch (InterruptedException e) {e.printStackTrace();}int x = 10 / 0;sum += i;}return sum;}, executorService).whenComplete((resp, exc) -> {
//            System.out.println("任务执行完了,返回结果是:" + resp + ",异常:" + exc);System.out.println("whenComplete:"+Thread.currentThread().getName());}).whenCompleteAsync((resp,exc)->{System.out.println("whenCompleteAsync:"+Thread.currentThread().getName());},executorService).exceptionally((exc) -> {
//            System.out.println("出现异常了,这个方法里面可以修改返回结果");return 20;});System.out.println("sum:" + integerCompletableFuture.get());
handle
handle 是执行任务完成时对结果的处理。
exceptionally和handle同时存在,handle 的返回值会覆盖掉exceptionally的。whenCompleteAsync是感知任务执行完了,而handle是任务执行完了真真的调用
CompletableFuture<Integer> integerCompletableFuture = CompletableFuture.supplyAsync(() -> {System.out.println("任务线程:"+Thread.currentThread().getName());Integer sum = 0;for (int i = 1; i <= 5; i++) {try {Thread.sleep(100);} catch (InterruptedException e) {e.printStackTrace();}int x = 10 / 0;sum += i;}return sum;}, executorService).handle((resp,exc)->{System.out.println("handle:resp:"+resp+",exc:"+exc);return 22;});System.out.println("sum:" + integerCompletableFuture.get());任务串行化
前一个任务执行完才能执行后一个任务。
// 接收前一个任务的执行结果,并消费处理,该任务没有返回结果 ,可以接收到上一个任务的异常
public CompletionStage<T> whenComplete(BiConsumer action)
public CompletionStage<T> whenCompleteAsync(BiConsumer action)
public CompletionStage<T> whenCompleteAsync(BiConsumer action, Executor executor)// 不依赖前面任务的执行结果,只要前面任务执行完了,该任务就马上执行
public CompletableFuture<Void> thenRun(Runnable action)
public CompletableFuture<Void> thenRunAsync(Runnable action)
public CompletableFuture<Void> thenRunAsync(Runnable action, Executor executor)// 接收前一个任务的执行结果,并消费处理,该任务没有返回结果
public CompletableFuture<Void> thenAccept(Consumer<? super T> action)
public CompletableFuture<Void> thenAcceptAsync(Consumer<? super T> action)
public CompletableFuture<Void> thenAcceptAsync(Consumer<? super T> action,Executor executor)//接收前一个任务的执行结果,并消费,该任务有返回结果
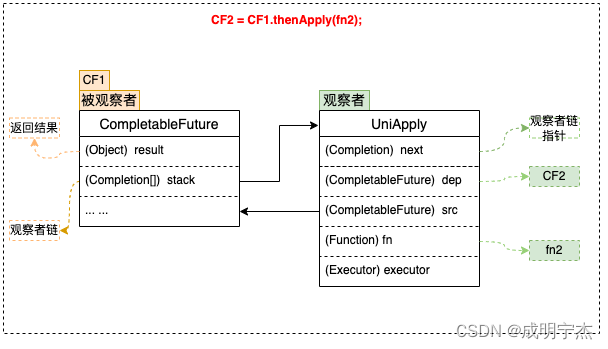
public <U> CompletableFuture<U> thenApply( Function<? super T,? extends U> fn)
public <U> CompletableFuture<U> thenApplyAsync(Function<? super T,? extends U> fn)
public <U> CompletableFuture<U> thenApplyAsync( Function<? super T,? extends U> fn, Executor executor)//接收前一个任务的执行结果,并消费,该任务有返回结果,可以接收到前面任务异常
public <U> CompletableFuture<U> handle(BiFunction<? super T, Throwable, ? extends U> fn)
public <U> CompletableFuture<U> handleAsync(BiFunction<? super T, Throwable, ? extends U> fn)
public <U> CompletableFuture<U> handleAsync(BiFunction<? super T, Throwable, ? extends U> fn, Executor executor) CompletableFuture<Integer> integerCompletableFuture = CompletableFuture.supplyAsync(() -> {System.out.println("任务1开始执行,计算结果返回");int x = 10 * 2;return x;}, executorService);integerCompletableFuture.thenRunAsync(() -> {System.out.println("任务2开始执行,这里不需要依赖任务1的返回值");}, executorService);integerCompletableFuture.thenAcceptAsync((resp)->{System.out.println("任务3开始执行,这里需要依赖到任务1中的返回值:"+resp+",该任务没有返回值");},executorService);CompletableFuture<String> stringCompletableFuture = integerCompletableFuture.thenApplyAsync((resp) -> {System.out.println("任务4开始执行,这里需要依赖到任务1中的返回值:" + resp + ",该任务有回值");return "任务4:" + resp;}, executorService);System.out.println("sum:" + stringCompletableFuture.get());两个任务组合-- 都要完成
两个任务都要完成以后,再去触发第三个任务。
// 组合两个任务,不需要获取前两个任务的结果,之前前两个任务执行完后就执行该任务
public CompletableFuture<Void> runAfterBoth(CompletionStage<?> other,Runnable action)
public CompletableFuture<Void> runAfterBothAsync(CompletionStage<?> other, Runnable action)
public CompletableFuture<Void> runAfterBothAsync(CompletionStage<?> other, Runnable action,Executor executor)// 组合两个任务,需要前两个任务的返回结果,执行该任务后没有返回结果
public <U> CompletableFuture<Void> thenAcceptBoth(CompletionStage<? extends U> other, BiConsumer<? super T, ? super U> action)
public <U> CompletableFuture<Void> thenAcceptBothAsync(CompletionStage<? extends U> other, BiConsumer<? super T, ? super U> action)
public <U> CompletableFuture<Void> thenAcceptBothAsync(CompletionStage<? extends U> other,BiConsumer<? super T, ? super U> action, Executor executor)// 组合两个任务,需要前两个任务的返回结果,执行该任务后有返回结果
public <U,V> CompletableFuture<V> thenCombine(CompletionStage<? extends U> other,BiFunction<? super T,? super U,? extends V> fn)
public <U,V> CompletableFuture<V> thenCombineAsync(CompletionStage<? extends U> other,BiFunction<? super T,? super U,? extends V> fn)
public <U,V> CompletableFuture<V> thenCombineAsync(CompletionStage<? extends U> other,BiFunction<? super T,? super U,? extends V> fn, Executor executor)
// 第1个任务CompletableFuture<Integer> future1 = CompletableFuture.supplyAsync(() -> {System.out.println("任务1执行");return 10;}, executorService);// 第2个任务CompletableFuture<String> future2 = CompletableFuture.supplyAsync(() -> {System.out.println("任务2执行");return "java";}, executorService);// 组合前两个任务
// future1.runAfterBothAsync(future2, () -> {
// System.out.println("前两个任务执行后在执行该任务,不需要前两个任务的结果,该任务不需要返回");
// }, executorService);// future1.thenAcceptBothAsync(future2, (f1, f2) -> {
// System.out.println("前两个任务执行后在执行该个任务,需要前两个任务的结果:" + f1 + " -- " + f2 + ",该任务不需要返回");
// }, executorService);CompletableFuture<String> stringCompletableFuture = future1.thenCombineAsync(future2, (f1, f2) -> {System.out.println("前两个任务执行后在执行该个任务,需要前两个任务的结果:" + f1 + " -- " + f2 + ",该任务需要返回");return f1 + f2;}, executorService);System.out.println("sum:" + stringCompletableFuture.get());多任务组合
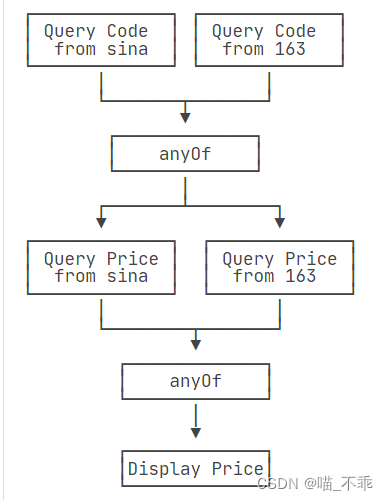
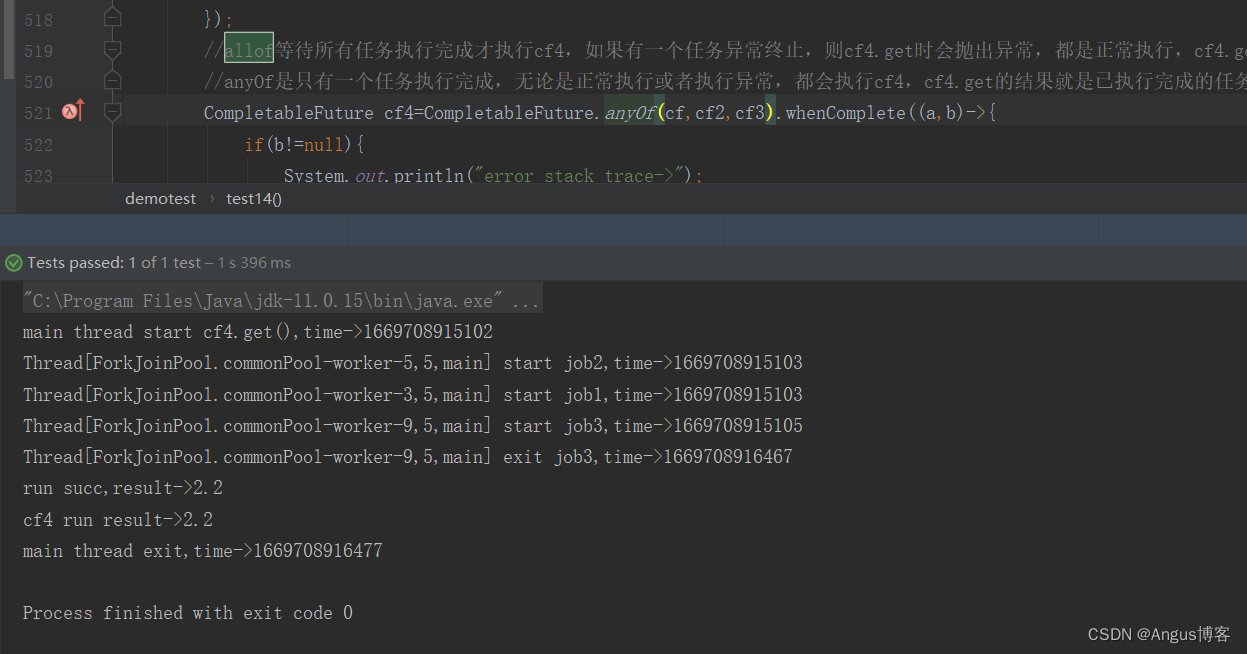
allof顾名思义,就是所有的任务执行完成后返回future,
anyof就是只要有一个任务执行完成后就返回future并将第一个完成的参数带着一起返回,
       CompletableFuture<String> future1 = CompletableFuture.supplyAsync(() -> {try {Thread.sleep(5000);System.out.println("任务1查询用户地址");} catch (InterruptedException e) {e.printStackTrace();}return "addressList";}, executorService);CompletableFuture<String> future2 = CompletableFuture.supplyAsync(() -> {try {Thread.sleep(3000);} catch (InterruptedException e) {e.printStackTrace();}System.out.println("任务2查询用户购物车");return "carList";}, executorService);CompletableFuture<String> future3 = CompletableFuture.supplyAsync(() -> {try {Thread.sleep(2000);} catch (InterruptedException e) {e.printStackTrace();}System.out.println("任务3查询购物车商品");return "goodsList";}, executorService);// 组合多个任务,所有任务都要完成
//        CompletableFuture<Void> voidCompletableFuture = CompletableFuture.allOf(future1, future2, future3);
//        voidCompletableFuture.get(); // 等待所有任务完成。// 组合多个任务,只要有一个任务完成CompletableFuture<Object> objectCompletableFuture = CompletableFuture.anyOf(future1, future2, future3);objectCompletableFuture.get(); // 等待所有任务完成。//        System.out.println("显示地址:" + future1.get());
//        System.out.println("显示购物车:" + future2.get());
//        System.out.println("显示商品:" + future3.get());
Java定时调度机制
定时任务作为一种系统调度工具,在一些需要有定时作业的系统中应用广泛,如每逢某个时间点统计数据、在将来某个时刻执行某些动作。比如:每天晚上十二点统计当日的订单,销量等等。
ScheduledExecutorService
ScheduledExecutorService是JDK提供的一个定时调度类,主要作用就是可以将定时任务与线程池功能结合使用。因为ScheduledExecutorService继承于ExecutorService,所以本身支持线程池的所有功能。额外还提供了4种方法,我们来看看其作用。
常用API
/*** 带延迟时间的调度,只执行一次* 调度之后可通过Future.get()阻塞直至任务执行完毕*/
public ScheduledFuture<?> schedule(Runnable command,long delay, TimeUnit unit);/*** 带延迟时间的调度,只执行一次* 调度之后可通过Future.get()阻塞直至任务执行完毕,并且可以获取执行结果*/
public <V> ScheduledFuture<V> schedule(Callable<V> callable,long delay, TimeUnit unit);/*** 带延迟时间的调度,循环执行,固定频率*/
public ScheduledFuture<?> scheduleAtFixedRate(Runnable command,long initialDelay,long period,TimeUnit unit);/*** 带延迟时间的调度,循环执行,固定延迟*/
public ScheduledFuture<?> scheduleWithFixedDelay(Runnable command,long initialDelay,long delay,TimeUnit unit);
延时调用,只执行一次
// 1.创建一个定时调度类,里面包含一个线程池,启动线程的核心数是10,ScheduledExecutorService scheduler = Executors.newScheduledThreadPool(10);// 2.延时2s后执行,只调用一次,没有返回值scheduler.schedule(() -> {System.out.println("schedule: " + new Date());}, 2, TimeUnit.SECONDS);// 3.延时2s后执行,只调用一次,有回值ScheduledFuture<Integer> future = scheduler.schedule(() -> {System.out.println("schedule: " + new Date());return 10;}, 2, TimeUnit.SECONDS);Integer result = future.get(); // 获取返回值System.out.println("result:" + result); // 1.创建一个定时调度类,里面包含一个线程池,启动线程的核心数是10,ScheduledExecutorService scheduler = Executors.newScheduledThreadPool(10);// 循环执行,固定频率(任务执行时间超过了周期时间,直接执行了)scheduler.scheduleAtFixedRate(new Runnable() {@Overridepublic void run() {System.out.println("Start: scheduleWithFixedDelay: " + new Date());try {Thread.sleep(10000);} catch (InterruptedException e) {e.printStackTrace();}System.out.println("End : scheduleWithFixedDelay: " + new Date());}}, 0, 5, TimeUnit.SECONDS);// 循环执行,固定延迟(任务执行时间超过了周期时间,还要等周期的时间)scheduler.scheduleWithFixedDelay(new Runnable() {@Overridepublic void run() {System.out.println("Start: scheduleWithFixedDelay: " + new Date());try {Thread.sleep(10000);} catch (InterruptedException e) {e.printStackTrace();}System.out.println("End : scheduleWithFixedDelay: " + new Date());}}, 0, 5, TimeUnit.SECONDS);Scheduled注解
Spring 3.0 版本之后自带定时任务,提供了@EnableScheduling注解和@Scheduled注解来实现定时任务功能。
基于注解@Scheduled默认为单线程,开启多个任务时,任务的执行时机会受上一个任务执行时间的影响。@EnableScheduling注解: 在配置类上使用,开启计划任务的支持。 @Scheduled注解: 来声明这是一个任务,包括 cron,fixDelay,fixRate 等类型(方法上,需先开启计划任务的支持)。
@Scheduled注解基本使用
@Component
public class ScheduleTask {@Scheduled(cron = "0/2 * *  * * ? ")   //每2秒执行一次public void task1() {String data = new SimpleDateFormat("yyyy-MM-dd HH:mm:ss").format(new Date());System.out.println(Thread.currentThread().getId() + ":" + data);}
}@SpringBootApplication
@EnableScheduling // 开启定时任务
public class ThreadLockApplication {public static void main(String[] args) {SpringApplication.run(ThreadLockApplication.class, args);}
}
cron表达式
该参数接收一个cron表达式,cron表达式是一个字符,共6或7个域,每一个域代表一个含义。
cron表达式语法:

通配符说明:
*表示所有值。 例如:在分的字段上设置 *,表示每一分钟都会触发。?表示不指定值。使用的场景为不需要关心当前设置这个字段的值。例如:要在每月的10号触发一个操作,但不关心是周几,所以需要周位置的那个字段设置为”?” 具体设置为 0 0 0 10 * ?-表示区间。例如 在小时上设置 “10-12”,表示 10,11,12点都会触发。,表示指定多个值,例如在周字段上设置 “MON,WED,FRI” 表示周一,周三和周五触发/用于递增触发。如在秒上面设置”5/15” 表示从5秒开始,每增15秒触发(5,20,35,50)。 在日字段上设置’1/3’所示每月1号开始,每隔三天触发一次。L表示最后的意思。在日字段设置上,表示当月的最后一天(依据当前月份,如果是二月还会依据是否是润年[leap]), 在周字段上表示星期六,相当于”7”或”SAT”。如果在”L”前加上数字,则表示该数据的最后一个。例如在周字段上设置”6L”这样的格式,则表示“本月最后一个星期五”W表示离指定日期的最近那个工作日(周一至周五). 例如在日字段上置”15W”,表示离每月15号最近的那个工作日触发。如果15号正好是周六,则找最近的周五(14号)触发, 如果15号是周未,则找最近的下周一(16号)触发.如果15号正好在工作日(周一至周五),则就在该天触发。如果指定格式为 “1W”,它则表示每月1号往后最近的工作日触发。如果1号正是周六,则将在3号下周一触发。(注,”W”前只能设置具体的数字,不允许区间”-“)。#序号(表示每月的第几个周几),例如在周字段上设置”6#3”表示在每月的第三个周六.注意如果指定”#5”,正好第五周没有周六,则不会触发该配置(用在母亲节和父亲节再合适不过了) ;小提示:’L’和 ‘W’可以一组合使用。如果在日字段上设置”LW”,则表示在本月的最后一个工作日触发;周字段的设置,若使用英文字母是不区分大小写的,即MON与mon相同
示例:
每隔5秒执行一次:*/5 * * * * ?每隔1分钟执行一次:0 */1 * * * ?每天23点执行一次:0 0 23 * * ?每天凌晨1点执行一次:0 0 1 * * ?每月1号凌晨1点执行一次:0 0 1 1 * ?每月最后一天23点执行一次:0 0 23 L * ?每周星期六凌晨1点实行一次:0 0 1 ? * L在26分、29分、33分执行一次:0 26,29,33 * * * ?每天的0点、13点、18点、21点都执行一次:0 0 0,13,18,21 * * ?可通过在线生成Cron表达式的工具:在线Cron表达式生成器 来生成自己想要的表达式。
@Scheduled单线的问题
@Scheduled默认使用单线程执行任务,如果是每2s循环执行一次任务,加入其中有一个任务超4s,那么后面的任务就需要等待4s后才去执行任务。所以在任务处理时一般都是用多线程的方式。
@Scheduled(cron = "0/2 * * * * ?") //每2秒执行一次public void task1() {String data = new SimpleDateFormat("yyyy-MM-dd HH:mm:ss").format(new Date());try {Thread.sleep(4000);} catch (InterruptedException e) {e.printStackTrace();}System.out.println(Thread.currentThread().getId() + ":" + data);}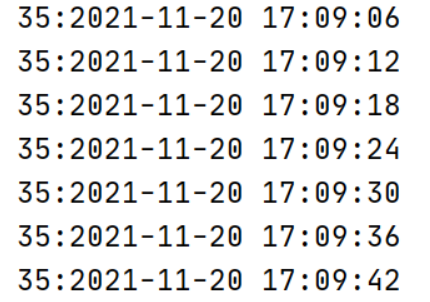
1、使用@Async来解决
@EnableAsync是Spring提供的处理任务组件,使用默认的线程池。
@Component
@Async // 使用异步处理任务
@EnableAsync // 开启异步处理
public class ScheduleTask {@Scheduled(cron = "0/2 * *  * * ?")   //每2秒执行一次public void task1() {String data = new SimpleDateFormat("yyyy-MM-dd HH:mm:ss").format(new Date());try {Thread.sleep(4000);} catch (InterruptedException e) {e.printStackTrace();}System.out.println(Thread.currentThread().getId() + ":" + data);}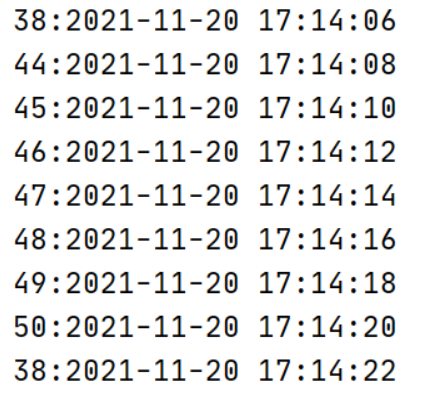
2、使用自定义线程池处理
// 创建一个线程池ExecutorService executorService = Executors.newFixedThreadPool(10);@Scheduled(cron = "0/2 * * * * ?") //每2秒执行一次public void task1() {// 每次执行任务启动一个线程去处理executorService.submit(() -> {String data = new SimpleDateFormat("yyyy-MM-dd HH:mm:ss").format(new Date());try {Thread.sleep(4000);} catch (InterruptedException e) {e.printStackTrace();}System.out.println(Thread.currentThread().getId() + ":" + data);});}请求合并
场景
高并发场景中,调用批量接口相比调用非批量接口有更大的性能优势。但有时候,请求更多的是单个接口,不能够直接调用批量接口,如果这个接口是高频接口,对其做请求合并就很有必要了。比如电影网站的获取电影详情接口,APP的一次请求是单个接口调用,用户量少的时候请求也不多,完全没问题;但同一时刻往往有大量用户访问电影详情,是个高并发的高频接口,如果都是单次查询,后台就不一定能hold住了。为了优化这个接口,后台可以将相同的请求进行合并,然后调用批量的查询接口。
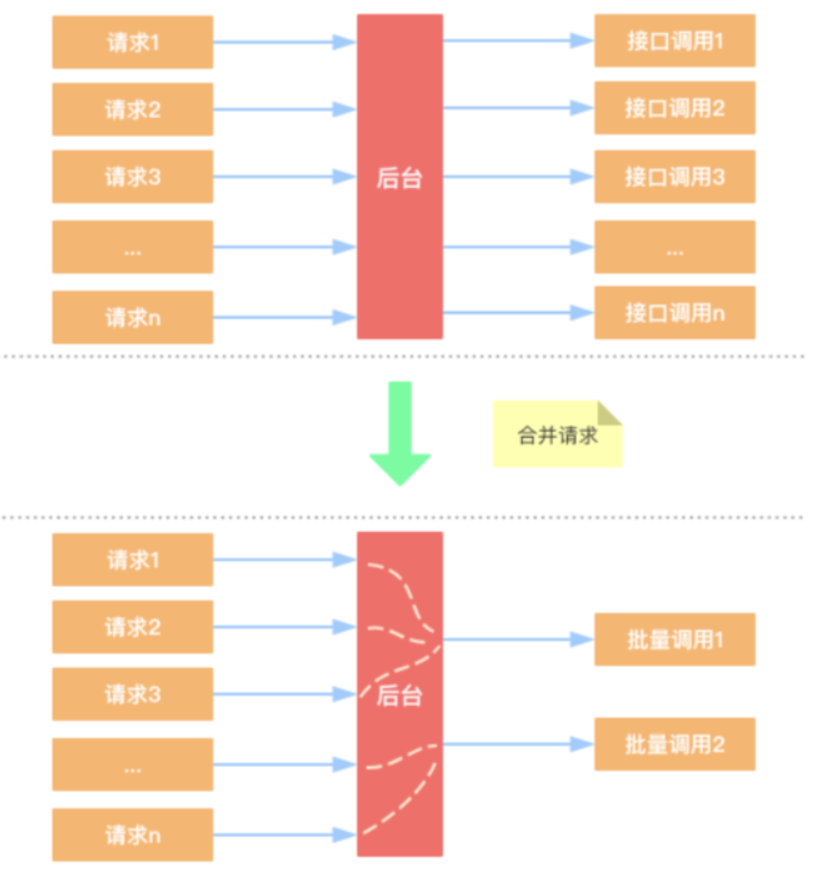
请求合并的目的
- 减少访问数据库的次数
- 单位时间内的多个请求,合并为一个请求。让业务逻辑层把单个查询的sql,改为批量查询的sql。或者逻辑里面需要调用redis,那批量逻辑里面就可以用redis的pipeline去实现。
单个接口
@Autowiredprivate UserService userService;@GetMapping("/info/{id}")public User info(@PathVariable Integer id) {return userService.info(id);}这个接口如果访问的频率很高,会对数据库或者redis造成很大的压力,可以优化成批量接口。
批量接口
1、请求参数封装
@Data
public class BatchRequest {// 数据唯一标识private Integer id;// 线程阻塞任务private CompletableFuture<User> future;
}
2、响应结果封装
@Data
public class BatchResult {private String id;private User user;
}
3.任务批量处理
@Configuration
public class BarchRequestTask {// 场景一个线程池处理任务private ExecutorService executorService = Executors.newFixedThreadPool(10);@Autowiredprivate UserMapper userMapper;// 创建一个缓存队列,用来方批量处理的任务@Beanpublic LinkedBlockingQueue<BatchRequest> blockingQueue() {LinkedBlockingQueue<BatchRequest> linkedBlockingQueue = new LinkedBlockingQueue<BatchRequest>();return linkedBlockingQueue;}@Scheduled(cron = "0/5 * * * * *") // 每5s执行一次public void actionTask() {executorService.submit(() -> {// 1.准备一个集合List<BatchRequest> list = new ArrayList<>();// 2.队列中的任务取出来放到集合中int size = blockingQueue.size();for (int i = 0; i <blockingQueue.size(); i++) {list.add(blockingQueue.poll());}if (list.size() > 0) {// 3.批量查询List<BatchResult> resultes = userMapper.batchQuery(list);// 4.把结果集响应给线程for (BatchRequest request : list) {// 把集合转成MapMap<String, User> map = resultes.stream().collect(Collectors.toMap(BatchResult::getId, BatchResult::getUser));// 从结果集中找到当前请求对应的结果User user = map.get(request.getId().toString());// 把结果集响应给对应的线程request.getFuture().complete(user);}}});}
}
4.批量接口
@Autowiredprivate LinkedBlockingQueue blockingQueue; // 阻塞队列@GetMapping("/batchInfo/{id}")public User batchInfo(@PathVariable Integer id) {// 1、创建一个批量请求任务对象BatchRequest request = new BatchRequest();CompletableFuture<User> future = new CompletableFuture();request.setId(id);request.setFuture(future); // 设置阻塞任务// 2.把任务添加到对象中blockingQueue.add(request);User user = null;try {user = future.get(); // 阻塞等待线程去处理} catch (InterruptedException e) {e.printStackTrace();} catch (ExecutionException e) {e.printStackTrace();}return user == null ? null : user;}5.dao层批量查询
<mapper namespace="com.qf.threadlock.mapper.UserMapper"><resultMap id="resultMap" type="com.qf.entity.BatchResult"><result column="id" property="id"></result><association property="user" javaType="com.qf.entity.User"><result column="id" property="id"/><result column="name" property="name"/></association></resultMap><select id="batchQuery" resultMap="resultMap">select * from t_user where id in<foreach collection="list" open="(" close=")" item="req" separator=",">#{req.id}</foreach></select>
</mapper>
6.接口批量测试
String url = "http://localhost:8080/threadMere/batchInfo/";for (int i = 1; i < 10; i++) {new Thread(() -> {DefaultHttpClient client = new DefaultHttpClient();HttpGet httpGet = new HttpGet(url + 3);try {CloseableHttpResponse execute = client.execute(httpGet);InputStream content = execute.getEntity().getContent();Scanner scanner = new Scanner(content);while (scanner.hasNextLine()) {System.out.println(scanner.nextLine());}} catch (IOException e) {e.printStackTrace();}}).start();}}Fork/Join框架
Fork/Join框架是Java 7提供的一个用于并行执行任务的框架,是一个把大任务分割成若干个小任务,最终汇总每个小任务结果后得到大任务结果的框架,从而提升应用的性能。Fork/Join框架要完成两件事情:
1.任务分割:首先Fork/Join框架需要把大的任务分割成足够小的子任务,如果子任务比较大的话还要对子任务进行继续分割
2.执行任务并合并结果:分割的子任务分别放到双端队列里,然后启动几个线程分别从双端队列里获取任务执行。子任务执行完的结果都放在另外一个队列里,启动一个线程从队列里取数据,然后合并这些数据。
在Java的Fork/Join框架中,使用两个类完成上述操作
1.ForkJoinTask:我们要使用Fork/Join框架,首先需要创建一个ForkJoin任务。该类提供了在任务中执行fork和join的机制。通常情况下我们不需要直接集成ForkJoinTask类,只需要继承它的子类,Fork/Join框架提供了两个子类:
cursiveTask:用于有返回结果的任务
2.ForkJoinPool:ForkJoinTask需要通过ForkJoinPool来执行
任务分割出的子任务会添加到当前工作线程所维护的双端队列中,进入队列的头部。当一个工作线程的队列里暂时没有任务时,它会随机从其他工作线程的队列的尾部获取一个任务(工作窃取算法)。
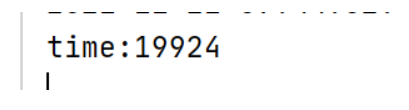
请求未拆分
@GetMapping("/sum")public Integer sum() {long start = System.currentTimeMillis();Integer sum = 0;for (int i = 0; i < 10000; i++) {try {Thread.sleep·1);} catch (InterruptedException e) {e.printStackTrace();}sum += i;}long end = System.currentTimeMillis();System.out.println("time:" + (end - start));return sum;}运行:
请求拆分
1、提交任务
@GetMapping("/sum2")public Integer sum2() {long start = System.currentTimeMillis();// 给数组中添加元素Integer[] array = new Integer[10000];for (int i = 0; i < 10000; i++) {array[i] = i;}// 创建ForkJoinPoolForkJoinPool pool = new ForkJoinPool();// 创建taskComputeTask task = new ComputeTask(0, array.length, array);// 任务拆分,获取结果Integer sum = pool.invoke(task);long end = System.currentTimeMillis();System.out.println("time:" + (end - start));return sum;}2.请求拆分合并
@Data
@AllArgsConstructor
@NoArgsConstructor
public class ComputeTask extends RecursiveTask<Integer> {private Integer start;private Integer end;private Integer[] task;@Overrideprotected Integer compute() {int sum = 0;if ((end - start) < 100) {for (int i = start; i < end; i++) {try {Thread.sleep(1);} catch (InterruptedException e) {e.printStackTrace();}sum += i;}} else {int mid = (end + start) / 2;ComputeTask left = new ComputeTask(start, mid, task);ComputeTask right = new ComputeTask(mid, end, task);left.fork(); // 拆分right.fork(); // 拆分sum = left.join() + right.join(); // 等待获取结果}return sum;}
}
3.运行