1 BatchNorm
BN的原理
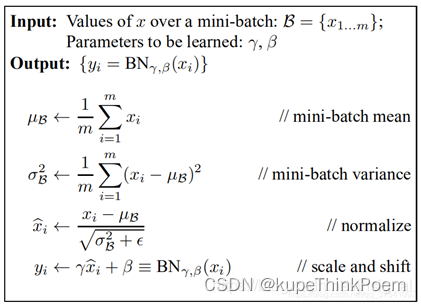
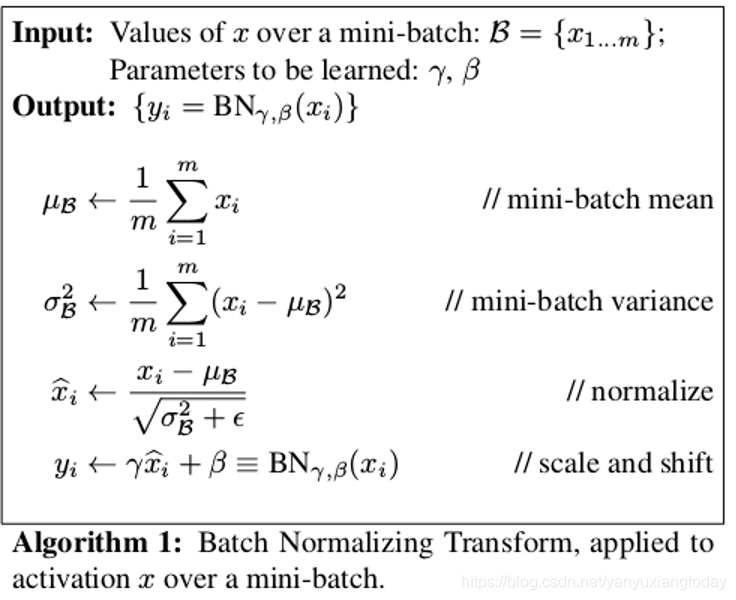
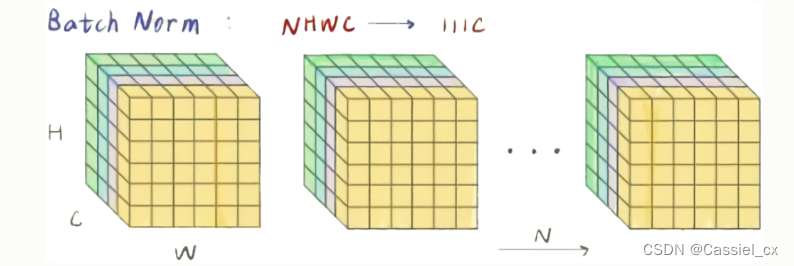
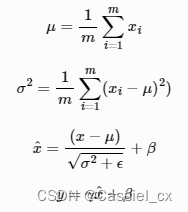
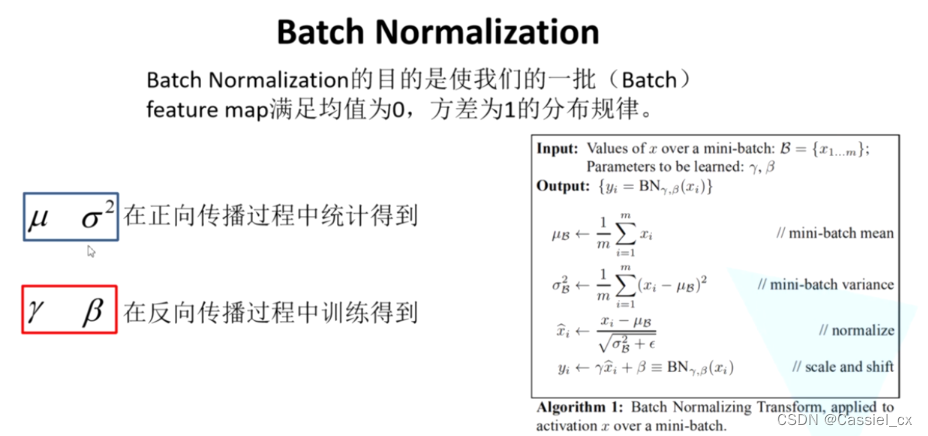
BN是计算机视觉最常用的标准化方法,它沿着N、H、W维度对输入特征图求均值和方差,随后再利用均值和方差来归一化特征图。计算过程如下图所示,1)沿着通道维度计算其他维度的均值;2)沿着通道维度计算其他维度的方差;3)归一化特征图;4)加入可学习参数γ和β(在每次反向传播后更新),对归一化的特征图进行包含缩放和平移的仿射操作,
pytorch中的BN有三种:torch.nn.BatchNorm1d、torch.nn.BatchNorm2d、torch.nn.BatchNorm3d。这里拿torch.nn.BatchNorm2d来举例,它的参数如下,
Args:num_features: 输入特征通道数eps: 为保证数值稳定性(分母不能趋近或取0), 给分母加上的值, 默认值是1e-5momentum: 计算running_mean和running_var时使用的动量(指数平均因子), 默认值是0.1affine: 布尔值, 是否给BN层添加仿射变换的可学习参数γ和β, 默认为Truetrack_running_stats: 布尔值, 是否记录训练中的running mean和variance, 若为False, 则该BN层在训练和验证阶段都只在当前输入中统计mean和variance, 如果此时的batch_size比较小, 那么其统计特性就会和全局统计特性有着较大偏差,可能导致糟糕的效果. 默认值为True更新running_mean和running_var的公式

其中, 为模型更新前的running_mean或running_var,
 为此次输入的mean或者var。在验证时(model.eval()),running_mean和running_var被视为均值和方差来标准化输入张量。
BN的优点
BN使得网络中每层输入数据的分布相对稳定(可以使用较大的学习率),不仅极大提升了训练速度,收敛过程大大加快;
BN使得模型对网络中的参数不那么敏感,减弱对初始化的强依赖性,简化调参过程,使得网络学习更加稳定;
BN允许网络使用饱和性激活函数(例如sigmoid等),归一化后的数据,能让梯度维持在比较大的值和变化率,缓解梯度消失或者爆炸;
有轻微的正则化作用(相当于给隐藏层加入噪声,类似Dropout,能缓解过拟合。
BN的缺点
对batchsize的大小比较敏感。如果batchsize太小,则计算的均值、方差不足以代表整个数据分布。小的bathsize引入的随机性更大,难以达到收敛;
不适合于RNN、风格迁移等任务。拿风格迁移举例,由于Mini-Batch内可能存在多张无关的图片,去计算这些图片的均值和方差会弱化单张图片本身特有的一些细节信息。
代码实例
(1)随机初始化输入张量和实例化BN
import torch
import torch.nn as nn# 固定随机种子, 使随机生成的input每次都一样
torch.manual_seed(42)
# 随机生成形状为[1,2,2,2]输入
input = torch.randn((1,2,2,2)).cuda()
print('input:', input)# 实例化BN
bn = nn.BatchNorm2d(num_features=2, eps=0.00001, momentum=0.1, affine=True, track_running_stats=True).cuda()
bn.running_mean = (torch.ones([2])*2).cuda()
bn.running_var = (torch.ones([2])*1).cuda()
bn.train()
# 查看模型更新前的参数
print('trainning:', bn.training)
print('running_mean:', bn.running_mean)
print('running_var:', bn.running_var)
print('weight:', bn.weight)  # γ, 初始值为1
print('bias:', bn.bias)  # β, 初始值为0# 打印结果
'''
input: tensor([[[[ 0.3367,  0.1288],[ 0.2345,  0.2303]],[[-1.1229, -0.1863],[ 2.2082, -0.6380]]]], device='cuda:0')
trainning: True
running_mean: tensor([2., 2.], device='cuda:0')
running_var: tensor([1., 1.], device='cuda:0')
weight: Parameter containing:
tensor([1., 1.], device='cuda:0', requires_grad=True)
bias: Parameter containing:
tensor([0., 0.], device='cuda:0', requires_grad=True)
'''
(2)经过BN层,获取输出结果
# 输出
output = bn(input)
print('output:', output)# 查看模型更新后的参数
print('trainning:', bn.training)
print('running_mean:', bn.running_mean)
print('running_var:', bn.running_var)
print('weight:', bn.weight)
print('bias:', bn.bias)# 打印结果, 由于没有反向传播, 所以γ和β值不变
'''
output: tensor([[[[ 1.4150, -1.4102],[ 0.0257, -0.0305]],[[-0.9276, -0.1964],[ 1.6731, -0.5491]]]], device='cuda:0',grad_fn=<CudnnBatchNormBackward0>)
trainning: True
running_mean: tensor([1.8233, 1.8065], device='cuda:0')
running_var: tensor([0.9007, 1.1187], device='cuda:0')
weight: Parameter containing:
tensor([1., 1.], device='cuda:0', requires_grad=True)
bias: Parameter containing:
tensor([0., 0.], device='cuda:0', requires_grad=True)
'''
(3)根据BN的原理,自己写一段归一化代码
# 计算输入数据的均值和方差. 注意, torch.var()函数中unbiased默认为True,表示方差的无偏估计,这里需将它设为False
cur_mean = torch.mean(input, dim=[0,2,3])
cur_var = torch.var(input, dim=[0,2,3], unbiased=False)
print('cur_mean:', cur_mean)
print('cur_var:', cur_var)# 计算running_mean和running_var
new_mean = (torch.ones([2])*2) * (1-bn.momentum) + cur_mean * bn.momentum
new_var = (torch.ones([2])*1) * (1-bn.momentum) + cur_var * bn.momentum
print('new_mean:', new_mean)
print('new_var:', new_var)# 打印结果, 可以看到, 计算出的new_mean和new_var与步骤2的running_mean和running_var一致
'''
cur_mean: tensor([0.2326, 0.0653])
cur_var: tensor([0.0072, 2.1872])
new_mean: tensor([1.8233, 1.8065])
new_var: tensor([0.9007, 1.1187])
'''# 计算输出结果, 训练时用当前数据的mean和方差做标准化, 验证时用running_mean和running_var做标准化
output2 = (input - cur_mean) / torch.sqrt(cur_var + bn.eps)
print('output2:', output2)# 打印结果, 可以看到, 计算出的output2与步骤2的output一致
'''
output2: tensor([[[[ 1.4150, -1.4102],[ 0.0257, -0.0305]],[[-0.9276, -0.1964],[ 1.6731, -0.5491]]]])
'''
2 SyncBatchNorm
BN的效果与batchsize的大小有很大关系。而像目标检测、语义分割这些任务,占用显存较高,每张卡分到的图片数就会变少,而在DP模式下,每张卡只能拿到自己那部分的计算结果。为了在验证或者测试模型时使用相同的running_mean和running_var,DP模式便只拿主卡上计算的均值和方差去更新running_mean和running_var,BN的效果自然就会变差。一个解决思路就是用SyncBN代替BN,使用全局的BN统计量来标准化输入,相比于单卡的BN统计量,全局的BN统计量会更准确。
SyncBatchNorm的原理
本小节的两张图片来自:https://cloud.tencent.com/developer/article/2126838
(1)计算各张卡的均值和方差

(2)同步各卡之间的均值和方差
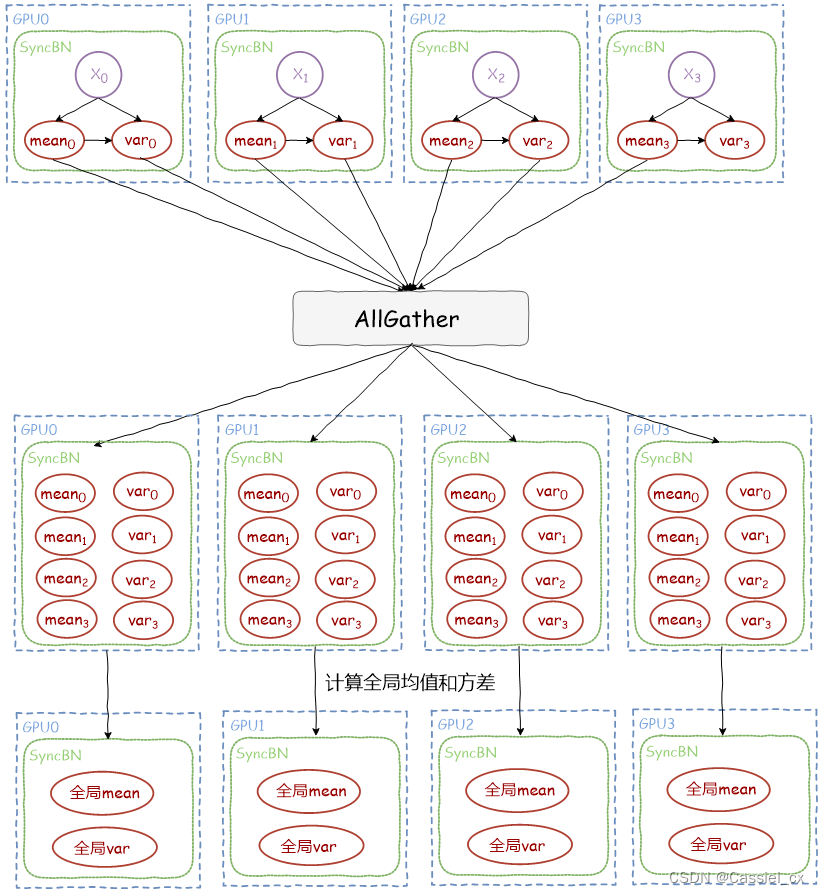
利用torch.distributed.all_gather函数收集各GPU上的均值和方差,得到全局的均值和方差,更新running_mean和running_var;
(3)标准化输入,该过程与BN类似。
SyncBN源码
import torch
from torch.autograd.function import Functionclass SyncBatchNorm(Function):@staticmethoddef forward(self, input, weight, bias, running_mean, running_var, eps, momentum, process_group, world_size):input = input.contiguous()size = input.numel() // input.size(1)if size == 1:raise ValueError('Expected more than 1 value per channel when training, got input size {}'.format(size))count = torch.Tensor([size]).to(input.device)# calculate mean/invstd for input.mean, invstd = torch.batch_norm_stats(input, eps)count_all = torch.empty(world_size, 1, dtype=count.dtype, device=count.device)mean_all = torch.empty(world_size, mean.size(0), dtype=mean.dtype, device=mean.device)invstd_all = torch.empty(world_size, invstd.size(0), dtype=invstd.dtype, device=invstd.device)count_l = list(count_all.unbind(0))mean_l = list(mean_all.unbind(0))invstd_l = list(invstd_all.unbind(0))# using all_gather instead of all reduce so we can calculate count/mean/var in one gocount_all_reduce = torch.distributed.all_gather(count_l, count, process_group, async_op=True)mean_all_reduce = torch.distributed.all_gather(mean_l, mean, process_group, async_op=True)invstd_all_reduce = torch.distributed.all_gather(invstd_l, invstd, process_group, async_op=True)# wait on the async communication to finishcount_all_reduce.wait()mean_all_reduce.wait()invstd_all_reduce.wait()# calculate global mean & invstdmean, invstd = torch.batch_norm_gather_stats_with_counts(input,mean_all,invstd_all,running_mean,running_var,momentum,eps,count_all.view(-1).long().tolist())self.save_for_backward(input, weight, mean, invstd, count_all)self.process_group = process_group# apply element-wise normalizationout = torch.batch_norm_elemt(input, weight, bias, mean, invstd, eps)return out@staticmethoddef backward(self, grad_output):grad_output = grad_output.contiguous()saved_input, weight, mean, invstd, count_tensor = self.saved_tensorsgrad_input = grad_weight = grad_bias = Noneprocess_group = self.process_group# calculate local stats as well as grad_weight / grad_biassum_dy, sum_dy_xmu, grad_weight, grad_bias = torch.batch_norm_backward_reduce(grad_output,saved_input,mean,invstd,weight,self.needs_input_grad[0],self.needs_input_grad[1],self.needs_input_grad[2])if self.needs_input_grad[0]:# synchronizing stats used to calculate input gradient.# TODO: move div_ into batch_norm_backward_elemt kernelsum_dy_all_reduce = torch.distributed.all_reduce(sum_dy, torch.distributed.ReduceOp.SUM, process_group, async_op=True)sum_dy_xmu_all_reduce = torch.distributed.all_reduce(sum_dy_xmu, torch.distributed.ReduceOp.SUM, process_group, async_op=True)# wait on the async communication to finishsum_dy_all_reduce.wait()sum_dy_xmu_all_reduce.wait()divisor = count_tensor.sum()mean_dy = sum_dy / divisormean_dy_xmu = sum_dy_xmu / divisor# backward pass for gradient calculationgrad_input = torch.batch_norm_backward_elemt(grad_output,saved_input,mean,invstd,weight,mean_dy,mean_dy_xmu)# synchronizing of grad_weight / grad_bias is not needed as distributed# training would handle all reduce.if weight is None or not self.needs_input_grad[1]:grad_weight = Noneif weight is None or not self.needs_input_grad[2]:grad_bias = Nonereturn grad_input, grad_weight, grad_bias, None, None, None, None, None, None
SyncBN的使用
注意,SyncBN需要在DDP环境初始化后初始化,但是要在DDP模型之前完成初始化。
import torch
from torch import distributeddistributed.init_process_group(backend='nccl')
model = torch.nn.SyncBatchNorm.convert_sync_batchnorm(model)
model = torch.nn.parallel.DistributedDataParallel(model)
@classmethod
def convert_sync_batchnorm(cls, module, process_group=None):module_output = moduleif isinstance(module, torch.nn.modules.batchnorm._BatchNorm):module_output = torch.nn.SyncBatchNorm(module.num_features,module.eps,module.momentum,module.affine,module.track_running_stats,process_group,)if module.affine:with torch.no_grad():module_output.weight = module.weightmodule_output.bias = module.biasmodule_output.running_mean = module.running_meanmodule_output.running_var = module.running_varmodule_output.num_batches_tracked = module.num_batches_trackedif hasattr(module, "qconfig"):module_output.qconfig = module.qconfigfor name, child in module.named_children():module_output.add_module(name, cls.convert_sync_batchnorm(child, process_group))del modulereturn module_output3 InstanceNorm
IN的原理
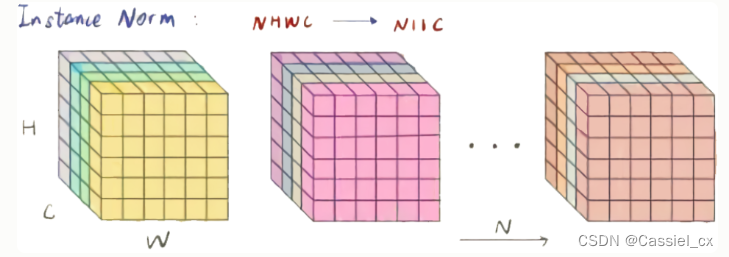
BN注重对batchsize数据归一化,但是在图像风格化任务中,生成的风格结果主要依赖于某个图像实例,所以对整个batchsize数据进行归一化不合适,因此提出了IN,只对HW维度进行归一化,IN保留了N、C的维度。计算过程如下图所示,1)沿着H、W维度,对输入张量求均值和方差;2)利用求得的均值和方差来标准化输入张量;3)加入可学习参数γ和β,对标准化后的数据做仿射变换,
IN的使用
torch.nn.InstanceNorm2d(num_features, eps=1e-05, momentum=0.1, affine=True, track_running_stats=True)class InstanceNorm2d(_InstanceNorm):def _get_no_batch_dim(self):return 3def _check_input_dim(self, input):if input.dim() not in (3, 4):raise ValueError('expected 3D or 4D input (got {}D input)'.format(input.dim()))class _InstanceNorm(_NormBase):def __init__(self,num_features: int,eps: float = 1e-5,momentum: float = 0.1,affine: bool = False,track_running_stats: bool = False,device=None,dtype=None) -> None:factory_kwargs = {'device': device, 'dtype': dtype}super(_InstanceNorm, self).__init__(num_features, eps, momentum, affine, track_running_stats, **factory_kwargs)def _check_input_dim(self, input):raise NotImplementedErrordef _get_no_batch_dim(self):raise NotImplementedErrordef _handle_no_batch_input(self, input):return self._apply_instance_norm(input.unsqueeze(0)).squeeze(0)def _apply_instance_norm(self, input):return F.instance_norm(input, self.running_mean, self.running_var, self.weight, self.bias,self.training or not self.track_running_stats, self.momentum, self.eps)def _load_from_state_dict(self, state_dict, prefix, local_metadata, strict,missing_keys, unexpected_keys, error_msgs):version = local_metadata.get('version', None)# at version 1: removed running_mean and running_var when# track_running_stats=False (default)if version is None and not self.track_running_stats:running_stats_keys = []for name in ('running_mean', 'running_var'):key = prefix + nameif key in state_dict:running_stats_keys.append(key)if len(running_stats_keys) > 0:error_msgs.append('Unexpected running stats buffer(s) {names} for {klass} ''with track_running_stats=False. If state_dict is a ''checkpoint saved before 0.4.0, this may be expected ''because {klass} does not track running stats by default ''since 0.4.0. Please remove these keys from state_dict. If ''the running stats are actually needed, instead set ''track_running_stats=True in {klass} to enable them. See ''the documentation of {klass} for details.'.format(names=" and ".join('"{}"'.format(k) for k in running_stats_keys),klass=self.__class__.__name__))for key in running_stats_keys:state_dict.pop(key)super(_InstanceNorm, self)._load_from_state_dict(state_dict, prefix, local_metadata, strict,missing_keys, unexpected_keys, error_msgs)def forward(self, input: Tensor) -> Tensor:self._check_input_dim(input)if input.dim() == self._get_no_batch_dim():return self._handle_no_batch_input(input)return self._apply_instance_norm(input)IN的优点
IN适合于生成式对抗网络的相关任务,如风格迁移。图片生成的结果主要依赖于某个图像实例,对整个batchsize进行BN操作不适合风格迁移任务,在该任务中使用IN不仅可以加速模型收敛,并且可以保持每个图像实例之间的独立性,不受通道和batchsize的影响。
IN的缺点
如果要利用到特征图通道之间的相关性,不建议使用IN做归一化处理。
4 LayerNorm
LN的原理
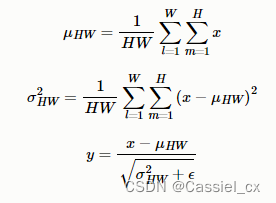
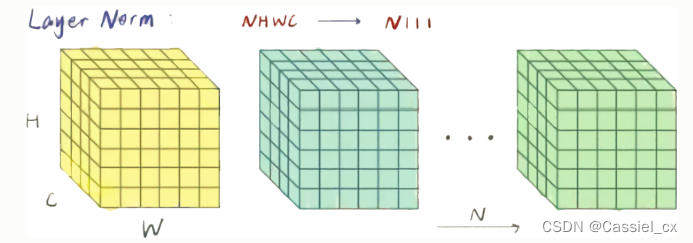
在NLP任务中,比如文本任务,不同样本的长度往往不一样,使用BN来标准化则不太合理。因此提出了LN,对CHW维度进行归一化。计算过程如下图所示,1)沿着C、H、W维度求输入张量的均值和方差;2)利用所求得的均值和方差标准化输入;3)加入可学习参数γ和β,对标准化后的数据做仿射变换,
LN的使用
torch.nn.LayerNorm(normalized_shape, eps=1e-05, elementwise_affine=True)class LayerNorm(Module):__constants__ = ['normalized_shape', 'eps', 'elementwise_affine']normalized_shape: Tuple[int, ...]eps: floatelementwise_affine: booldef __init__(self, normalized_shape: _shape_t, eps: float = 1e-5, elementwise_affine: bool = True,device=None, dtype=None) -> None:factory_kwargs = {'device': device, 'dtype': dtype}super(LayerNorm, self).__init__()if isinstance(normalized_shape, numbers.Integral):# mypy error: incompatible types in assignmentnormalized_shape = (normalized_shape,) # type: ignore[assignment]self.normalized_shape = tuple(normalized_shape) # type: ignore[arg-type]self.eps = epsself.elementwise_affine = elementwise_affineif self.elementwise_affine:self.weight = Parameter(torch.empty(self.normalized_shape, **factory_kwargs))self.bias = Parameter(torch.empty(self.normalized_shape, **factory_kwargs))else:self.register_parameter('weight', None)self.register_parameter('bias', None)self.reset_parameters()def reset_parameters(self) -> None:if self.elementwise_affine:init.ones_(self.weight)init.zeros_(self.bias)def forward(self, input: Tensor) -> Tensor:return F.layer_norm(input, self.normalized_shape, self.weight, self.bias, self.eps)def extra_repr(self) -> str:return '{normalized_shape}, eps={eps}, ' \'elementwise_affine={elementwise_affine}'.format(**self.__dict__)LN的优点
LN不需要批量训练。在单条数据内部就能完成归一化操作,因此可以用于batchsize=1和RNN的训练中,效果比BN更优。不同的输入样本有不同的均值和方差,可以更快、更好地达到最优效果。LN不需要保存batchsize的均值和方差,节省了额外的存储空间。
LN的缺点
LN与batchsize无关,在小batchsize上效果可能会比BN好,但是在大batchsize的效果还是BN更好。
5 GroupNorm
GN的原理
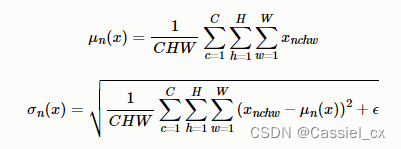
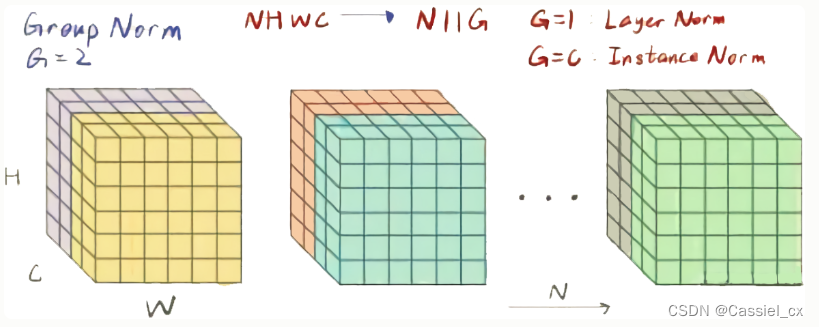
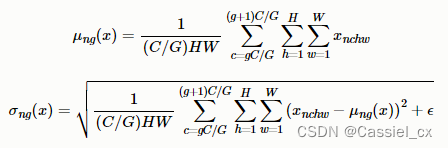
GN是为了解决BN对较小的batchsize效果差的问题,它将通道分成num_groupss组,每组包含channel/num_groups个通道,则特征图变为(N, G, C//G, H, W),然后计算每组(C//G, H, W)维度的均值和方差,这样就与batchsize无关。GN的极端情况就是LN和IN,分别对应G等于1和G等于C。GN的计算过程如下图所示,1)沿着C//G、H、W维度计算输入张量的均值和方差;2)利用所求得的均值和方差标准化输入;3)加入可学习参数γ和β,对标准化后的数据做仿射变换,
GN的使用
torch.nn.GroupNorm(num_groups, num_channels, eps=1e-05, affine=True, device=None, dtype=None)class GroupNorm(Module):__constants__ = ['num_groups', 'num_channels', 'eps', 'affine']num_groups: intnum_channels: inteps: floataffine: booldef __init__(self, num_groups: int, num_channels: int, eps: float = 1e-5, affine: bool = True,device=None, dtype=None) -> None:factory_kwargs = {'device': device, 'dtype': dtype}super(GroupNorm, self).__init__()if num_channels % num_groups != 0:raise ValueError('num_channels must be divisible by num_groups')self.num_groups = num_groupsself.num_channels = num_channelsself.eps = epsself.affine = affineif self.affine:self.weight = Parameter(torch.empty(num_channels, **factory_kwargs))self.bias = Parameter(torch.empty(num_channels, **factory_kwargs))else:self.register_parameter('weight', None)self.register_parameter('bias', None)self.reset_parameters()def reset_parameters(self) -> None:if self.affine:init.ones_(self.weight)init.zeros_(self.bias)def forward(self, input: Tensor) -> Tensor:return F.group_norm(input, self.num_groups, self.weight, self.bias, self.eps)def extra_repr(self) -> str:return '{num_groups}, {num_channels}, eps={eps}, ' \'affine={affine}'.format(**self.__dict__)GN的优点
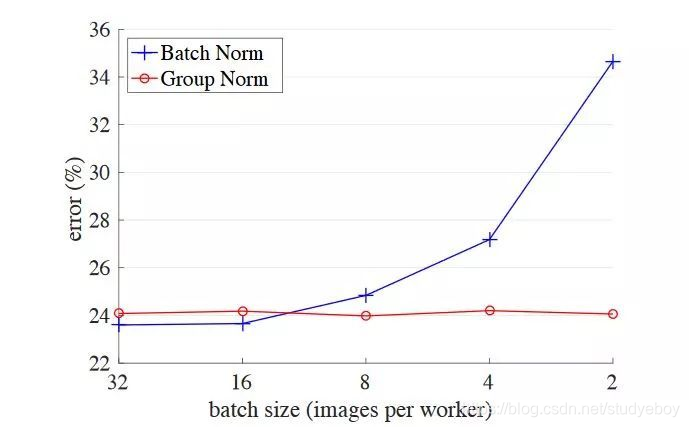
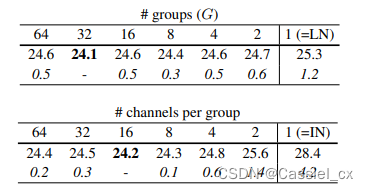
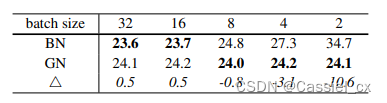
GN不依赖于batchsize,可以很好适用于RNN,这是GN的巨大优势。论文指出G为32或每个group的通道数为16时,效果最优;在batchsize小于16时,GN优于BN。
GN的缺点
在大batchsize时,效果不如BN。
6 总结
BN对小batchsize的效果不好;
IN作用在图像像素上,适用于风格化迁移;
LN主要对RNN作用明显;
GN将channel分组,然后再做归一化, 在batchsize<16的时候, 效果优于BN。
参考文章
【博客园】https://www.cnblogs.com/lxp-never/p/11566064.html
【知乎】https://zhuanlan.zhihu.com/p/395855181
【腾讯云】https://cloud.tencent.com/developer/article/2126838