前言
都说haproxy很牛x, 可是测试的结果实在是不算满意, 越测试越失望,无论是长连接还是并发, 但是测试的流程以及工具倒是可以分享分享。也望指出不足之处。
100w的长连接实在算不上太难的事情,不过对于网上关于测试方法以及测试工具的相关文章实在不甚满意,才有本文。
本文有两个难点,我算不上完全解决。
- 后端代码的性能.
- linux内核参数的优化.
环境说明
下面所有的测试机器都是基于openstack云平台,kvm虚拟化技术创建的云主机。
由于一个socket连接一般占用8kb内存,所以百万连接至少需要差不多8GB内存.
建立长连接主要是需要内存hold住内存,理论上只需要内存就足够了,不会消耗太多cpu资源, 相对内存而言.
而并发则对cpu很敏感,因为需要机器尽可能快的处理客户端发起的连接。
本文的并发主要指每秒处理的请求.
硬件配置
| 类型 | 配置 | 数量 |
|---|---|---|
| 后端 | 16核32GB | 1 |
| 客户端 | 2核4GB | 21 |
软件配置
| 类型 | 长连接 | 并发 |
|---|---|---|
| 后端 | python && gevent | golang |
| 客户端 | locust && pdsh | locust & pdsh |
IP地址
haproxy 192.168.111.111
client-master 192.168.111.31
client-slave 192.168.111.1[13-32]
测试步骤
系统调优
- 最大文件打开数
- 进程数
- socket设置
客户端
在/etc/sysctl.conf加入以下内容
-
# 系统级别最大打开文件 -
fs.file-max = 100000 -
# 单用户进程最大文件打开数 -
fs.nr_open = 100000 -
# 是否重用, 快速回收time-wait状态的tcp连接 -
net.ipv4.tcp_tw_reuse = 1 -
net.ipv4.tcp_tw_recycle = 1 -
# 单个tcp连接最大缓存byte单位 -
net.core.optmem_max = 8192 -
# 可处理最多孤儿socket数量,超过则警告,每个孤儿socket占用64KB空间 -
net.ipv4.tcp_max_orphans = 10240 -
# 最多允许time-wait数量 -
net.ipv4.tcp_max_tw_buckets = 10240 -
# 从客户端发起的端口范围,默认是32768 61000,则只能发起2w多连接,改为一下值,可一个IP可发起差不多6.4w连接。 -
net.ipv4.ip_local_port_range = 1024 65535
在/etc/security/limits.conf加入以下内容
-
# 最大不能超过fs.nr_open值, 分别为单用户进程最大文件打开数,soft指软性限制,hard指硬性限制 -
* soft nofile 100000 -
* hard nofile 100000 -
root soft nofile 100000 -
root hard nofile 100000
服务端
在/etc/sysctl.conf加入以下内容
-
# 系统最大文件打开数 -
fs.file-max = 20000000 -
# 单个用户进程最大文件打开数 -
fs.nr_open = 20000000 -
# 全连接队列长度,默认128 -
net.core.somaxconn = 10240 -
# 半连接队列长度,当使用sysncookies无效,默认128 -
net.ipv4.tcp_max_syn_backlog = 16384 -
net.ipv4.tcp_syncookies = 0 -
# 网卡数据包队列长度 -
net.core.netdev_max_backlog = 41960 -
# time-wait 最大队列长度 -
net.ipv4.tcp_max_tw_buckets = 300000 -
# time-wait 是否重新用于新链接以及快速回收 -
net.ipv4.tcp_tw_reuse = 1 -
net.ipv4.tcp_tw_recycle = 1 -
# tcp报文探测时间间隔, 单位s -
net.ipv4.tcp_keepalive_intvl = 30 -
# tcp连接多少秒后没有数据报文时启动探测报文 -
net.ipv4.tcp_keepalive_time = 900 -
# 探测次数 -
net.ipv4.tcp_keepalive_probes = 3 -
# 保持fin-wait-2 状态多少秒 -
net.ipv4.tcp_fin_timeout = 15 -
# 最大孤儿socket数量,一个孤儿socket占用64KB,当socket主动close掉,处于fin-wait1, last-ack -
net.ipv4.tcp_max_orphans = 131072 -
# 每个套接字所允许得最大缓存区大小 -
net.core.optmem_max = 819200 -
# 默认tcp数据接受窗口大小 -
net.core.rmem_default = 262144 -
net.core.wmem_default = 262144 -
net.core.rmem_max = 16777216 -
net.core.wmem_max = 16777216 -
# tcp栈内存使用第一个值内存下限, 第二个值缓存区应用压力上限, 第三个值内存上限, 单位为page,通常为4kb -
net.ipv4.tcp_mem = 786432 4194304 8388608 -
# 读, 第一个值为socket缓存区分配最小字节, 第二个,第三个分别被rmem_default, rmem_max覆盖 -
net.ipv4.tcp_rmem = 4096 4096 4206592 -
# 写, 第一个值为socket缓存区分配最小字节, 第二个,第三个分别被wmem_default, wmem_max覆盖 -
net.ipv4.tcp_wmem = 4096 4096 4206592
在/etc/security/limits.conf加入一下内容
-
# End of file -
root soft nofile 2100000 -
root hard nofile 2100000 -
* soft nofile 2100000 -
* hard nofile 2100000
重启使上述内容生效
不愿意重启就使用以下命令
sysctl -p宿主机
一般宿主机都会启用防火墙,所以防火墙会记录每一条tcp连接记录,所以如果当虚拟机建立的tcp数量超过宿主机的防火最大记录数,则会drop掉后来的tcp.主要通过/etc/sysctl.conf下的这个配置项。
-
# 将连接改为200w+以满足单机100w长连接. -
net.nf_conntrack_max=2048576
测试工具选取
locust
一个用python编写的非常出色的测试框架,满足大多数测试场景.内置http client, 可自定义client, 支持水平扩展.
下载安装参考: https://docs.locust.io/en/latest/index.html
pdsh
用于调试启动多个locust客户端以及一些批量操作.
下载安装使用参考:
https://github.com/chaos/pdsh
http://kumu-linux.github.io/blog/2013/06/19/pdsh/
server脚本编写
长连接通过tcp协议测试, 借助gevent框架.
脚本如下
-
#coding: utf-8 -
from __future__ import print_function -
from gevent.server import StreamServer -
import gevent -
# sleeptime = 60 -
def handle(socket, address): -
# print(address) -
# data = socket.recv(1024) -
# print(data) -
while True: -
gevent.sleep(sleeptime) -
try: -
socket.send("ok") -
except Exception as e: -
print(e) -
if __name__ == "__main__": -
import sys -
port = 80 -
if len(sys.argv) > 2: -
port = int(sys.argv[1]) -
sleeptime = int(sys.argv[2]) -
else: -
print("需要两个参数!!") -
sys.exit(1) -
# default backlog is 256 -
server = StreamServer(('0.0.0.0', port), handle, backlog=4096) -
server.serve_forever()
并发通过http协议测试,借助golang, 因为golang可以充分利用多核且效率高.
脚本如下
-
package main -
import ( -
// "fmt" -
"io" -
"log" -
"net/http" -
"os" -
"time" -
) -
type myHandler struct{} -
func (*myHandler) ServeHTTP(w http.ResponseWriter, r *http.Request) { -
// time.Sleep(time.Second * 1) -
io.WriteString(w, "ok") -
} -
func main() { -
var port string -
port = ":" + os.Args[1] -
srv := &http.Server{ -
Addr: port, -
Handler: &myHandler{}, -
ReadTimeout: 30 * time.Second, -
WriteTimeout: 30 * time.Second, -
} -
log.Fatal(srv.ListenAndServe()) -
}
client脚本编写
长连接脚本
-
#coding: utf-8 -
import time -
from gevent import socket -
from locust import Locust, TaskSet, events, task -
class SocketClient(object): -
""" -
Simple, sample socket client implementation that wraps xmlrpclib.ServerProxy and -
fires locust events on request_success and request_failure, so that all requests -
gets tracked in locust's statistics. -
""" -
def __init__(self): -
# 仅在新建实例的时候创建socket. -
self._socket = socket.socket(socket.AF_INET, socket.SOCK_STREAM) -
self.__connected = False -
def __getattr__(self, name): -
skt = self._socket -
def wrapper(*args, **kwargs): -
start_time = time.time() -
# 判断是否之前建立过连接,如果是则建立连接,否则直接使用之前的连接 -
if not self.__connected: -
try: -
skt.connect(args[0]) -
self.__connected = True -
except Exception as e: -
total_time = int((time.time() - start_time) * 1000) -
events.request_failure.fire(request_type="connect", name=name, response_time=total_time, exception=e) -
else: -
try: -
data = skt.recv(1024) -
# print(data) -
except Exception as e: -
total_time = int((time.time() - start_time) * 1000) -
events.request_failure.fire(request_type="recv", name=name, response_time=total_time, exception=e) -
else: -
total_time = int((time.time() - start_time) * 1000) -
if data == "ok": -
events.request_success.fire(request_type="recv", name=name, response_time=total_time, response_length=len(data)) -
elif len(data) == 0: -
events.request_failure.fire(request_type="recv", name=name, response_time=total_time, exception="server closed") -
else: -
events.request_failure.fire(request_type="recv", name=name, response_time=total_time, exception="wrong data: {}".format(data)) -
return wrapper -
class SocketLocust(Locust): -
""" -
This is the abstract Locust class which should be subclassed. It provides an XML-RPC client -
that can be used to make XML-RPC requests that will be tracked in Locust's statistics. -
""" -
def __init__(self, *args, **kwargs): -
super(SocketLocust, self).__init__(*args, **kwargs) -
self.client = SocketClient() -
class SocketUser(SocketLocust): -
# 目标地址 -
host = "192.168.111.30" -
# 目标端口 -
port = 80 -
min_wait = 100 -
max_wait = 1000 -
class task_set(TaskSet): -
@task(1) -
def connect(self): -
self.client.connect((self.locust.host, self.locust.port))
并发脚本
-
#coding: utf-8 -
from __future__ import print_function -
from locust import HttpLocust, TaskSet, task -
class WebsiteUser(HttpLocust): -
host = "http://192.168.111.30" -
# 目标端口 -
port = 80 -
min_wait = 100 -
max_wait = 1000 -
class task_set(TaskSet): -
@task(1) -
def index(self): -
self.client.get("/")
监控工具选择
netdata
通过本工具可以直观的感受到系统的各项指标的变化
效果图如下
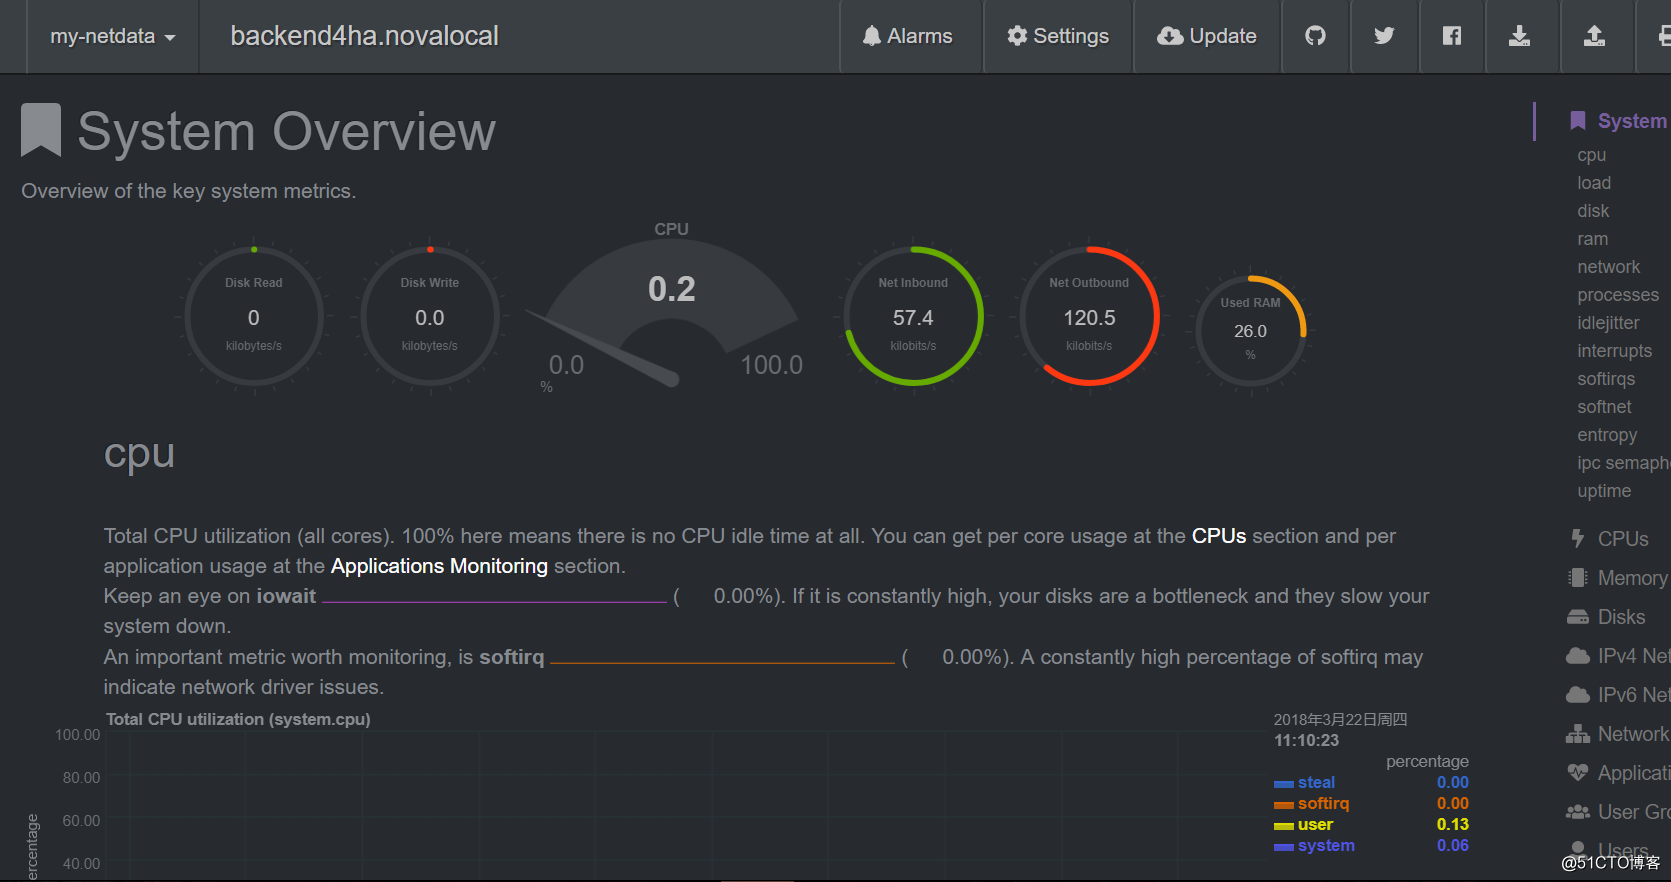
下载安装参考:https://github.com/firehol/netdata/wiki/Installation
本机脚本
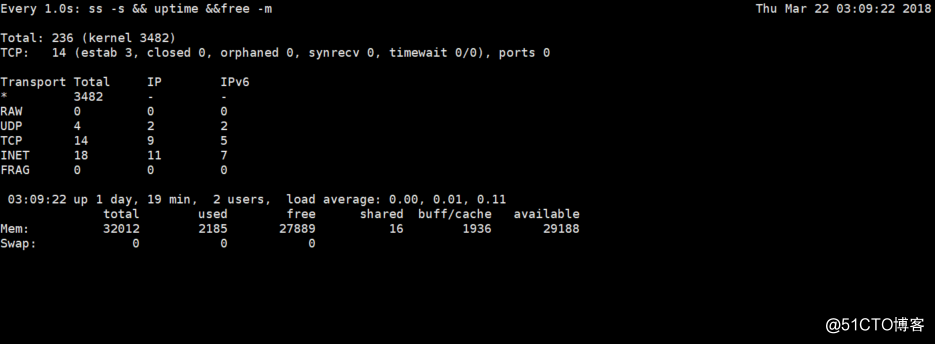
watch -n 1 "ss -s && uptime &&free -m"简单查看本机连接数,负载,内存情况。
效果图如下
长连接测试步骤
启动客户端
- locust master
locust -f /root/loadtest/socket_load_backend.py --master- locust slave
pdsh -w 192.168.111.1[13-32] "locust -f /root/loadtest/socket_load_backend.py --slave --master-host=192.168.111.31"注意: 在slave端一样需要又socket_load_backend.py文件.
启动后端
nohup python /root/loadtest/tcpserver.py 80 550 &> /var/log/tcpserver1.log &开始测试
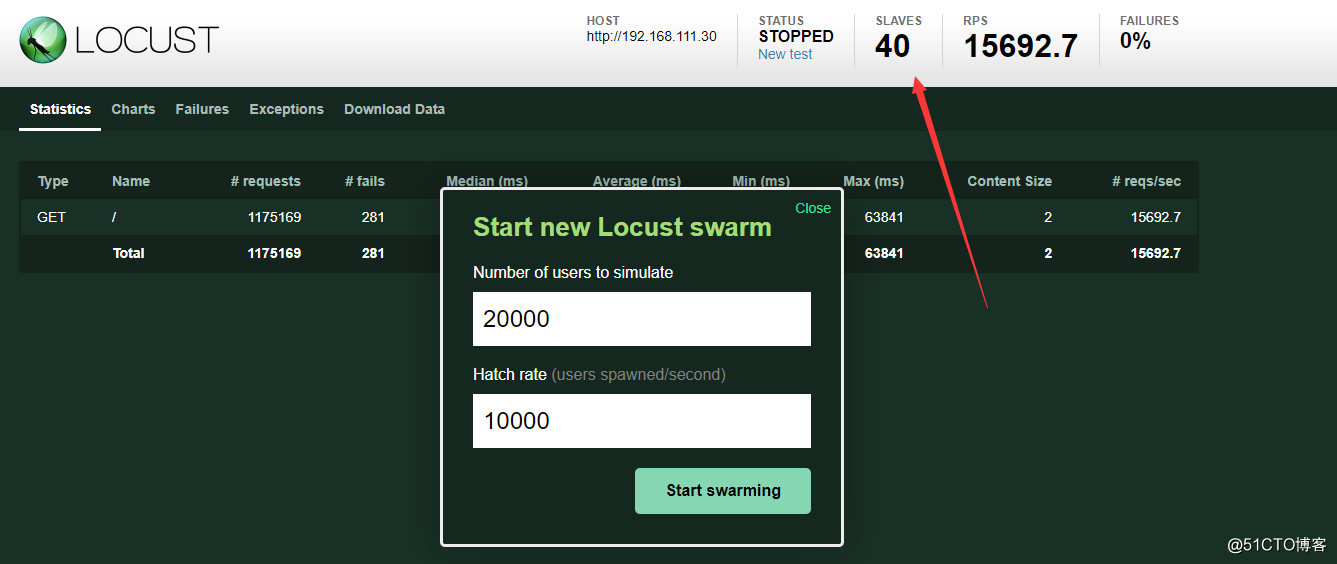
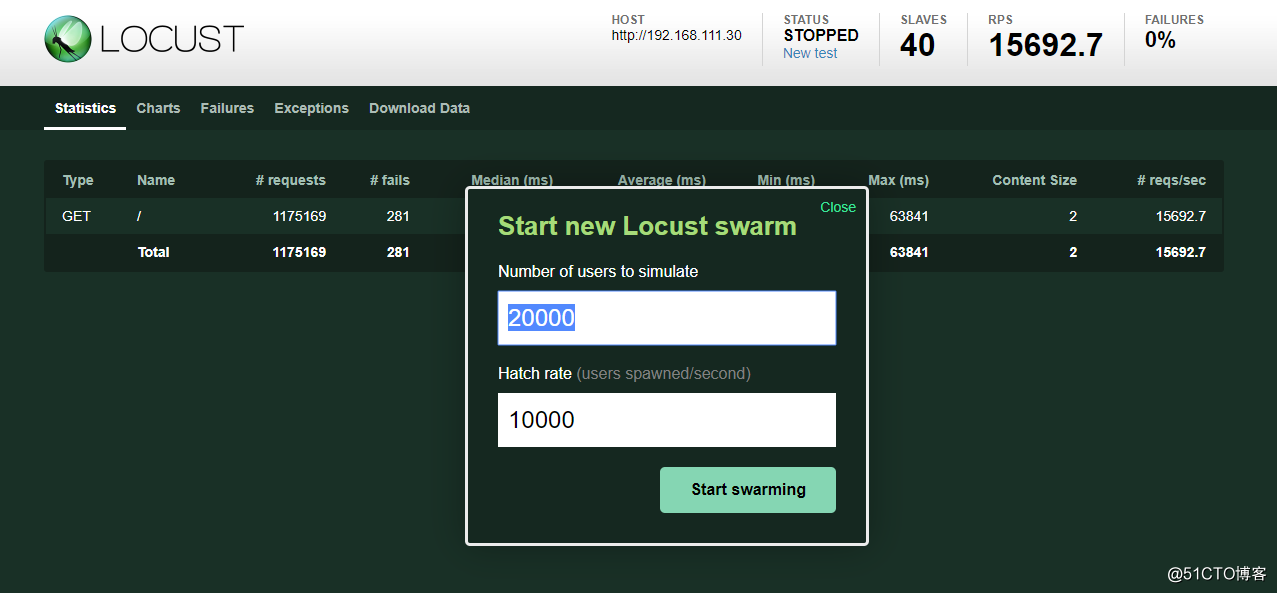
登陆locust的web页面: http://192.168.111.31:8089
开始参数如下.
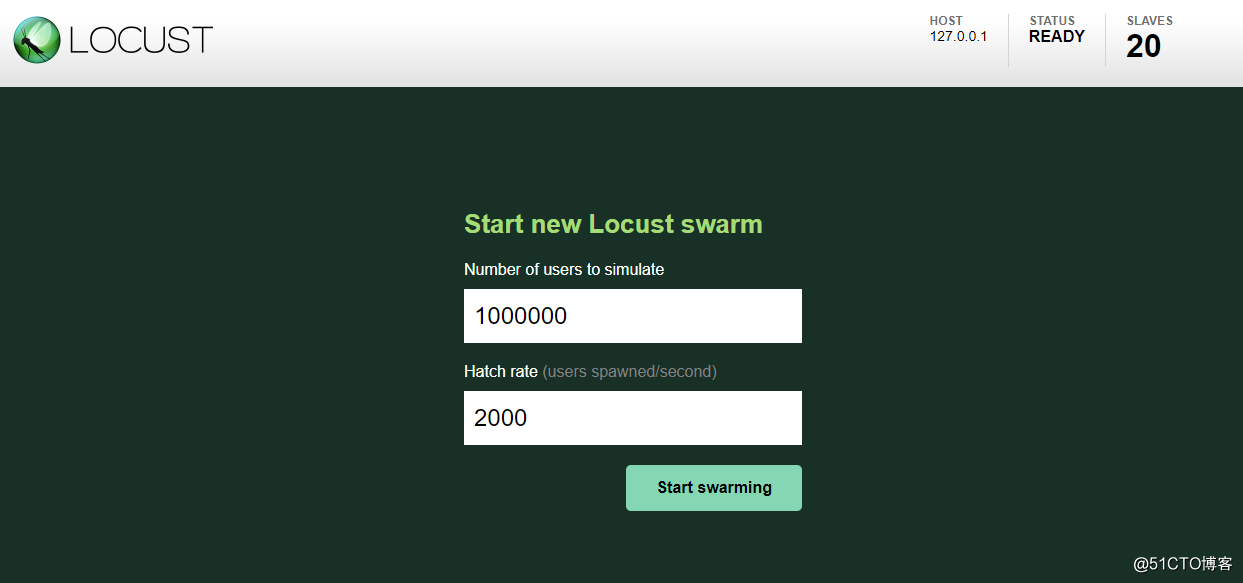
Number of users to simulate
代表最终创建多少的用户.
Hatch rate (users spawned/second)代表每秒创建多少的用户
由上图可知,每秒2000个用户数增长,增长大盘100w需要500秒,所以在后端每个连接保持550秒,以保证至少550秒内达到100w连接.当建立一百万用户以后就会每隔一段时间执行自定义的任务,时间间隔在min_wait与max_wait时间范围内.
测试结果
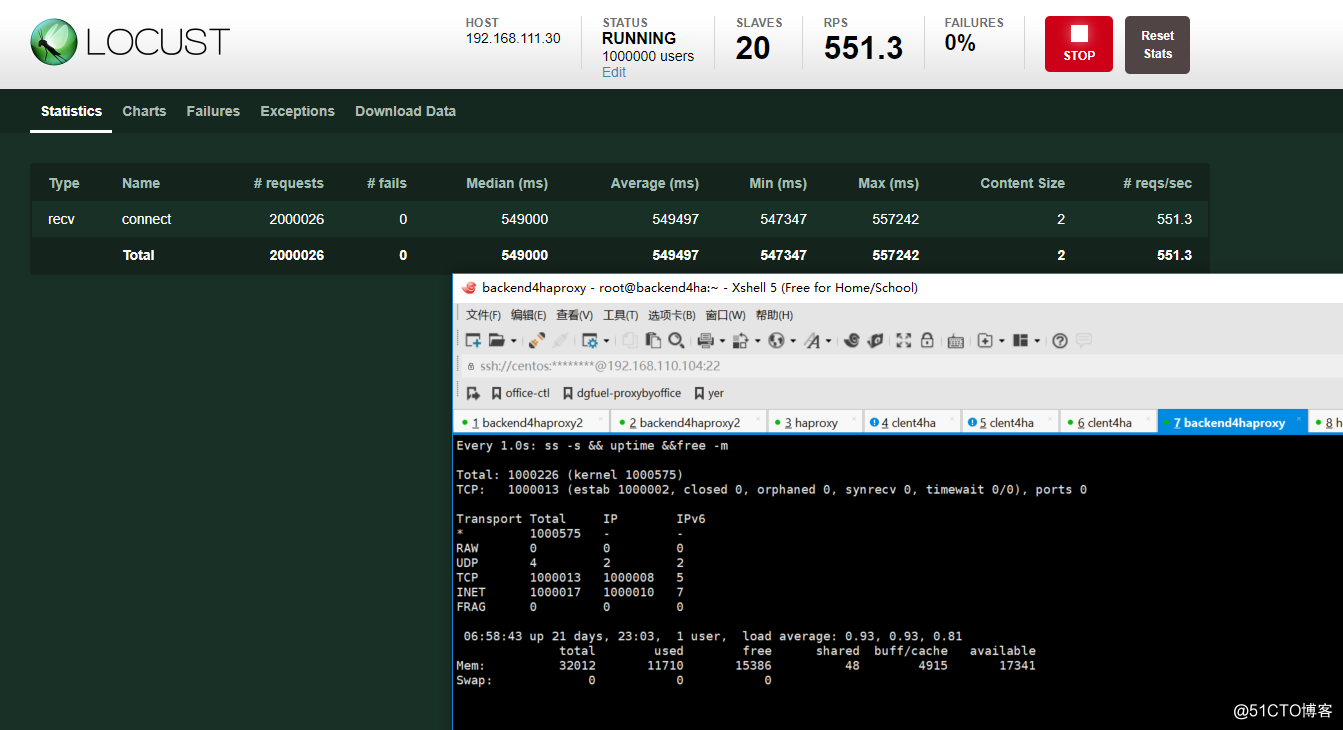
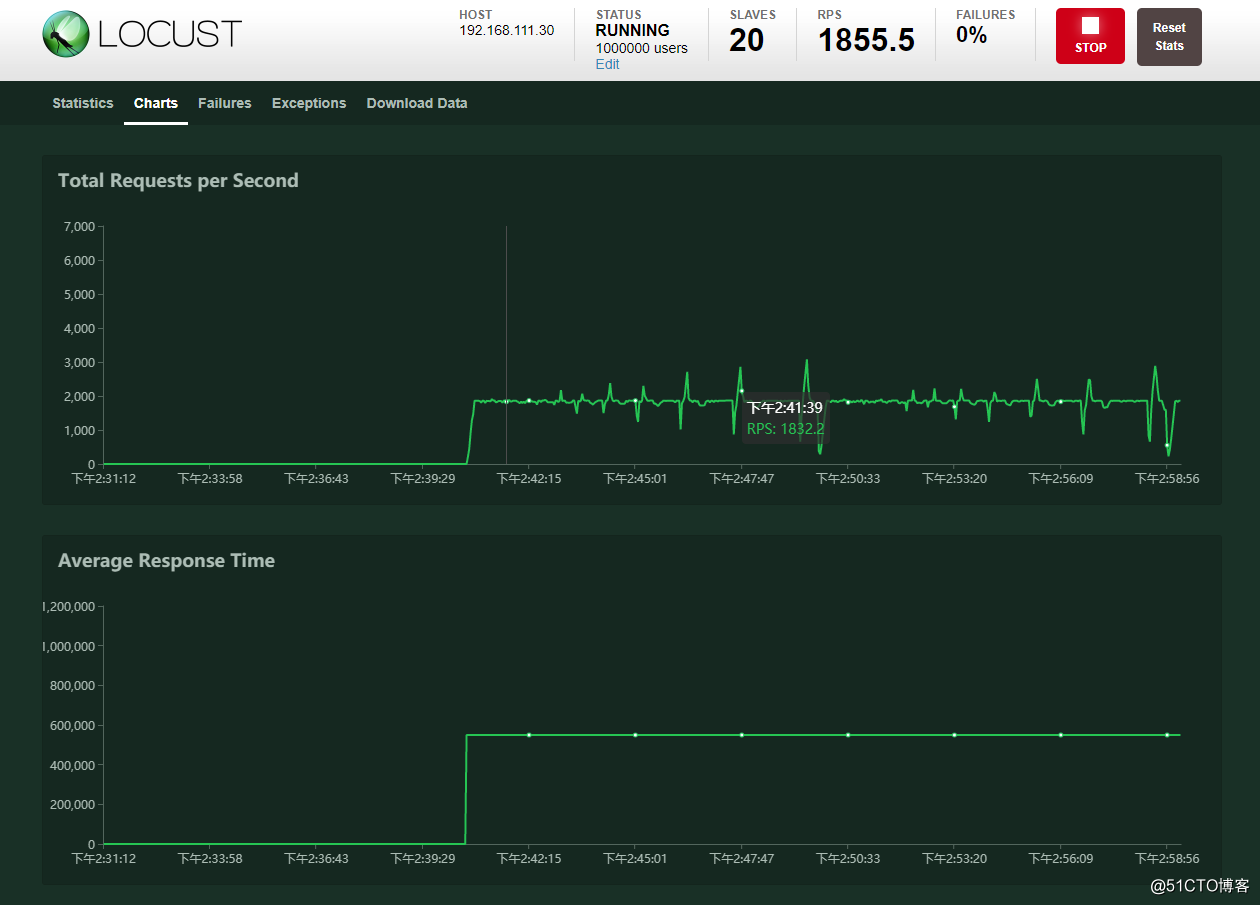
从面结果可以看出,一共完成了200w左右的请求, 每秒请求数量差不多在1800左右.然后负载在1左右,说明cpu资源差不多达到了100%.因为这里的后端是单进程的.再者内存使用量在11GB左右,还算合理.
并发测试步骤
启动客户端
- locust master
locust -f /root/loadtest/http_load_backend.py --master- locust slave
-
pdsh -w 192.168.111.1[13-32] "locust -f /root/loadtest/http_load_backend.py --slave --master-host=192.168.111.31" -
# 多新建一个终端再次执行以下命令,因为它是单线程的,所以启动的数量一般与cpu个数相等,而上面的长连接消耗的主要是内存,所以不需要多启动一倍的客户端 -
pdsh -w 192.168.111.1[13-32] "locust -f /root/loadtest/http_load_backend.py --slave --master-host=192.168.111.31"
启动后可以发现有40个slave,效果如下.
启动后端
nohup go run go/src/server.go 80 &> /var/log/goServer.log &开始测试
注意这地方的测试应该是1w 1.5w 2w的数量依次的往上加,即,第一次user用户数填10000,Hatch rate填10000,然后依次分别增加.
这里就贴最终的结果了.
测试结果
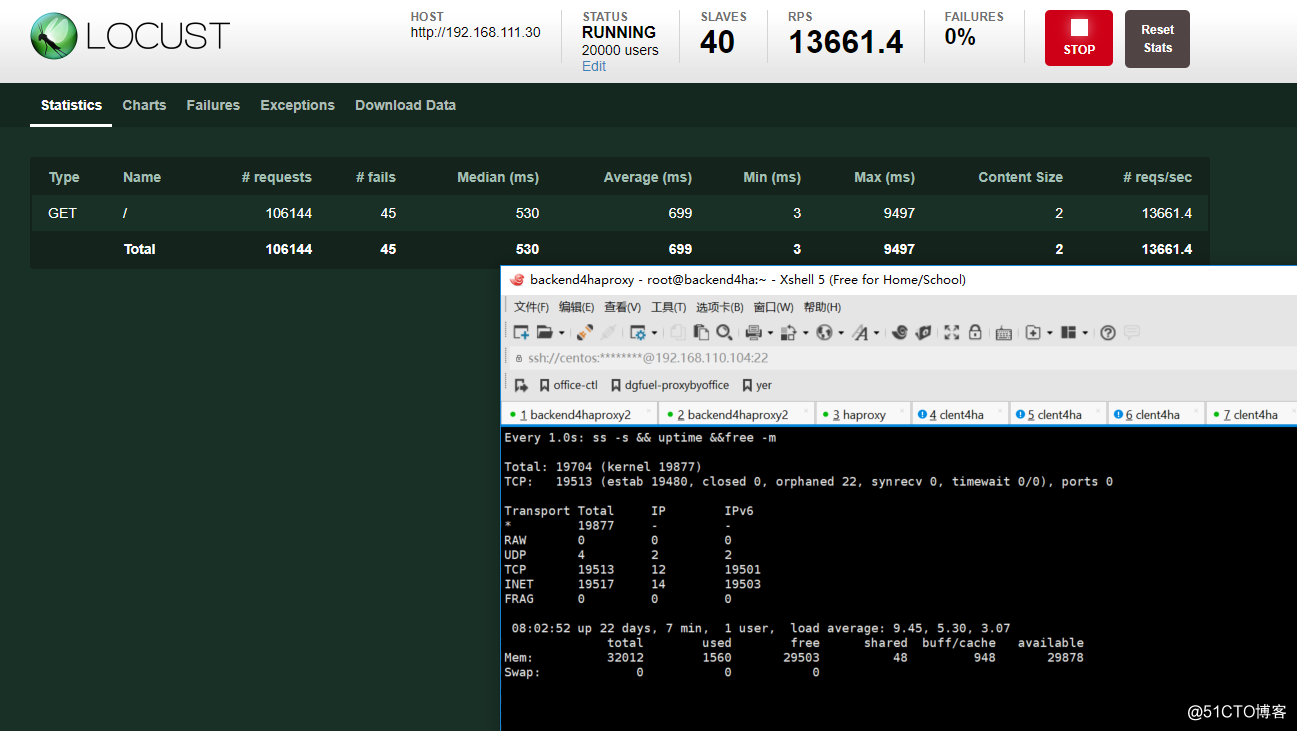
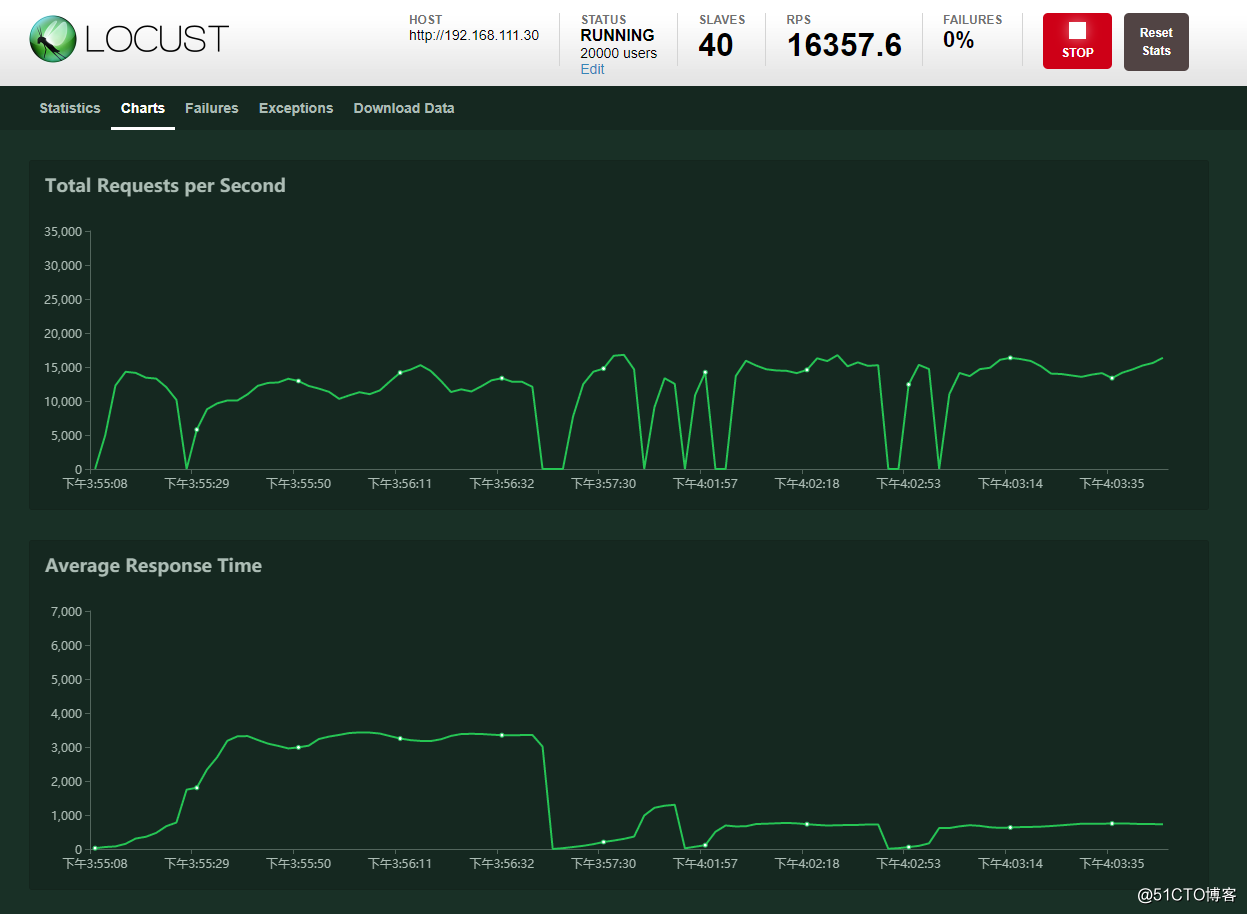
从面结果可以看出,一共完成了10w左右的请求, 每秒请求数量差不多在16000左右.然后负载在9左右,远远没有想想中的强势...其中主要受两方面限制, 一是内核参数, 再者就是宿主机性能的限制.
而性能调优暂时不在这篇文章内容内,主要是积累还不够.再者本文主要是测试.
而负载均衡器暂时还没看到满意的,所以并发到1.6w就算本文的结束了。
总结
工欲善其事必先利其器,动手之前应该选一件称手的工具,locust便是那件不错的工具,但是有了工具还要设定正确的目标,以及步骤,不然很难成功.这里算是抛砖引玉了吧.
不足之处
-
没有对吞吐量做测试,即服务端发送不同的文本大小,这里只是测试2字节的相应内容.
- 没有测试并发更高的情况下的100w长连接.
后记
之所以想写一篇大数量级的测试方式,是因为,网上大多数文章要么是给测试代码或者工具,要么是给一堆解释的不是很清楚的参数,再者就是只贴连接数的数量,如果只是达到这么多的连接,却不给出成功失败率,实在是有点耍流氓。
有意思的是这么强势的测试框架居然相关内容这么少,有空读读源码.
本文所有的代码可以在以下链接找到
https://github.com/youerning/blog/tree/master/locust-test
参考文档:
Linux之TCPIP内核参数优化:
https://www.cnblogs.com/fczjuever/archive/2013/04/17/3026694.html
理解 Linux backlog/somaxconn 内核参数:
https://jaminzhang.github.io/linux/understand-Linux-backlog-and-somaxconn-kernel-arguments/
Linux下Http高并发参数优化之TCP参数:
https://kiswo.com/article/1017
单台服务器百万并发长连接支持:
http://blog.csdn.net/mawming/article/details/51941771
结合案例深入解析orphan socket产生与消亡:
https://m.aliyun.com/yunqi/articles/91966
出处;http://blog.51cto.com/youerning/2089930?lb