文章目录
- 前言
- 一、蓝桥杯按键原理图
- 二、独立按键与矩阵按键处理思路
- 1.独立按键
- 2.矩阵按键
- 代码实现
- 总结
前言
按键设计一般分为两种:独立按键和矩阵键盘。按键数量较少的用前者,按键数量较多的用后者。虽然两种设计都是操作按键,但是其键盘扫描方式和程序的设计思路是截然不同的。独立按键简单很多,矩阵键盘虽然复杂,只要掌握了本质思路,也没有什么困难之处。
一、蓝桥杯按键原理图
二、独立按键与矩阵按键处理思路
1.独立按键
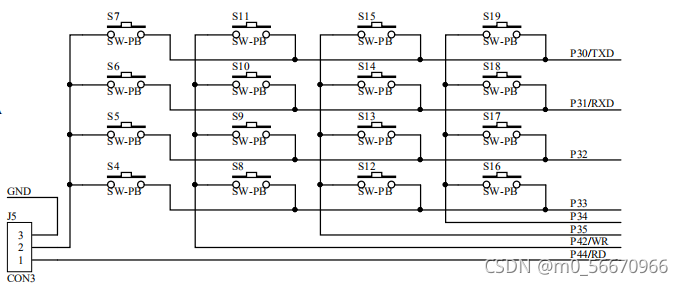
首先将J5的跳线帽2~3相连,独立按键有两个引脚,其中一个通过上拉电阻接到单片机的I/O端口,另外一端接地。也就是说,平时按键没有动作的时候,输出的是高电平,如果有按下动作发生,则输出的是低电平。那么,我们在程序设计的时候,只要扫描跟按键引脚相连的I/O端口,如果发现有低电平产生,则判定该按键处于按下状态。有些时候,电路或者外围有电磁干扰,也会使单片机的I/O端口产生低电平,这种干扰信号会让单片机误认为是按键动作。所以,在扫描按键的时候应该做去抖动处理,把干扰信号过滤掉,从而获得准确的按键状态信号。
2.矩阵按键
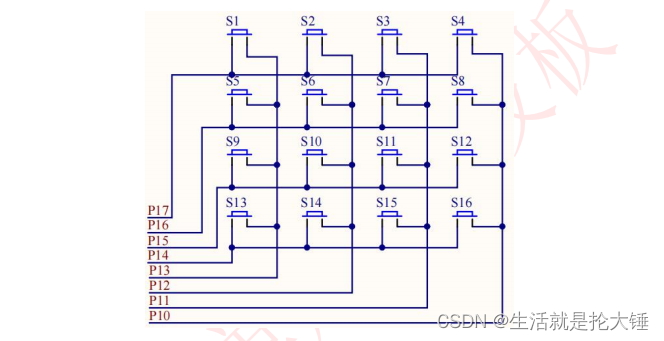
首先将J5的跳线帽1~2相连,与独立按键不同的是,矩阵按键的两个引脚都分别连接的单片机的I/O端口,一个作为行信号,另外一个作为列信号。
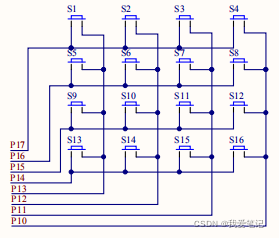
在上面的矩阵键盘中,要识别出S9按键的按下状态,应该怎么做呢?
对与矩阵键盘,我们只能逐行扫描,然后读取列的状态信号。如果如果S9按键有按下动作的话,那么S9按键行输出低电平,S9按键列信号也应该为低电平,而该行上其他没有按下动作的按键的列信号则为高电平。因此,我们可以得到矩阵键盘的基本扫描步骤:
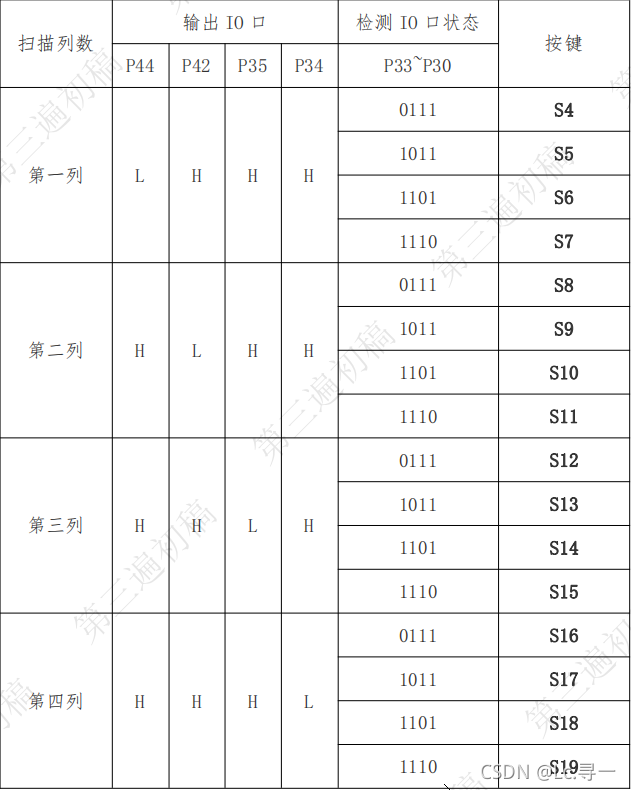
<1> 第一列输出低电平,第二三四列输出高电平,逐个读取判断行信号,如果都为高电平则第一行上没有按键按下。
<2> 第二列输出低电平,第一三四列输出高电平,逐个读取判断行信号。如果都为高电平则第二行上没有按键按下。
<3> 第三列输出低电平,第一二四列输出高电平,发现S9行信号为低电平,那么可以判断得第三行的S9列的按键有按下动作。
<4> 第四列输出低电平,第一二三列输出高电平,逐个读取判断行信号。如果都为高电平则第四行上没有按键按下。
如此循环往复,扫描的按键的状态。
三、代码实现
key.h
#ifndef __KEY_H
#define __KEY_H
#include "STC15F2K60S2.H" unsigned char Key_Read(void);
unsigned char Key_Read_BTN(void);
#endif
key.c
// 运行程序时,将J5调整为KBD模式(1-2脚短接)
#include "key.h"unsigned char Key_Read(void)
{unsigned int  Key_New;unsigned char Key_Val;P44 = 0; P42 = 1; P35 = 1; P34 = 1;	// 第1列Key_New = P3;P44 = 1; P42 = 0;										// 第2列Key_New = (Key_New<<4) | (P3&0x0f);P42 = 1; P35 = 0;										// 第3列Key_New = (Key_New<<4) | (P3&0x0f);P35 = 1; P34 = 0;										// 第4列Key_New = (Key_New<<4) | (P3&0x0f);switch(~Key_New) {case 0x8000: Key_Val = 4; break;	// S4case 0x4000: Key_Val = 5; break;	// S5case 0x2000: Key_Val = 6; break;	// S6case 0x1000: Key_Val = 7; break;	// S7case 0x0800: Key_Val = 8; break;	// S8case 0x0400: Key_Val = 9; break;	// S9case 0x0200: Key_Val = 10; break;	// S10case 0x0100: Key_Val = 11; break;	// S11case 0x0080: Key_Val = 12; break;	// S12case 0x0040: Key_Val = 13; break;	// S13case 0x0020: Key_Val = 14; break;	// S14case 0x0010: Key_Val = 15; break;	// S15case 0x0008: Key_Val = 16; break;	// S16case 0x0004: Key_Val = 17; break;	// S17case 0x0002: Key_Val = 18; break;	// S18case 0x0001: Key_Val = 19; break;	// S19default: Key_Val = 0;}return Key_Val;
}unsigned char Key_Read_BTN(void)
{unsigned char Key_Val;if(P30 == 0)Key_Val = 7;else if(P31 == 0)Key_Val = 6;else if(P32 == 0)Key_Val = 5;else if(P33 == 0)Key_Val = 4;else Key_Val = 0;return Key_Val;
}
seg.h
#ifndef __SEG_H
#define __SEG_H
#include "STC15F2K60S2.H"void Seg_Tran(unsigned char *pucSeg_Buf, unsigned char *pucSeg_Code);
void Seg_Disp(unsigned char *pucSeg_Code, unsigned char ucSeg_Pos);
#endif
seg.c
#include "seg.h"
// 显示转换
void Seg_Tran(unsigned char *pucSeg_Buf, unsigned char *pucSeg_Code)
{   unsigned char i, j=0, temp;for(i=0; i<8; i++, j++){switch(pucSeg_Buf[j]) { // 低电平点亮段,段码[MSB...LSB]对应码顺序为[dp g f e d c b a]case '0': temp = 0xc0; break;case '1': temp = 0xf9; break;case '2': temp = 0xa4; break;case '3': temp = 0xb0; break;case '4': temp = 0x99; break;case '5': temp = 0x92; break;case '6': temp = 0x82; break;case '7': temp = 0xf8; break;case '8': temp = 0x80; break;case '9': temp = 0x90; break;case 'A': temp = 0x88; break;case 'B': temp = 0x83; break;case 'C': temp = 0xc6; break;case 'D': temp = 0xA1; break;case 'E': temp = 0x86; break;case 'F': temp = 0x8E; break;case 'H': temp = 0x89; break;case 'L': temp = 0xC7; break;case 'N': temp = 0xC8; break;case 'P': temp = 0x8c; break;case 'U': temp = 0xC1; break;case '-': temp = 0xbf; break;case ' ': temp = 0xff; break;default: temp = 0xff;}	if(pucSeg_Buf[j+1] == '.'){temp = temp&0x7f;j++;}pucSeg_Code[i] = temp;}
}
// 数码管显示
void Seg_Disp(unsigned char *pucSeg_Code, unsigned char ucSeg_Pos)
{P0 = 0xff; 						// 消隐P2 = P2 & 0x1F | 0xE0;			// P27~P25清零,再定位Y7CP2 &= 0x1F;						// P27~P25清零P0 = 1<<ucSeg_Pos; 				// 位选P2 = P2 & 0x1F | 0xC0;			// P27~P25清零,再定位Y6CP2 &= 0x1F;						// P27~P25清零P0 = pucSeg_Code[ucSeg_Pos]; 		// 段码P2 = P2 & 0x1F | 0xE0;			// P27~P25清零,再定位Y7CP2 &= 0x1F;						// P27~P25清零
}
main.c
#include "tim.h"
#include "key.h"
#include "seg.h"
#define TEST_I 60
unsigned char ucSec, ucLed;
unsigned char ucKey_Dly, ucKey_Old;
unsigned char pucSeg_Buf[8], pucSeg_Code[8], ucSeg_Pos;
unsigned long ulms, ulKey_Time;void Key_Proc(void);
void SEG_Proc(unsigned char ucSeg_Val);void main(void)
{Cls_Peripheral();Timer1Init();while(1){Key_Proc();Seg_Tran(pucSeg_Buf, pucSeg_Code);}
}void Time_1(void) interrupt 3
{unsigned char buf[] = {TEST_I+'0', TEST_I+1+'0', TEST_I+2+'0', TEST_I+3+'0', TEST_I+4+'0', TEST_I+5+'0', TEST_I+6+'0', TEST_I+7+'0'};ulms++;if(++ucKey_Dly == 10)ucKey_Dly = 0;if(!(ulms % 1000)){ucSec++;ucLed ^= 1;Led_Disp(ucLed);}Seg_Disp(buf, ucSeg_Pos);	if(++ucSeg_Pos == 8) ucSeg_Pos = 0;
}void Key_Proc(void)
{unsigned char ucKey_Val, ucKey_Down, ucKey_Up;if(ucKey_Dly) return;ucKey_Dly = 1;ucKey_Val = Key_Read();ucKey_Down = ucKey_Val & (ucKey_Old ^ ucKey_Val);ucKey_Up = ~ucKey_Val & (ucKey_Old ^ ucKey_Val);ucKey_Old = ucKey_Val;if(ucKey_Down){ulKey_Time = ulms;SEG_Proc(ucKey_Down);}if(ucKey_Up)SEG_Proc(ucKey_Up);if(ucKey_Old && (ulms - ulKey_Time > 1000)){ulKey_Time = ulms;SEG_Proc(ucKey_Old);}
}void SEG_Proc(unsigned char ucSeg_Val)
{unsigned char i;for(i=0; i<7; i++)pucSeg_Buf[i] = pucSeg_Buf[i+1];	if(ucSeg_Val < 14)pucSeg_Buf[i] = ucSeg_Val-4+'0';elsepucSeg_Buf[i] = ucSeg_Val-14+'A';
}
总结
实现了用数码管显示按键键值


