ThreeJS WEBGL Decal

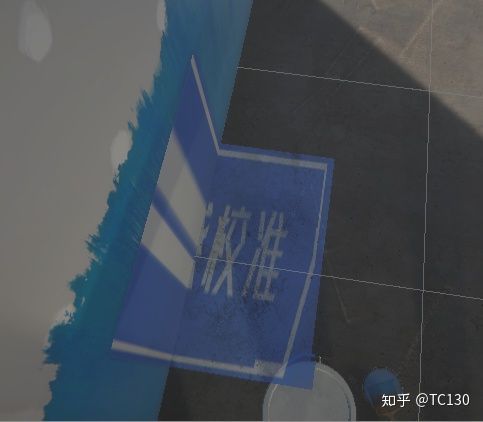
贴花 在图形学里主要指将特定图案,以类似粘贴或印刷的方式附着于其他物体上,能创造一种新颖的体验或逼真的效果,比较有趣,游戏中比较出名的有喷射战士splatoon123等。
unity HDRP中默认支持decal,不过我没有针对性研究,只是正好看到threejs里这个example,感觉做的挺好,这里面主要是通过将被贴的mesh顶点worldspace转成目标点的投影坐标,然后采用了clip裁切获取子mesh的方式,具体原理参考wolfire 。
import {BufferGeometry,Float32BufferAttribute,Matrix4,Vector3
} from 'three';/*** You can use this geometry to create a decal mesh, that serves different kinds of purposes.* e.g. adding unique details to models, performing dynamic visual environmental changes or covering seams.** Constructor parameter:** mesh — Any mesh object* position — Position of the decal projector* orientation — Orientation of the decal projector* size — Size of the decal projector** reference: http://blog.wolfire.com/2009/06/how-to-project-decals/**/class DecalGeometry extends BufferGeometry {constructor( mesh, position, orientation, size ) {super();// buffersconst vertices = [];const normals = [];const uvs = [];// helpersconst plane = new Vector3();// this matrix represents the transformation of the decal projectorconst projectorMatrix = new Matrix4();projectorMatrix.makeRotationFromEuler( orientation );projectorMatrix.setPosition( position );const projectorMatrixInverse = new Matrix4();projectorMatrixInverse.copy( projectorMatrix ).invert();// generate buffersgenerate();// build geometrythis.setAttribute( 'position', new Float32BufferAttribute( vertices, 3 ) );this.setAttribute( 'normal', new Float32BufferAttribute( normals, 3 ) );this.setAttribute( 'uv', new Float32BufferAttribute( uvs, 2 ) );function generate() {let decalVertices = [];const vertex = new Vector3();const normal = new Vector3();// handle different geometry typesif ( mesh.geometry.isGeometry === true ) {console.error( 'THREE.DecalGeometry no longer supports THREE.Geometry. Use BufferGeometry instead.' );return;}const geometry = mesh.geometry;const positionAttribute = geometry.attributes.position;const normalAttribute = geometry.attributes.normal;// first, create an array of 'DecalVertex' objects// three consecutive 'DecalVertex' objects represent a single face//// this data structure will be later used to perform the clippingif ( geometry.index !== null ) {// indexed BufferGeometryconst index = geometry.index;for ( let i = 0; i < index.count; i ++ ) {vertex.fromBufferAttribute( positionAttribute, index.getX( i ) );normal.fromBufferAttribute( normalAttribute, index.getX( i ) );pushDecalVertex( decalVertices, vertex, normal );}} else {// non-indexed BufferGeometryfor ( let i = 0; i < positionAttribute.count; i ++ ) {vertex.fromBufferAttribute( positionAttribute, i );normal.fromBufferAttribute( normalAttribute, i );pushDecalVertex( decalVertices, vertex, normal );}}// second, clip the geometry so that it doesn't extend out from the projectordecalVertices = clipGeometry( decalVertices, plane.set( 1, 0, 0 ) );decalVertices = clipGeometry( decalVertices, plane.set( - 1, 0, 0 ) );decalVertices = clipGeometry( decalVertices, plane.set( 0, 1, 0 ) );decalVertices = clipGeometry( decalVertices, plane.set( 0, - 1, 0 ) );decalVertices = clipGeometry( decalVertices, plane.set( 0, 0, 1 ) );decalVertices = clipGeometry( decalVertices, plane.set( 0, 0, - 1 ) );// third, generate final vertices, normals and uvsfor ( let i = 0; i < decalVertices.length; i ++ ) {const decalVertex = decalVertices[ i ];// create texture coordinates (we are still in projector space)uvs.push(0.5 + ( decalVertex.position.x / size.x ),0.5 + ( decalVertex.position.y / size.y ));// transform the vertex back to world spacedecalVertex.position.applyMatrix4( projectorMatrix );// now create vertex and normal buffer datavertices.push( decalVertex.position.x, decalVertex.position.y, decalVertex.position.z );normals.push( decalVertex.normal.x, decalVertex.normal.y, decalVertex.normal.z );}}function pushDecalVertex( decalVertices, vertex, normal ) {// transform the vertex to world space, then to projector spacevertex.applyMatrix4( mesh.matrixWorld );vertex.applyMatrix4( projectorMatrixInverse );normal.transformDirection( mesh.matrixWorld );decalVertices.push( new DecalVertex( vertex.clone(), normal.clone() ) );}function clipGeometry( inVertices, plane ) {const outVertices = [];const s = 0.5 * Math.abs( size.dot( plane ) );// a single iteration clips one face,// which consists of three consecutive 'DecalVertex' objectsfor ( let i = 0; i < inVertices.length; i += 3 ) {let total = 0;let nV1;let nV2;let nV3;let nV4;const d1 = inVertices[ i + 0 ].position.dot( plane ) - s;const d2 = inVertices[ i + 1 ].position.dot( plane ) - s;const d3 = inVertices[ i + 2 ].position.dot( plane ) - s;const v1Out = d1 > 0;const v2Out = d2 > 0;const v3Out = d3 > 0;// calculate, how many vertices of the face lie outside of the clipping planetotal = ( v1Out ? 1 : 0 ) + ( v2Out ? 1 : 0 ) + ( v3Out ? 1 : 0 );switch ( total ) {case 0: {// the entire face lies inside of the plane, no clipping neededoutVertices.push( inVertices[ i ] );outVertices.push( inVertices[ i + 1 ] );outVertices.push( inVertices[ i + 2 ] );break;}case 1: {// one vertex lies outside of the plane, perform clippingif ( v1Out ) {nV1 = inVertices[ i + 1 ];nV2 = inVertices[ i + 2 ];nV3 = clip( inVertices[ i ], nV1, plane, s );nV4 = clip( inVertices[ i ], nV2, plane, s );}if ( v2Out ) {nV1 = inVertices[ i ];nV2 = inVertices[ i + 2 ];nV3 = clip( inVertices[ i + 1 ], nV1, plane, s );nV4 = clip( inVertices[ i + 1 ], nV2, plane, s );outVertices.push( nV3 );outVertices.push( nV2.clone() );outVertices.push( nV1.clone() );outVertices.push( nV2.clone() );outVertices.push( nV3.clone() );outVertices.push( nV4 );break;}if ( v3Out ) {nV1 = inVertices[ i ];nV2 = inVertices[ i + 1 ];nV3 = clip( inVertices[ i + 2 ], nV1, plane, s );nV4 = clip( inVertices[ i + 2 ], nV2, plane, s );}outVertices.push( nV1.clone() );outVertices.push( nV2.clone() );outVertices.push( nV3 );outVertices.push( nV4 );outVertices.push( nV3.clone() );outVertices.push( nV2.clone() );break;}case 2: {// two vertices lies outside of the plane, perform clippingif ( ! v1Out ) {nV1 = inVertices[ i ].clone();nV2 = clip( nV1, inVertices[ i + 1 ], plane, s );nV3 = clip( nV1, inVertices[ i + 2 ], plane, s );outVertices.push( nV1 );outVertices.push( nV2 );outVertices.push( nV3 );}if ( ! v2Out ) {nV1 = inVertices[ i + 1 ].clone();nV2 = clip( nV1, inVertices[ i + 2 ], plane, s );nV3 = clip( nV1, inVertices[ i ], plane, s );outVertices.push( nV1 );outVertices.push( nV2 );outVertices.push( nV3 );}if ( ! v3Out ) {nV1 = inVertices[ i + 2 ].clone();nV2 = clip( nV1, inVertices[ i ], plane, s );nV3 = clip( nV1, inVertices[ i + 1 ], plane, s );outVertices.push( nV1 );outVertices.push( nV2 );outVertices.push( nV3 );}break;}case 3: {// the entire face lies outside of the plane, so let's discard the corresponding verticesbreak;}}}return outVertices;}function clip( v0, v1, p, s ) {const d0 = v0.position.dot( p ) - s;const d1 = v1.position.dot( p ) - s;const s0 = d0 / ( d0 - d1 );const v = new DecalVertex(new Vector3(v0.position.x + s0 * ( v1.position.x - v0.position.x ),v0.position.y + s0 * ( v1.position.y - v0.position.y ),v0.position.z + s0 * ( v1.position.z - v0.position.z )),new Vector3(v0.normal.x + s0 * ( v1.normal.x - v0.normal.x ),v0.normal.y + s0 * ( v1.normal.y - v0.normal.y ),v0.normal.z + s0 * ( v1.normal.z - v0.normal.z )));// need to clip more values (texture coordinates)? do it this way:// intersectpoint.value = a.value + s * ( b.value - a.value );return v;}}}// helperclass DecalVertex {constructor( position, normal ) {this.position = position;this.normal = normal;}clone() {return new this.constructor( this.position.clone(), this.normal.clone() );}}export { DecalGeometry, DecalVertex };
还有其他实现手段,参考游戏中的Decal(贴花) ;