目录
- 前言
- 一、使用freeview查看卷
- 二、使用freeview查看3D surface
- Pial surface
- white surface
- Inflated Surface
- Thickness Map
- Cortical Parcellation
前言
因一些原因需要学习FreeSurfer,然而教程比较少有些难懂,看了一段时间觉得可能要钻钻牛角尖才可以完成学习,所以开始记笔记(基本上是逐字逐句的读tutorial),如果有错误欢迎指正
教程地址: https://surfer.nmr.mgh.harvard.edu/fswiki/Tutorials
教程所使用数据: https://surfer.nmr.mgh.harvard.edu/fswiki/Tutorials
自行安装FreeSurfer
将网站上的tutorial data下载下来后解压,设置环境变量并进入工作目录(两个export可以直接写进bashrc中,我只写了第一个,因为之后freesurfer还要用,总是要改的东西写进bashrc感觉很麻烦)
export TUTORIAL_DATA=<path_to_your_tutorial_data>
export SUBJECTS_DIR=$TUTORIAL_DATA/buckner_data/tutorial_subjs
cd $SUBJECTS_DIR
FreeSurfer的输出中, lh应该是left hemisphere, rh 应该是right hemisphere, 表示左右脑
一、使用freeview查看卷
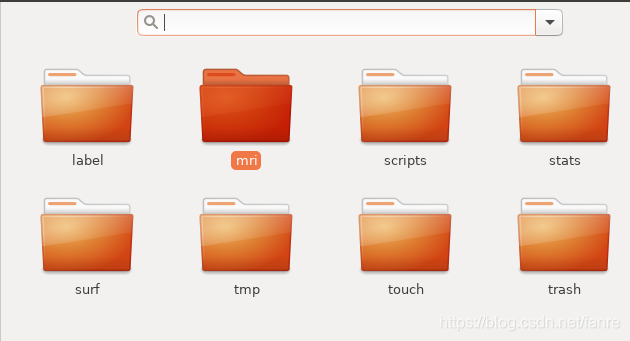
FreeSurfer中的输出有好几个文件夹,主要的输出数据被称为volume,用翻译软件翻译的为卷,我就这么记录好了
教程中第一步为
freeview -v \
good_output/mri/T1.mgz \
good_output/mri/wm.mgz \
good_output/mri/brainmask.mgz \
good_output/mri/aseg.mgz:colormap=lut:opacity=0.2 \
-f good_output/surf/lh.white:edgecolor=blue \
good_output/surf/lh.pial:edgecolor=red \
good_output/surf/rh.white:edgecolor=blue \
good_output/surf/rh.pial:edgecolor=red
其中,freeview为调用freesurfer的视图工具, 斜杠表示这些动作统一执行,如果对数据比较了解,应该可以直接输入freeview,然后在file里load volume
这一步的意思是, 加载结果为good_output的项目名下,mri文件夹中的T1.mgz, wm.mgz, brainmask.mgz, aseg.mgz这几个卷,其中aseg.mgz设置了颜色(colormap应该是一个颜色的映射,lut的意思是look up table),这几个卷的加载都是在-v指令下的(v指的是volume)
除此以外,还有一个-f指的是surface,还是good_output文件夹下,surf文件夹中,分别是左脑和右脑的白色表面(white surface)和软膜表面(pial surface),加载的时候顺便上了个色(edgecolor)
我的翻译可能不准确,因为是直接挂谷歌翻译的…
freeview 空白窗口

加载卷和表面(load Volume和load Surface):

加载后的图片,上面是volumes(卷)下面是surface(表面)

加载的卷里,wm.mgz, brainmask.mgz主要是用来纠错的,tutorial对三个卷进行了说明:
brainmask.mgz : skull-stripped volume primarily used for troubleshooting
wm.mgz : white matter mask also used for troubleshooting
aseg.mgz : subcortical segmentation loaded with its corresponding color table and at a low opacity. For more information on the subcortical segmentation, see here.
简单翻译了一下
brainmask.mgz : 颅骨剥离体积,主要用于故障排除
wm.mgz : 白质遮罩,主要用于故障排除
aseg.mgz : 皮质下分割,更多内容可以在这里了解
(我暂时没做了解,因为看不大懂)
加载后在freeview界面可以用鼠标旋转大脑进行观察,也可以点左边的复选框将一些部分隐藏用于对比和查看
双击某个卷后该卷会上升到顶端(应该是指优先显示,毕竟可以显示的内容太多了.部分卷可以半透明显示所以冲突不大)
图片正上方的选项可以更改视图
![]()
快捷键 alt+f 显示突出显示的表面(我试了一下就是取消/勾选已选择的surface的复选框)
快捷键 alt+v 显示/隐藏高亮部分(应该指的是前面指令里上色的部分,取消所有surface的勾选后查看更清楚)
alt+a 和alt+s更改高亮的权重,也就是颜色更明显或者更不明显
教程在这里提到有一个关于wm卷的heat overlay 和jet overlay,但是我没找到,唯一找到的与overlay有关的内容在layer - cycle throught overlays
然后可以推出freeview了
二、使用freeview查看3D surface
在终端运行这段代码
freeview -f good_output/surf/lh.pial:annot=aparc.annot:name=pial_aparc:visible=0
good_output/surf/lh.pial:annot=aparc.a2009s.annot:name=pial_aparc_des:visible=0
good_output/surf/lh.inflated:overlay=lh.thickness:overlay_threshold=0.1,3::name=inflated_thickness:visible=0
good_output/surf/lh.inflated:visible=0
good_output/surf/lh.white:visible=0
good_output/surf/lh.pial
–viewport 3d
还是一样, 可以直接用freeview的load surface来打开,文件在在good_output项目下的surf文件夹里(但是直接复制粘贴这个运行要方便得多)
指令中, 将 Desikan-Killiany 皮质分区加载到左脑(lh=left hemisphere)的pial surface(lh.pial, 翻译为软膜表面):
lh.pial:annot=aparc.annot
将 Desrieux 皮质分区加载到软膜表面:
lh.pial:annot=aparc.a2009s.annot
更改在菜单显示中显示的名称并关闭该层:
:name=pial_aparc:visible=0
加载膨胀表面顶部的厚度叠加层并设置要显示的最小和最大阈值:
lh.inflated:overlay=lh.thickness:overlay_threshold=0.1,3
由上面的指令可以看出来, 加载pial surface的时候可以叠加皮质分区,用"annot="来指定该分区
然后aparc.annot表示Desikan-Killiany皮质分区,aparc.a2009s.annot表示Desrieux皮质分区
name指定展现出来的名称(应该是指在freeview界面中的名字),而visible=0则将pial surface设置了不可见,以避免pial surface和加载到上面的皮质分区发生冲突,最后再单独加载pial surface方便对比查看
thickness是厚度层
我下面直接用英文名称好了,因为不知道专业名词,机翻出来的看着怪怪的
Pial surface

红色的是脑沟,绿色的是脑回
white surface

white surface,表面显示白质和灰质之间的边界
Inflated Surface

Press Alt+c to cycle to the curvature on the inflated surface. With the inflated surface, you can fully see the sulci. If you look at the options next to ‘Curvature’ in the left menu pane, you can switch it to binary to see the curvature in grayscale. Or switch it to ‘off’ to see the smooth inflated surface.
The inflated surface can be helpful to find bumps, holes, or other defects that may need to be corrected. If you click on the inflated surface, you will see the coordinates of the vertex you clicked on in the ‘Cursor’ window.
机翻:按 Alt+c 循环到inflated surface上的曲率。 通过inflated surface,您可以完全看到脑沟。 如果您查看左侧菜单窗格中“Curvature”(曲率)旁边的选项,您可以将其切换为二进制以查看灰度曲率。 或将其切换到“关闭”以查看平滑的inflated surface。inflated surface有助于发现可能需要纠正的凸块、孔洞或其他缺陷。 如果您单击inflated surface,您将在“Cursor”窗口中看到您单击的顶点的坐标。
Thickness Map

Press Alt+c to cycle to the thickness map on the inflated surface
机翻:按 Alt+c 循环到inflated surface上的厚度图
alt+c似乎是调换左侧surface栏下各个surface的顺序,这里直接勾选应该也没有问题
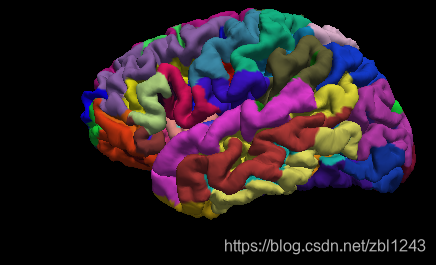
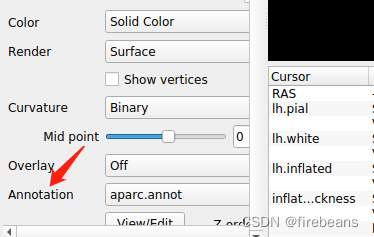
Cortical Parcellation
皮质分区
左边是 Desikan-Killiany 分区,右边是 Desrieux 分区。


Click on a color and view the name of the cortical region in the ‘Cursor’ or ‘Mouse’ windows next to where it says ‘aparc.annot’. Rotate the brain so you are looking at the medial wall. Notice that all subcortical gray matter is not a part of the surface labels (because again, those areas do not count towards the cortical surface measures).
By default there are two parcellations that are made when recon-all is run. The two parcellations are the ?h.aparc.annot, created with the Desikan-Killiany atlas, and the ?h.aparc.a2009s.annot, created with the Destrieux atlas. The difference is the number and designation of the areas that are labeled. You can load the Destrieux parcellation by clicking on the drop down box next to ‘Annotation’ on the left panel and choosing Load from file… Browse to lh.aparc.a2009s.annot and hit ‘Open’.
机翻:单击一种颜色并在“aparc.annot”旁边的“Cursor”或“Mouse”窗口中查看皮质区域的名称。 旋转大脑,让您看到内壁。 请注意,所有皮层下灰质都不是表面标签的一部分(因为同样,这些区域不计入皮层表面测量值)。
默认情况下,运行 recon-all 时会进行两个分区。 这两个分区是使用 Desikan-Killiany 地图集创建的 ?h.aparc.annot 和使用 Destrieux 地图集创建的 ?h.aparc.a2009s.annot。 不同之处在于标记区域的数量和名称。 您可以通过单击左侧面板上“Annotation”旁边的下拉框并选择从文件加载…来加载 Destrieux 分区。浏览到 lh.aparc.a2009s.annot 并点击“open”。

annotation:
练习题就不记录了