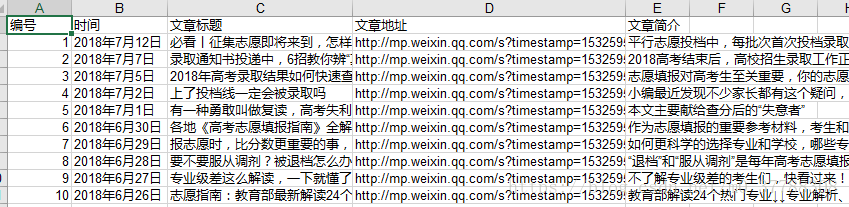
1、新建component文件夹存放我们的组件,里边存放的就是我们所用的组件,我们今天要做的事弹出框,新建文件夹popup存放我们的组件模板,点击右键选择新建component,就会自动生成组件的模板wxss、wxml、json、js,如图:

2、写一些组件样式和布局,和页面写法类似:
(1)wxml
<view class="com-selectBox"><view class="weui-cells__title">证件类型<text class="red">*</text></view><view class="com-sContent" bindtap="selectToggle"><view class="com-sTxt">{{nowText}}</view><image src="/images/user_avatar.png"  class="com-sImg"  animation="{{animationData}}"></image></view><view class="com-sList" wx:if="{{selectShow}}"><view wx:for="{{propArray}}" data-index="{{index}}" wx:key="" class="com-sItem" bindtap="setText">{{item.text}}</view></view>
</view>
(2)wxss
.com-selectBox{width: 100%;padding-top: 34rpx;}.red{color: red;
}
.com-sContent{padding: 4rpx 0 0rpx 0;border-bottom: 1rpx solid #e2e2e2;background: white;font-size: 16px;position: relative;height: 30px;line-height: 30px;
}
.com-sImg{position: absolute;right: 10px;top: 11px;width: 16px;height: 9px;transition: all .3s ease;
}
.com-sTxt{overflow: hidden;text-overflow: ellipsis;white-space: nowrap;font-size: 14px;color:#aaa;
}
.com-sList{background: white;width: inherit;position: absolute;/* border: 1px solid #e2e2e2; */border-top: none;box-sizing: border-box;z-index: 3;max-height: 120px;overflow: auto;
}
.com-sItem{height: 30px;line-height: 30px;border-bottom: 1px solid #e2e2e2;padding: 0 6px;text-align: left;overflow: hidden;text-overflow: ellipsis;white-space: nowrap;font-size: 14px;
}
.com-sItem:first-child{border-top: none;
}
(3)js
Component({/*** 组件的属性列表*/properties: {propArray: {type: Array,}},/*** 组件的初始数据*/data: {selectShow: false, //初始option不显示nowText: "请选择", //初始内容animationData: {} //右边箭头的动画},/*** 组件的方法列表*/methods: {//option的显示与否selectToggle: function () {var nowShow = this.data.selectShow; //获取当前option显示的状态//创建动画var animation = wx.createAnimation({timingFunction: "ease"})this.animation = animation;if (nowShow) {animation.rotate(0).step();this.setData({animationData: animation.export()})} else {animation.rotate(180).step();this.setData({animationData: animation.export()})}this.setData({selectShow: !nowShow})},//设置内容setText: function (e) {var nowData = this.properties.propArray; //当前option的数据是引入组件的页面传过来的,所以这里获取数据只有通过this.propertiesvar nowIdx = e.target.dataset.index; //当前点击的索引var nowText = nowData[nowIdx].text; //当前点击的内容//子组件触发事件var nowDate = {id: nowIdx,text: nowText}// triggerEvent 关键字用于将事件传递给页面this.triggerEvent("myget", nowDate)//再次执行动画,注意这里一定,一定,一定是this.animation来使用动画this.animation.rotate(0).step();this.setData({selectShow: false,nowText: nowText,animationData: this.animation.export()})}}
})
1)父组件向子组件传递参数
- 先在子组件properties当中定义好要接收的参数,properties就是小程序当中接收父组件传递参数的地方,类似于vue的prop;
- properties与data的不同:properties(属性)中定义的变量是开放的,外部(page页面)可以访问;data中的数据是私有的,外部不能访问;properties中type是必填的,value和observer是选填的。data中定义的变量必须有初始值否者会报 ** is not defined
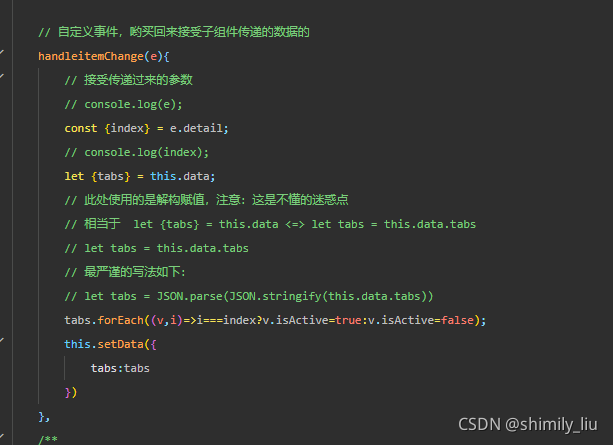
2)子组件想父组件传递事件
- 自定义组件触发事件时,需要使用 triggerEvent 方法,指定事件名、detail对象和事件选项;
- this.triggerEvent,相当于Vue的事件总线
(4)组件的使用
1)json
{"usingComponents": {"Select": "/components/my-select/my-select"}
}
2) wxml
<Select prop-array="{{selectArray}}" bind:myget="getDate"></Select> 3) js
getDate:function(e){console.log(e.detail)
},


![[python]微信公众号文章爬取](https://img-blog.csdnimg.cn/20200620224807193.jpg?x-oss-process=image/watermark,type_ZmFuZ3poZW5naGVpdGk,shadow_10,text_aHR0cHM6Ly9ibG9nLmNzZG4ubmV0L3FxXzMyODE1ODA3,size_16,color_FFFFFF,t_70)