今天跟着这篇博客抓取微信公众号文章练习了一下爬虫,运行成功。想和大家分享一下过程中出现的问题和解决方法。
运行环境 windows 7 + Pycharm2018 + Python 2.7
目录
-
-
- 目录
- 1.安装必要的Python包
- 1.1 关于下载selenium包
- 1.2关于下载json包
- 2.运行之前的准备
- 代码中需要修改的地方
- 运行结果展示
- 需要注意的地方
-
1.安装必要的Python包
运行代码需要安装以下packages:
pyquery、requests、selenium 、pyExcelerator和json
同时需要下载 phantomjs-2.1.1-windows,将里面的 phantomjs.exe 放到 Python2.7的Script 目录下
其中有两点说明:
1.1 关于下载selenium包
使用cmd下载selenium时不能直接输入 pip install selenium ,否则运行代码时会报错,因为默认install的是最新版本,也就是3.x版本的selenium,为了解决这个问题,键入以下代码即可:
pip uninstall selenium
y
pip install selenium==2.53.6
附上selenium的官方下载地址
1.2关于下载json包
使用cmd下载json包时亦不可直接输入pip install json ,会报错显示没有找到合适的json包,这是因为在python2中存在两个json包,分别是simplejson和json-py,这里我采用了simplejson,附上相应代码
pip install simplejson下载成功后,import json ,不会报错,说明安装成功。
2.运行之前的准备
首先附上完整代码,再进行修改说明
# coding: utf-8'''
通过搜狗搜索中的微信搜索入口来爬取
'''# 这三行代码是防止在python2上面编码错误的,在python3上面不要要这样设置
import sysreload(sys)
sys.setdefaultencoding('utf-8')from urllib import quote
from pyquery import PyQuery as pq
from selenium import webdriver
from pyExcelerator import * # 导入excel相关包import requests
import time
import re
import json
import osclass weixin_spider:def __init__(self, keywords):' 构造函数 'self.keywords = keywords# 搜狐微信搜索链接入口# self.sogou_search_url = 'http://weixin.sogou.com/weixin?type=1&query=%s&ie=utf8&_sug_=n&_sug_type_=' % quote(self.keywords)self.sogou_search_url = 'http://weixin.sogou.com/weixin?type=1&query=%s&ie=utf8&s_from=input&_sug_=n&_sug_type_=' % quote(self.keywords)# 爬虫伪装头部设置self.headers = {'User-Agent': 'Mozilla/5.0 (Windows NT 6.3; WOW64; rv:51.0) Gecko/20100101 Firefox/51.0'}# 设置操作超时时长self.timeout = 5# 爬虫模拟在一个request.session中完成self.s = requests.Session()# excel 第一行数据self.excel_data = [u'编号', u'时间', u'文章标题', u'文章地址', u'文章简介']# 定义excel操作句柄self.excle_w = Workbook()# 搜索入口地址,以公众为关键字搜索该公众号def get_search_result_by_keywords(self):self.log(u'搜索地址为:%s' % self.sogou_search_url)return self.s.get(self.sogou_search_url, headers=self.headers, timeout=self.timeout).content# 获得公众号主页地址def get_wx_url_by_sougou_search_html(self, sougou_search_html):doc = pq(sougou_search_html)# print doc('p[class="tit"]')('a').attr('href')# print doc('div[class=img-box]')('a').attr('href')# 通过pyquery的方式处理网页内容,类似用beautifulsoup,但是pyquery和jQuery的方法类似,找到公众号主页地址return doc('div[class=txt-box]')('p[class=tit]')('a').attr('href')# 使用webdriver 加载公众号主页内容,主要是js渲染的部分def get_selenium_js_html(self, url):browser = webdriver.PhantomJS(executable_path=r'D:\Anaconda3\envs\python2\Scripts\phantomjs.exe')browser.get(url)time.sleep(3)# 执行js得到整个页面内容html = browser.execute_script("return document.documentElement.outerHTML")browser.close()return html# 获取公众号文章内容def parse_wx_articles_by_html(self, selenium_html):doc = pq(selenium_html)print u'开始查找内容msg'return doc('div[class="weui_media_box appmsg"]')# 有的公众号仅仅有10篇文章,有的可能多一点# return doc('div[class="weui_msg_card"]')#公众号只有10篇文章文章的# 将获取到的文章转换为字典def switch_arctiles_to_list(self, articles):# 定义存贮变量articles_list = []i = 1# 以当前时间为名字建表excel_sheet_name = time.strftime('%Y-%m-%d')excel_content = self.excle_w.add_sheet(excel_sheet_name)# 遍历找到的文章,解析里面的内容if articles:for article in articles.items():self.log(u'开始整合(%d/%d)' % (i, len(articles)))# 处理单个文章articles_list.append(self.parse_one_article(article, i, excel_content))i += 1return articles_list# 解析单篇文章def parse_one_article(self, article, i, excel_content):article_dict = {}# 获取标题title = article('h4[class="weui_media_title"]').text().strip()self.log(u'标题是: %s' % title)# 获取标题对应的地址url = 'http://mp.weixin.qq.com' + article('h4[class="weui_media_title"]').attr('hrefs')self.log(u'地址为: %s' % url)# 获取概要内容summary = article('.weui_media_desc').text()self.log(u'文章简述: %s' % summary)# 获取文章发表时间date = article('.weui_media_extra_info').text().strip()self.log(u'发表时间为: %s' % date)# 获取封面图片pic = self.parse_cover_pic(article)# 获取文章内容content = self.parse_content_by_url(url).html()# 存储文章到本地contentfiletitle = self.keywords + '/' + title + '_' + date + '.html'self.save_content_file(contentfiletitle, content)# 将这些简单的信息保存成excel数据cols = 0tempContent = [i, date, title, url, summary]for data in self.excel_data:excel_content.write(0, cols, data)excel_content.write(i, cols, tempContent[cols])cols += 1self.excle_w.save(self.keywords + '/' + self.keywords + '.xls')# 返回字典数据return {'title': title,'url': url,'summary': summary,'date': date,'pic': pic,'content': content}# 查找封面图片,获取封面图片地址def parse_cover_pic(self, article):pic = article('.weui_media_hd').attr('style')p = re.compile(r'background-image:url\((.*?)\)')rs = p.findall(pic)self.log(u'封面图片是:%s ' % rs[0] if len(rs) > 0 else '')return rs[0] if len(rs) > 0 else ''# 获取文章页面详情def parse_content_by_url(self, url):page_html = self.get_selenium_js_html(url)return pq(page_html)('#js_content')# 存储文章到本地def save_content_file(self, title, content):with open(title, 'w') as f:f.write(content)# 存贮json数据到本地def save_file(self, content):' 数据写入文件 'with open(self.keywords + '/' + self.keywords + '.txt', 'w') as f:f.write(content)# 自定义log函数,主要是加上时间def log(self, msg):print u'%s: %s' % (time.strftime('%Y-%m-%d_%H-%M-%S'), msg)# 验证函数def need_verify(self, selenium_html):' 有时候对方会封锁ip,这里做一下判断,检测html中是否包含id=verify_change的标签,有的话,代表被重定向了,提醒过一阵子重试 'return pq(selenium_html)('#verify_change').text() != ''# 创建公众号命名的文件夹def create_dir(self):if not os.path.exists(self.keywords):os.makedirs(self.keywords)# 爬虫主函数def run(self):' 爬虫入口函数 '# Step 0 : 创建公众号命名的文件夹self.create_dir()# Step 1:GET请求到搜狗微信引擎,以微信公众号英文名称作为查询关键字self.log(u'开始获取,微信公众号英文名为:%s' % self.keywords)self.log(u'开始调用sougou搜索引擎')sougou_search_html = self.get_search_result_by_keywords()# Step 2:从搜索结果页中解析出公众号主页链接self.log(u'获取sougou_search_html成功,开始抓取公众号对应的主页wx_url')wx_url = self.get_wx_url_by_sougou_search_html(sougou_search_html)self.log(u'获取wx_url成功,%s' % wx_url)# Step 3:Selenium+PhantomJs获取js异步加载渲染后的htmlself.log(u'开始调用selenium渲染html')selenium_html = self.get_selenium_js_html(wx_url)# Step 4: 检测目标网站是否进行了封锁if self.need_verify(selenium_html):self.log(u'爬虫被目标网站封锁,请稍后再试')else:# Step 5: 使用PyQuery,从Step 3获取的html中解析出公众号文章列表的数据self.log(u'调用selenium渲染html完成,开始解析公众号文章')articles = self.parse_wx_articles_by_html(selenium_html)self.log(u'抓取到微信文章%d篇' % len(articles))# Step 6: 把微信文章数据封装成字典的listself.log(u'开始整合微信文章数据为字典')articles_list = self.switch_arctiles_to_list(articles)'''json 数据,需要分析json数据的可以把这些注释打开# Step 7: 把Step 5的字典list转换为Jsonself.log(u'整合完成,开始转换为json')data_json = json.dumps(articles_list)# Step 8: 写文件self.log(u'转换为json完成,开始保存json数据到文件')self.save_file(data_json)'''self.log(u'保存完成,程序结束')# main
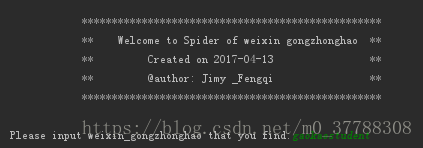
if __name__ == '__main__':print u'''************************************************** ** Welcome to Pycharm of weixin gongzhonghao ** **************************************************'''prompt = u'Please input weixin_gongzhonghao that you find:'gongzhonghao = raw_input(prompt)if not gongzhonghao:gongzhonghao = u'gaokaostudent'weixin_spider(gongzhonghao).run()运行成功的公众号名称:gaokaostudent
代码中需要修改的地方
2.1首先要修改phantomjs.exe所在的文件路径为
在Python2下的安装路径python2\Scripts\phantomjs.exe

2.2接着在运行代码时,键入你想爬取的公众号ID:
我这里是爬取了一个高考填报志愿相关的公众号gaokaostudent的文章。

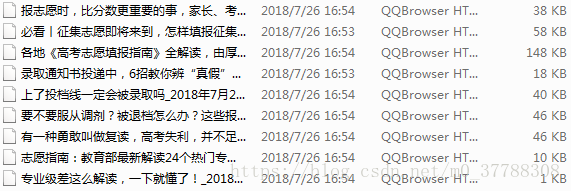
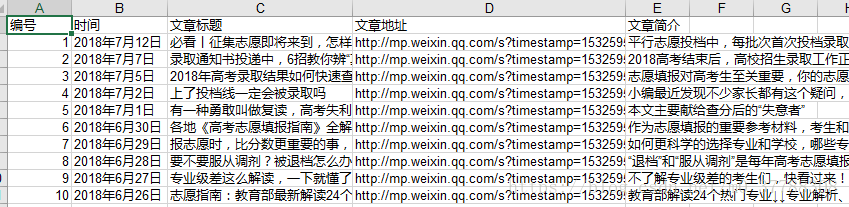
运行结果展示
开始爬取文章内容时,python会自动生成一个gaokaostudent文件夹,里面存储了你所爬取到的文章内容和一个整理好的excel文件,具体内容如下图所示:

需要注意的地方
本篇文章中所爬取的微信公众号,其标题大多是只包含了Utf-8编码的内容,如果你所爬取的公众号内容标题中含有其他特殊字符,可能会爬取失败。