引入
-
除了传统的边缘检测算法,当然也有基于深度学习的边缘检测模型
-
这次就介绍一篇比较经典的论文 Holistically-Nested Edge Detection
-
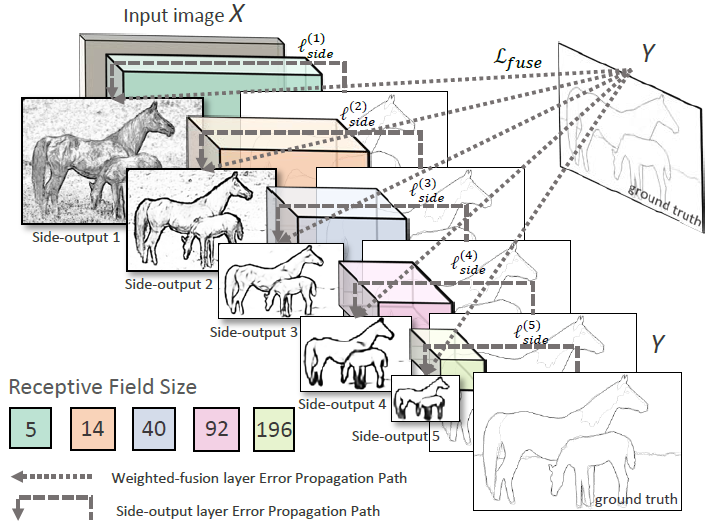
其中的 Holistically-Nested 表示此模型是一个多尺度的端到端边缘检测模型
相关资料
-
论文:Holistically-Nested Edge Detection
-
官方代码(Caffe):s9xie/hed
-
非官方实现(Pytorch): xwjabc/hed
效果演示
-
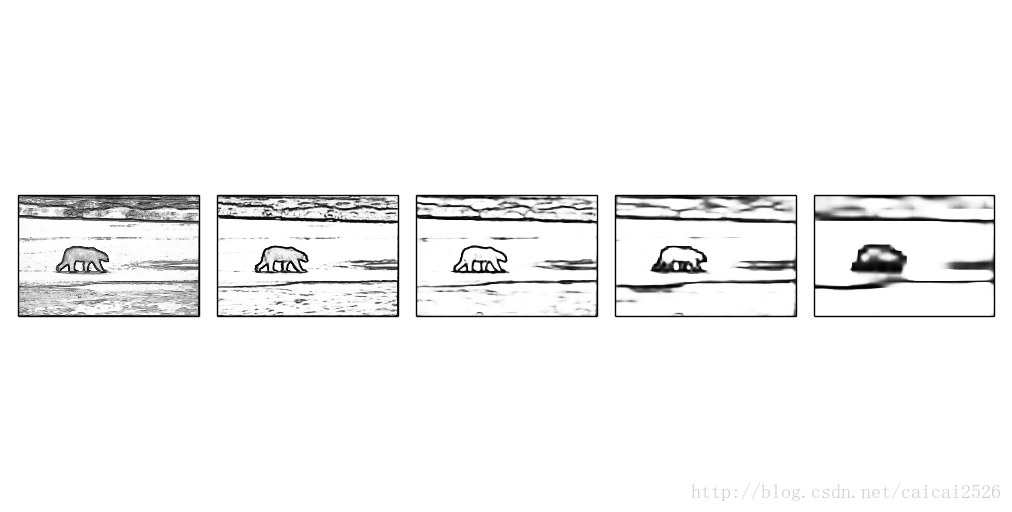
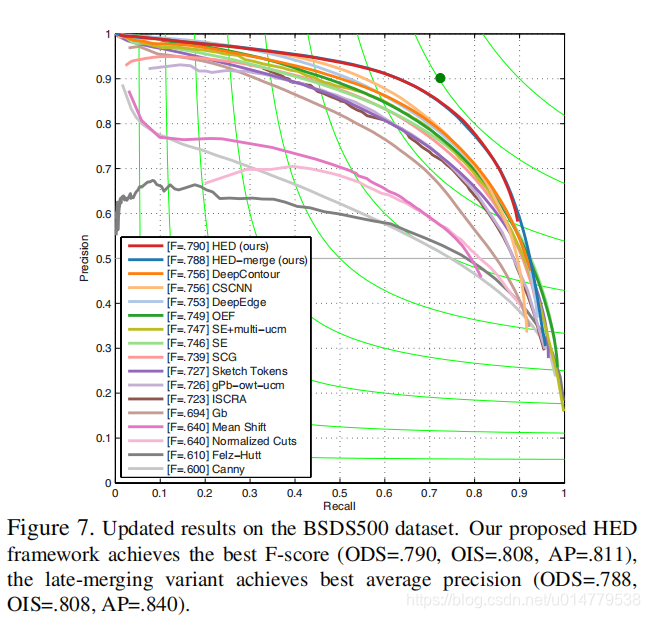
论文中的效果对比图:

模型结构
-
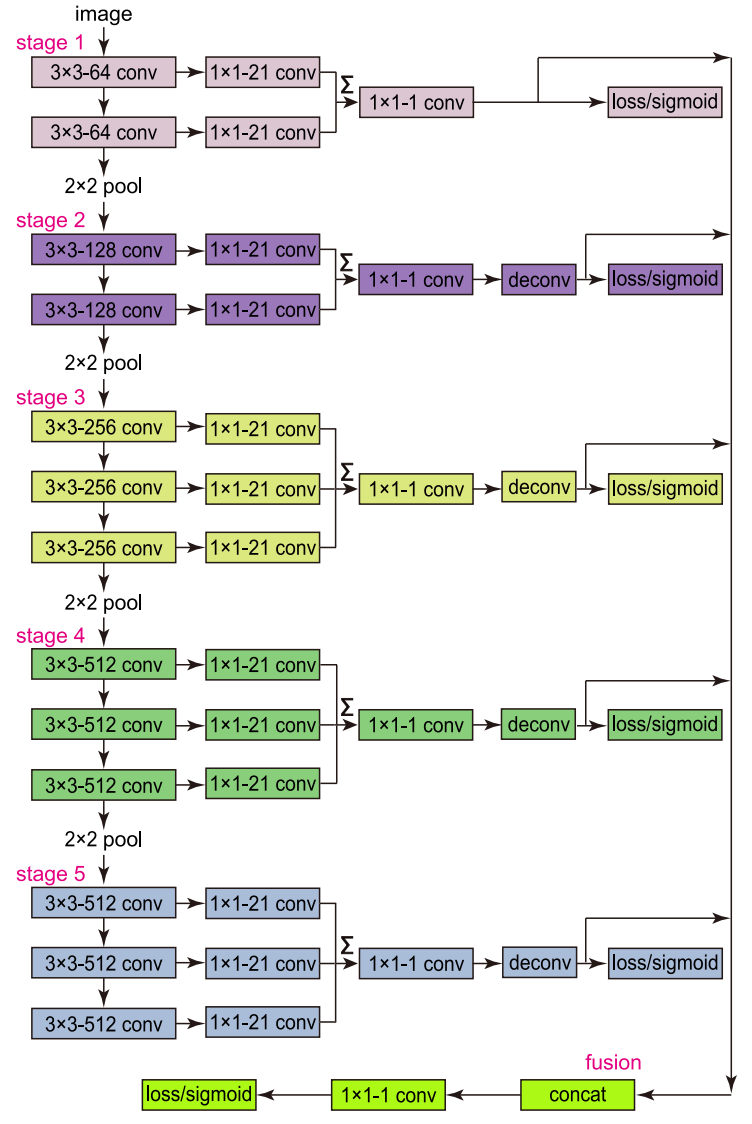
HED 模型包含五个层级的特征提取架构,每个层级中:
-
使用 VGG Block 提取层级特征图
-
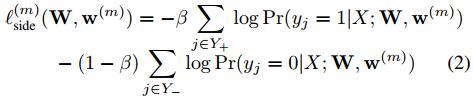
使用层级特征图计算层级输出
-
层级输出上采样
-
-
最后融合五个层级输出作为模型的最终输出:
-
通道维度拼接五个层级的输出
-
1x1 卷积对层级输出进行融合
-
-
模型总体架构图如下:

代码实现
导入必要的模块
import cv2
import numpy as npfrom PIL import Imageimport paddle
import paddle.nn as nn
构建 HED Block
-
由一个 VGG Block 和一个 score Conv2D 层组成
-
使用 VGG Block 提取图像特征信息
-
使用一个额外的 Conv2D 计算边缘得分
class HEDBlock(nn.Layer):def __init__(self, in_channels, out_channels, paddings, num_convs, with_pool=True):super().__init__()# VGG Blockif with_pool:pool = nn.MaxPool2D(kernel_size=2, stride=2)self.add_sublayer('pool', pool)conv1 = nn.Conv2D(in_channels=in_channels, out_channels=out_channels, kernel_size=3, stride=1, padding=paddings[0])relu = nn.ReLU()self.add_sublayer('conv1', conv1)self.add_sublayer('relu1', relu)for _ in range(num_convs-1):conv = nn.Conv2D(in_channels=out_channels, out_channels=out_channels, kernel_size=3, stride=1, padding=paddings[_+1])self.add_sublayer(f'conv{_+2}', conv)self.add_sublayer(f'relu{_+2}', relu)self.layer_names = [name for name in self._sub_layers.keys()]# Socre Layerself.score = nn.Conv2D(in_channels=out_channels, out_channels=1, kernel_size=1, stride=1, padding=0)def forward(self, input):for name in self.layer_names:input = self._sub_layers[name](input)return input, self.score(input)
构建 HED Caffe 模型
-
本模型基于官方开源的 Caffe 预训练模型实现,预测结果非常接近官方实现。
-
此代码会稍显冗余,主要是为了对齐官方提供的预训练模型,具体的原因请参考如下说明:
-
由于 Paddle 的 Bilinear Upsampling 与 Caffe 的 Bilinear DeConvolution 并不完全等价,所以这里使用 Transpose Convolution with Bilinear 进行替代以对齐模型输出。
-
因为官方开源的 Caffe 预训练模型中第一个 Conv 层的 padding 参数为 35,所以需要在前向计算时进行中心裁剪特征图以恢复其原始形状。
-
裁切所需要的参数参考自 XWJABC 的复现代码,代码链接
-
class HED_Caffe(nn.Layer):def __init__(self,channels=[3, 64, 128, 256, 512, 512],nums_convs=[2, 2, 3, 3, 3],paddings=[[35, 1], [1, 1], [1, 1, 1], [1, 1, 1], [1, 1, 1]],crops=[34, 35, 36, 38, 42],with_pools=[False, True, True, True, True]):super().__init__()'''Caffe HED model re-implementation in Paddle.This model is based on the official Caffe pre-training model. The inference results of this model are very close to the official implementation in Caffe.Pytorch and Paddle's Bilinear Upsampling are not completely equivalent to Caffe's DeConvolution with Bilinear, so Transpose Convolution with Bilinear is used instead.In the official Caffe pre-training model, the padding parameter value of the first convolution layer is equal to 35, so the feature map needs to be cropped. The crop parameters refer to the code implementation by XWJABC. The code link: https://github.com/xwjabc/hed/blob/master/networks.py#L55.'''assert (len(channels) - 1) == len(nums_convs), '(len(channels) -1) != len(nums_convs).'self.crops = crops# HED Blocksfor index, num_convs in enumerate(nums_convs):block = HEDBlock(in_channels=channels[index], out_channels=channels[index+1], paddings=paddings[index], num_convs=num_convs, with_pool=with_pools[index])self.add_sublayer(f'block{index+1}', block)self.layer_names = [name for name in self._sub_layers.keys()]# Upsamplesfor index in range(2, len(nums_convs)+1):upsample = nn.Conv2DTranspose(in_channels=1, out_channels=1, kernel_size=2**index, stride=2**(index-1), bias_attr=False)upsample.weight.set_value(self.bilinear_kernel(1, 1, 2**index))upsample.weight.stop_gradient = Trueself.add_sublayer(f'upsample{index}', upsample)# Output Layersself.out = nn.Conv2D(in_channels=len(nums_convs), out_channels=1, kernel_size=1, stride=1, padding=0)self.sigmoid = nn.Sigmoid()def forward(self, input):h, w = input.shape[2:]scores = []for index, name in enumerate(self.layer_names):input, score = self._sub_layers[name](input)if index > 0:score = self._sub_layers[f'upsample{index+1}'](score)score = score[:, :, self.crops[index]: self.crops[index] + h, self.crops[index]: self.crops[index] + w]scores.append(score)output = self.out(paddle.concat(scores, 1))return self.sigmoid(output)@staticmethoddef bilinear_kernel(in_channels, out_channels, kernel_size):'''return a bilinear filter tensor'''factor = (kernel_size + 1) // 2if kernel_size % 2 == 1:center = factor - 1else:center = factor - 0.5og = np.ogrid[:kernel_size, :kernel_size]filt = (1 - abs(og[0] - center) / factor) * (1 - abs(og[1] - center) / factor)weight = np.zeros((in_channels, out_channels, kernel_size, kernel_size), dtype='float32')weight[range(in_channels), range(out_channels), :, :] = filtreturn paddle.to_tensor(weight, dtype='float32')构建 HED 模型
-
下面就是一个比较精简的 HED 模型实现
-
与此同时也意味着下面这个模型会与官方实现的模型有所差异,具体差异如下:
-
3 x 3 卷积采用 padding == 1
-
采用 Bilinear Upsampling 进行上采样
-
-
同样可以加载预训练模型,不过精度可能会略有下降
# class HEDBlock(nn.Layer):
#     def __init__(self, in_channels, out_channels, num_convs, with_pool=True):
#         super().__init__()
#         # VGG Block
#         if with_pool:
#             pool = nn.MaxPool2D(kernel_size=2, stride=2)
#             self.add_sublayer('pool', pool)#         conv1 = nn.Conv2D(in_channels=in_channels, out_channels=out_channels, kernel_size=3, stride=1, padding=1)
#         relu = nn.ReLU()#         self.add_sublayer('conv1', conv1)
#         self.add_sublayer('relu1', relu)#         for _ in range(num_convs-1):
#             conv = nn.Conv2D(in_channels=out_channels, out_channels=out_channels, kernel_size=3, stride=1, padding=1)
#             self.add_sublayer(f'conv{_+2}', conv)
#             self.add_sublayer(f'relu{_+2}', relu)#         self.layer_names = [name for name in self._sub_layers.keys()]#         # Socre Layer
#         self.score = nn.Conv2D(
#             in_channels=out_channels, out_channels=1, kernel_size=1, stride=1, padding=0)#     def forward(self, input):
#         for name in self.layer_names:
#             input = self._sub_layers[name](input)
#         return input, self.score(input)# class HED(nn.Layer):
#     def __init__(self,
#                  channels=[3, 64, 128, 256, 512, 512],
#                  nums_convs=[2, 2, 3, 3, 3],
#                  with_pools=[False, True, True, True, True]):
#         super().__init__()
#         '''
#         HED model implementation in Paddle.#         Fix the padding parameter and use simple Bilinear Upsampling.
#         '''
#         assert (len(channels) - 1) == len(nums_convs), '(len(channels) -1) != len(nums_convs).'#         # HED Blocks
#         for index, num_convs in enumerate(nums_convs):
#             block = HEDBlock(in_channels=channels[index], out_channels=channels[index+1], num_convs=num_convs, with_pool=with_pools[index])
#             self.add_sublayer(f'block{index+1}', block)#         self.layer_names = [name for name in self._sub_layers.keys()]#         # Output Layers
#         self.out = nn.Conv2D(in_channels=len(nums_convs), out_channels=1, kernel_size=1, stride=1, padding=0)
#         self.sigmoid = nn.Sigmoid()#     def forward(self, input):
#         h, w = input.shape[2:]
#         scores = []
#         for index, name in enumerate(self.layer_names):
#             input, score = self._sub_layers[name](input)
#             if index > 0:
#                 score = nn.functional.upsample(score, size=[h, w], mode='bilinear')
#             scores.append(score)#         output = self.out(paddle.concat(scores, 1))
#         return self.sigmoid(output)
预训练模型
def hed_caffe(pretrained=True, **kwargs):model = HED_Caffe(**kwargs)if pretrained:pdparams = paddle.load('hed_pretrained_bsds.pdparams')model.set_dict(pdparams)return model
预处理操作
-
类型转换
-
归一化
-
转置
-
增加维度
-
转换为 Paddle Tensor
def preprocess(img):img = img.astype('float32')img -= np.asarray([104.00698793, 116.66876762, 122.67891434], dtype='float32')img = img.transpose(2, 0, 1)img = img[None, ...]return paddle.to_tensor(img, dtype='float32')
后处理操作
-
上下阈值限制
-
删除通道维度
-
反归一化
-
类型转换
-
转换为 Numpy NdArary
def postprocess(outputs):results = paddle.clip(outputs, 0, 1)results = paddle.squeeze(results, 1)results *= 255.0results = results.cast('uint8')return results.numpy()
模型推理
model = hed_caffe(pretrained=True)
img = cv2.imread('sample.png')
img_tensor = preprocess(img)
outputs = model(img_tensor)
results = postprocess(outputs)show_img = np.concatenate([cv2.cvtColor(img, cv2.COLOR_BGR2RGB), cv2.cvtColor(results[0], cv2.COLOR_GRAY2RGB)], 1)
Image.fromarray(show_img)
[外链图片转存失败,源站可能有防盗链机制,建议将图片保存下来直接上传(img-ST0UFcaX-1637974547860)(output_20_0.png)]
模型训练
- 模型的训练代码仍在打磨,后续会继续更新的
总结
-
这是一篇发表于 CVPR 2015 上的论文,距离现在也又很多年时间了,所以模型结构看起来算是比较简单的。
-
不过由于当时官方实现采用的是 Caffe 框架,加上那个 35 的谜之 padding,导致复现的时候并不是很顺利。
-
有关于边缘检测模型的训练,之后会有一个单独的项目来详细展开的,敬请期待(低情商:还没搞完)。