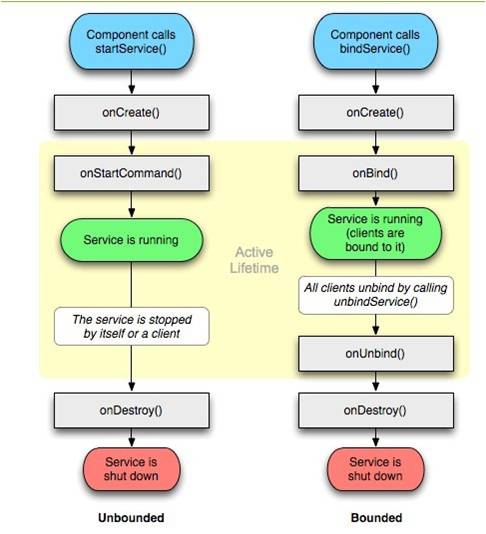
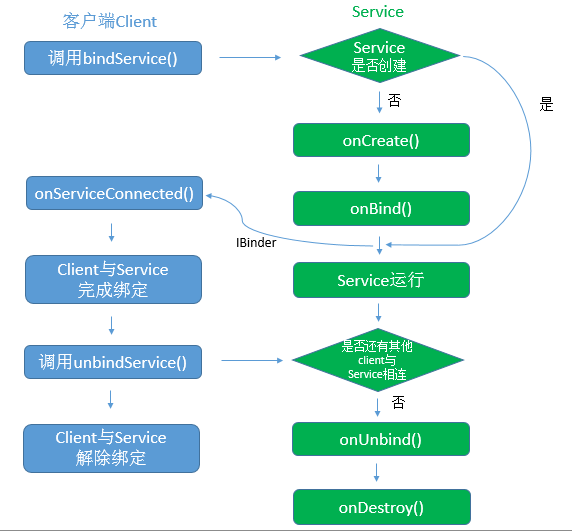
通过bindService启动的Service,会执行Service的onCreate、onBind、onUnbind、onDestroy方法,可以通过onBind方法返回的Binder对象和调用端进行通信,并且Service的生命周期和调用端同步。 如下是启动bindService的代码
var stu: Student? = null
val connection = object : ServiceConnection {override fun onServiceConnected(p0: ComponentName?, p1: IBinder?) {stu = Student.Stub.asInterface(p1)}override fun onServiceDisconnected(p0: ComponentName?) {}
}
val intent = Intent(this, Student::class.java)
bindService(intent, connection, BIND_AUTO_CREATE)复制代码
如下是bindService的启动流程:

1.bindService 发起端进程
1.1 ContextWrapper.bindService
public class ContextWrapper extends Context {public boolean bindService(Intent service, ServiceConnection conn,int flags) {//mBase为ContentImplreturn mBase.bindService(service, conn, flags);}
}
复制代码继续调用ContentImpl.bindService方法:
class ContextImpl extends Context {public boolean bindService(Intent service, ServiceConnection conn, int flags) {warnIfCallingFromSystemProcess();return bindServiceCommon(service, conn, flags, null, mMainThread.getHandler(), null,getUser());}final @NonNull LoadedApk mPackageInfo;private boolean bindServiceCommon(Intent service, ServiceConnection conn, int flags,String instanceName, Handler handler, Executor executor, UserHandle user) {// 将ServiceConnection转换成Binder对象变量,用于进程间通信IServiceConnection sd;//...if (mPackageInfo != null) {// 将ServiceConnection转换成可跨进程if (executor != null) {sd = mPackageInfo.getServiceDispatcher(conn, getOuterContext(), executor, flags);} else {sd = mPackageInfo.getServiceDispatcher(conn, getOuterContext(), handler, flags);}} else {throw new RuntimeException("Not supported in system context");}validateServiceIntent(service);try {//...// 调用AMS.bindIsolatedService方法int res = ActivityManager.getService().bindIsolatedService(mMainThread.getApplicationThread(), getActivityToken(), service,service.resolveTypeIfNeeded(getContentResolver()),sd, flags, instanceName, getOpPackageName(), user.getIdentifier());if (res < 0) {throw new SecurityException("Not allowed to bind to service " + service);}return res != 0;} catch (RemoteException e) {throw e.rethrowFromSystemServer();}}
}
复制代码首先将ServiceConnection变量存储到可跨进程通信的Binder对象并赋值到sd变量,并把sd变量传给AMS中,后续AMS通过这个Binder通信。最后调用AMS.bindIsolatedService跨进程调用方法。在分析另一个AMS进程前,先分析本进程如何
public final class LoadedApk {@UnsupportedAppUsagepublic final IServiceConnection getServiceDispatcher(ServiceConnection c,Context context, Handler handler, int flags) {return getServiceDispatcherCommon(c, context, handler, null, flags);}private IServiceConnection getServiceDispatcherCommon(ServiceConnection c,Context context, Handler handler, Executor executor, int flags) {synchronized (mServices) {LoadedApk.ServiceDispatcher sd = null;//...// 创建ServiceDispatcher对象,并把ServiceConnection参数作为其变量之一sd = new ServiceDispatcher(c, context, executor, flags);//...// 返回ServiceDispatcher.InnerConnection内部类,其继承IServiceConnection.Stub,是个binderreturn sd.getIServiceConnection();}}
}static final class ServiceDispatcher {// 返回的是此对象private final ServiceDispatcher.InnerConnection mIServiceConnection;// 存储ServiceConnection的变量private final ServiceConnection mConnection;private final Context mContext;private final Handler mActivityThread;private final Executor mActivityExecutor;private final ServiceConnectionLeaked mLocation;ServiceDispatcher(ServiceConnection conn,Context context, Handler activityThread, int flags) {//创建InnerConnection对象,等会会返回该对象mIServiceConnection = new InnerConnection(this);//用户定义的ServiceConnectionmConnection = conn;mContext = context;mActivityThread = activityThread;mActivityExecutor = null;mLocation = new ServiceConnectionLeaked(null);mLocation.fillInStackTrace();mFlags = flags;}// 返回的是mIServiceConnection变量,是Binder类IServiceConnection getIServiceConnection() {return mIServiceConnection;}//内部的Binder类private static class InnerConnection extends IServiceConnection.Stub {final WeakReference<LoadedApk.ServiceDispatcher> mDispatcher;// 通过构造函数弱引用ServiceDispatcher对象,此对象有ServiceConnection变量InnerConnection(LoadedApk.ServiceDispatcher sd) {mDispatcher = new WeakReference<LoadedApk.ServiceDispatcher>(sd);}// 调用ServiceDispatcher.connected()方法public void connected(ComponentName name, IBinder service, boolean dead)throws RemoteException {LoadedApk.ServiceDispatcher sd = mDispatcher.get();if (sd != null) {sd.connected(name, service, dead);}}}// ServiceDispatcher.connected()的方法public void connected(ComponentName name, IBinder service, boolean dead) {if (mActivityExecutor != null) {// 在线程池执行一个任务mActivityExecutor.execute(new RunConnection(name, service, 0, dead));} else if (mActivityThread != null) {// 给主线程发送一个post一个任务mActivityThread.post(new RunConnection(name, service, 0, dead));} else {// 如果上述两个都为空,则执行doConnected方法doConnected(name, service, dead);}}private final class RunConnection implements Runnable {RunConnection(ComponentName name, IBinder service, int command, boolean dead) {mName = name;mService = service;mCommand = command;mDead = dead;}public void run() {if (mCommand == 0) {// mCommand为0 ,进入doConnected方法doConnected(mName, mService, mDead);} else if (mCommand == 1) {doDeath(mName, mService);}}final ComponentName mName;final IBinder mService;final int mCommand;final boolean mDead;}// 调用ServiceConnection.onServiceConnected()方法public void doConnected(ComponentName name, IBinder service, boolean dead) {ServiceDispatcher.ConnectionInfo old;ServiceDispatcher.ConnectionInfo info;synchronized (this) {if (mForgotten) {return;}old = mActiveConnections.get(name);if (old != null && old.binder == service) {return;}if (service != null) {info = new ConnectionInfo();info.binder = service;//创建死亡监听对象info.deathMonitor = new DeathMonitor(name, service);try {//建立死亡通知service.linkToDeath(info.deathMonitor, 0);mActiveConnections.put(name, info);} catch (RemoteException e) {mActiveConnections.remove(name);return;}} else {mActiveConnections.remove(name);}if (old != null) {old.binder.unlinkToDeath(old.deathMonitor, 0);}}// 如果有旧服务,它现在已断开连接。if (old != null) {mConnection.onServiceDisconnected(name);}if (dead) {mConnection.onBindingDied(name);}//如果有新的可行服务,它现在已连接。if (service != null) {// 回调用户定义的ServiceConnection()mConnection.onServiceConnected(name, service);} else {// The binding machinery worked, but the remote returned null from onBind().mConnection.onNullBinding(name);}}}
复制代码创建LoadedApk.ServiceDispatcher类的实例化对象,对象里面包含了一个Binder对象LoadedApk.ServiceDispatcher.InnerConnection,方法最后就是返回这个Binder对象。AMS也通过这个Binder对象通信调用ServiceConnection.onServiceConnected()方法。