文章linux 4.14 代码分析smmu 流程
linux 在驱动找到对应的设备后会执行driver_probe_device 函数,具体dev和drv 匹配参考文章链接
driver_probe_device->really_probe->dma_configure->of_dma_configure
int of_dma_configure(struct device *dev, struct device_node *np)
{const struct iommu_ops *iommu;省略部分代码iommu = of_iommu_configure(dev, np);if (IS_ERR(iommu) && PTR_ERR(iommu) == -EPROBE_DEFER)return -EPROBE_DEFER;dev_dbg(dev, "device is%sbehind an iommu\n",iommu ? " " : " not ");arch_setup_dma_ops(dev, dma_addr, size, iommu, coherent);return 0;
}
通过of_iommu_configure 获取到了iommu 的操作函数集,arch_setup_dma_ops 设置了dev->dma_ops 决定了dma api 执行的函数。
of_iommu_configure 函数
const struct iommu_ops *of_iommu_configure(struct device *dev,struct device_node *master_np)
{const struct iommu_ops *ops = NULL;struct iommu_fwspec *fwspec = dev->iommu_fwspec;......if (fwspec) {if (fwspec->ops)return fwspec->ops;/* In the deferred case, start again from scratch */iommu_fwspec_free(dev);}if (dev_is_pci(dev)) {struct of_pci_iommu_alias_info info = {.dev = dev,.np = master_np,};err = pci_for_each_dma_alias(to_pci_dev(dev),of_pci_iommu_init, &info);} else {struct of_phandle_args iommu_spec;int idx = 0;while (!of_parse_phandle_with_args(master_np, "iommus","#iommu-cells",idx, &iommu_spec)) {err = of_iommu_xlate(dev, &iommu_spec);of_node_put(iommu_spec.np);idx++;if (err)break;}}if (!err)ops = dev->iommu_fwspec->ops;.......if (ops && ops->add_device && dev->bus && !dev->iommu_group)err = ops->add_device(dev);return ops;
}
从函数中可以看出,区分了是不是pci设备,看不走pci设备的代码,调用了of_iommu_xlate 函数。首先通过of_parse_phandle_with_args函数找到了iommu-spec 。 这里具体iomms,iommu-cell 的含义可以参考
Documentation\devicetree\bindings\iommu 中的iommu.txt 文档,从文档中部分解释摘抄如下:
- #iommu-cells: The number of cells in an IOMMU specifier needed to encode an address.
The meaning of the IOMMU specifier is defined by the device tree binding of the specific IOMMU. Below are a few examples of typical use-cases:
- #iommu-cells = <0>: Single master IOMMU devices are not configurable and therefore no additional information needs to be encoded in the specifier. This may also apply to multiple master IOMMU devices that do not allow the association of masters to be configured. Note that an IOMMU can by design be multi-master yet only expose a single master in a given configuration. In such cases the number of cells will usually be 1 as in the next case.
- #iommu-cells = <1>: Multiple master IOMMU devices may need to be configured in order to enable translation for a given master. In such cases the single address cell corresponds to the master device's ID. In some cases more than one cell can be required to represent a single master ID.
- #iommu-cells = <4>: Some IOMMU devices allow the DMA window for masters to be configured. The first cell of the address in this may contain the master device's ID for example, while the second cell could contain the start of the DMA window for the given device. The length of the DMA window is given by the third and fourth cells.
根据文档中的例子看当使用cells 为 1 时需要和 stream id 匹配, cells 为4 的时候需要dma windows。上面的while 循环不断遍历
获得了iommus 描述符对应的地址。然后调用了of_iommu_xlate 函数
static int of_iommu_xlate(struct device *dev,struct of_phandle_args *iommu_spec)
{const struct iommu_ops *ops;struct fwnode_handle *fwnode = &iommu_spec->np->fwnode;int err;ops = iommu_ops_from_fwnode(fwnode); //通过fwnode 去查找iommu驱动注册的opsif ((ops && !ops->of_xlate) ||!of_device_is_available(iommu_spec->np) ||(!ops && !of_iommu_driver_present(iommu_spec->np)))return NO_IOMMU;err = iommu_fwspec_init(dev, &iommu_spec->np->fwnode, ops);if (err)return err;/** The otherwise-empty fwspec handily serves to indicate the specific* IOMMU device we're waiting for, which will be useful if we ever get* a proper probe-ordering dependency mechanism in future.*/if (!ops)return -EPROBE_DEFER;return ops->of_xlate(dev, iommu_spec);
}
const struct iommu_ops *iommu_ops_from_fwnode(struct fwnode_handle *fwnode)
{const struct iommu_ops *ops = NULL;struct iommu_device *iommu;spin_lock(&iommu_device_lock);list_for_each_entry(iommu, &iommu_device_list, list)if (iommu->fwnode == fwnode) {ops = iommu->ops;break;}spin_unlock(&iommu_device_lock);return ops;
}时从fwnode 的链表中查找对应的iommu device ,fwnode 往链表中添加时在iommu 驱动注册的时候。后面会介绍,在此获得了ops后,会执行iommu_fwspec_init函数
int iommu_fwspec_init(struct device *dev, struct fwnode_handle *iommu_fwnode,const struct iommu_ops *ops)
{struct iommu_fwspec *fwspec = dev->iommu_fwspec;if (fwspec)return ops == fwspec->ops ? 0 : -EINVAL;fwspec = kzalloc(sizeof(*fwspec), GFP_KERNEL);if (!fwspec)return -ENOMEM;of_node_get(to_of_node(iommu_fwnode));fwspec->iommu_fwnode = iommu_fwnode;fwspec->ops = ops;dev->iommu_fwspec = fwspec;return 0;
函数此函数主要是把ops 赋值给另外iommu_fwspec.。回到上面的of_iommu_configure 函数
if (!err)
ops = dev->iommu_fwspec->ops;
这句代码拿到了需要的ops。
总结下获得iommu ops 代码执行流程:
driver_probe_device->really_probe->dma_configure->of_dma_configure->of_iommu_configure->of_iommu_xlate->iommu_ops_from_fwnode
以上可以看出获得ops 主要是根据fwnode 找到的。
---------------------------------------为fwnode 设置smmu ops-----------------------------------------------------------------------------------------------
kernel\msm-4.14\drivers\iommu\arm-smmu.c 文件中可以看到arm smmu 的驱动
static struct platform_driver arm_smmu_driver = {
.driver = {
.name = "arm-smmu",
.of_match_table = of_match_ptr(arm_smmu_of_match),
.pm = &arm_smmu_pm_ops,
.suppress_bind_attrs = true,
},
.probe = arm_smmu_device_dt_probe,
.remove = arm_smmu_device_remove,
};
arm_smmu_of_match 此匹配表中有多种设备的驱动
static const struct of_device_id arm_smmu_of_match[] = {
{ .compatible = "arm,smmu-v1", .data = &smmu_generic_v1 },
{ .compatible = "arm,smmu-v2", .data = &smmu_generic_v2 },
{ .compatible = "arm,mmu-400", .data = &smmu_generic_v1 },
{ .compatible = "arm,mmu-401", .data = &arm_mmu401 },
{ .compatible = "arm,mmu-500", .data = &arm_mmu500 },
{ .compatible = "cavium,smmu-v2", .data = &cavium_smmuv2 },
{ .compatible = "qcom,smmu-v2", .data = &qcom_smmuv2 },
{ .compatible = "qcom,qsmmu-v500", .data = &qcom_smmuv500 },
{ },
};
qcom,qsmmu-v500 是目前高通使用的,是高通基于mmu500
arm_smmu_device_dt_probe函数比较大 前面是获取资源的一些函数调用
static int arm_smmu_device_dt_probe(struct platform_device *pdev)
{iommu_device_set_ops(&smmu->iommu, &arm_smmu_ops);iommu_device_set_fwnode(&smmu->iommu, dev->fwnode);err = iommu_device_register(&smmu->iommu);if (!using_legacy_binding)arm_smmu_bus_init();}
这三个函数主要是用来设置arm smmu ops 的,arm smmu ops 函数还是挺多的。
static struct iommu_ops arm_smmu_ops = {.capable		= arm_smmu_capable,.domain_alloc		= arm_smmu_domain_alloc,.domain_free		= arm_smmu_domain_free,.attach_dev		= arm_smmu_attach_dev,.detach_dev		= arm_smmu_detach_dev,.map			= arm_smmu_map,.unmap			= arm_smmu_unmap,.map_sg			= arm_smmu_map_sg,.iova_to_phys		= arm_smmu_iova_to_phys,.iova_to_phys_hard	= arm_smmu_iova_to_phys_hard,.add_device		= arm_smmu_add_device,.remove_device		= arm_smmu_remove_device,.device_group		= arm_smmu_device_group,.domain_get_attr	= arm_smmu_domain_get_attr,.domain_set_attr	= arm_smmu_domain_set_attr,.of_xlate		= arm_smmu_of_xlate,.get_resv_regions	= arm_smmu_get_resv_regions,.put_resv_regions	= arm_smmu_put_resv_regions,.pgsize_bitmap		= -1UL, /* Restricted during device attach */.trigger_fault		= arm_smmu_trigger_fault,.reg_read		= arm_smmu_reg_read,.reg_write		= arm_smmu_reg_write,.tlbi_domain		= arm_smmu_tlbi_domain,.enable_config_clocks	= arm_smmu_enable_config_clocks,.disable_config_clocks	= arm_smmu_disable_config_clocks,.is_iova_coherent	= arm_smmu_is_iova_coherent,.iova_to_pte = arm_smmu_iova_to_pte,
};
iommu_device_set_ops 函数很简单就是赋值操作
static inline void iommu_device_set_ops(struct iommu_device *iommu,const struct iommu_ops *ops)
{iommu->ops = ops;
}
iommu_device_set_fwnode 也是简单的赋值
static inline void iommu_device_set_fwnode(struct iommu_device *iommu,struct fwnode_handle *fwnode)
{iommu->fwnode = fwnode;
}
两个函数分别把ops 和dev 的fwnode 赋值给了smmu->iommu,然后执行iommu_device_register
int iommu_device_register(struct iommu_device *iommu)
{spin_lock(&iommu_device_lock);list_add_tail(&iommu->list, &iommu_device_list);spin_unlock(&iommu_device_lock);return 0;
}
iommu_device_register 将iommu 加入到了iommu_device_list 链表中。在获取ops 时会通过iommu_ops_from_fwnode 来获取ops。
arm_smmu_device_dt_probe->iommu_device_set_ops
->iommu_device_set_fwnode
->iommu_device_register
------------------------------------给设备添加group 并且获得domain-----------------------
在arm_smmu_device_dt_probe 执行完iommu_device_register 函数后会执行arm_smmu_bus_init函数
arm_smmu_bus_init 函数 将从总线上遍历设备
static void arm_smmu_bus_init(void)
{/* Oh, for a proper bus abstraction */if (!iommu_present(&platform_bus_type))bus_set_iommu(&platform_bus_type, &arm_smmu_ops);
#ifdef CONFIG_ARM_AMBAif (!iommu_present(&amba_bustype))bus_set_iommu(&amba_bustype, &arm_smmu_ops);
#endif
#ifdef CONFIG_PCIif (!iommu_present(&pci_bus_type)) {pci_request_acs();bus_set_iommu(&pci_bus_type, &arm_smmu_ops);}
#endif
}
根据不同的总线类型调用bus_set_iommu函数
int bus_set_iommu(struct bus_type *bus, const struct iommu_ops *ops)
{int err;if (bus->iommu_ops != NULL)return -EBUSY;bus->iommu_ops = ops;/* Do IOMMU specific setup for this bus-type */err = iommu_bus_init(bus, ops);if (err)bus->iommu_ops = NULL;return err;
}
在bus_set_iommu函数中将 iommu ops 赋值给了 bus 的iommu ops 这里的iommu ops 就是前面提到的arm_smmu_ops
static int iommu_bus_init(struct bus_type *bus, const struct iommu_ops *ops)
{int err;struct notifier_block *nb;struct iommu_callback_data cb = {.ops = ops,};nb = kzalloc(sizeof(struct notifier_block), GFP_KERNEL);if (!nb)return -ENOMEM;nb->notifier_call = iommu_bus_notifier;err = bus_register_notifier(bus, nb);if (err)goto out_free;err = bus_for_each_dev(bus, NULL, &cb, add_iommu_group);if (err)goto out_err;return 0;....
}
iommu_bus_init 初始化时候注册了一个通知回调函数。bus_for_each_dev 函数根据函数名也可以看出时遍历设备。这里还有个add_iommu_group 函数通过bus_for_each_dev 传递下去。
int bus_for_each_dev(struct bus_type *bus, struct device *start,void *data, int (*fn)(struct device *, void *))
{struct klist_iter i;struct device *dev;int error = 0;if (!bus || !bus->p)return -EINVAL;klist_iter_init_node(&bus->p->klist_devices, &i,(start ? &start->p->knode_bus : NULL));while ((dev = next_device(&i)) && !error)error = fn(dev, data);klist_iter_exit(&i);return error;
}
从总线的设备上不断的遍历,找到设备后执行fn函数,也就是执行add_iommu_group函数。fn函数有两个参数一个是dev,另一个是 data。这个data 就是iommu_bus_init中的
struct iommu_callback_data cb = {
.ops = ops,
};
所以在add_iommu_group 中通过
static int add_iommu_group(struct device *dev, void *data)
{struct iommu_callback_data *cb = data;const struct iommu_ops *ops = cb->ops;int ret;if (!ops->add_device)return 0;WARN_ON(dev->iommu_group);ret = ops->add_device(dev);/** We ignore -ENODEV errors for now, as they just mean that the* device is not translated by an IOMMU. We still care about* other errors and fail to initialize when they happen.*/if (ret == -ENODEV)ret = 0;return ret;
}
ops->add_device 实际上就是调用了arm_smmu_ops->add_device 函数。从前面的函数集可以看到arm_smmu_ops中的add_device 是指向arm_smmu_add_device 函数
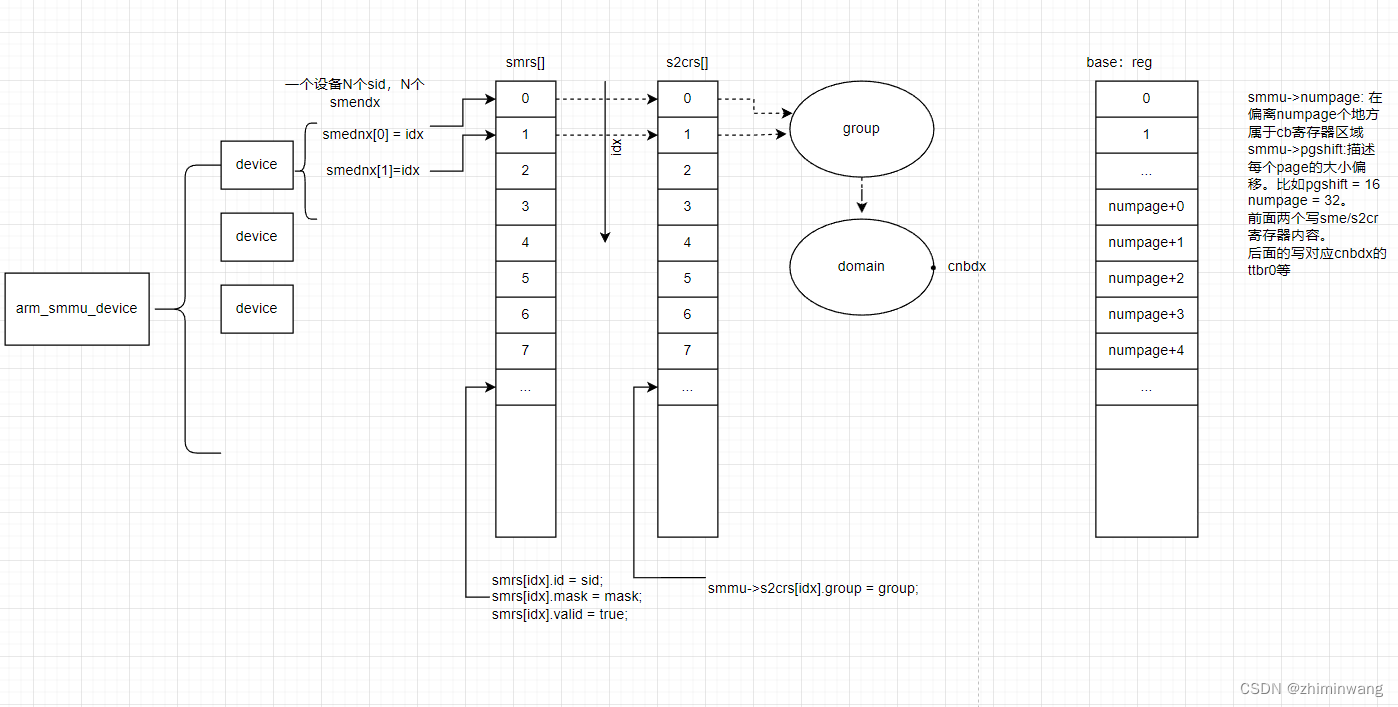
static int arm_smmu_add_device(struct device *dev)
{
....for (i = 0; i < fwspec->num_ids; i++) {u16 sid = fwspec->ids[i];u16 mask = fwspec->ids[i] >> SMR_MASK_SHIFT;if (sid & ~smmu->streamid_mask) {dev_err(dev, "stream ID 0x%x out of range for SMMU (0x%x)\n",sid, smmu->streamid_mask);goto out_pwr_off;}if (mask & ~smmu->smr_mask_mask) {dev_err(dev, "SMR mask 0x%x out of range for SMMU (0x%x)\n",mask, smmu->smr_mask_mask);goto out_pwr_off;}}
......
cfg->smmu = smmu;fwspec->iommu_priv = cfg;while (i--)cfg->smendx[i] = INVALID_SMENDX;ret = arm_smmu_master_alloc_smes(dev);if (ret)goto out_cfg_free;}
arm_smmu_master_alloc_smes 会为没有group 的设置创建group,关于smmu的group 和stream id 概念 参考文章
https://zhuanlan.zhihu.com/p/27026590
https://blog.csdn.net/tiantao2012/article/details/62892281
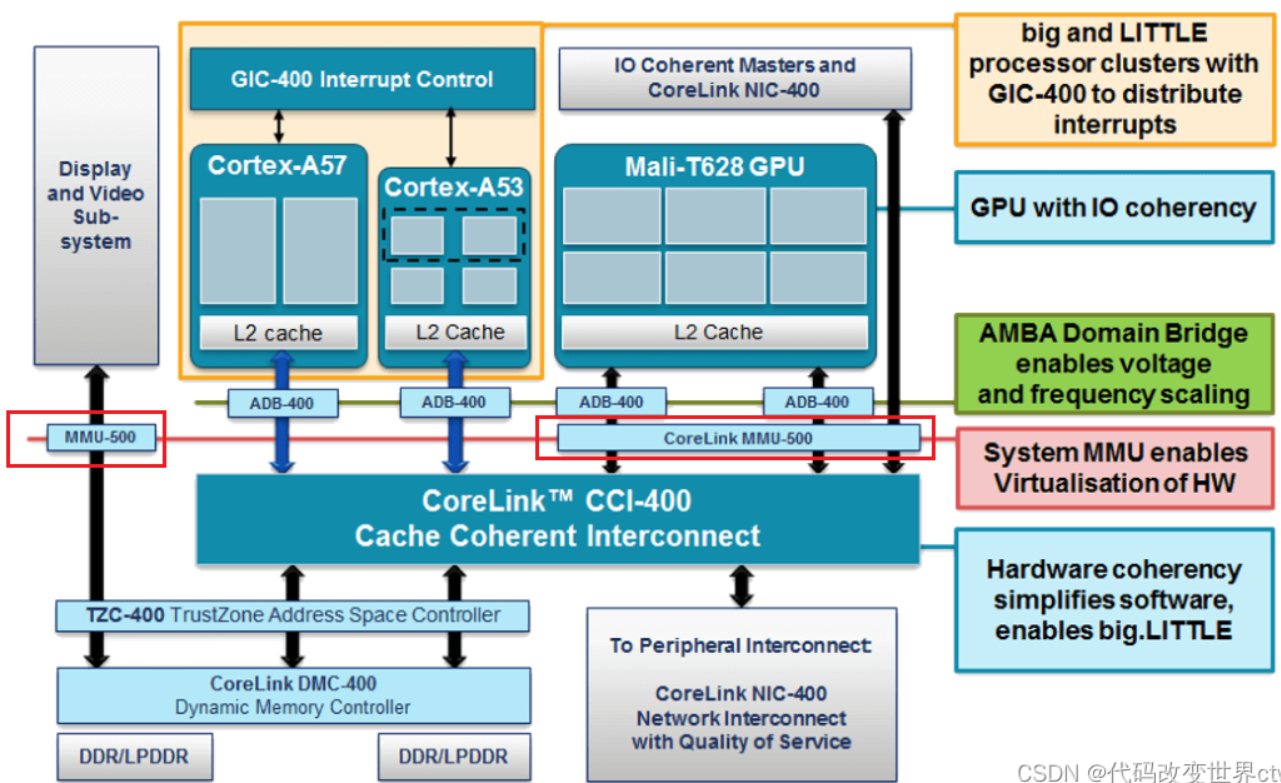
stream id 的概念可以参考 arm mmu500 文档
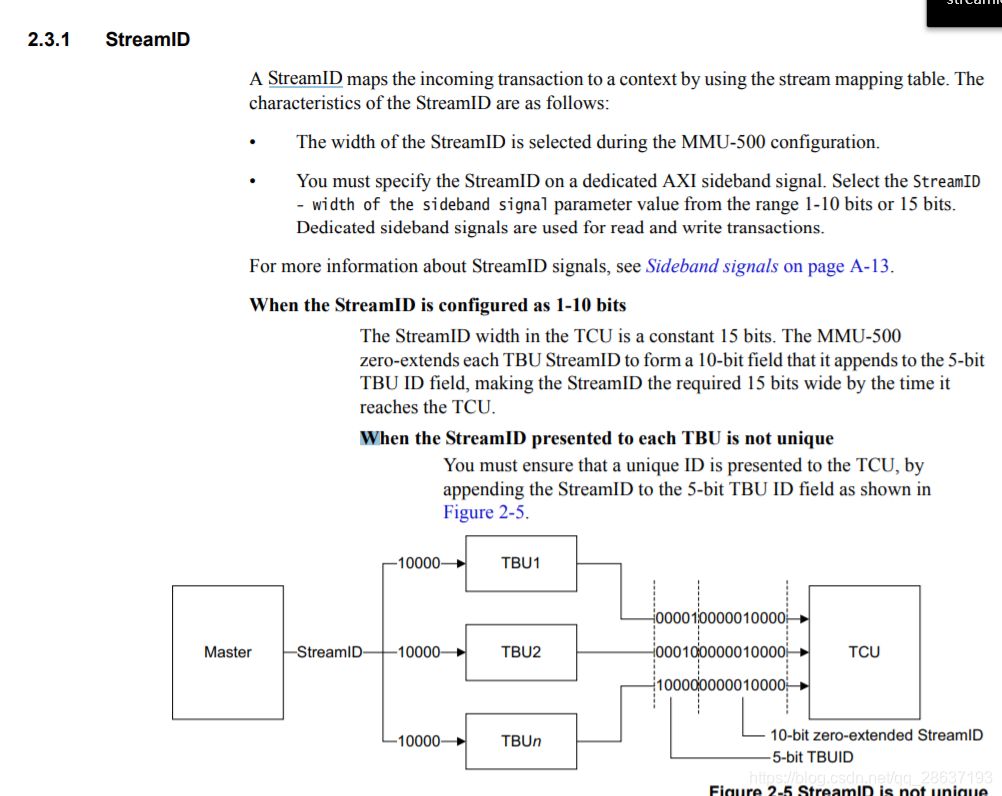
这里的TBU 代表的是转换缓冲单元,包含了存储页表的TLB。TCU 是转换控制单元,用于控制和管理地址转换。
在高通的qsmuu-v500 中 也是很多个TBU 链接 一个TCU(实现了单个TCU)。
arm_smmu_master_alloc_smes 函数回得到group
static int arm_smmu_master_alloc_smes(struct device *dev)
{
const struct iommu_ops *ops = dev->bus->iommu_ops;......group = iommu_group_get_for_dev(dev);if (!group)group = ERR_PTR(-ENOMEM);if (IS_ERR(group)) {ret = PTR_ERR(group);goto iommu_group_err;}iommu_group_put(group);/* It worked! Don't poke the actual hardware until we've attached */for_each_cfg_sme(fwspec, i, idx)smmu->s2crs[idx].group = group;}
iommu_group_get_for_dev 主要是分配group 设置domian
struct iommu_group *iommu_group_get_for_dev(struct device *dev)
{
const struct iommu_ops *ops = dev->bus->iommu_ops;.....group = ops->device_group(dev);if (WARN_ON_ONCE(group == NULL))return ERR_PTR(-EINVAL);if (IS_ERR(group))return group;/** Try to allocate a default domain - needs support from the* IOMMU driver.*/if (!group->default_domain) {struct iommu_domain *dom;dom = __iommu_domain_alloc(dev->bus, iommu_def_domain_type);if (!dom && iommu_def_domain_type != IOMMU_DOMAIN_DMA) {dev_warn(dev,"failed to allocate default IOMMU domain of type %u; falling back to IOMMU_DOMAIN_DMA",iommu_def_domain_type);dom = __iommu_domain_alloc(dev->bus, IOMMU_DOMAIN_DMA);}group->default_domain = dom;if (!group->domain)group->domain = dom;}ret = iommu_group_add_device(group, dev);......
}
ops->device_group 实际上调用arm_smmu_device_group 函数
static struct iommu_group *arm_smmu_device_group(struct device *dev)
{....if (group)iommu_group_ref_get(group);else {if (dev_is_pci(dev))group = pci_device_group(dev);elsegroup = generic_device_group(dev);if (IS_ERR(group))return NULL;}if (arm_smmu_arch_device_group(dev, group)) {iommu_group_put(group);return ERR_PTR(-EINVAL);}return group;
}
如果不是pci设备 执行generic_device_group 函数,然后调用iommu_group_alloc 此函数回分配一个group 并且进行一些kobject操作。
group domain 参考https://blog.csdn.net/tiantao2012/article/details/62892281 文章,
在获得到group后 iommu_group_get_for_dev 执行__iommu_domain_alloc 函数
static struct iommu_domain *__iommu_domain_alloc(struct bus_type *bus,unsigned type)
{struct iommu_domain *domain;if (bus == NULL || bus->iommu_ops == NULL)return NULL;domain = bus->iommu_ops->domain_alloc(type);if (!domain)return NULL;domain->ops  = bus->iommu_ops;domain->type = type;/* Assume all sizes by default; the driver may override this later */domain->pgsize_bitmap  = bus->iommu_ops->pgsize_bitmap;domain->is_debug_domain = false;memset(domain->name, 0, IOMMU_DOMAIN_NAME_LEN);return domain;
}
上边函数中为domain的ops 设置了bus->iommu_ops ,bus->iommu_ops 在前面已经被设置为了arm_smmu_ops
所以设备使用smmu的ops 只需要通过获得group 在获得domain。并且设置了domain的ops
总结设置group过程:
arm_smmu_device_dt_probe->arm_smmu_bus_init->bus_set_iommu->iommu_bus_init->bus_for_each_dev->add_iommu_group->arm_smmu_add_device_arm_smmu_master_alloc_smes->iommu_group_get_for_dev->arm_smmu_device_group->generic_device_group
-------------------------------------------配置group 的iommu data----------------------------------------------------------------------
回到arm_smmu_device_group函数在获得group后执行arm_smmu_arch_device_group 函数,在此函数中调用了smmu->arch_ops->device_group(dev, group);, arch_ops 的赋值时在arm smmu 的probe 函数。
static struct platform_driver arm_smmu_driver = {.driver	= {.name		= "arm-smmu",.of_match_table	= of_match_ptr(arm_smmu_of_match),.pm		= &arm_smmu_pm_ops,.suppress_bind_attrs = true,},.probe	= arm_smmu_device_dt_probe,.remove	= arm_smmu_device_remove,
};
static int arm_smmu_device_dt_probe(struct platform_device *pdev)
{......arm_smmu_arch_init();.....data = of_device_get_match_data(dev);smmu->version = data->version;smmu->model = data->model;smmu->arch_ops = data->arch_ops;....
}可以看到smmu->arch_ops = data->arch_ops; 这句代码。这里还有个arm_smmu_arch_init 函数,会进行一些初始化。后边会用到。
查看of_device_get_match_data 函数的实现,回发现data 来自of_match_stable
onst void *of_device_get_match_data(const struct device *dev)
{const struct of_device_id *match;match = of_match_device(dev->driver->of_match_table, dev);if (!match)return NULL;return match->data;
}
实际上就是来自arm_smmu.c文件中的
ARM_SMMU_MATCH_DATA(smmu_generic_v1, ARM_SMMU_V1, GENERIC_SMMU, NULL);
ARM_SMMU_MATCH_DATA(smmu_generic_v2, ARM_SMMU_V2, GENERIC_SMMU, NULL);
ARM_SMMU_MATCH_DATA(arm_mmu401, ARM_SMMU_V1_64K, GENERIC_SMMU, NULL);
ARM_SMMU_MATCH_DATA(arm_mmu500, ARM_SMMU_V2, ARM_MMU500, NULL);
ARM_SMMU_MATCH_DATA(cavium_smmuv2, ARM_SMMU_V2, CAVIUM_SMMUV2, NULL);
ARM_SMMU_MATCH_DATA(qcom_smmuv2, ARM_SMMU_V2, QCOM_SMMUV2, &qsmmuv2_arch_ops);
ARM_SMMU_MATCH_DATA(qcom_smmuv500, ARM_SMMU_V2, QCOM_SMMUV500,&qsmmuv500_arch_ops);static const struct of_device_id arm_smmu_of_match[] = {{ .compatible = "arm,smmu-v1", .data = &smmu_generic_v1 },{ .compatible = "arm,smmu-v2", .data = &smmu_generic_v2 },{ .compatible = "arm,mmu-400", .data = &smmu_generic_v1 },{ .compatible = "arm,mmu-401", .data = &arm_mmu401 },{ .compatible = "arm,mmu-500", .data = &arm_mmu500 },{ .compatible = "cavium,smmu-v2", .data = &cavium_smmuv2 },{ .compatible = "qcom,smmu-v2", .data = &qcom_smmuv2 },{ .compatible = "qcom,qsmmu-v500", .data = &qcom_smmuv500 },{ },
};
高通平台最新使用的时qcom,qsmmu-v500,所以使用的data 是qcom_smmuv500,对应的操作函数如下
struct arm_smmu_arch_ops qsmmuv500_arch_ops = {.init = qsmmuv500_arch_init,.iova_to_phys_hard = qsmmuv500_iova_to_phys_hard,.init_context_bank = qsmmuv500_init_cb,.device_group = qsmmuv500_device_group,
};
所以arch_ops->device_group 函数执行的是 qsmmuv500_device_group
static int qsmmuv500_device_group(struct device *dev,struct iommu_group *group)
{struct iommu_fwspec *fwspec = dev->iommu_fwspec;struct arm_smmu_device *smmu = fwspec_smmu(fwspec);struct qsmmuv500_archdata *data = get_qsmmuv500_archdata(smmu);struct qsmmuv500_group_iommudata *iommudata;u32 actlr, i;struct arm_smmu_smr *smr;iommudata = to_qsmmuv500_group_iommudata(group);if (!iommudata) {iommudata = kzalloc(sizeof(*iommudata), GFP_KERNEL);if (!iommudata)return -ENOMEM;iommu_group_set_iommudata(group, iommudata,qsmmuv500_release_group_iommudata);}for (i = 0; i < data->actlr_tbl_size; i++) {smr = &data->actlrs[i].smr;actlr = data->actlrs[i].actlr;if (!arm_smmu_fwspec_match_smr(fwspec, smr))continue;if (!iommudata->has_actlr) {iommudata->actlr = actlr;iommudata->has_actlr = true;} else if (iommudata->actlr != actlr) {return -EINVAL;}}return 0;
}
此函数创建了一个iommudata 将get_qsmmuv500_archdata (实际调用smmu->archdata)获取的data 一些值赋值给iommudta。
smmu->archdata 获得是从前面提到的arm_smmu_arch_init函数。
static int arm_smmu_arch_init(struct arm_smmu_device *smmu)
{if (!smmu->arch_ops)return 0;if (!smmu->arch_ops->init)return 0;return smmu->arch_ops->init(smmu);
}
init函数实际上执行的是qsmmuv500_arch_init
static int qsmmuv500_arch_init(struct arm_smmu_device *smmu)
{struct resource *res;struct device *dev = smmu->dev;struct qsmmuv500_archdata *data;struct platform_device *pdev;int ret;u32 val;void __iomem *reg;data = devm_kzalloc(dev, sizeof(*data), GFP_KERNEL);if (!data)return -ENOMEM;INIT_LIST_HEAD(&data->tbus);pdev = container_of(dev, struct platform_device, dev);res = platform_get_resource_byname(pdev, IORESOURCE_MEM, "tcu-base");if (!res) {dev_err(dev, "Unable to get the tcu-base\n");return -EINVAL;}data->tcu_base = devm_ioremap(dev, res->start, resource_size(res));if (IS_ERR(data->tcu_base))return PTR_ERR(data->tcu_base);data->version = readl_relaxed(data->tcu_base + TCU_HW_VERSION_HLOS1);smmu->archdata = data;if (arm_smmu_is_static_cb(smmu))return 0;ret = qsmmuv500_read_actlr_tbl(smmu);if (ret)return ret;.....}
回到qsmmuv500_device_group 函数
void iommu_group_set_iommudata(struct iommu_group *group, void *iommu_data,void (*release)(void *iommu_data))
{group->iommu_data = iommu_data;group->iommu_data_release = release;
}
将iommu_data 赋值给group 组中,从高通的代看iommu_data保存着应该是硬件的一些信息。
总结下给dev 设置group增加iommu data流程:
arm_smmu_device_dt_probe->arm_smmu_bus_init->bus_set_iommu->iommu_bus_init->bus_for_each_dev->add_iommu_group->arm_smmu_add_device_arm_smmu_master_alloc_smes->iommu_group_get_for_dev->arm_smmu_device_group->arm_smmu_arch_device_group->qsmmuv500_device_group->get_qsmmuv500_archdata
-------------------------------------------------------------------设置dma ops-----------------------------
回到 of_dma_configure 函数前面
driver_probe_device->really_probe->dma_configure->of_dma_configure->of_iommu_configure->of_iommu_xlate->iommu_ops_from_fwnode
拿到 iommu ops 后执行
driver_probe_device->really_probe->dma_configure->of_dma_configure->arch_setup_dma_ops
void arch_setup_dma_ops(struct device *dev, u64 dma_base, u64 size,const struct iommu_ops *iommu, bool coherent)
{if (!dev->dma_ops)dev->dma_ops = &swiotlb_dma_ops;dev->archdata.dma_coherent = coherent;__iommu_setup_dma_ops(dev, dma_base, size, iommu);#ifdef CONFIG_XENif (xen_initial_domain()) {dev->archdata.dev_dma_ops = dev->dma_ops;dev->dma_ops = xen_dma_ops;}
#end
调用了__iommu_setup_dma_ops 函数
static void __iommu_setup_dma_ops(struct device *dev, u64 dma_base, u64 size,const struct iommu_ops *ops)
{struct iommu_domain *domain;if (!ops)return;/** The IOMMU core code allocates the default DMA domain, which the* underlying IOMMU driver needs to support via the dma-iommu layer.*/domain = iommu_get_domain_for_dev(dev);if (!domain)goto out_err;if (domain->type == IOMMU_DOMAIN_DMA) {if (iommu_dma_init_domain(domain, dma_base, size, dev))goto out_err;dev->dma_ops = &iommu_dma_ops;}return;out_err:pr_debug("Failed to set up IOMMU for device %s; retaining platform DMA ops\n",dev_name(dev));
}
iommu_get_domain_for_dev 通过设备的group 获取到domain,之前设置的type 是IOMMU_DOMAIN_DMA 执行iommu_dma_init_domain函数,此函数代码没看懂,看官方注释是根据dma base addr 和size 去配置空间。
addr 是of_dma_configure 函数中通过of_dma_get_range函数获得的,它在通过dtsi 获得。
看下dev->dma_ops 绑定的函数 集iommu_dma_ops
static const struct dma_map_ops iommu_dma_ops = {.alloc = __iommu_alloc_attrs,.free = __iommu_free_attrs,.mmap = __iommu_mmap_attrs,.get_sgtable = __iommu_get_sgtable,.map_page = __iommu_map_page,.unmap_page = __iommu_unmap_page,.map_sg = __iommu_map_sg_attrs,.unmap_sg = __iommu_unmap_sg_attrs,.sync_single_for_cpu = __iommu_sync_single_for_cpu,.sync_single_for_device = __iommu_sync_single_for_device,.sync_sg_for_cpu = __iommu_sync_sg_for_cpu,.sync_sg_for_device = __iommu_sync_sg_for_device,.map_resource = iommu_dma_map_resource,.unmap_resource = iommu_dma_unmap_resource,.mapping_error = iommu_dma_mapping_error,
};
到这里dev 的dma_ops 和dev 通过group,domain ops 已经全部设置完成了