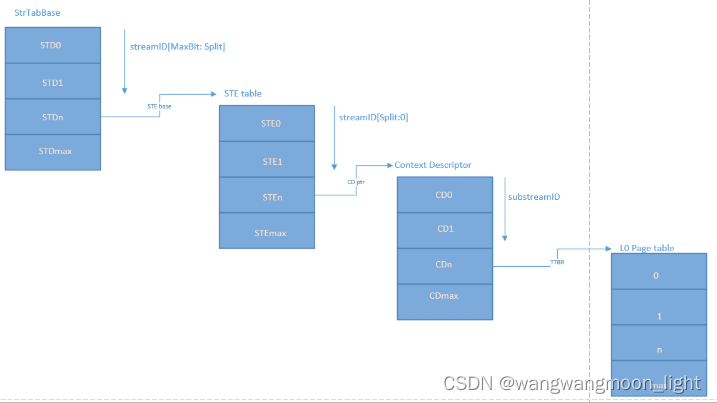
设备StreamID:sid
struct iommu_fwspec {const struct iommu_ops	*ops;struct fwnode_handle	*iommu_fwnode;void			*iommu_priv;unsigned int		num_ids;u32			ids[1];  //ids保存的某device使用的streamID
};
通过iommu_fwspec_add_id函数设置:
struct iommu_fwspec {const struct iommu_ops	*ops;struct fwnode_handle	*iommu_fwnode;void			*iommu_priv;unsigned int		num_ids;  //和该设备关联的总共ids/streamIDu32			ids[1];//sid内容数组
};int iommu_fwspec_add_ids(struct device *dev, u32 *ids, int num_ids)
{struct iommu_fwspec *fwspec = dev->iommu_fwspec;size_t size;int i;if (!fwspec)return -EINVAL;size = offsetof(struct iommu_fwspec, ids[fwspec->num_ids + num_ids]);if (size > sizeof(*fwspec)) {fwspec = krealloc(dev->iommu_fwspec, size, GFP_KERNEL);if (!fwspec)return -ENOMEM;dev->iommu_fwspec = fwspec;}for (i = 0; i < num_ids; i++)fwspec->ids[fwspec->num_ids + i] = ids[i];fwspec->num_ids += num_ids;return 0;
}
设置流程dump_stack信息:
[ 79.499624] ===iommu_fwspec_add_ids for dev 0000:0a:00.0 num_ids 1
[ 79.505862] CPU: 29 PID: 1 Comm: swapper/0 Not tainted 4.19.0l+ #20
[ 79.512098] Hardware name: PHYTIUM LTD Phytium S2500/64/Phytium S2500/64, BIOS V2.2 Feb 9 2021
[ 79.520754] Call trace:
[ 79.523192] dump_backtrace+0x0/0x1c0
[ 79.526838] show_stack+0x24/0x30
[ 79.530138] dump_stack+0x9c/0xbc
[ 79.533439] iommu_fwspec_add_ids+0x44/0xd0
[ 79.537602] iort_iommu_xlate+0x144/0x170
[ 79.541592] iort_pci_iommu_init+0x58/0x80
[ 79.545670] pci_for_each_dma_alias+0x44/0x188
[ 79.550093] iort_iommu_configure+0xac/0x1c8
[ 79.554343] acpi_dma_configure+0x68/0xbc
[ 79.558333] pci_dma_configure+0xa8/0xc8
[ 79.562236] dma_configure+0x4c/0x64
[ 79.565795] really_probe+0x98/0x3b8
[ 79.569354] driver_probe_device+0x6c/0x138
[ 79.573516] __driver_attach+0x118/0x150
[ 79.577419] bus_for_each_dev+0x84/0xd8
[ 79.581237] driver_attach+0x30/0x40
[ 79.584795] bus_add_driver+0x20c/0x250
[ 79.588613] driver_register+0x64/0x110
[ 79.592430] __pci_register_driver+0x58/0x68
[ 79.596681] xhci_pci_init+0x58/0x64
[ 79.600240] do_one_initcall+0x68/0x1e4
[ 79.604059] kernel_init_freeable+0x2d0/0x388
[ 79.608396] kernel_init+0x18/0x108
[ 79.611867] ret_from_fork+0x10/0x1c
iort_iommu_configure函数:
//drivers/acpi/arm64/iort.c
const struct iommu_ops *iort_iommu_configure(struct device *dev)
{struct acpi_iort_node *node, *parent;const struct iommu_ops *ops;u32 streamid = 0;int err = -ENODEV;/** If we already translated the fwspec there* is nothing left to do, return the iommu_ops.*/ops = iort_fwspec_iommu_ops(dev->iommu_fwspec);if (ops)return ops;if (dev_is_pci(dev)) { //PCI设备的sid 使用的是BDF号。struct pci_bus *bus = to_pci_dev(dev)->bus;struct iort_pci_alias_info info = { .dev = dev };node = iort_scan_node(ACPI_IORT_NODE_PCI_ROOT_COMPLEX,iort_match_node_callback, &bus->dev);if (!node)return NULL;info.node = node;
//计算siderr = pci_for_each_dma_alias(to_pci_dev(dev),iort_pci_iommu_init, &info); } else {int i = 0;node = iort_scan_node(ACPI_IORT_NODE_NAMED_COMPONENT,iort_match_node_callback, dev);if (!node)return NULL;do {parent = iort_node_map_platform_id(node, &streamid,IORT_IOMMU_TYPE,i++);if (parent)err = iort_iommu_xlate(dev, parent, streamid);} while (parent && !err);}/** If we have reason to believe the IOMMU driver missed the initial* add_device callback for dev, replay it to get things in order.*/if (!err) {ops = iort_fwspec_iommu_ops(dev->iommu_fwspec);err = iort_add_device_replay(ops, dev);}/* Ignore all other errors apart from EPROBE_DEFER */if (err == -EPROBE_DEFER) {ops = ERR_PTR(err);} else if (err) {dev_dbg(dev, "Adding to IOMMU failed: %d\n", err);ops = NULL;}return ops;
}*/
int pci_for_each_dma_alias(struct pci_dev *pdev,int (*fn)(struct pci_dev *pdev,u16 alias, void *data), void *data)
{.....struct pci_bus *bus;int ret;ret = fn(pdev, PCI_DEVID(pdev->bus->number, pdev->devfn), data);.....
}static int iort_pci_iommu_init(struct pci_dev *pdev, u16 alias, void *data)
{struct iort_pci_alias_info *info = data;struct acpi_iort_node *parent;u32 streamid;parent = iort_node_map_id(info->node, alias, &streamid,IORT_IOMMU_TYPE);return iort_iommu_xlate(info->dev, parent, streamid);
}最终:
static int arm_smmu_iort_xlate(struct device *dev, u32 streamid,struct fwnode_handle *fwnode,const struct iommu_ops *ops)
{int ret = iommu_fwspec_init(dev, fwnode, ops);if (!ret)ret = iommu_fwspec_add_ids(dev, &streamid, 1);  //添加streamidreturn ret;
}
arm_smmu_add_device
在drivers/iommu/arm-smmu.c的 arm_smmu_add_device函数中:
#ifdef CONFIG_ARCH_PHYTIUM
#define FWID_READ(id) (((u16)(id) >> 3) | (((id) >> SMR_MASK_SHIFT | 0x7000) << SMR_MASK_SHIFT))
#endif
//默认streamID会使用pci的bdf,但ft2000+ 硬件实现上不同,该值会通过FWID_READ函数进行调整。iommu_fwspec_add_ids加入到fwspec中。因此一个设备会有两个sid。static int arm_smmu_add_device(struct device *dev)
{struct arm_smmu_device *smmu;struct arm_smmu_master_cfg *cfg;struct iommu_fwspec *fwspec = dev->iommu_fwspec;int i, ret;#ifdef CONFIG_ARCH_PHYTIUM/* FT2000PLUS workaround patch */if ((read_cpuid_id() & MIDR_CPU_MODEL_MASK) == MIDR_PHYTIUM_FT2000PLUS) {printk("===arm_smmu_add_device ft2000+ \n");int num = fwspec->num_ids;for (i = 0; i < num; i++) {u32 fwid = FWID_READ(fwspec->ids[i]);printk("===arm_smmu_add_device ft2000+ ids %llx to fwid %llx \n",fwspec->ids[i],fwid);iommu_fwspec_add_ids(dev, &fwid, 1);}}
#endif..............
打印一下设备的sidfor (i = 0; i < fwspec->num_ids; i++) {u16 sid = fwspec->ids[i];u16 mask = fwspec->ids[i] >> SMR_MASK_SHIFT;printk("===arm_smmu_add_device for dev %s num_ids %d of %d sid %llx  \n",dev_name(dev),fwspec->num_ids,i,sid);if (sid & ~smmu->streamid_mask) {dev_err(dev, "stream ID 0x%x out of range for SMMU (0x%x)\n",sid, smmu->streamid_mask);goto out_free;}if (mask & ~smmu->smr_mask_mask) {dev_err(dev, "SMR mask 0x%x out of range for SMMU (0x%x)\n",mask, smmu->smr_mask_mask);goto out_free;}}
...................ret = arm_smmu_master_alloc_smes(dev); //分配stream mapping entry 表项}
ft2000+日志:0000:04:00.x 都有一个-x80的sid。
[ 11.775255] ===arm_smmu_add_device for dev 0000:41:00.0 num_ids 2 of 0 sid 4100
[ 11.782698] ===arm_smmu_add_device for dev 0000:41:00.0 num_ids 2 of 1 sid 820
[ 12.576919] ===arm_smmu_add_device for dev 0000:03:00.0 num_ids 2 of 0 sid 300
[ 12.576922] ===arm_smmu_add_device for dev 0000:03:00.0 num_ids 2 of 1 sid 60
[ 15.638439] ===arm_smmu_add_device for dev 0000:04:00.0 num_ids 2 of 0 sid 400
[ 15.645802] ===arm_smmu_add_device for dev 0000:04:00.0 num_ids 2 of 1 sid 80
[ 16.494888] ===arm_smmu_add_device for dev 0000:51:00.0 num_ids 2 of 0 sid 5100
[ 16.502947] ===arm_smmu_add_device for dev 0000:51:00.0 num_ids 2 of 1 sid a20
[ 17.105745] ===arm_smmu_add_device for dev 0000:04:00.1 num_ids 2 of 0 sid 401
[ 17.119853] ===arm_smmu_add_device for dev 0000:04:00.1 num_ids 2 of 1 sid 80
[ 18.338789] ===arm_smmu_add_device for dev 0000:04:00.2 num_ids 2 of 0 sid 402
[ 18.346151] ===arm_smmu_add_device for dev 0000:04:00.2 num_ids 2 of 1 sid 80
[ 19.099235] ===arm_smmu_add_device for dev 0000:04:00.3 num_ids 2 of 0 sid 403
[ 19.099237] ===arm_smmu_add_device for dev 0000:04:00.3 num_ids 2 of 1 sid 80
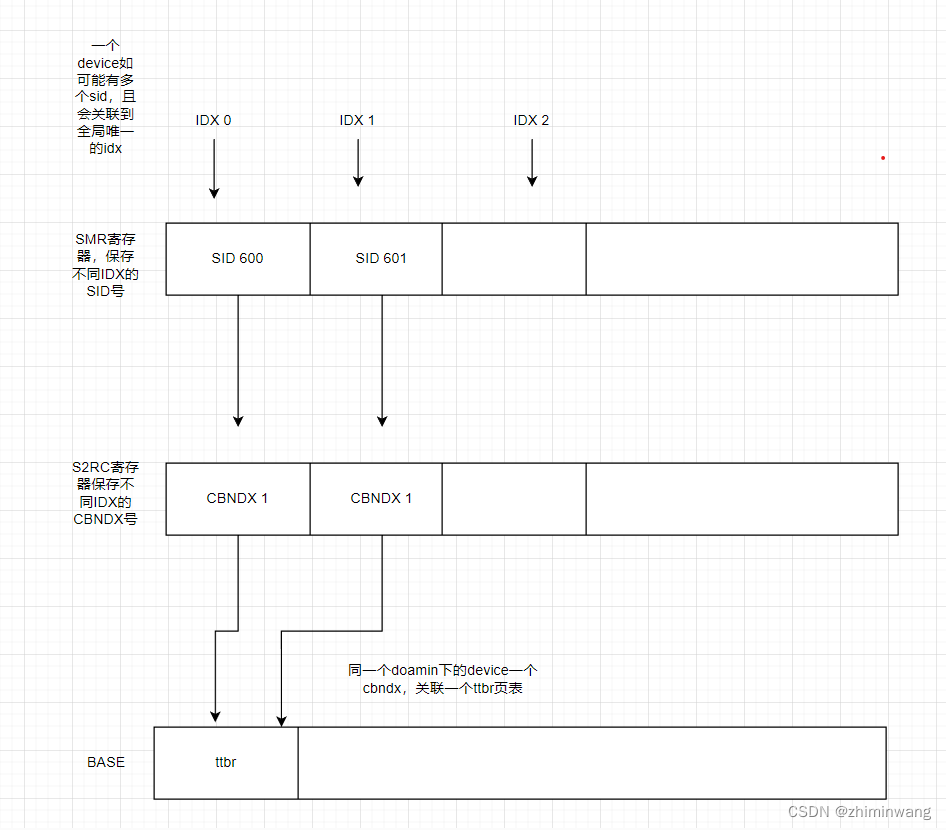
上述中发现一个dev可能有多个sid,如iommu_fwspec_add_ids函数关联了多个sid的话,最终往iommu_fwspec 中填充sid数组值。
在arm_smmu_add_device函数中建立一个设备下的sid和其它数据的关系:
static int arm_smmu_add_device(struct device *dev)
{#ifdef CONFIG_ARCH_PHYTIUM
#define FWID_READ(id) (((u16)(id) >> 3) | (((id) >> SMR_MASK_SHIFT | 0x7000) << SMR_MASK_SHIFT))/* FT2000PLUS workaround patch */if ((read_cpuid_id() & MIDR_CPU_MODEL_MASK) == MIDR_PHYTIUM_FT2000PLUS) {int num = fwspec->num_ids;for (i = 0; i < num; i++) {u32 fwid = FWID_READ(fwspec->ids[i]);iommu_fwspec_add_ids(dev, &fwid, 1); //这里对2000+进行特殊处理,再一次添加了处理后的sid值,应该是2000+处理器的smmu识别sid的方式不一样,}}
#endifret = -EINVAL;for (i = 0; i < fwspec->num_ids; i++) {u16 sid = fwspec->ids[i];u16 mask = fwspec->ids[i] >> SMR_MASK_SHIFT;if (sid & ~smmu->streamid_mask) {dev_err(dev, "stream ID 0x%x out of range for SMMU (0x%x)\n",sid, smmu->streamid_mask);goto out_free;}if (mask & ~smmu->smr_mask_mask) {dev_err(dev, "SMR mask 0x%x out of range for SMMU (0x%x)\n",mask, smmu->smr_mask_mask);goto out_free;}}ret = -ENOMEM;
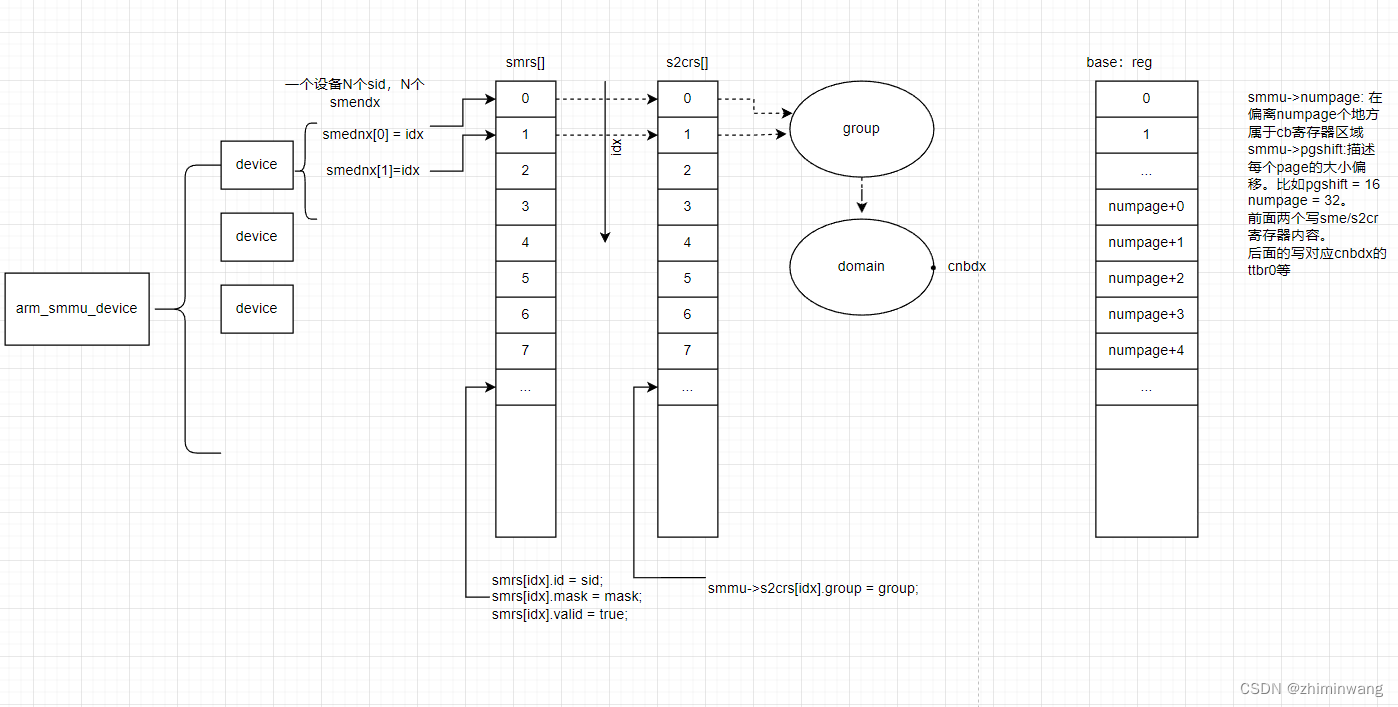
//cfg的smendx数组大小刚好和fwspec的num_ids一致,后面要保存数据。cfg = kzalloc(offsetof(struct arm_smmu_master_cfg, smendx[i]),GFP_KERNEL);if (!cfg)goto out_free;cfg->smmu = smmu;fwspec->iommu_priv = cfg;while (i--)cfg->smendx[i] = INVALID_SMENDX;ret = arm_smmu_master_alloc_smes(dev);}arm_smmu_attach_dev函数:
arm_smmu_init_domain_context初始化domain,是arm_smmu_add_device一路调用到arm_smmu_attach_dev:
static int arm_smmu_init_domain_context(struct iommu_domain *domain,struct arm_smmu_device *smmu)
{............struct arm_smmu_domain *smmu_domain = to_smmu_domain(domain);struct arm_smmu_cfg *cfg = &smmu_domain->cfg;ret = __arm_smmu_alloc_bitmap(smmu->context_map, start,smmu->num_context_banks);cfg->cbndx = ret;  //将上述获取的全局唯一context bank 编号 保存在cfg->cbndxarm_smmu_init_context_bank(smmu_domain, &pgtbl_cfg); //设置好cb等参数。其中包括lape获取的页表等内容。arm_smmu_write_context_bank(smmu, cfg->cbndx); //编号作为参数............}static void arm_smmu_write_context_bank(struct arm_smmu_device *smmu, int idx)
{
............
cb_base = ARM_SMMU_CB(smmu, idx); //根据编号获取cb_base地址下面是一些写寄存器的操作/* TTBRs */if (cfg->fmt == ARM_SMMU_CTX_FMT_AARCH32_S) {writel_relaxed(cfg->asid, cb_base + ARM_SMMU_CB_CONTEXTIDR);writel_relaxed(cb->ttbr[0], cb_base + ARM_SMMU_CB_TTBR0);writel_relaxed(cb->ttbr[1], cb_base + ARM_SMMU_CB_TTBR1);} else {writeq_relaxed(cb->ttbr[0], cb_base + ARM_SMMU_CB_TTBR0); //将ttbr[0]写入,其中保存的是页表的pgd基地址。if (stage1)writeq_relaxed(cb->ttbr[1], cb_base + ARM_SMMU_CB_TTBR1);}............}
[ 78.770289] ===arm_smmu_init_domain_context for dev arm-smmu.0.auto domain ffff8139415a1b50 smmu ffff834941ef0018 smmu_doamin->stage 0 fmt 2 cfg->cbndx 0
[ 78.784048] CPU: 28 PID: 1 Comm: swapper/0 Not tainted 4.19.0l+ #40
[ 78.790284] Hardware name: PHYTIUM LTD Phytium S2500/64/Phytium S2500/64, BIOS V2.2 Feb 9 2021
[ 78.798938] Call trace:
[ 78.801373] dump_backtrace+0x0/0x1c0
[ 78.805017] show_stack+0x24/0x30
[ 78.808316] dump_stack+0x9c/0xbc
[ 78.811615] arm_smmu_attach_dev+0x44c/0x788
[ 78.815864] __iommu_attach_device+0x54/0xf8
[ 78.820113] iommu_group_add_device+0x17c/0x478
[ 78.824621] iommu_group_get_for_dev+0x74/0x178
[ 78.829129] arm_smmu_add_device+0x218/0x6b8
[ 78.833379] iort_iommu_configure+0x144/0x1c8
[ 78.837715] acpi_dma_configure+0x68/0xbc
[ 78.841705] pci_dma_configure+0xa8/0xc8
[ 78.845608] dma_configure+0x4c/0x64
[ 78.849166] really_probe+0x98/0x3b8
[ 78.852725] driver_probe_device+0x6c/0x138
[ 78.856887] __driver_attach+0x118/0x150
[ 78.860790] bus_for_each_dev+0x84/0xd8
[ 78.864608] driver_attach+0x30/0x40
[ 78.868166] bus_add_driver+0x20c/0x250
[ 78.871984] driver_register+0x64/0x110
[ 78.875802] __pci_register_driver+0x58/0x68
[ 78.880051] ahci_pci_driver_init+0x28/0x30
[ 78.884213] do_one_initcall+0x68/0x1e4
[ 78.888031] kernel_init_freeable+0x2d0/0x388
[ 78.892367] kernel_init+0x18/0x108
[ 78.895839] ret_from_fork+0x10/0x1c
设备创建group和doamin流程
device:加组流程
really_probedma_configurepci_dma_configureacpi_dma_configureiort_iommu_configurearm_smmu_add_devicearm_smmu_master_alloc_smesiommu_group_get_for_devarm_smmu_device_group //创建iommu_groupgroup->default_domain = dom; //创建domaingroup->domain = dom;iommu_group_add_device //将deive加入到group链表,将iommu_grouop 赋值dev->iommu_group指针__iommu_attach_devicearm_smmu_attach_devfor_each_cfg_sme:smmu->s2crs[idx].group = group; //循环将该device下的第idxg个s2crs数组分配grouparm_smmu_device_grouppci_device_groupalloc_groupgeneric_device_group
关联smmu下的SMMU_SMRn寄存器。其中写入streamID。
相关寄存器参考:(66条消息) Smmu硬件寄存器—V2_一墨一飞花的博客-CSDN博客_smmu context bank
SMMU_SMRn
streamID匹配寄存器。
EXMASK, bits[31:16] 屏蔽无关位,如果EXMASK[i]==1,则EXID[i]被忽略;
相反,EXMASK[i]==0,则EXID[i]有效,用于匹配
EXID, bits[15:0] 用于匹配的streamID
static int arm_smmu_master_alloc_smes(struct device *dev)
{struct iommu_fwspec *fwspec = dev->iommu_fwspec;struct arm_smmu_master_cfg *cfg = fwspec->iommu_priv;struct arm_smmu_device *smmu = cfg->smmu;struct arm_smmu_smr *smrs = smmu->smrs;struct iommu_group *group;int i, idx, ret;mutex_lock(&smmu->stream_map_mutex);/* Figure out a viable stream map entry allocation */for_each_cfg_sme(fwspec, i, idx) {u16 sid = fwspec->ids[i];u16 mask = fwspec->ids[i] >> SMR_MASK_SHIFT;if (idx != INVALID_SMENDX) {ret = -EEXIST;goto out_err;}ret = arm_smmu_find_sme(smmu, sid, mask); //分配一个smmu下唯一的idx给当前设备的arm_smmu_master_cfg ,如果sid一致,则返回同样的idx。这个在ft2000+上就是这种情况,bus_dev_fn忽略fn则会导致很多设备相同。if (ret < 0)goto out_err;idx = ret;if (smrs && smmu->s2crs[idx].count == 0) {smrs[idx].id = sid; //将streamid保存在全局smrs数组下,后续写入寄存器中,一个设备有多个sid的情况下也会分配多个全局唯一的idx。smrs[idx].mask = mask;smrs[idx].valid = true;}smmu->s2crs[idx].count++;cfg->smendx[i] = (s16)idx;  //设置当前设备arm_smmu_master_cfg 数组smendx为smmu全局分配的idx值。}group = iommu_group_get_for_dev(dev);if (!group)group = ERR_PTR(-ENOMEM);if (IS_ERR(group)) {ret = PTR_ERR(group);goto out_err;}iommu_group_put(group);/* It worked! Now, poke the actual hardware */for_each_cfg_sme(fwspec, i, idx) {arm_smmu_write_sme(smmu, idx);  //将smrs下的sid写入寄存器中。根据idx来定位寄存器地址。smmu->s2crs[idx].group = group;}mutex_unlock(&smmu->stream_map_mutex);return 0;out_err:while (i--) {arm_smmu_free_sme(smmu, cfg->smendx[i]);cfg->smendx[i] = INVALID_SMENDX;}mutex_unlock(&smmu->stream_map_mutex);return ret;
}
关联smmu下的s2cr寄存器。
static int arm_smmu_domain_add_master(struct arm_smmu_domain *smmu_domain,struct iommu_fwspec *fwspec)
{struct arm_smmu_device *smmu = smmu_domain->smmu;struct arm_smmu_s2cr *s2cr = smmu->s2crs;u8 cbndx = smmu_domain->cfg.cbndx;   //init_context_bank 中分配的,从bitmap中查找的唯一编号,参考arm_smmu_init_domain_context中分配cfg->cbndx的过程。enum arm_smmu_s2cr_type type;int i, idx;if (smmu_domain->stage == ARM_SMMU_DOMAIN_BYPASS)type = S2CR_TYPE_BYPASS;elsetype = S2CR_TYPE_TRANS;for_each_cfg_sme(fwspec, i, idx) {if (type == s2cr[idx].type && cbndx == s2cr[idx].cbndx)continue;s2cr[idx].type = type;s2cr[idx].privcfg = S2CR_PRIVCFG_DEFAULT;s2cr[idx].cbndx = cbndx;arm_smmu_write_s2cr(smmu, idx); //根据设备在全局的idx号,定位到s2cr寄存器地址。}return 0;
}
相关写寄存器的函数:通过idx关联。
//写入streamID。可以推断idx值
static void arm_smmu_write_smr(struct arm_smmu_device *smmu, int idx)
{struct arm_smmu_smr *smr = smmu->smrs + idx;u32 reg = smr->id << SMR_ID_SHIFT | smr->mask << SMR_MASK_SHIFT;if (!(smmu->features & ARM_SMMU_FEAT_EXIDS) && smr->valid)reg |= SMR_VALID;writel_relaxed(reg, ARM_SMMU_GR0(smmu) + ARM_SMMU_GR0_SMR(idx));
}//根据idx 找到s2cr寄存器,可以找到cbndx值,该值可以定位到io-pgtable页表的pgd地址。
static void arm_smmu_write_s2cr(struct arm_smmu_device *smmu, int idx)
{struct arm_smmu_s2cr *s2cr = smmu->s2crs + idx;u32 reg = (s2cr->type & S2CR_TYPE_MASK) << S2CR_TYPE_SHIFT |  //16-17bit为TYPE位(s2cr->cbndx & S2CR_CBNDX_MASK) << S2CR_CBNDX_SHIFT |   //0-7bit为CBNDX位。(s2cr->privcfg & S2CR_PRIVCFG_MASK) << S2CR_PRIVCFG_SHIFT;if (smmu->features & ARM_SMMU_FEAT_EXIDS && smmu->smrs &&smmu->smrs[idx].valid)reg |= S2CR_EXIDVALID;writel_relaxed(reg, ARM_SMMU_GR0(smmu) + ARM_SMMU_GR0_S2CR(idx));
}static void arm_smmu_write_sme(struct arm_smmu_device *smmu, int idx)
{arm_smmu_write_s2cr(smmu, idx);if (smmu->smrs)arm_smmu_write_smr(smmu, idx);
}
arm_smmu_device_group:
static struct iommu_group *arm_smmu_device_group(struct device *dev)
{struct iommu_fwspec *fwspec = dev->iommu_fwspec;struct arm_smmu_device *smmu = fwspec_smmu(fwspec);struct iommu_group *group = NULL;int i, idx;for_each_cfg_sme(fwspec, i, idx) {if (group && smmu->s2crs[idx].group &&group != smmu->s2crs[idx].group)return ERR_PTR(-EINVAL);printk("===arm_smmu_deivce_group for %s idx %d group %llx \n",dev_name(dev),idx,group);group = smmu->s2crs[idx].group; //对于ft2000+,由于idx存在一致,因此会分在一个组。}printk("==arm_smmu_device_group=== is_pci %d group = %llx name %s \n",dev_is_pci(dev),group,dev_name(dev));if (group)return iommu_group_ref_get(group);printk("group is empty \n");if (dev_is_pci(dev))group = pci_device_group(dev);elsegroup = generic_device_group(dev);return group;
}
arm_smmu_attach_dev->
arm_smmu_domain_add_master
{
....struct iommu_fwspec *fwspec = dev_iommu_fwspec_get(dev);struct arm_smmu_master_cfg *cfg = dev_iommu_priv_get(dev);arm_smmu_domain_add_master(smmu_domain, cfg, fwspec);
.....
}/*
配置设备下不同idx组寄存器,其中cbndx使用的是domain唯一的值。
不同设备如果使用同一个domain。则根据唯一的cbndx值(arm_smmu_init_domain_context中分配)
因此设备的dma发送sid找到smr的idx组。对应s2cr中查找cbndx。进而找到ttbr ?
*/
static int arm_smmu_domain_add_master(struct arm_smmu_domain *smmu_domain, //设备归属的domainstruct arm_smmu_master_cfg *cfg,   //dev下的struct iommu_fwspec *fwspec)   //dev下的
{struct arm_smmu_device *smmu = smmu_domain->smmu;struct arm_smmu_s2cr *s2cr = smmu->s2crs;u8 cbndx = smmu_domain->cfg.cbndx; //一个domain唯一的cbndx。enum arm_smmu_s2cr_type type;int i, idx;if (smmu_domain->stage == ARM_SMMU_DOMAIN_BYPASS)type = S2CR_TYPE_BYPASS;elsetype = S2CR_TYPE_TRANS;for_each_cfg_sme(cfg, fwspec, i, idx) {if (type == s2cr[idx].type && cbndx == s2cr[idx].cbndx)continue;s2cr[idx].type = type;s2cr[idx].privcfg = S2CR_PRIVCFG_DEFAULT;s2cr[idx].cbndx = cbndx;arm_smmu_write_s2cr(smmu, idx); //写入第idx组s2cr寄存器}return 0;
}
StreamID写入smmu寄存器:
arm_smmu_attach_dev(struct iommu_domain *domain, struct device *dev)
arm_smmu_init_domain_context(domain, smmu);
arm_smmu_init_context_bank(smmu_domain, &pgtbl_cfg);
arm_smmu_write_context_bank(smmu, cfg->cbndx);
地址映射使用io_pgtable_ops
//drivers/iommu/io-pgtable.h
struct io_pgtable_ops {int (*map)(struct io_pgtable_ops *ops, unsigned long iova,phys_addr_t paddr, size_t size, int prot);size_t (*unmap)(struct io_pgtable_ops *ops, unsigned long iova,size_t size);phys_addr_t (*iova_to_phys)(struct io_pgtable_ops *ops,unsigned long iova);
};
iommu_ops的map函数arm_smmu_map
static int arm_smmu_map(struct iommu_domain *domain, unsigned long iova,phys_addr_t paddr, size_t size, int prot)
{struct io_pgtable_ops *ops = to_smmu_domain(domain)->pgtbl_ops;if (!ops)return -ENODEV;return ops->map(ops, iova, paddr, size, prot);
}
arm_smmu_init_domain_context中对domain进行初始化的时候分配io_pgtable_ops:
static int arm_smmu_init_domain_context(struct iommu_domain *domain,struct arm_smmu_device *smmu)
{................pgtbl_ops = alloc_io_pgtable_ops(fmt, &pgtbl_cfg, smmu_domain);................}//drivers/iommu/io-pgtable.cstatic const struct io_pgtable_init_fns *
io_pgtable_init_table[IO_PGTABLE_NUM_FMTS] = {
#ifdef CONFIG_IOMMU_IO_PGTABLE_LPAE[ARM_32_LPAE_S1] = &io_pgtable_arm_32_lpae_s1_init_fns,[ARM_32_LPAE_S2] = &io_pgtable_arm_32_lpae_s2_init_fns,[ARM_64_LPAE_S1] = &io_pgtable_arm_64_lpae_s1_init_fns,[ARM_64_LPAE_S2] = &io_pgtable_arm_64_lpae_s2_init_fns,
#endif
#ifdef CONFIG_IOMMU_IO_PGTABLE_ARMV7S[ARM_V7S] = &io_pgtable_arm_v7s_init_fns,
#endif
};struct io_pgtable_ops *alloc_io_pgtable_ops(enum io_pgtable_fmt fmt,struct io_pgtable_cfg *cfg,void *cookie)
{struct io_pgtable *iop;const struct io_pgtable_init_fns *fns;if (fmt >= IO_PGTABLE_NUM_FMTS)return NULL;fns = io_pgtable_init_table[fmt];if (!fns)return NULL;iop = fns->alloc(cfg, cookie);if (!iop)return NULL;iop->fmt        = fmt;iop->cookie     = cookie;iop->cfg        = *cfg;return &iop->ops;
}
io_pgtable_arm_64_lpae_s1_init_fns: driver/iommu/io-pgtable-arm.c
struct io_pgtable_init_fns io_pgtable_arm_64_lpae_s1_init_fns = {.alloc  = arm_64_lpae_alloc_pgtable_s1,.free   = arm_lpae_free_pgtable,
};static struct io_pgtable *
arm_64_lpae_alloc_pgtable_s1(struct io_pgtable_cfg *cfg, void *cookie)
{
..................struct arm_lpae_io_pgtable *data;data = arm_lpae_alloc_pgtable(cfg); //分配data->pgd = __arm_lpae_alloc_pages(data->pgd_size, GFP_KERNEL, cfg);
...................
}static struct arm_lpae_io_pgtable *
arm_lpae_alloc_pgtable(struct io_pgtable_cfg *cfg)
{unsigned long va_bits, pgd_bits;struct arm_lpae_io_pgtable *data;
。。。。。。。。。。。data = kmalloc(sizeof(*data), GFP_KERNEL);if (!data)return NULL;data->pg_shift = __ffs(cfg->pgsize_bitmap);data->bits_per_level = data->pg_shift - ilog2(sizeof(arm_lpae_iopte));va_bits = cfg->ias - data->pg_shift;data->levels = DIV_ROUND_UP(va_bits, data->bits_per_level);/* Calculate the actual size of our pgd (without concatenation) */pgd_bits = va_bits - (data->bits_per_level * (data->levels - 1));data->pgd_size = 1UL << (pgd_bits + ilog2(sizeof(arm_lpae_iopte)));data->iop.ops = (struct io_pgtable_ops) {.map            = arm_lpae_map, //map函数.unmap          = arm_lpae_unmap,.iova_to_phys   = arm_lpae_iova_to_phys,};return data;
}
案例:
ft2000+/5.10内核
分组树:
[root@localhost ~]# tree /sys/kernel/iommu_groups/
/sys/kernel/iommu_groups/
├── 0
│   ├── devices
│   │   └── 0000:41:00.0 -> ../../../../devices/pci0000:40/0000:40:00.0/0000:41:00.0
│   ├── reserved_regions
│   └── type
├── 1
│   ├── devices
│   │   └── 0000:03:00.0 -> ../../../../devices/pci0000:00/0000:00:00.0/0000:01:00.0/0000:02:01.0/0000:03:00.0
│   ├── reserved_regions
│   └── type
├── 10
│   ├── devices
│   │   └── 0000:40:00.0 -> ../../../../devices/pci0000:40/0000:40:00.0
│   ├── reserved_regions
│   └── type
├── 11
│   ├── devices
│   │   └── 0000:50:00.0 -> ../../../../devices/pci0000:50/0000:50:00.0
│   ├── reserved_regions
│   └── type
├── 12
│   ├── devices
│   │   └── 0000:70:00.0 -> ../../../../devices/pci0000:70/0000:70:00.0
│   ├── reserved_regions
│   └── type
├── 13
│   ├── devices
│   │   ├── 0000:04:00.1 -> ../../../../devices/pci0000:00/0000:00:00.0/0000:01:00.0/0000:02:02.0/0000:04:00.1
│   │   ├── 0000:04:00.2 -> ../../../../devices/pci0000:00/0000:00:00.0/0000:01:00.0/0000:02:02.0/0000:04:00.2
│   │   └── 0000:04:00.3 -> ../../../../devices/pci0000:00/0000:00:00.0/0000:01:00.0/0000:02:02.0/0000:04:00.3
│   ├── reserved_regions
│   └── type
├── 14
│   ├── devices
│   │   └── 0000:21:00.0 -> ../../../../devices/pci0000:20/0000:20:00.0/0000:21:00.0
│   ├── reserved_regions
│   └── type
├── 2
│   ├── devices
│   │   └── 0000:00:00.0 -> ../../../../devices/pci0000:00/0000:00:00.0
│   ├── reserved_regions
│   └── type
├── 3
│   ├── devices
│   │   └── 0000:01:00.0 -> ../../../../devices/pci0000:00/0000:00:00.0/0000:01:00.0
│   ├── reserved_regions
│   └── type
├── 4
│   ├── devices
│   │   └── 0000:02:01.0 -> ../../../../devices/pci0000:00/0000:00:00.0/0000:01:00.0/0000:02:01.0
│   ├── reserved_regions
│   └── type
├── 5
│   ├── devices
│   │   └── 0000:02:02.0 -> ../../../../devices/pci0000:00/0000:00:00.0/0000:01:00.0/0000:02:02.0
│   ├── reserved_regions
│   └── type
├── 6
│   ├── devices
│   │   └── 0000:02:04.0 -> ../../../../devices/pci0000:00/0000:00:00.0/0000:01:00.0/0000:02:04.0
│   ├── reserved_regions
│   └── type
├── 7
│   ├── devices
│   │   └── 0000:02:05.0 -> ../../../../devices/pci0000:00/0000:00:00.0/0000:01:00.0/0000:02:05.0
│   ├── reserved_regions
│   └── type
├── 8
│   ├── devices
│   │   └── 0000:02:06.0 -> ../../../../devices/pci0000:00/0000:00:00.0/0000:01:00.0/0000:02:06.0
│   ├── reserved_regions
│   └── type
└── 9├── devices│   ├── 0000:04:00.0 -> ../../../../devices/pci0000:00/0000:00:00.0/0000:01:00.0/0000:02:02.0/0000:04:00.0│   └── 0000:20:00.0 -> ../../../../devices/pci0000:20/0000:20:00.0├── reserved_regions└── type48 directories, 30 files
设备下最终sid:看下上述9组。包含04:00.0和20:00.0。 看下面的日志:恰好这两个共同的0x400的sid;
[   10.503563] ===arm_smmu_add_device dev 0000:41:00.0 num_ids 4 of 0 sid 4100
[   10.510581] ===arm_smmu_add_device dev 0000:41:00.0 num_ids 4 of 1 sid 4101
[   10.517598] ===arm_smmu_add_device dev 0000:41:00.0 num_ids 4 of 2 sid 820
[   10.524522] ===arm_smmu_add_device dev 0000:41:00.0 num_ids 4 of 3 sid 820
[   10.677266] ===arm_smmu_add_device dev 0000:03:00.0 num_ids 2 of 0 sid 300
[   10.684191] ===arm_smmu_add_device dev 0000:03:00.0 num_ids 2 of 1 sid 60
[   11.108133] ===arm_smmu_add_device dev 0000:00:00.0 num_ids 2 of 0 sid 0
[   11.121369] ===arm_smmu_add_device dev 0000:00:00.0 num_ids 2 of 1 sid 0
[   11.155433] ===arm_smmu_add_device dev 0000:01:00.0 num_ids 2 of 0 sid 100
[   11.162367] ===arm_smmu_add_device dev 0000:01:00.0 num_ids 2 of 1 sid 20
[   11.215796] ===arm_smmu_add_device dev 0000:02:01.0 num_ids 2 of 0 sid 208
[   11.215799] ===arm_smmu_add_device dev 0000:02:01.0 num_ids 2 of 1 sid 41
[   11.268019] ===arm_smmu_add_device dev 0000:02:02.0 num_ids 2 of 0 sid 210
[   11.283765] ===arm_smmu_add_device dev 0000:02:02.0 num_ids 2 of 1 sid 42
[   11.387949] ===arm_smmu_add_device dev 0000:02:04.0 num_ids 2 of 0 sid 220
[   11.387950] ===arm_smmu_add_device dev 0000:02:04.0 num_ids 2 of 1 sid 44
[   11.442892] ===arm_smmu_add_device dev 0000:02:05.0 num_ids 2 of 0 sid 228
[   11.449820] ===arm_smmu_add_device dev 0000:02:05.0 num_ids 2 of 1 sid 45
[   11.484502] ===arm_smmu_add_device dev 0000:02:06.0 num_ids 2 of 0 sid 230
[   11.491435] ===arm_smmu_add_device dev 0000:02:06.0 num_ids 2 of 1 sid 46
[   11.526207] ===arm_smmu_add_device dev 0000:20:00.0 num_ids 2 of 0 sid 2000
[   11.533218] ===arm_smmu_add_device dev 0000:20:00.0 num_ids 2 of 1 sid 400   //0x400
[   11.568096] ===arm_smmu_add_device dev 0000:40:00.0 num_ids 2 of 0 sid 4000
[   11.575107] ===arm_smmu_add_device dev 0000:40:00.0 num_ids 2 of 1 sid 800
[   11.610065] ===arm_smmu_add_device dev 0000:50:00.0 num_ids 2 of 0 sid 5000
[   11.617080] ===arm_smmu_add_device dev 0000:50:00.0 num_ids 2 of 1 sid a00
[   11.652088] ===arm_smmu_add_device dev 0000:70:00.0 num_ids 2 of 0 sid 7000
[   11.665674] ===arm_smmu_add_device dev 0000:70:00.0 num_ids 2 of 1 sid e00
[   13.530809] ===arm_smmu_add_device dev 0000:04:00.0 num_ids 2 of 0 sid 400  //x0400
[   13.537743] ===arm_smmu_add_device dev 0000:04:00.0 num_ids 2 of 1 sid 80
[   13.848325] ===arm_smmu_add_device dev 0000:04:00.1 num_ids 2 of 0 sid 401
[   13.855250] ===arm_smmu_add_device dev 0000:04:00.1 num_ids 2 of 1 sid 80
[   14.171899] ===arm_smmu_add_device dev 0000:04:00.2 num_ids 2 of 0 sid 402
[   14.178831] ===arm_smmu_add_device dev 0000:04:00.2 num_ids 2 of 1 sid 80
[   14.489847] ===arm_smmu_add_device dev 0000:04:00.3 num_ids 2 of 0 sid 403
[   14.496779] ===arm_smmu_add_device dev 0000:04:00.3 num_ids 2 of 1 sid 80
[   21.292421] ===arm_smmu_add_device dev 0000:21:00.0 num_ids 2 of 0 sid 2100
[   21.299443] ===arm_smmu_add_device dev 0000:21:00.0 num_ids 2 of 1 sid 420