测试程序
#include "muduo/base/AsyncLogging.h"
#include "muduo/base/Logging.h"
#include "muduo/base/Timestamp.h"#include <stdio.h>
#include <sys/resource.h>
#include <unistd.h>off_t kRollSize = 500*1000*1000;muduo::AsyncLogging* g_asyncLog = NULL;// 6. 回调函数
void asyncOutput(const char* msg, int len)
{// 7. 写日志操作g_asyncLog->append(msg, len);
}void bench(bool longLog)
{// 4. 设置回调muduo::Logger::setOutput(asyncOutput);int cnt = 0;const int kBatch = 1000;muduo::string empty = " ";muduo::string longStr(3000, 'X');longStr += " ";for (int t = 0; t < 30; ++t){muduo::Timestamp start = muduo::Timestamp::now();for (int i = 0; i < kBatch; ++i){// 5. 写日志 -- LOG_INFOLOG_INFO << "Hello 0123456789" << " abcdefghijklmnopqrstuvwxyz "<< (longLog ? longStr : empty)<< cnt;++cnt;}muduo::Timestamp end = muduo::Timestamp::now();printf("%f\n", timeDifference(end, start)*1000000/kBatch);struct timespec ts = { 0, 500*1000*1000 };nanosleep(&ts, NULL);}
}int main(int argc, char* argv[])
{{// set max virtual memory to 2GB.size_t kOneGB = 1000*1024*1024;rlimit rl = { 2*kOneGB, 2*kOneGB };setrlimit(RLIMIT_AS, &rl);}printf("pid = %d\n", getpid());char name[256] = { '\0' };strncpy(name, argv[0], sizeof name - 1);// 1. 创建AsyncLogging类的实例muduo::AsyncLogging log(::basename(name), kRollSize);// 2. 异步日志线程启动log.start();g_asyncLog = &log;bool longLog = argc > 1;// 3. 写日志bench(longLog);
}
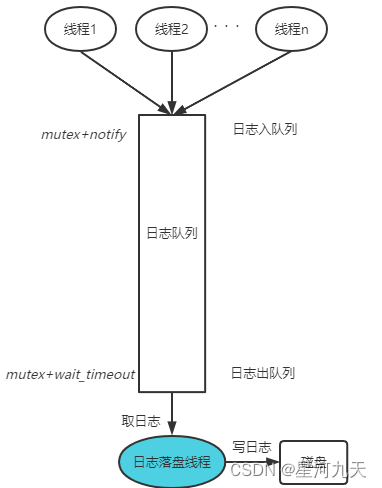
模型
实现原理:
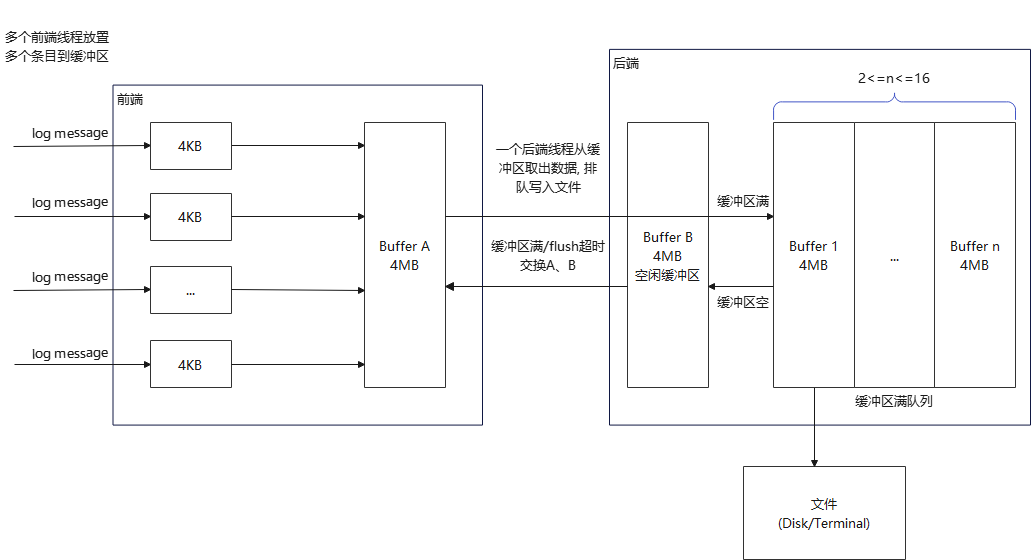
采用双缓冲区(double buffering)交互技术。基本思想是准备2部分buffer:A和B,前端(front end)线程往buffer A填入数据(日志消息),后端(back end)线程负责将buffer B写入日志文件。当A写满时,交换A和B。
源码分析
本文主要参照上面的测试程序,解析整个日志库的实现流程。
AsyncLogging
AsyncLogging类主要功能:提供后端线程,定时将日志缓冲写到磁盘,维护缓冲及缓冲队列。
日志线程–start、stop
// 线程开始
void start()
{running_ = true;thread_.start();  latch_.wait();
}// 线程结束
void stop() NO_THREAD_SAFETY_ANALYSIS
{running_ = false;cond_.notify();thread_.join();
}// 线程执行函数
void AsyncLogging::threadFunc()
{assert(running_ == true);latch_.countDown();LogFile output(basename_, rollSize_, false);BufferPtr newBuffer1(new Buffer);BufferPtr newBuffer2(new Buffer);newBuffer1->bzero();newBuffer2->bzero();BufferVector buffersToWrite;buffersToWrite.reserve(16);  // 指定写缓冲队列大小 while (running_)   // running_线程运行标志 stop()时退出{assert(newBuffer1 && newBuffer1->length() == 0);assert(newBuffer2 && newBuffer2->length() == 0);assert(buffersToWrite.empty());{muduo::MutexLockGuard lock(mutex_);if (buffers_.empty())  // unusual usage!{cond_.waitForSeconds(flushInterval_);}buffers_.push_back(std::move(currentBuffer_));  //每次当已满缓冲队列中有数据时,或者即使没有数据但3秒超时,就将当前缓冲加入到已满缓冲队列currentBuffer_ = std::move(newBuffer1);  // buffer1移动给当前缓冲buffersToWrite.swap(buffers_); // 通过swap函数交换已满缓冲队列和待写缓冲队列if (!nextBuffer_){nextBuffer_ = std::move(newBuffer2);  // buffer2移动给空闲缓冲}}assert(!buffersToWrite.empty());if (buffersToWrite.size() > 25)  // 超过100MB 删除多余缓冲 有利于提升磁盘性能{char buf[256];snprintf(buf, sizeof buf, "Dropped log messages at %s, %zd larger buffers\n",Timestamp::now().toFormattedString().c_str(),buffersToWrite.size()-2);fputs(buf, stderr);output.append(buf, static_cast<int>(strlen(buf)));buffersToWrite.erase(buffersToWrite.begin()+2, buffersToWrite.end());}for (const auto& buffer : buffersToWrite){// FIXME: use unbuffered stdio FILE ? or use ::writev ?output.append(buffer->data(), buffer->length());  // 待写缓冲中的数据通过LogFile对象,写入log文件}if (buffersToWrite.size() > 2){// drop non-bzero-ed buffers, avoid trashingbuffersToWrite.resize(2);  // 擦除多余缓冲,只用保留两个,归还给buffer1和buffer2}if (!newBuffer1){assert(!buffersToWrite.empty());newBuffer1 = std::move(buffersToWrite.back());buffersToWrite.pop_back();newBuffer1->reset();}if (!newBuffer2){assert(!buffersToWrite.empty());newBuffer2 = std::move(buffersToWrite.back());buffersToWrite.pop_back();newBuffer2->reset();}buffersToWrite.clear();  // 待写缓冲队列清空output.flush();  // 将内核高速缓存中的数据flush到磁盘,防止意外情况造成数据丢失}output.flush();
}
总结下几个缓冲的概念:
// 定义
typedef muduo::detail::FixedBuffer<muduo::detail::kLargeBuffer> Buffer;
typedef std::vector<std::unique_ptr<Buffer>> BufferVector;
typedef BufferVector::value_type BufferPtr;currentBuffer_: 当前缓冲,用于缓存append数据
nextBuffer_ : 空闲缓冲
buffers_ : 已满缓冲队列 注意: 在AsyncLogging构造时,指定了大小 --- buffers_.reserve(16);
日志添加
LargeBuffer
Large Buffer(FixedBuffermuduo::detail::kLargeBuffer)默认大小4MB,用于存储多条log消息;相对的,还有Small Buffer(FixedBuffermuduo::detail::kSmallBuffer)默认大小4KB,用于存储一条log消息。
append
void AsyncLogging::append(const char* logline, int len)
{muduo::MutexLockGuard lock(mutex_);  // 加锁 防止多线程调用时产生异常if (currentBuffer_->avail() > len)   // 当前缓冲(currentBuffer_)剩余空间(avail())足够存放新log消息大小(len)时,就直接存放到当前缓冲{currentBuffer_->append(logline, len);}else  // 当前缓冲剩余空间不够时,说明当前缓冲已满(或者接近已满),就将当前缓冲move到已满缓冲队列(buffers_){buffers_.push_back(std::move(currentBuffer_));  // std::move之后, currentBuffer_为空if (nextBuffer_){currentBuffer_ = std::move(nextBuffer_);  // 空闲缓冲move到当前缓冲 相当于为currentBuffer_申请空间}else{currentBuffer_.reset(new Buffer); // Rarely happens}currentBuffer_->append(logline, len);  // 新log消息存放到当前缓冲中(此时当前缓冲为空,剩余空间肯定够用)cond_.notify();  // 线程唤醒 --- cond_.waitForSeconds(flushInterval_);}
}
疑问:为什么最后要通过cond_唤醒后端线程?
因为没有log消息要记录时,后端线程很可能阻塞等待log消息,当有缓冲满时,及时唤醒后端将已满缓冲数据写到磁盘上,能有效改善新能;否则,短时间内产生大量log消息,可能造成数据堆积,甚至丢失,而后端线程一直休眠(直到3秒超时唤醒)。
LogFile
提供对日志文件的操作,包括滚动日志文件、将log数据写到当前log文件、flush log数据到当前log文件。
写文件
void LogFile::append(const char* logline, int len)
{if (mutex_)  // 加锁版本{MutexLockGuard lock(*mutex_);append_unlocked(logline, len);}else  // 不加锁版本{append_unlocked(logline, len);}
}void LogFile::append_unlocked(const char* logline, int len)
{file_->append(logline, len);  // 写日志数据至磁盘if (file_->writtenBytes() > rollSize_)  {rollFile();  // 滚动日志文件}else{++count_;if (count_ >= checkEveryN_){count_ = 0;time_t now = ::time(NULL);time_t thisPeriod_ = now / kRollPerSeconds_ * kRollPerSeconds_;if (thisPeriod_ != startOfPeriod_){rollFile();}else if (now - lastFlush_ > flushInterval_){lastFlush_ = now;file_->flush();}}}
}
flush
void LogFile::flush()
{if (mutex_){MutexLockGuard lock(*mutex_);file_->flush();}else{file_->flush();}
}
滚动日志
当日志文件接近指定的滚动限值(rollSize)时,需要换一个新文件写数据,便于后续归档、查看。
bool LogFile::rollFile()
{time_t now = 0;string filename = getLogFileName(basename_, &now);time_t start = now / kRollPerSeconds_ * kRollPerSeconds_;if (now > lastRoll_)  {lastRoll_ = now;lastFlush_ = now;startOfPeriod_ = start;file_.reset(new FileUtil::AppendFile(filename));return true;}return false;
}
AppendFile
提供了创建/打开文件、写文件、关闭文件等操作接口。
创建/打开文件
FileUtil::AppendFile::AppendFile(StringArg filename): fp_(::fopen(filename.c_str(), "ae")),  // 'e' for O_CLOEXECwrittenBytes_(0)
{assert(fp_);::setbuffer(fp_, buffer_, sizeof buffer_);// posix_fadvise POSIX_FADV_DONTNEED ?
}
写文件
void FileUtil::AppendFile::append(const char* logline, const size_t len)
{size_t n = write(logline, len);size_t remain = len - n;while (remain > 0){size_t x = write(logline + n, remain);if (x == 0){int err = ferror(fp_);if (err){fprintf(stderr, "AppendFile::append() failed %s\n", strerror_tl(err));}break;}n += x;remain = len - n; // remain -= x}writtenBytes_ += len;
}void FileUtil::AppendFile::flush()
{::fflush(fp_);
}size_t FileUtil::AppendFile::write(const char* logline, size_t len)
{// #undef fwrite_unlockedreturn ::fwrite_unlocked(logline, 1, len, fp_);  // 通过非线程安全的glibc库函数fwrite_unlocked()来完成写文件操作
}
关闭文件
FileUtil::AppendFile::~AppendFile()
{::fclose(fp_);
}
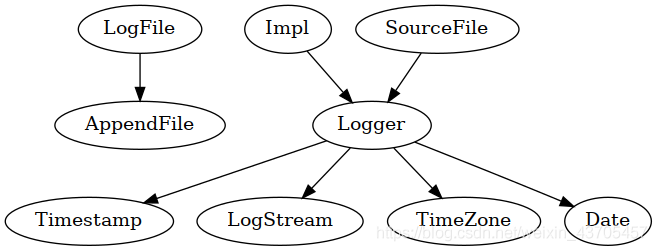
Logger
功能:为用户(前端线程)提供使用日志库的接口,是一个pointer to impl的实现(即GoF 桥接模式)。
宏构造对象
// 日志等级
enum LogLevel{TRACE,DEBUG,INFO,WARN,ERROR,FATAL,NUM_LOG_LEVELS,};#define LOG_TRACE if (muduo::Logger::logLevel() <= muduo::Logger::TRACE) \muduo::Logger(__FILE__, __LINE__, muduo::Logger::TRACE, __func__).stream()
#define LOG_DEBUG if (muduo::Logger::logLevel() <= muduo::Logger::DEBUG) \muduo::Logger(__FILE__, __LINE__, muduo::Logger::DEBUG, __func__).stream()
#define LOG_INFO if (muduo::Logger::logLevel() <= muduo::Logger::INFO) \muduo::Logger(__FILE__, __LINE__).stream()
#define LOG_WARN muduo::Logger(__FILE__, __LINE__, muduo::Logger::WARN).stream()
#define LOG_ERROR muduo::Logger(__FILE__, __LINE__, muduo::Logger::ERROR).stream()
#define LOG_FATAL muduo::Logger(__FILE__, __LINE__, muduo::Logger::FATAL).stream()
#define LOG_SYSERR muduo::Logger(__FILE__, __LINE__, false).stream()
#define LOG_SYSFATAL muduo::Logger(__FILE__, __LINE__, true).stream()
构造函数
// file: 文件名
// line: 文件行数
// level: 日志等级
// func: 函数名
Logger::Logger(SourceFile file, int line, LogLevel level, const char* func): impl_(level, 0, file, line)
{impl_.stream_ << func << ' '; // 这里处理的逻辑是: 调用Impl中的LogStream中的operator<<
}
析构函数
Logger::~Logger()
{impl_.finish();const LogStream::Buffer& buf(stream().buffer());g_output(buf.data(), buf.length());  //  // 数据回调 上层做具体处理if (impl_.level_ == FATAL){g_flush();abort();}
}
Impl
Logger::Impl是Logger的内部类,负责Logger主要实现,提供组装一条完整log消息的功能。
完整日志:
20220306 09:15:44.681220Z 4013 WARN Hello - Logging_test.cpp:75
格式说明:
日期      时间     微秒     线程  级别  正文     源文件名:       行号
20220306 09:15:44.681220Z  4013 WARN  Hello - Logging_test.cpp:75
Logger::Impl::Impl(LogLevel level, int savedErrno, const SourceFile& file, int line): time_(Timestamp::now()),stream_(),level_(level),line_(line),basename_(file)
{formatTime();CurrentThread::tid();stream_ << T(CurrentThread::tidString(), CurrentThread::tidStringLength());stream_ << T(LogLevelName[level], 6);if (savedErrno != 0){stream_ << strerror_tl(savedErrno) << " (errno=" << savedErrno << ") ";}
}
LogStream
LogStream 主要提供operator<<操作,将用户提供的整型数、浮点数、字符、字符串、字符数组、二进制内存、另一个Small Buffer,格式化为字符串,并加入当前类的Small Buffer。
operator<<
//...// 二进制数转换
LogStream& LogStream::operator<<(const void* p)
{uintptr_t v = reinterpret_cast<uintptr_t>(p);if (buffer_.avail() >= kMaxNumericSize){char* buf = buffer_.current();buf[0] = '0';buf[1] = 'x';size_t len = convertHex(buf+2, v);buffer_.add(len+2);}return *this;
}//...
kSmallBuffer
typedef detail::FixedBuffer<detail::kSmallBuffer> Buffer;  // 保存一条日志// 获取当前日志数据
const Buffer& buffer() const { return buffer_; }
总结
日志库的主要实现流程:
1)Logger 提供用户接口,将实现细节隐藏到Impl,Logger定义一组宏定义LOG_XXX方便用户在前端使用日志库;
2)Impl完成一条完整log消息的组装;
3)LogStream提供operator<< 格式化用户正文内容,将其转换为字符串,并添加到Small Buffer(4KB)末尾;
4)AsyncLogging 提供多个Large Buffer缓存多条log消息,前端需要在重新配接输出位置后,将每条log消息输出到Large Buffer中。后端线程也是由AsyncLogging 负责维护;
5)LogFile 提供日志文件操作,包括滚动日志文件、写日志文件;
6)AppendFile 封装了最底层的的写文件操作,供LogFile使用;
参考:
https://www.cnblogs.com/fortunely/p/15976710.html