1. 背景
由于深度学习模型结构越来越复杂,参数量也越来越大,需要大量的算力去做模型的训练和推理。然而随着移动设备的普及,将深度学习模型部署于计算资源有限基于ARM的移动设备成为了研究的热点。
ShuffleNet[1]是一种专门为计算资源有限的设备设计的神经网络结构,主要采用了pointwise group convolution 和 channel shuffle两种技术,在保留了模型精度的同时极大减少了计算开销。
[1] Zhang X, Zhou X, Lin M, et al. Shufflenet: An extremely efficient convolutional neural network for mobile devices[C].Proceedings of the IEEE conference on computer vision and pattern recognition. 2018: 6848-6856.
2. 相关工作
在论文中,提到了目前sota的两个工作,一个是谷歌的Xception,另一个是facebook推出的ResNeXt。
2.1 Xception
Xception[2]主要涉及了一个技术:深度可分离卷积,即把原本常规的卷积操作分为两步去做。
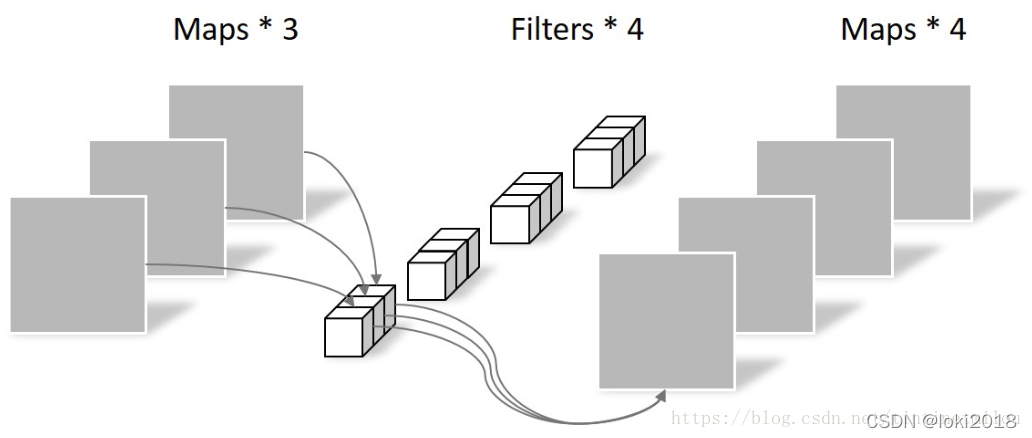
常规卷积是利用若干个多通道卷积核对输入的多通道图像进行处理,输出的是既提取了通道特征又提取了空间特征的feature map。

而深度可分离卷积将提取通道特征(PointWise Convolution)和空间特征(DepthWise Convolution)分为了两步去做:
首先卷积核从三维变为了二维的,每个卷积核只负责输入图像的一个通道,用于提取空间特征,这一步操作中不涉及通道和通道之间的信息交互。接着通过一维卷积来完成通道之间特征提取的工作,即一个常规的卷积操作,只不过卷积核是1*1的。

这样做的好处是降低了常规卷积时的参数量,假设输入通道为 M M M, 输出通道为 N N N,卷积核大小为 k × k , 那 么 k \times k, 那么 k×k,那么常规卷积的参数是: N × M × k × k N \times M \times k \times k N×M×k×k。而通过深度可分离卷积之后,参数量为 M × k × k + N × M × 1 × 1 M \times k \times k + N \times M \times 1 \times 1 M×k×k+N×M×1×1。
代码如下:
class SeparableConv2d(nn.Module):def __init__(self, in_channels, out_channels, kernel_size=1, stride=1, padding=0, dilation=1):super(SeparableConv2d, self).__init__()self.conv1 = nn.Conv2d(in_channels, in_channels, kernel_size, stride, padding, dilation, groups=in_channels, bias=False)self.pointwise = nn.Conv2d(in_channels, out_channels, 1, 1, 0, 1, 1, bias=False)def forward(self, x):x = self.conv1(x)x = self.pointwise(x)return x
[2] Chollet F. Xception: Deep learning with depthwise separable convolutions[C]. Proceedings of the IEEE conference on computer vision and pattern recognition. 2017: 1251-1258.
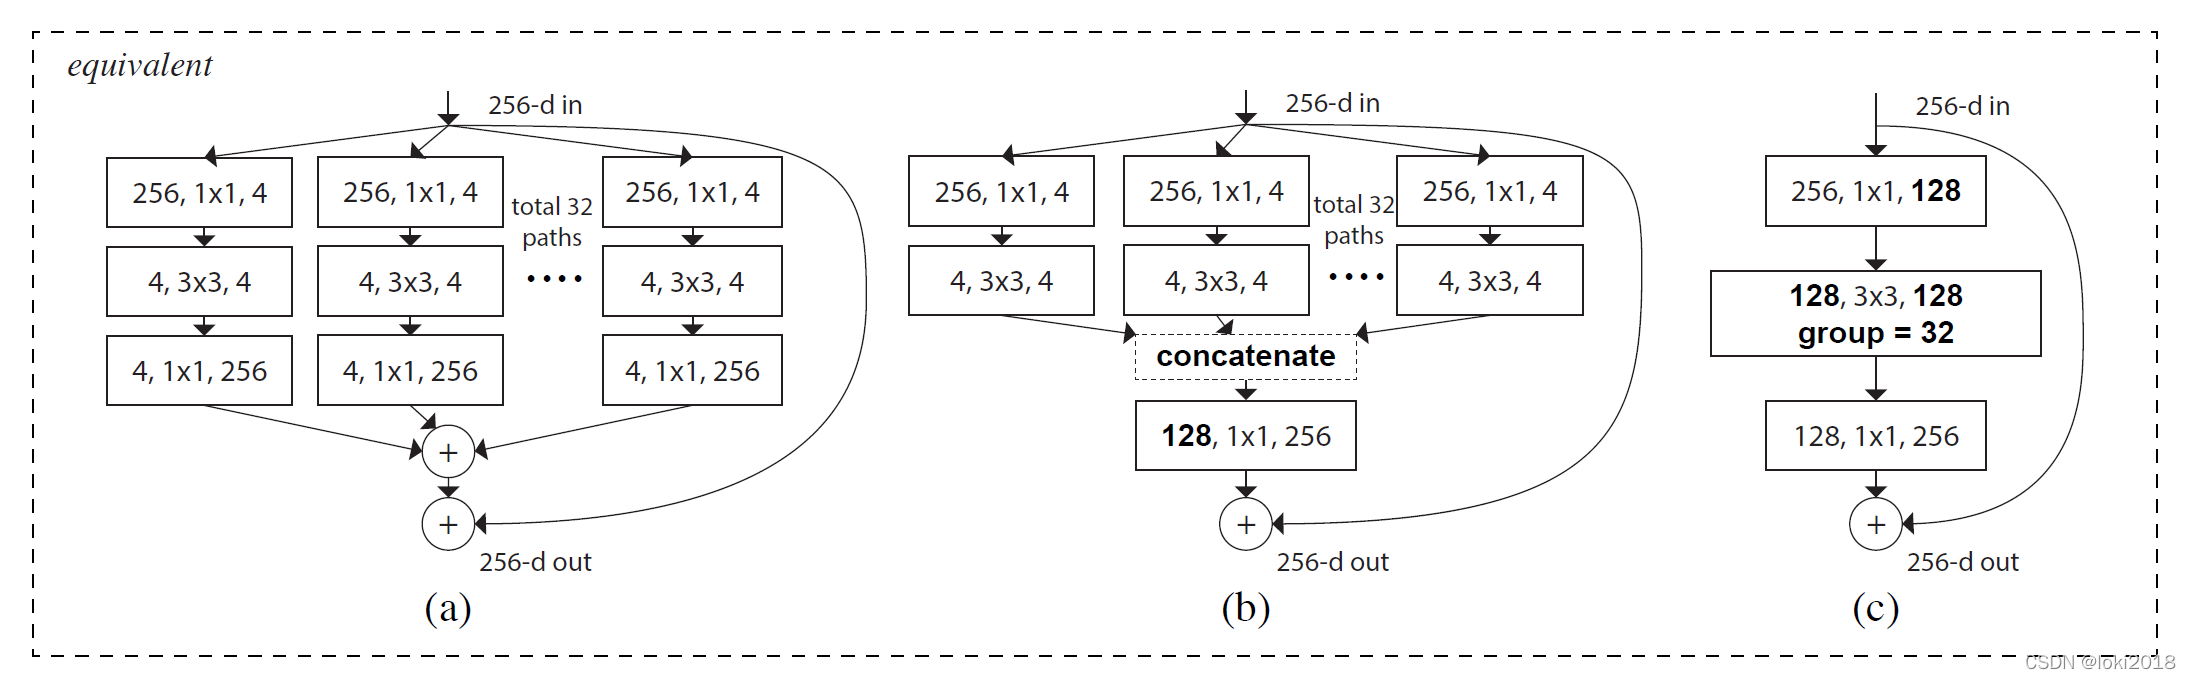
2.2 ResNeXt
作者灵感来源于VGG的模块化堆叠的结构,提出了一种基于分组卷积和残差连接的模块化卷积块从而降低了参数的数量。简单来说,理解了分组卷积的思想就能理解ResNeXt。
[3] Xie S, Girshick R, Dollár P, et al. Aggregated residual transformations for deep neural networks[C]. Proceedings of the IEEE conference on computer vision and pattern recognition. 2017: 1492-1500.
3. ShuffleNet
由于使用 1 × 1 1 \times 1 1×1卷积核进行操作时的复杂度较高,因为需要和每个像素点做互相关运算,作者关注到ResNeXt的设计中, 1 × 1 1 \times 1 1×1卷积操作的那一层需要消耗大量的计算资源,因此提出将这一层也设计为分组卷积的形式。然而,分组卷积只会在组内进行卷积,因此组和组之间不存在信息的交互,为了使得信息在组之间流动,作者提出将每次分组卷积后的结果进行组内分组,再互相交换各自的组内的子组。
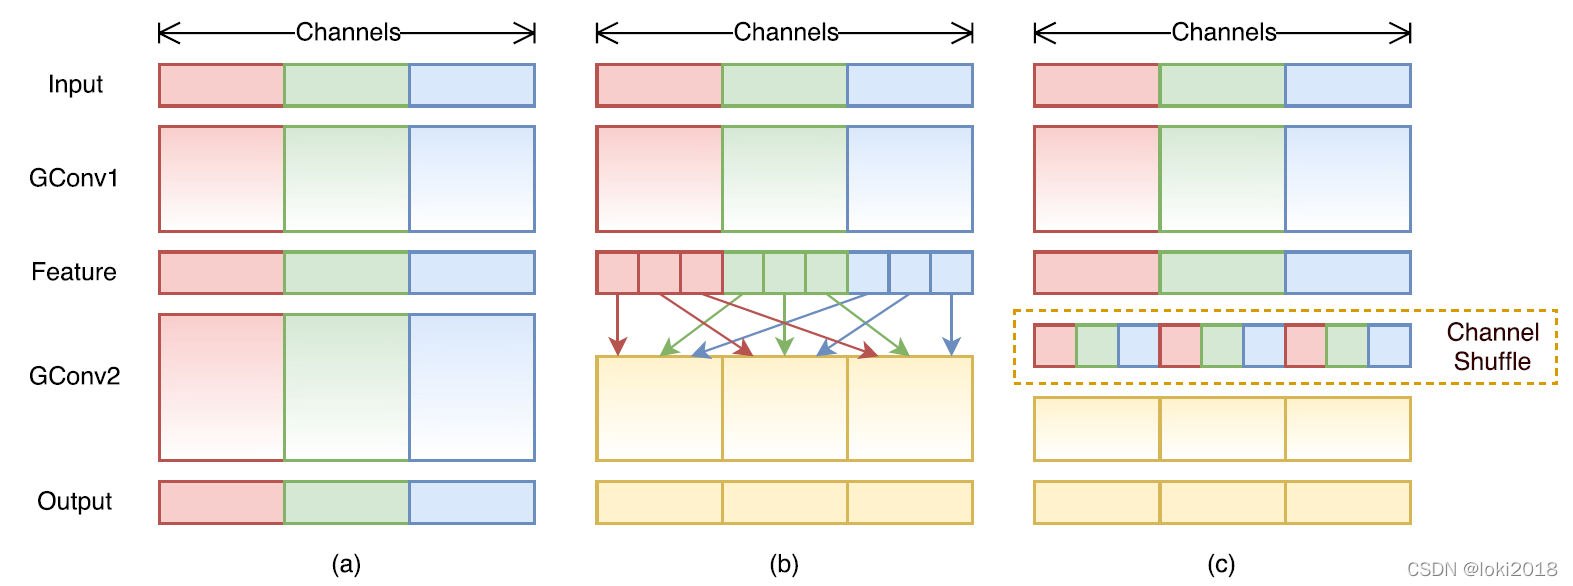
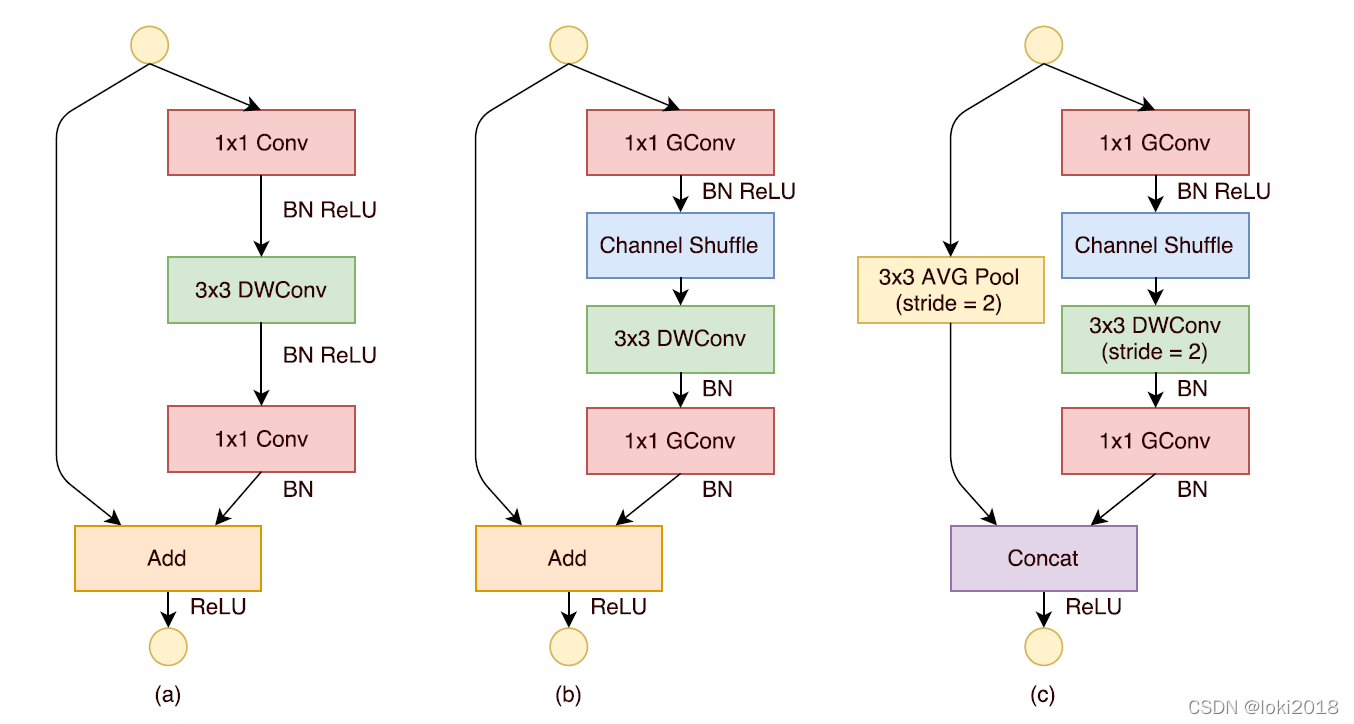
上图c就是一个shufflenet块,图a是一个简单的残差连接块,区别在于,shufflenet将残差连接改为了一个平均池化的操作与卷积操作之后做cancat,并且将 1 × 1 1 \times 1 1×1卷积改为了分组卷积,并且在分组之后进行了channel shuffle操作。
3.1 代码讲解
代码如下:
首先定义1x1,3x3,depthwise_3x3卷积操作:
import torch
import torch.nn as nn
import torchvision
from torch.utils import data
import matplotlib.pyplot as plt
import copy
def conv1x1(in_channels, out_channels, stride=1, groups=1, bias=False):# 1x1卷积操作return nn.Conv2d(in_channels=in_channels, out_channels=out_channels,kernel_size=1, stride=stride, groups=groups, bias=bias)def conv3x3(in_channels, out_channels, stride=1, padding=1, dilation=1, groups=1, bias=False):# 3x3卷积操作# 默认不是下采样return nn.Conv2d(in_channels=in_channels, out_channels=out_channels,kernel_size=3, stride=stride, padding=padding, dilation=dilation,groups=groups,bias=bias)def depthwise_con3x3(channels, stride):# 空间特征抽取# 输入通道和输出通道相等,且分组数等于通道数return nn.Conv2d(in_channels=channels, out_channels=channels,kernel_size=3, stride=stride, padding=1, groups=channels,bias=False)
接着是核心的channel shuffle操作:
通过矩阵变化即可实现,此操作并不会改变通道数和图像的尺寸

def channel_shuffle(x, groups):# x[batch_size, channels, H, W]batch, channels, height, width = x.size()channels_per_group = channels // groups # 每组通道数x = x.view(batch, groups, channels_per_group, height, width)x = torch.transpose(x, 1, 2).contiguous()x = x.view(batch, channels, height, width)return xclass ChannelShuffle(nn.Module):def __init__(self, channels, groups):super(ChannelShuffle, self).__init__()if channels % groups != 0:raise ValueError("通道数必须可以整除组数")self.groups = groupsdef forward(self, x):return channel_shuffle(x, self.groups)
然后定义shufflenet块,分为下采样和不下采样:
class ShuffleUnit(nn.Module):def __init__(self, in_channels, out_channels, groups, downsample, ignore_group):# 如果做下采样,那么通道数翻倍,高宽减半# 如果不做下采样,那么输入输出通道数相等,高宽不变super(ShuffleUnit, self).__init__()self.downsample = downsamplemid_channels = out_channels // 4if downsample:out_channels -= in_channelselse:assert in_channels == out_channels, "不做下采样时应该输入输出通道相等"self.compress_conv1 = conv1x1(in_channels=in_channels,out_channels=mid_channels,groups=(1 if ignore_group else groups))self.compress_bn1 = nn.BatchNorm2d(num_features=mid_channels)self.c_shuffle = ChannelShuffle(channels=mid_channels, groups=groups)self.dw_conv2 = depthwise_con3x3(channels=mid_channels, stride=(2 if downsample else 1))self.dw_bn2 = nn.BatchNorm2d(num_features=mid_channels)self.expand_conv3 = conv1x1(in_channels=mid_channels,out_channels=out_channels,groups=groups)self.expand_bn3 = nn.BatchNorm2d(num_features=out_channels)if downsample:self.avgpool = nn.AvgPool2d(kernel_size=3, stride=2, padding=1)self.activ = nn.ReLU(inplace=True)def forward(self, x):identity = xx = self.compress_conv1(x) # x[batch_size, mid_channels, H, W]x = self.compress_bn1(x)x = self.activ(x)x = self.c_shuffle(x)x = self.dw_conv2(x) # x[batch_size, mid_channels, H, w]x = self.dw_bn2(x)x = self.expand_conv3(x) # x[batch_size, out_channels, H, W]x = self.expand_bn3(x)if self.downsample:identity = self.avgpool(identity)x = torch.cat((x, identity), dim=1) # 通道维上拼接else:x = x + identityx = self.activ(x)return x
在进入shufflenet之前常规地做一个下采样:
class ShuffleInitBlock(nn.Module):def __init__(self, in_channels, out_channels):super(ShuffleInitBlock, self).__init__()self.conv = nn.Conv2d(in_channels, out_channels, kernel_size=3, stride=2, padding=1) # 下采样self.bn = nn.BatchNorm2d(out_channels)self.activ = nn.ReLU(inplace=True)self.pool = nn.MaxPool2d(kernel_size=3, stride=2, padding=1) # 下采样def forward(self, x):x = self.conv(x)x = self.bn(x)x = self.activ(x)x = self.pool(x)return x
建立shufflenet完整的流程:
class ShuffleNet(nn.Module):def __init__(self, channels, init_block_channels, groups, in_channels=1, in_size=(224, 224), num_classes=10):super(ShuffleNet, self).__init__()self.in_size = in_sizeself.num_classes = num_classesself.features = nn.Sequential()self.features.add_module("init_block", ShuffleInitBlock(in_channels, init_block_channels))in_channels = init_block_channelsfor i, channels_per_stage in enumerate(channels):stage = nn.Sequential()for j, out_channels in enumerate(channels_per_stage):downsample = (j == 0)ignore_group = (i==0) and (j==0)stage.add_module("unit{}".format(j + 1), ShuffleUnit(in_channels=in_channels,out_channels=out_channels,groups=groups,downsample=downsample,ignore_group=ignore_group))in_channels = out_channelsself.features.add_module("stage{}".format(i + 1), stage)self.features.add_module("final_pool", nn.AvgPool2d(kernel_size=7,stride=1))self.output = nn.Linear(in_features=in_channels,out_features=num_classes)def forward(self, x):x = self.features(x)x = x.view(x.size(0), -1)x = self.output(x)return xdef get_shufflenet(groups, width_scale):init_block_channels = 24layers = [2, 4, 2]if groups == 1:channels_per_layers = [144, 288, 576]elif groups == 2:channels_per_layers = [200, 400, 800]elif groups == 3:channels_per_layers = [240, 480, 960]elif groups == 4:channels_per_layers = [272, 544, 1088]elif groups == 8:channels_per_layers = [384, 768, 1536]else:raise ValueError("The {} of groups is not supported".format(groups))channels = [[ci] * li for (ci, li) in zip(channels_per_layers, layers)]if width_scale != 1.0:channels = [[int(cij * width_scale) for cij in ci] for ci in channels]init_block_channels = int(init_block_channels * width_scale)net = ShuffleNet(channels=channels,init_block_channels=init_block_channels,groups=groups)return net
训练过程:
net = get_shufflenet(groups=2, width_scale=1.0)
NUM_EPOCHS = 10
BATCH_SIZE = 64
NUM_CLASSES = 10
LR = 0.001
def load_data_fashion_mnist(batch_size, resize=None):trans = [torchvision.transforms.ToTensor()]if resize:trans.insert(0, torchvision.transforms.Resize(resize))trans = torchvision.transforms.Compose(trans)mnist_train = torchvision.datasets.FashionMNIST(root="./FashionMinist", train=True, transform=trans, download=True)mnist_test = torchvision.datasets.FashionMNIST(root="./FashionMinist", train=False, transform=trans, download=True)return (data.DataLoader(mnist_train, batch_size, shuffle=True,),data.DataLoader(mnist_test, batch_size, shuffle=False,))
train_loader, test_loader = load_data_fashion_mnist(BATCH_SIZE, 224)
device = torch.device('cuda' if torch.cuda.is_available() else 'cpu')def validate(net, data):total = 0correct = 0net.eval()with torch.no_grad():for i, (images, labels) in enumerate(data):images = images.to(device)x = net(images)value, pred = torch.max(x,1)pred = pred.data.cpu()total += x.size(0)correct += torch.sum(pred == labels)return correct*100./totaldef train(net):lossfunc = nn.CrossEntropyLoss()optimizer = torch.optim.Adam(net.parameters(), lr=LR)max_accuracy = 0accuracies = []def init_weights(m):if type(m) == nn.Linear or type(m) == nn.Conv2d:nn.init.xavier_uniform_(m.weight)net.apply(init_weights)net = net.to(device)net.train()for epoch in range(NUM_EPOCHS):for i, (images, labels) in enumerate(train_loader):images = images.to(device)labels = labels.to(device)optimizer.zero_grad()out = net(images)loss = lossfunc(out, labels)loss_item = loss.item()loss.backward()optimizer.step()accuracy = float(validate(net, test_loader))accuracies.append(accuracy)print("Epoch %d accuracy: %f loss: %f" % (epoch, accuracy, loss_item))if accuracy > max_accuracy:best_model = copy.deepcopy(net)max_accuracy = accuracyprint("Saving Best Model with Accuracy: ", accuracy)plt.plot(accuracies)return best_modelshufflenet = train(net)
4. ShuffleNetV2
Ma N, Zhang X, Zheng H T, et al. Shufflenet v2: Practical guidelines for efficient cnn architecture design[C]. Proceedings of the European conference on computer vision (ECCV). 2018: 116-131.
ShuffleNetV2 这篇文章对shufflenet进行了进一步的改进,并且提出了四个设计轻量化网络的原则:
- 输入输出通道相同时,内存访问量MAC最小
- 分组数过大会导致MAC增加
- 碎片化操作对并行加速不友好
- 逐元素操作会增加内存的消耗
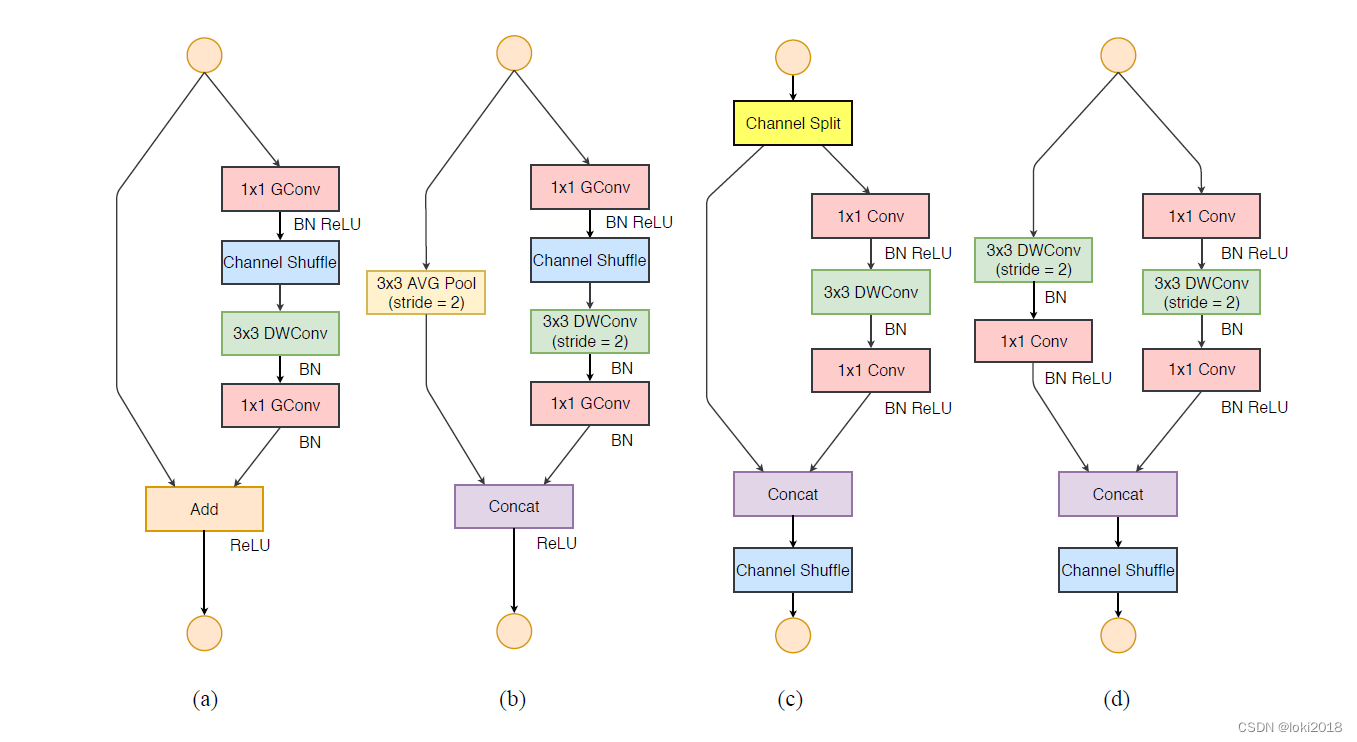
可以看到,shufflenetv2替换了1x1的分组卷积,并且尽量避免了add操作。
变动很小,就直接给出代码了:
class ShuffleUnitV2(nn.Module):def __init__(self, in_channels, out_channels, downsample, use_residual):super(ShuffleUnitV2, self).__init__()self.downsample = downsampleself.use_residual = use_residualmid_channels = out_channels // 2self.compress_conv1 = conv1x1(in_channels=(in_channels if downsample else mid_channels),out_channels=mid_channels)self.compress_bn1 = nn.BatchNorm2d(num_features=mid_channels)self.dw_conv2 = depthwise_con3x3(channels=mid_channels,stride=(2 if downsample else 1))self.dw_bn2 = nn.BatchNorm2d(mid_channels)self.expand_conv3 = conv1x1(in_channels=mid_channels,out_channels=mid_channels)self.expand_bn3 = nn.BatchNorm2d(num_features=mid_channels)if downsample:self.dw_conv4 = depthwise_con3x3(channels=in_channels,stride=2)self.dw_bn4 = nn.BatchNorm2d(num_features=in_channels)self.expand_conv5 = conv1x1(in_channels=in_channels,out_channels=mid_channels)self.expand_bn5 = nn.BatchNorm2d(num_features=mid_channels)self.activ = nn.ReLU(inplace=True)self.c_shuffle = ChannelShuffle(channels=out_channels,groups=2)def forward(self, x):if self.downsample:y1 = self.dw_conv4(x)y1 = self.dw_bn4(y1)y1 = self.expand_conv5(y1)y1 = self.expand_bn5(y1)y1 = self.activ(y1)x2 = xelse:y1, x2 = torch.chunk(x, chunks=2, dim=1)y2 = self.compress_conv1(x2)y2 = self.compress_bn1(y2)y2 = self.activ(y2)y2 = self.dw_conv2(y2)y2 = self.dw_bn2(y2)y2 = self.expand_conv3(y2)y2 = self.expand_bn3(y2)y2 = self.activ(y2)if self.use_residual and not self.downsample:y2 = y2 + x2x = torch.cat((y1, y2), dim=1)x = self.c_shuffle(x)return x
class ShuffleNetV2(nn.Module):def __init__(self, channels, init_block_channels, final_block_channels,use_residual=False, in_channels=1, in_size=(224, 224), num_classes=10):super(ShuffleNetV2, self).__init__()self.in_size = in_sizeself.num_classes = num_classesself.features = nn.Sequential()self.features.add_module("init_block", ShuffleInitBlock(in_channels=in_channels,out_channels=init_block_channels))in_channels = init_block_channelsfor i, channels_per_stage in enumerate(channels):stage = nn.Sequential()for j, out_channels in enumerate(channels_per_stage):downsample = (j==0)stage.add_module("unit{}".format(j+1), ShuffleUnitV2(in_channels=in_channels,out_channels=out_channels,downsample=downsample,use_residual=use_residual))in_channels=out_channelsself.features.add_module("stage{}".format(i + 1), stage)self.features.add_module("final_block", conv1x1(in_channels=in_channels,out_channels=final_block_channels))in_channels = final_block_channelsself.features.add_module("final_bn", nn.BatchNorm2d(num_features=in_channels))self.features.add_module("final_pool", nn.AdaptiveAvgPool2d(output_size=(1, 1)))self.features.add_module("flatten", nn.Flatten())self.output = nn.Linear(in_features=in_channels,out_features=num_classes)def forward(self, x):x = self.features(x)x = x.view(x.size(0), -1)x = self.output(x)return x
def get_shufflenetv2(width_scale):init_block_channels = 24final_block_channels = 1024layers = [4, 8, 4]channels_per_layers = [116, 232, 464]channels = [[ci] * li for (ci, li) in zip(channels_per_layers, layers)]if width_scale != 1.0:channels = [[int(cij * width_scale) for cij in ci] for ci in channels]if width_scale > 1.5:final_block_channels = int(final_block_channels * width_scale)net = ShuffleNetV2(channels=channels,init_block_channels=init_block_channels,final_block_channels=final_block_channels)return net


![vivado 仿真报错:ERROR: [VRFC 10-2987] ‘xxxxx‘ is not compiled in library ‘xil_defaultlib‘](https://img-blog.csdnimg.cn/ddc42048c6a24cb0a0756b7c8145efb6.png)
![仿真出现[VRFC 10-2263] Analyzing Verilog fileinto library xil_defaultlib](https://img-blog.csdnimg.cn/2f3e466be6fd45df81f6f904a77516e9.png)