目录
1、Configuration
2、GIC SDK Architecture
2.1、Structures
2.1.1、GIC interrupt vector table
2.1.2、GIC info
2.1.3、GIC
2.2、Functions
2.2.1、Basic
2.2.2、APIs
2.3、Configure flow
2.3.1、XScuGic_LookupConfig
2.3.2、XScuGic_CfgInitialize
2.3.3、Xil_ExceptionRegisterHandler
2.3.4、XScuGic_Connect
2.3.5、XScuGic_Enable
2.3.6、XScuTimer_EnableInterrupt
2.3.7、Xil_ExceptionEnable
2.4、IRQ Handler
Zynq 的中断控制,由 GIC 来控制,更多的 GIC 相关的内容参考:《ZYNQ 中断子系统》和《Linux 中断 —— ARM GIC 中断控制器》;
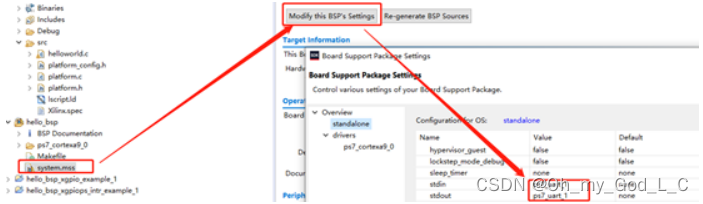
UG585 中已经描述,GIC 的配置不用 ps_init 中来进行配置,而是在 SDK 使用到的时候,调用 SDK 的 GIC 相关的 API 来进行配置;
GIC 的中断类型分为:SGI、PPI 和 SPI;

在硬件上,分为了很多组寄存器来配置,主要分为两类:
Interrupt Controller CPU:CPU 控制器;
Interrupt Controller Distributor:分发器;
1、Configuration
GIC 使用之前,主要需要配置的有:
1、是否使能中断;
2、中断优先级相关逻辑;
3、中断的目标 CPU;
4、中断的触发(沿触发,电平);
2、GIC SDK Architecture
Xilinx 的 SDK 提供了和 GIC 相关的库函数文件:
Makefile
xscugic.c
xscugic.h
xscugic_g.c
xscugic_hw.c
xscugic_hw.h
xscugic_intr.c
xscugic_selftest.c
xscugic_sinit.c
提供给用户层使用的函数,都位于 xscugic.h 中定义,我们来看下他的相关定义:
2.1、Structures
2.1.1、GIC interrupt vector table
GIC 的向量表使用一个叫做 XScuGic_VectorTableEntry 的结构体描述:
/*** This typedef is the exception handler function.*/
typedef void (*Xil_ExceptionHandler)(void *data);
typedef void (*Xil_InterruptHandler)(void *data);/* The following data type defines each entry in an interrupt vector table.* The callback reference is the base address of the interrupting device* for the low level driver and an instance pointer for the high level driver.*/
typedef struct
{Xil_InterruptHandler Handler;void *CallBackRef;
} XScuGic_VectorTableEntry;
这个结构用于描述一个中断的入口;
2.1.2、GIC info
GIC 的基本信息使用一个叫做 XScuGic_Config 的结构体描述(看起来名字是配置,其实并不是,只是描述了 GIC 的基本信息而已):
/*** This typedef contains configuration information for the device.*/
typedef struct
{u16 DeviceId;		/**< Unique ID  of device */u32 CpuBaseAddress;	/**< CPU Interface Register base address */u32 DistBaseAddress;	/**< Distributor Register base address */XScuGic_VectorTableEntry HandlerTable[XSCUGIC_MAX_NUM_INTR_INPUTS];/**<Vector table of interrupt handlers */
} XScuGic_Config;
DeviceId 描述了这个 GIC 的 ID,也就是,可能多个 GIC,这里为 0;
CpuBaseAddress:这个是前面说到的配置 GIC Cpu Interface 寄存器的基地址;
DistBaseAddress:这个是前面说到的配置 GIC Distributor 寄存器的基地址;
HandlerTable:指的是中断的入口,XSCUGIC_MAX_NUM_INTR_INPUTS 在 Zynq-7000 上最多支持 95 个,所以:
#define XSCUGIC_MAX_NUM_INTR_INPUTS 95U /* Maximum number of interrupt defined by Zynq */
2.1.3、GIC
整个 GIC 使用 XScuGic 来描述,包含了上面的所有信息:
/*** The XScuGic driver instance data. The user is required to allocate a* variable of this type for every intc device in the system. A pointer* to a variable of this type is then passed to the driver API functions.*/
typedef struct
{XScuGic_Config *Config;  /**< Configuration table entry */u32 IsReady;		 /**< Device is initialized and ready */u32 UnhandledInterrupts; /**< Intc Statistics */
} XScuGic;
2.2、Functions
2.2.1、Basic
为了更快的进行配置,GIC 的头文件定义了一些快速读写寄存器的 API:
读写 GIC CPU Interface 的:
/****************************************************************************/
/**
*
* Write the given CPU Interface register
*
* @param    InstancePtr is a pointer to the instance to be worked on.
* @param    RegOffset is the register offset to be written
* @param    Data is the 32-bit value to write to the register
*
* @return   None.
*
* @note
* C-style signature:
*    void XScuGic_CPUWriteReg(XScuGic *InstancePtr, u32 RegOffset, u32 Data)
*
*****************************************************************************/
#define XScuGic_CPUWriteReg(InstancePtr, RegOffset, Data) \
(XScuGic_WriteReg(((InstancePtr)->Config->CpuBaseAddress), (RegOffset), \((u32)(Data))))/****************************************************************************/
/**
*
* Read the given CPU Interface register
*
* @param    InstancePtr is a pointer to the instance to be worked on.
* @param    RegOffset is the register offset to be read
*
* @return   The 32-bit value of the register
*
* @note
* C-style signature:
*    u32 XScuGic_CPUReadReg(XScuGic *InstancePtr, u32 RegOffset)
*
*****************************************************************************/
#define XScuGic_CPUReadReg(InstancePtr, RegOffset) \(XScuGic_ReadReg(((InstancePtr)->Config->CpuBaseAddress), (RegOffset)))
读写 GIC Distributor 的:
/****************************************************************************/
/**
*
* Write the given Distributor Interface register
*
* @param    InstancePtr is a pointer to the instance to be worked on.
* @param    RegOffset is the register offset to be written
* @param    Data is the 32-bit value to write to the register
*
* @return   None.
*
* @note
* C-style signature:
*    void XScuGic_DistWriteReg(XScuGic *InstancePtr, u32 RegOffset, u32 Data)
*
*****************************************************************************/
#define XScuGic_DistWriteReg(InstancePtr, RegOffset, Data) \
(XScuGic_WriteReg(((InstancePtr)->Config->DistBaseAddress), (RegOffset), \((u32)(Data))))/****************************************************************************/
/**
*
* Read the given Distributor Interface register
*
* @param    InstancePtr is a pointer to the instance to be worked on.
* @param    RegOffset is the register offset to be read
*
* @return   The 32-bit value of the register
*
* @note
* C-style signature:
*    u32 XScuGic_DistReadReg(XScuGic *InstancePtr, u32 RegOffset)
*
*****************************************************************************/
#define XScuGic_DistReadReg(InstancePtr, RegOffset) \
(XScuGic_ReadReg(((InstancePtr)->Config->DistBaseAddress), (RegOffset)))
2.2.2、APIs
除了基础的读写寄存器的宏,Xilinx SDK 还定义了一组与 GIC 相关的接口:
/** Required functions in xscugic.c*/s32  XScuGic_Connect(XScuGic *InstancePtr, u32 Int_Id,Xil_InterruptHandler Handler, void *CallBackRef);
void XScuGic_Disconnect(XScuGic *InstancePtr, u32 Int_Id);void XScuGic_Enable(XScuGic *InstancePtr, u32 Int_Id);
void XScuGic_Disable(XScuGic *InstancePtr, u32 Int_Id);s32  XScuGic_CfgInitialize(XScuGic *InstancePtr, XScuGic_Config *ConfigPtr,u32 EffectiveAddr);s32  XScuGic_SoftwareIntr(XScuGic *InstancePtr, u32 Int_Id, u32 Cpu_Id);void XScuGic_GetPriorityTriggerType(XScuGic *InstancePtr, u32 Int_Id,u8 *Priority, u8 *Trigger);
void XScuGic_SetPriorityTriggerType(XScuGic *InstancePtr, u32 Int_Id,u8 Priority, u8 Trigger);
void XScuGic_InterruptMaptoCpu(XScuGic *InstancePtr, u8 Cpu_Id, u32 Int_Id);
void XScuGic_Stop(XScuGic *InstancePtr);
void XScuGic_SetCpuID(u32 CpuCoreId);
u32 XScuGic_GetCpuID(void);
/** Initialization functions in xscugic_sinit.c*/
XScuGic_Config *XScuGic_LookupConfig(u16 DeviceId);/** Interrupt functions in xscugic_intr.c*/
void XScuGic_InterruptHandler(XScuGic *InstancePtr);/** Self-test functions in xscugic_selftest.c*/
s32  XScuGic_SelfTest(XScuGic *InstancePtr);
2.3、Configure flow
了解了前面的先验知识,那么开始软件配置流程(其实就是按照 Xilinx 的说明配置寄存器):
可以选择 SDK 中的一个 scu timer 的 sample 看看:
配置流程为(以 Timer 为例):
XScuGic_LookupConfig —— 获取 GIC 的寄存器基地址,并赋值给 XScuGic_Config;
XScuGic_CfgInitialize —— GIC 初始化,配置相关寄存器;
XScuGic_SetPriorityTriggerType —— 设置中断优先级及中断触发方式;
Xil_ExceptionInit —— 异常初始化;
Xil_ExceptionRegisterHandler —— 注册 ISR;
XScuGic_Connect —— 设置中断服务程序入口地址;
XScuGic_Enable —— GIC使能;
XScuTimer_EnableInterrupt —— 使能 Timer 中断
Xil_ExceptionEnable —— 使能 CPU 的中断(CPSR)
2.3.1、XScuGic_LookupConfig
首先定义一个 XScuGic_Config:
XScuGic_Config *IntcConfig;调用 XScuGic_LookupConfig 获得一个 XScuGic_Config:
/** Initialize the interrupt controller driver so that it is ready to* use.*/
IntcConfig = XScuGic_LookupConfig(INTC_DEVICE_ID);
if (NULL == IntcConfig) {return XST_FAILURE;
}
我们来看看他的实现:
XScuGic_Config *XScuGic_LookupConfig(u16 DeviceId)
{XScuGic_Config *CfgPtr = NULL;u32 Index;for (Index=0U; Index < (u32)XPAR_SCUGIC_NUM_INSTANCES; Index++) {if (XScuGic_ConfigTable[Index].DeviceId == DeviceId) {CfgPtr = &XScuGic_ConfigTable[Index];break;}}return (XScuGic_Config *)CfgPtr;
}
传入的 Device ID 为 0,所以得到的是:
/* Definitions for peripheral PS7_SCUGIC_0 */
#define XPAR_PS7_SCUGIC_0_DEVICE_ID 0U
#define XPAR_PS7_SCUGIC_0_BASEADDR 0xF8F00100U
#define XPAR_PS7_SCUGIC_0_HIGHADDR 0xF8F001FFU
#define XPAR_PS7_SCUGIC_0_DIST_BASEADDR 0xF8F01000UXScuGic_Config XScuGic_ConfigTable[XPAR_XSCUGIC_NUM_INSTANCES] =
{{XPAR_PS7_SCUGIC_0_DEVICE_ID,XPAR_PS7_SCUGIC_0_BASEADDR,XPAR_PS7_SCUGIC_0_DIST_BASEADDR,{{0}}		/**< Initialize the HandlerTable to 0 */}
};
这个函数执行后,
XScuGic_Config->DeviceId=0;
XScuGic_Config->CpuBaseAddress=0xF8F00100U
XScuGic_Config->DistBaseAddress=0xF8F01000U
XScuGic_Config->HandlerTable[XSCUGIC_MAX_NUM_INTR_INPUTS] = NULL;
2.3.2、XScuGic_CfgInitialize
通过 XScuGic_CfgInitialize 配置 GIC:
int Status;Status = XScuGic_CfgInitialize(IntcInstancePtr, IntcConfig,IntcConfig->CpuBaseAddress);
if (Status != XST_SUCCESS) {return XST_FAILURE;
}
它的实现为:
s32  XScuGic_CfgInitialize(XScuGic *InstancePtr,XScuGic_Config *ConfigPtr,u32 EffectiveAddr)
{u32 Int_Id;u32 Cpu_Id = CpuId + (u32)1;   // 0 + 1;(void) EffectiveAddr;Xil_AssertNonvoid(InstancePtr != NULL);Xil_AssertNonvoid(ConfigPtr != NULL);/** Detect Zynq-7000 base silicon configuration,Dual or Single CPU.* If it is single CPU cnfiguration then invoke assert for CPU ID=1*/
#ifdef ARMA9if ( XPAR_CPU_ID == 0x01 ){Xil_AssertNonvoid((Xil_In32(XPS_EFUSE_BASEADDR + EFUSE_STATUS_OFFSET)& EFUSE_STATUS_CPU_MASK ) == 0);}
#endifif(InstancePtr->IsReady != XIL_COMPONENT_IS_READY) {InstancePtr->IsReady = 0U;InstancePtr->Config = ConfigPtr;for (Int_Id = 0U; Int_Id<XSCUGIC_MAX_NUM_INTR_INPUTS;Int_Id++) {/** Initalize the handler to point to a stub to handle an* interrupt which has not been connected to a handler. Only* initialize it if the handler is 0 which means it was not* initialized statically by the tools/user. Set the callback* reference to this instance so that unhandled interrupts* can be tracked.*/if 	((InstancePtr->Config->HandlerTable[Int_Id].Handler == NULL)) {InstancePtr->Config->HandlerTable[Int_Id].Handler =StubHandler;}InstancePtr->Config->HandlerTable[Int_Id].CallBackRef =InstancePtr;}XScuGic_Stop(InstancePtr);DistributorInit(InstancePtr, Cpu_Id);CPUInitialize(InstancePtr);InstancePtr->IsReady = XIL_COMPONENT_IS_READY;}return XST_SUCCESS;
}
首先初始化了 Handler Table,然后调用 XScuGic_Stop(InstancePtr) 来关闭 GIC,调用 DistributorInit(InstancePtr, Cpu_Id); 来初始化 Distributor 寄存器,调用 CPUInitialize(InstancePtr); 来初始化 GIC CPU Interface 寄存器;
XScuGic_Stop:
用于关闭 GIC
void XScuGic_Stop(XScuGic *InstancePtr)
{u32 Int_Id;u32 RegValue;u32 Target_Cpu;u32 DistDisable = 1; /* To track if distributor need to be disabled or not */u32 LocalCpuID = ((u32)0x1 << CpuId);Xil_AssertVoid(InstancePtr != NULL);/* If distributor is already disabled, no need to do anything */RegValue = XScuGic_DistReadReg(InstancePtr, XSCUGIC_DIST_EN_OFFSET);if ((RegValue & XSCUGIC_EN_INT_MASK) == 0U) {return;}LocalCpuID |= LocalCpuID << 8U;LocalCpuID |= LocalCpuID << 16U;/** Check if the interrupt are targeted to current cpu only or not.* Also remove current cpu from interrupt target register for all* interrupts.*/for (Int_Id = 32U; Int_Id<XSCUGIC_MAX_NUM_INTR_INPUTS;Int_Id=Int_Id+4U) {Target_Cpu = XScuGic_DistReadReg(InstancePtr,XSCUGIC_SPI_TARGET_OFFSET_CALC(Int_Id));if ((Target_Cpu != LocalCpuID) && (Target_Cpu!= 0)) {/** If any other CPU is also programmed to target register, GIC* distributor can not be disabled.*/DistDisable = 0;}/* Remove current CPU from interrupt target register */Target_Cpu &= (~LocalCpuID);XScuGic_DistWriteReg(InstancePtr,XSCUGIC_SPI_TARGET_OFFSET_CALC(Int_Id), Target_Cpu);}/** If GIC distributor is safe to be disabled, disable all the interrupt* and then disable distributor.*/if ( DistDisable == 1) {for (Int_Id = 0U; Int_Id<XSCUGIC_MAX_NUM_INTR_INPUTS;Int_Id=Int_Id+32U) {/** Disable all the interrupts*/XScuGic_DistWriteReg(InstancePtr,XSCUGIC_EN_DIS_OFFSET_CALC(XSCUGIC_DISABLE_OFFSET,Int_Id),0xFFFFFFFFU);}XScuGic_DistWriteReg(InstancePtr, XSCUGIC_DIST_EN_OFFSET, 0U);}
}
DistributorInit->DoDistributorInit:
初始化 Distributor,对中断的优先级、触发方式和分发到 Target CPU 进行初始化:
static void DistributorInit(XScuGic *InstancePtr, u32 CpuID)
{u32 Int_Id;u32 LocalCpuID = CpuID;u32 RegValue;#if USE_AMP==1 && (defined (ARMA9) || defined(__aarch64__))
#warning "Building GIC for AMP"/** GIC initialization is taken care by master CPU in* openamp configuration, so do nothing and return.*/return;
#endifRegValue = XScuGic_DistReadReg(InstancePtr, XSCUGIC_DIST_EN_OFFSET);if ((RegValue & XSCUGIC_EN_INT_MASK) == 0U) {Xil_AssertVoid(InstancePtr != NULL);DoDistributorInit(InstancePtr, CpuID);return;}/** The overall distributor should not be initialized in AMP case where* another CPU is taking care of it.*/LocalCpuID |= LocalCpuID << 8U;LocalCpuID |= LocalCpuID << 16U;for (Int_Id = 32U; Int_Id<XSCUGIC_MAX_NUM_INTR_INPUTS;Int_Id=Int_Id+4U) {RegValue = XScuGic_DistReadReg(InstancePtr,XSCUGIC_SPI_TARGET_OFFSET_CALC(Int_Id));RegValue |= LocalCpuID;XScuGic_DistWriteReg(InstancePtr,XSCUGIC_SPI_TARGET_OFFSET_CALC(Int_Id),RegValue);}
}
CPUInitialize:
配置优先级 Mask->0xF0,使能中断;
static void CPUInitialize(XScuGic *InstancePtr)
{/** Program the priority mask of the CPU using the Priority mask register*/XScuGic_CPUWriteReg(InstancePtr, XSCUGIC_CPU_PRIOR_OFFSET, 0xF0U);/** If the CPU operates in both security domains, set parameters in the* control_s register.* 1. Set FIQen=1 to use FIQ for secure interrupts,* 2. Program the AckCtl bit* 3. Program the SBPR bit to select the binary pointer behavior* 4. Set EnableS = 1 to enable secure interrupts* 5. Set EnbleNS = 1 to enable non secure interrupts*//** If the CPU operates only in the secure domain, setup the* control_s register.* 1. Set FIQen=1,* 2. Set EnableS=1, to enable the CPU interface to signal secure interrupts.* Only enable the IRQ output unless secure interrupts are needed.*/XScuGic_CPUWriteReg(InstancePtr, XSCUGIC_CONTROL_OFFSET, 0x07U);}
2.3.3、Xil_ExceptionRegisterHandler
注册中断对应的 GIC 通用中断处理函数入口:
void Xil_ExceptionRegisterHandler(u32 Exception_id,Xil_ExceptionHandler Handler,void *Data)
{XExc_VectorTable[Exception_id].Handler = Handler;XExc_VectorTable[Exception_id].Data = Data;
}
这说明意思呢?比如:
/** Connect the interrupt controller interrupt handler to the hardware* interrupt handling logic in the processor.*/Xil_ExceptionRegisterHandler(XIL_EXCEPTION_ID_IRQ_INT,(Xil_ExceptionHandler)XScuGic_InterruptHandler,IntcInstancePtr);这里指的是,注册了 IRQ 的入口为 XScuGic_InterruptHandler,Cortex-A 系列的中断向量表如下:
#define XIL_EXCEPTION_ID_RESET			0U
#define XIL_EXCEPTION_ID_UNDEFINED_INT		1U
#define XIL_EXCEPTION_ID_SWI_INT		2U
#define XIL_EXCEPTION_ID_PREFETCH_ABORT_INT	3U
#define XIL_EXCEPTION_ID_DATA_ABORT_INT		4U
#define XIL_EXCEPTION_ID_IRQ_INT		5U
#define XIL_EXCEPTION_ID_FIQ_INT		6U
这里注册的是 IRQ 类型的入口;
2.3.4、XScuGic_Connect
设置指定 IRQ 的中断服务程序的入口,比如 Timer,UART,入口都是前面的 XScuGic_InterruptHandler,但是在 XScuGic_InterruptHandler 会根据具体的中断号,来执行对应的 ISR;
s32  XScuGic_Connect(XScuGic *InstancePtr, u32 Int_Id,Xil_InterruptHandler Handler, void *CallBackRef)
{/** Assert the arguments*/Xil_AssertNonvoid(InstancePtr != NULL);Xil_AssertNonvoid(Int_Id < XSCUGIC_MAX_NUM_INTR_INPUTS);Xil_AssertNonvoid(Handler != NULL);Xil_AssertNonvoid(InstancePtr->IsReady == XIL_COMPONENT_IS_READY);/** The Int_Id is used as an index into the table to select the proper* handler*/InstancePtr->Config->HandlerTable[Int_Id].Handler = Handler;InstancePtr->Config->HandlerTable[Int_Id].CallBackRef = CallBackRef;return XST_SUCCESS;
}
以 Timer 为例:
/** Connect the device driver handler that will be called when an* interrupt for the device occurs, the handler defined above performs* the specific interrupt processing for the device.*/Status = XScuGic_Connect(IntcInstancePtr, TimerIntrId,(Xil_ExceptionHandler)TimerIntrHandler,(void *)TimerInstancePtr);if (Status != XST_SUCCESS) {return Status;}
2.3.5、XScuGic_Enable
开启指定中断号的 GIC 中断,通过配置 Distributor 的 ICDISER0~ICDISER2:
void XScuGic_Enable(XScuGic *InstancePtr, u32 Int_Id)
{u32 Mask;/** Assert the arguments*/Xil_AssertVoid(InstancePtr != NULL);Xil_AssertVoid(Int_Id < XSCUGIC_MAX_NUM_INTR_INPUTS);Xil_AssertVoid(InstancePtr->IsReady == XIL_COMPONENT_IS_READY);/** The Int_Id is used to create the appropriate mask for the* desired bit position. Int_Id currently limited to 0 - 31*/Mask = 0x00000001U << (Int_Id % 32U);/** Enable the selected interrupt source by setting the* corresponding bit in the Enable Set register.*/XScuGic_DistWriteReg(InstancePtr, (u32)XSCUGIC_ENABLE_SET_OFFSET +((Int_Id / 32U) * 4U), Mask);
}
2.3.6、XScuTimer_EnableInterrupt
使能模块的 Interrupt,这里是 Timer,所以用这个,其他模块参考对应的寄存器和 API;
2.3.7、Xil_ExceptionEnable
通过配置 CPSR 来使能 CPU 中断:
#define XREG_CPSR_IRQ_ENABLE			0x80
#define XIL_EXCEPTION_IRQ	XREG_CPSR_IRQ_ENABLE#define Xil_ExceptionEnable() \Xil_ExceptionEnableMask(XIL_EXCEPTION_IRQ)#if defined (__GNUC__) || defined (__ICCARM__)
#define Xil_ExceptionEnableMask(Mask)	\mtcpsr(mfcpsr() & ~ ((Mask) & XIL_EXCEPTION_ALL))
#else
#define Xil_ExceptionEnableMask(Mask)	\{								\register u32 Reg __asm("cpsr"); \mtcpsr((Reg) & (~((Mask) & XIL_EXCEPTION_ALL))); \}
#endif
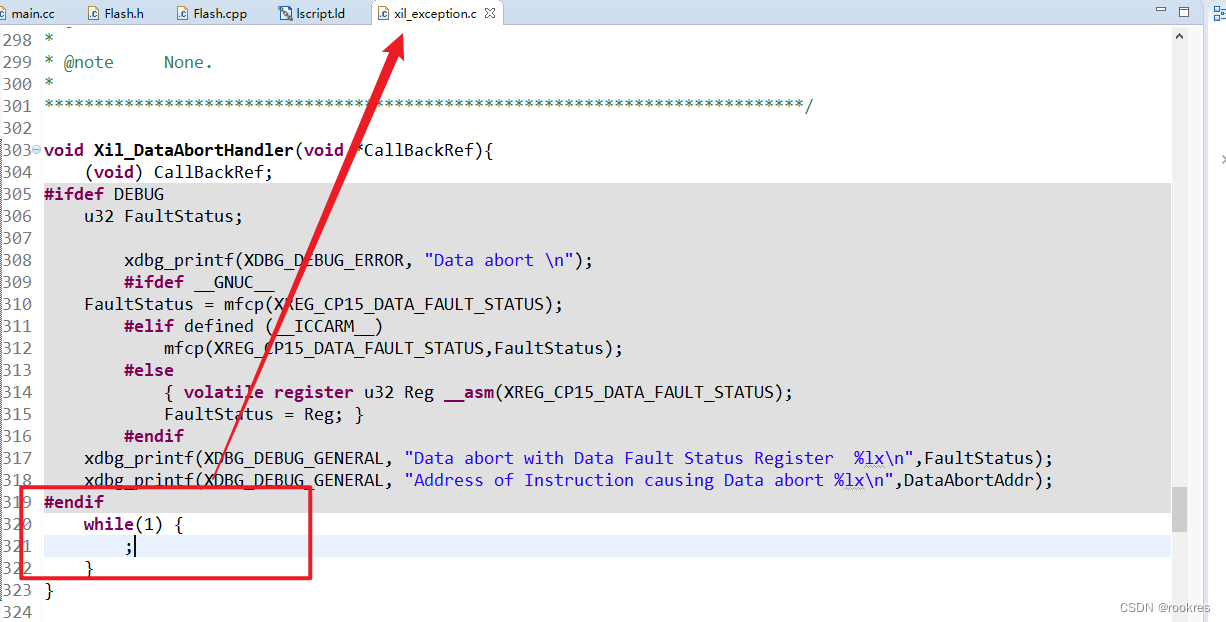
2.4、IRQ Handler
所有配置完成,那么当中断来的时候呢,首先 CPU 会跳转到我们的中断向量表的 IRQ,在:
ps7_cortexa9_0/libsrc/standalone_v6_5/src/asm_vectors.S
.globl _vector_table.section .vectors
_vector_table:B       _bootB       UndefinedB       SVCHandlerB       PrefetchAbortHandlerB       DataAbortHandlerNOP     /* Placeholder for address exception vector*/B       IRQHandlerB       FIQHandler
也就是 IRQHandler 这符号:
IRQHandler:                                     /* IRQ vector handler */stmdb   sp!,{r0-r3,r12,lr}              /* state save from compiled code*/
#ifdef __ARM_NEON__vpush {d0-d7}vpush {d16-d31}vmrs r1, FPSCRpush {r1}vmrs r1, FPEXCpush {r1}
#endif#ifdef PROFILINGldr     r2, =prof_pcsubs    r3, lr, #0str     r3, [r2]
#endifbl      IRQInterrupt                    /* IRQ vector */#ifdef __ARM_NEON__pop     {r1}vmsr    FPEXC, r1pop     {r1}vmsr    FPSCR, r1vpop    {d16-d31}vpop    {d0-d7}
#endifldmia   sp!,{r0-r3,r12,lr}              /* state restore from compiled code */subs    pc, lr, #4                      /* adjust return */
根据 AAPCS 规则保存 R0-R3、R12、LR;跳转到 IRQInterrupt,最后通过指令:
subs pc, lr, #4
返回(ARM Cortex-A 处理器规定的返回地址);
IRQInterrupt 是 C 代码,它的实现是:
/*****************************************************************************/
/**
*
* This is the C level wrapper for the IRQ interrupt called from the vectors.s
* file.
*
* @param	None.
*
* @return	None.
*
* @note		None.
*
******************************************************************************/
void IRQInterrupt(void)
{XExc_VectorTable[XIL_EXCEPTION_ID_IRQ_INT].Handler(XExc_VectorTable[XIL_EXCEPTION_ID_IRQ_INT].Data);
}
这个 XExc_VectorTable 有印象吗,就是通过 Xil_ExceptionRegisterHandler 注册下去的,所以,这里会调用到注册下去的通过 GIC 的 Handler:XScuGic_InterruptHandler
void XScuGic_InterruptHandler(XScuGic *InstancePtr)
{u32 InterruptID;u32 IntIDFull;XScuGic_VectorTableEntry *TablePtr;/* Assert that the pointer to the instance is valid*/Xil_AssertVoid(InstancePtr != NULL);/** Read the int_ack register to identify the highest priority interrupt ID* and make sure it is valid. Reading Int_Ack will clear the interrupt* in the GIC.*/IntIDFull = XScuGic_CPUReadReg(InstancePtr, XSCUGIC_INT_ACK_OFFSET);InterruptID = IntIDFull & XSCUGIC_ACK_INTID_MASK;if(XSCUGIC_MAX_NUM_INTR_INPUTS < InterruptID){goto IntrExit;}/** If the interrupt is shared, do some locking here if there are multiple* processors.*//** If pre-eption is required:* Re-enable pre-emption by setting the CPSR I bit for non-secure ,* interrupts or the F bit for secure interrupts*//** If we need to change security domains, issue a SMC instruction here.*//** Execute the ISR. Jump into the Interrupt service routine based on the* IRQSource. A software trigger is cleared by the ACK.*/TablePtr = &(InstancePtr->Config->HandlerTable[InterruptID]);if(TablePtr != NULL) {TablePtr->Handler(TablePtr->CallBackRef);}IntrExit:/** Write to the EOI register, we are all done here.* Let this function return, the boot code will restore the stack.*/XScuGic_CPUWriteReg(InstancePtr, XSCUGIC_EOI_OFFSET, IntIDFull);/** Return from the interrupt. Change security domains could happen here.*/
}
首先读取 CPU Inferface 的 寄存器 ICCIAR:
![]()

来确定是哪个 IRQ 产生了(Interrupt ID);
然后调用这个 ID 的 Handler,进行具体的中断处理函数,这里我们使用的是 Timer 的,这个 Handler 是在调用 XScuGic_Connect 就挂接好了;
最后,写 EOI 寄存器,告诉 GIC,这个中断处理完毕;
相关代码和工程在 gitee 持续更新:
https://gitee.com/stephenzhou-tech/Zynq7020_PS


![vivado 仿真报错:ERROR: [VRFC 10-2987] ‘xxxxx‘ is not compiled in library ‘xil_defaultlib‘](https://img-blog.csdnimg.cn/ddc42048c6a24cb0a0756b7c8145efb6.png)
![仿真出现[VRFC 10-2263] Analyzing Verilog fileinto library xil_defaultlib](https://img-blog.csdnimg.cn/2f3e466be6fd45df81f6f904a77516e9.png)