http://xenyinzen.wikidot.com/loongson-about
+++++++++++++++++++++++++++++++++++++++++
PMON-V1.1 目录结构
+++++++++++++++++++++++++++++++++++++++++
pmon的目录结构大致如下(由linux工具tree生成)
.
|-- Targets 目标结构相关代码,每个新结构在该目录下有一个子目录
| `-- Bonito Bonito是我们的北桥代号,里面是一些关于北桥的代码
| |-- Bonito
| |-- compile
| | `-- zboot
| | |-- images
| | |-- pmon
| | `-- utils
| |-- conf
| |-- dev
| |-- include
| `-- pci
|-- conf 源代码编译所依赖的配置文件所在目录
|-- doc 说明文档
|-- examples 一看就知道是样例,但我还不知道只面究竟写的是什么
|-- fb 在frambuffer上做文字和图形显示的代码
|-- include 系统头文件
|-- lib
| |-- libc C库
| `-- libz zip压缩库
|-- pic 开机启动图片(压缩后的)存放目录
|-- pmon pmon主体代码
| |-- arch 平台相关代码
| | `-- mips 处理器相关的代码,比如Flush_Cache等
| |-- cmds pmon shell 命令代码
| |-- common 各模块共同依赖的代码
| |-- custom ??这个目录不知道干什么用的
| |-- dev 一些基本设备的驱动,比如Flash
| |-- fs 文件系统支持代码
| |-- loaders 二进制文件加载器代码
| `-- netio 网络命令以及tftp的实现
|-- sys pmon的较低层的代码
| |-- arch 处理器相关代码一些定义
| | `-- mips
| | `-- include
| |-- dev 各种设备的驱动程序
| | |-- ata
| | |-- fd
| | |-- ic
| | |-- microcode
| | | `-- siop
| | |-- mii
| | |-- pci
| | `-- usb
| |-- kern 主要是一些系统调用的实现,比如malloc,time, signal, socket
| |-- linux
| |-- net 实现网络协议
| |-- netinet 实现网络协议
| |-- scsi Scsi协议的实现
| |-- sys 这个大目录的头文件存放区
| `-- vm ??虚拟内存相关实现
|-- tools 一些工具
| |-- bmp_logo 把bmp图转换成C数据的工具
| |-- bootelf
| |-- mk
| |-- pmoncfg 源代码配置工具
| |-- scripts
| `-- srecord
|-- x86emu x86显卡模拟器,主要是运行显卡的BIOS,初始化显卡
| `-- int10
| `-- x86emu
| |-- include
| | `-- x86emu
| `-- src
| `-- x86emu
| `-- x86emu
`-- zloader zip格式加载启动代码
Targets目录的组成
每个结构一个目录,我们拿Bonito来为例子,主要有下列文件:
start.S 位于Targets/Bonito/Bonito 目录下,是C环境建立之前的汇编代码,使整个BIOS运行的起点。
tgt_machdep.c位于Targets/Bonito/Bonito 目录下,一些板子相关的函数。
pci_machdep.c进行Targets/Bonito/pci 空间分配的一些函数
Targets/Bonito/dev 目录下一些板子特殊的设备的驱动。
Targets/Bonito/conf 目录下是一些编译环境建立需要的一些文件
参考说明
本文的撰写过程中,参考了诸多中科龙梦科技有限公司的内部资料(都是可以公开的),另外还有一些未署名的文档,无法一一列举,在此表示感谢。龙芯事业一定会在前仆后继的勇士所铺设的道路上日益壮大!
+++++++++++++++++++++++++++++++++++++++++
代码执行流程
+++++++++++++++++++++++++++++++++++++++++
当整个板子起电后,CPU将从 0xBFC00000 取指令开始执行,而ROM在系统中的地址就是从该地址开始的。所以,其中的第一条指令就是整个过程中 CPU 要执行的第一个指令。
初始化CPU内的寄存器,清TLB.
初始化一些北桥的基本配置,以确保uart能够正常工作.
初始化uart,主要是设置波特率.
初始化内存(主要通过I2C协议从内存的EEPROM读取内存参数来进行设置).
初始化cache.
拷贝pmon的代码到内存,然后通过
la v0, initmips
jalr v0
nop
从此代码便到内存中间去了,从这开始因为可以读写内存,所以有了栈,故可以用C的代码了,所以以后的程序便是C代码了
+++++++++++++++++++++++++++++++++++++++++
start.S详解
+++++++++++++++++++++++++++++++++++++++++
start.S文件在 /Targets/Bonito/Bonito 目录当中,是整个PMON代码的起点。我们首先研究它。
文件一开头是版权声明部分,然后是包括一些头文件,然后是一些宏定义,然后才是代码。
与CPU相关的一些宏定义有
/**   Register usage:**    s0    link versus load offset, used to relocate absolute adresses.*    s1    free*    s2    memory size.*    s3    free.*    s4    Bonito base address.*    s5    dbg.*    s6    sdCfg.*    s7    rasave.*    s8    L3 Cache size.*/#define tmpsize        s1
#define msize        s2
#define bonito        s4
#define dbg            s5
#define sdCfg        s6
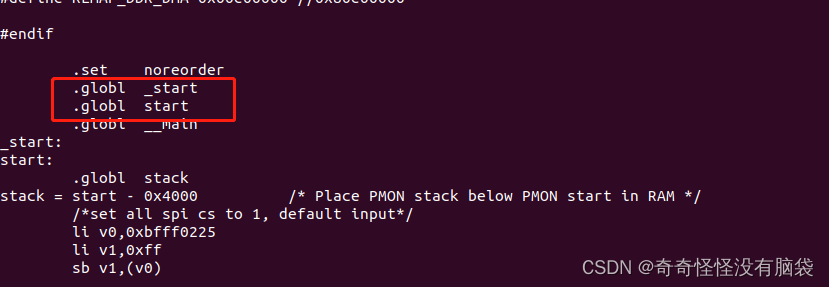
下面是程序的开头,不过并不生成实际的二进制数据,它告诉编译汇编器一些信息。
.set    noreorder.globl    _start.globl    start.globl    __main_start:
start:.globl    stackstack = start - 0x4000         /* Place PMON stack below PMON start in RAM */ =====================
解释:
.set noreorder
是告诉汇编汇编器不要对后面的代码进行优化处理,比如重新排列执行代码。.globl _start
.globl start
.globl __main
这里,定义了三个全局符号。可以PMON代码中的任何地方引用它。_start:
start:
.globl stack
stack = start - 0x4000 /* Place PMON stack below PMON start in RAM */
在这里定义了子程序的名称 _start 和 start。并定义了堆栈的栈底 stack 值,在 start 以下 16K 处。
=====================
下面是程序执行的第一条语句
/* NOTE!! Not more that 16 instructions here!!! Right now it's FULL! */mtc0    zero, COP_0_STATUS_REGmtc0    zero, COP_0_CAUSE_REGli    t0, SR_BOOT_EXC_VEC        /* Exception to Boostrap Location */                                mtc0    t0, COP_0_STATUS_REG/* SR's BEV bit is set so the CPU uses the ROM(kseg1) space exception entry point when reboot exception occursla    sp, stack                la    gp, _gp                =====================
解释:
由于龙芯的地址空间决定,这里的代码不能超过 16 条指令,因为后面紧跟着的是中断向量的地址。(??)接着,就把 CP0 的状态寄存器 COP_0_STATUS_REG 和 COP_0_CAUSE_REG 寄存器全部清空为0。
li t0, SR_BOOT_EXC_VEC
接着设置状态寄存器的BEV位,这样就是让 CP0 运行在没有 TLB 的模式,并且一旦发生异常,就进入ROM 的 bfc00000 位置重启。后面两句主要设置引导程序的堆栈空间,
la sp, stack 是把栈底地址给 sp 寄存器,(现在有个疑问就是 pmon的栈是往上还是往下生长的??)
la gp, _gp 是把编译器中的 _gp 全局地址给 gp 寄存器,这样做法是让全局变量可以作相对寄存器寻址。
其中_gp是在连接脚本文件里定义的。
=====================
bal uncached
nop
bal locate
nop uncached:
or ra, UNCACHED_MEMORY_ADDR
j ra
nop=====================
解释:
这段程序先进行一个无条件跳转连接指令,这样做的目的很明确就是想清空预取指令和流水线的指令。
这样就跳到 uncached 这里运行。
先来看看bal指令会做些什么事情,
通常bal指令会算出跳转到的目的地址相对于PC寄存器的偏移量,
然后把PC+8指令地址放到ra寄存器里,也就是把bal locate指令地址放到RA寄存器,以便可以返回。由于龙芯2E的加电时启动地址是 0xBFC0 0000,那么放在ra里的值就是 0xBFCO 0028(第8条指令)。
后面
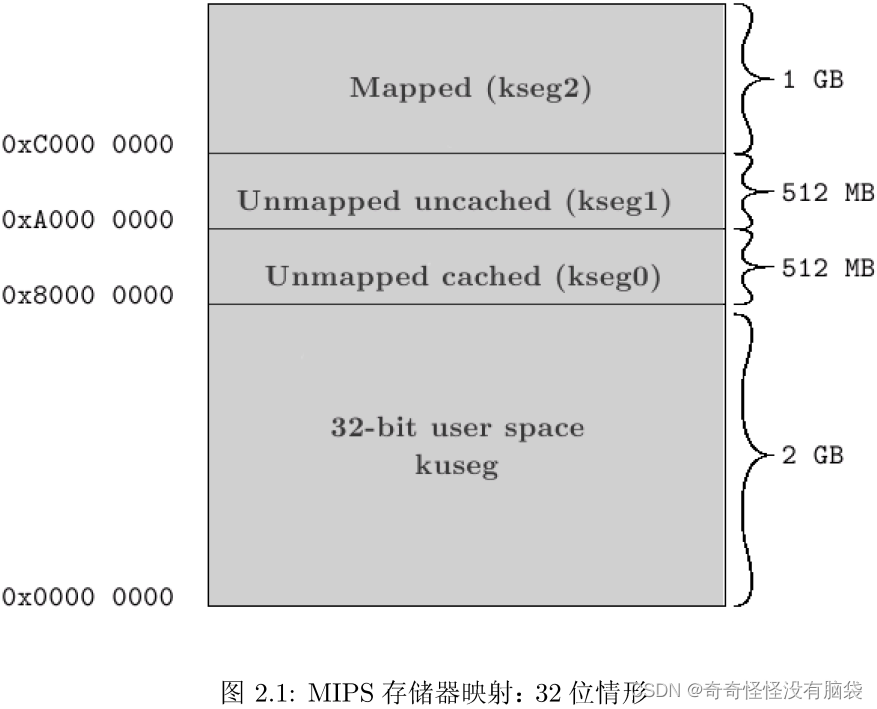
or ra, UNCACHED_MEMORY_ADDR,这里进行是与0xA000 00000的或运算,
也就是说从ROM加载时,不会改变返回地址 ra 的值。
写这句的目的主要是保证要从ROM中运行后面的一段程序,而不是从其它地址(RAM中)运行。
所以接着就跳回来到 bal locate位置并执行 bal locate 指令,这样就跳到 locate 的位置执行程序了。
=====================
在MIPS中,异常处理入口有两套,通过 CP0 的 STATUS 寄存器位 BEV 来决定,当 BEV=1 时,异常的入口地址为 0xBFC00000 开始的地址。而 BEV=0,异常地址为 0x80000000 开始的地址,所以PMON程序段开始处是一些异常的调入口,需要跳过这段空间,程序就是通过这个 bal 指令跳到后面的

2
下面是那段被跳过去的异常代码
/**  Reboot vector usable from outside pmon. *//* started in aligned address by 2^8=256 Bytes, that is 0xbfc00000 + 0x100 = 0xbfc00100 */.align    8
ext_map_and_reboot:bal    CPU_TLBClear                nopli    a0, 0xc0000000li    a1, 0x40000000bal    CPU_TLBInitnopla    v0, tgt_reboot                la    v1, start                    subu    v0, v1                    lui    v1, 0xffc0                    addu    v0, v1jr    v0nop/**  Exception vectors here for rom, before we are up and running. Catch*  whatever comes up before we have a fully fledged exception handler.*//* TLB refill exception *//* bfc00200, this code address is 0xbfc00200, 2^9 = 512 Bytes, it is a exception process function */.align    9            move    k0, ra            /* save ra */la    a0, v200_msgbal    stringserialnopb    exc_common.align    7            /* bfc00280 */move    k0, ra    #save rala    a0, v280_msgbal    stringserialnopb    exc_common        // print the CP0 register's infomation/* Cache error handler */.align    8            /* bfc00300 */PRINTSTR("\r\nPANIC! Unexpected Cache Error exception! ")mfc0    a0, COP_0_CACHE_ERRbal    hexserialnopb    exc_common/* General exception handler */.align    7            /* bfc00380 */move    k0, ra    #save rala    a0, v380_msgbal    stringserialnopb    exc_common.align    8            /* bfc00400 */move    k0, ra    #save rala    a0, v400_msgbal    stringserialnop/* when the exception occurs, do this code to present the CP0 register's content */
exc_common:PRINTSTR("\r\nCAUSE=")mfc0    a0, COP_0_CAUSE_REGbal    hexserialnopPRINTSTR("\r\nSTATUS=")mfc0    a0, COP_0_STATUS_REGbal    hexserialnopPRINTSTR("\r\nERRORPC=")mfc0    a0, COP_0_ERROR_PCbal    hexserialnopPRINTSTR("\r\nEPC=")mfc0    a0, COP_0_EXC_PCbal    hexserialnopPRINTSTR("\r\nBADVADDR=")mfc0    a0, COP_0_BAD_VADDRbal    hexserialnopPRINTSTR("\r\nRA=")move    a0, k0bal    hexserialnop//    b    ext_map_and_rebootnop/* control the distribution of the code, here we insert a bank 256 Bytes. */.align 8    nop/* handler name table */.align 8.word read.word write.word open.word close.word nullfunction.word printf.word vsprintf.word nullfunction.word nullfunction.word getenv.word nullfunction.word nullfunction.word nullfunction.word nullfunction
3
让我们看看 locate 标号之后的代码是些什么
/**  We get here from executing a bal to get the PC value of the current execute*  location into ra. Check to see if we run from ROM or if this is ramloaded.*/
locate:la        s0, start                subu    s0, ra, s0                and        s0, 0xffff0000            li        t0, SR_BOOT_EXC_VECmtc0    t0, COP_0_STATUS_REGmtc0    zero, COP_0_CAUSE_REG    .set noreorder/* the varible bonito is register s4, BONITO_REG_BASE is 0x1fe00000 */li        bonito, PHYS_TO_UNCACHED(BONITO_REG_BASE)  bal    1f    nop            /* now the value of ra is 0xbfc00xxx *//* bonito endianess */BONITO_BIC(BONITO_BONPONCFG, BONITO_BONPONCFG_CPUBIGEND)BONITO_BIC(BONITO_BONGENCFG, BONITO_BONGENCFG_BYTESWAP|BONITO_BONGENCFG_MSTRBYTESWAP)BONITO_BIS(BONITO_BONPONCFG, BONITO_BONPONCFG_IS_ARBITER)/** In certain situations it is possible for the Bonito ASIC* to come up with the PCI registers uninitialised, so do them here*/BONITO_INIT(BONITO_PCICLASS,(PCI_CLASS_BRIDGE << PCI_CLASS_SHIFT) | (PCI_SUBCLASS_BRIDGE_HOST << PCI_SUBCLASS_SHIFT))BONITO_INIT(BONITO_PCICMD, BONITO_PCICMD_PERR_CLR | BONITO_PCICMD_SERR_CLR | BONITO_PCICMD_MABORT_CLR | BONITO_PCICMD_MTABORT_CLR | BONITO_PCICMD_TABORT_CLR | BONITO_PCICMD_MPERR_CLR )//BONITO_INIT(BONITO_PCILTIMER, 0)BONITO_INIT(BONITO_PCILTIMER, 255)BONITO_INIT(BONITO_PCIBASE0, 0)BONITO_INIT(BONITO_PCIBASE1, 0)BONITO_INIT(BONITO_PCIBASE2, 0)BONITO_INIT(BONITO_PCIEXPRBASE, 0)BONITO_INIT(BONITO_PCIINT, 0)BONITO_BIS(BONITO_PCICMD, BONITO_PCICMD_PERRRESPEN)BONITO_BIS(BONITO_PCICMD, PCI_COMMAND_IO_ENABLE|PCI_COMMAND_MEM_ENABLE|PCI_COMMAND_MASTER_ENABLE)BONITO_BIC(BONITO_BONGENCFG, 0x80)  #½ûÖ¹iobc#BONITO_BIS(BONITO_BONGENCFG, BONITO_BONGENCFG_BUSERREN)/* Set debug mode */BONITO_BIS(BONITO_BONGENCFG, BONITO_BONGENCFG_DEBUGMODE)/******** added to init southbridge*/
#ifdef VGA_NOTEBOOK_V2ISA_BRMW_INIT(0,0x74,0xeb,0x0)ISA_BRMW_INIT(0,0x75,0xff,0x20)ISABWWR_INIT(4,0x48,0xb000)ISABBWR_INIT(4,0x41,0x80)RMW_INIT(MOD_W,(PCI_IO_SPACE+0xb04c),0xffffffdf,0x0)
#endif// SouthBridge settings/* Set the SMB base address */ISABWWR_INIT(4, SMBUS_IO_BASE_ADDR, SMBUS_IO_BASE_VALUE | 0x1)/* enable the host controller */ISABHWR_INIT(4, SMBUS_HOST_CONFIG_ADDR, SMBUS_HOST_CONFIG_ENABLE_BIT)/* enable the SMB IO ports */ISABBWR_INIT(4, PCI_COMMAND_STATUS_REG, PCI_COMMAND_IO_ENABLE)ISARD_INIT(CTC_PORT+PT_CONTROL)/* program i8254 ISA refresh counter */ISAWR_INIT(CTC_PORT+PT_CONTROL,PTCW_SC(PT_REFRESH)|PTCW_16B|PTCW_MODE(MODE_RG))ISAWR_INIT(CTC_PORT+PT_REFRESH, ISAREFRESH & 0xff)ISAWR_INIT(CTC_PORT+PT_REFRESH, ISAREFRESH >> 8)EXIT_INIT(0)1:    move a0, ra            /* now the value of ra is 0xbfc00xxx */
reginit:            lw    t3, Init_Op(a0)lw    t0, Init_A0(a0)        /* Init_A0 is 4 */and    t4, t3, OP_MASK        /* OP_MASK is 0x000000fc, to keep 4 bytes aligned *//* * EXIT(STATUS) */bne    t4, OP_EXIT, 8f        /* OP_EXIT is 0x00000000 */nopmove v0, t0                /* now v0 is the content of 4 bytes offset from 0xbfc000xx */b    .donenop/* * DELAY(CYCLES) */
8:    bne    t4, OP_DELAY, 8f    /* OP_DELAY is 0x00000008 */nop
1:    bnez    t0,1b            /* t0 不等于 0就在这死循环 */subu    t0,1b    .nextnop    /*  * READ(ADDR) */
8:    bne    t4, OP_RD, 8f        /* OP_RD is 0x00000010 */nopand    t4, t3, MOD_MASK    /* MOD_MASK is 0x00000003 */bne    t4, MOD_B, 1f        /* MOD_B is 0x00000000 ??? why not 0x01 or 0x03 */noplbu    t5, 0(t0)b    .nextnop
1:    bne    t4, MOD_H, 1f        /* MOD_H is 0x00000001 ??? why not 0x02 */noplhu    t5, 0(t0)b    .nextnop
1:    bne    t4, MOD_W, 1f        /* MOD_H is 0x00000002 ??? why not 0x00 */nop
#if __mips64lwu    t5, 0(t0)
#else lw    t5, 0(t0)
#endifb    .nextnop
1:
#if __mips64lw    t5,0(t0)b    .nextnop
#elseb    .fatalnop
#endif/* * WRITE(ADDR,VAL) */
8:    bne    t4, OP_WR, 8f        /* OP_WR is 0x00000014 */noplw    t1, Init_A1(a0)            /* Init_A1 is 8 */and    t4, t3, MOD_MASK    /* MOD_MASK is 0x00000003 */bne    t4, MOD_B, 1fnopsb    t1, 0(t0)b    .nextnop
1:    bne    t4,MOD_H,1fnopsh    t1,0(t0)b    .nextnop
1:    bne    t4,MOD_W,1fnopsw    t1,0(t0)b    .nextnop1:
#if __mips64sd    t1,0(t0)b    .nextnop
#elseb    .fatalnop
#endif/* * RMW(ADDR,AND,OR) */
8:    bne    t4,OP_RMW,8fnoplw    t1,Init_A1(a0)lw    t2,Init_A2(a0)and    t4,t3,MOD_MASKbne    t4,MOD_B,1fnoplbu    t4,0(t0)and    t4,t1or    t4,t2sb    t4,0(t0)b    .nextnop
1:    bne    t4,MOD_H,1fnoplhu    t4,0(t0)and    t4,t1or    t4,t2sh    t4,0(t0)b    .nextnop
1:    bne    t4,MOD_W,1fnoplw    t4,0(t0)and    t4,t1or    t4,t2sw    t4,0(t0)b    .nextnop1:
#if __mips64ld    t4,0(t0)and    t4,t1or    t4,t2sd    t4,0(t0)b    .nextnop
#else    b    .fatalnop
#endif/* * WAIT(ADDR,MASK,VAL) */
8:    bne    t4,OP_WAIT,8fnoplw    t1,Init_A1(a0)lw    t2,Init_A2(a0)and    t4,t3,MOD_MASKbne    t4,MOD_B,1fnop
3:    lbu    t4,0(t0)and    t4,t1bne    t4,t2,3bnopb    .nextnop
1:    bne    t4,MOD_H,1fnop
3:    lhu    t4,0(t0)and    t4,t1bne    t4,t2,3bnopb    .nextnop
1:    bne    t4,MOD_W,1fnop
3:    lw    t4,0(t0)and    t4,t1bne    t4,t2,3bnopb    .nextnop
1:
#if __mips64
3:    ld    t4,0(t0)and    t4,t1bne    t4,t2,3bnopb    .nextnop
#else    b    .fatal    nop
#endif.next:    addu    a0, Init_Size        /* Init_Size is 16 */b    reginit                /* a big repeatation */nop    8:
.fatal:    b .donenopbal stuck                /* these two sentences seem been ignored */nop=====================
解释:
locate:la        s0, start                subu    s0, ra, s0                and        s0, 0xffff0000
此时,ra 中的地址值是前面 uncached 标号的地址,第二句作用是计算前面跳转时已运行过的代码的长度,最后一句把零头截掉。
这段代码是为了访问数据,因为这段汇编在Rom执行,而编译出来的数据段在 0x8002xxxx,
为了能够访问数据段的数据,需要进行一个地址的修正,s0 正是起到这种修正的目的。li        t0, SR_BOOT_EXC_VECmtc0    t0, COP_0_STATUS_REGmtc0    zero, COP_0_CAUSE_REG
为保险起见,再清理一遍配置寄存器.set noreorder/* the varible bonito is register s4, BONITO_REG_BASE is 0x1fe00000 */li        bonito, PHYS_TO_UNCACHED(BONITO_REG_BASE)  bal    1f    nop            /* now the value of ra is 0xbfc00xxx */
将 BONITO_REG_BASE 的物理地址值保存到 s4 寄存器
(通过映射到未经缓存的地址空间里,龙芯 CPU 访问外部空间,只能用映射后的地址),
然后跳转到后面1标号处执行。1:    move a0, ra        /* now the value of ra is 0xbfc00xxx */
reginit:            /* local name */lw    t3, Init_Op(a0)lw    t0, Init_A0(a0)        // Init_A0 is 4and    t4, t3, OP_MASK        // OP_MASK is 0x000000fc, to keep 4 bytes aligned
在1标号的地方,取跳转时压入的RA寄存器的值,然后通过寄存器相对寻址的方式,取得跳转指令后面保存的参数,并保存到t3, t0寄存器。上句说的就是这些参数/* bonito endianess */BONITO_BIC(BONITO_BONPONCFG, BONITO_BONPONCFG_CPUBIGEND)BONITO_BIC(BONITO_BONGENCFG, BONITO_BONGENCFG_BYTESWAP|BONITO_BONGENCFG_MSTRBYTESWAP)BONITO_BIS(BONITO_BONPONCFG, BONITO_BONPONCFG_IS_ARBITER)/** In certain situations it is possible for the Bonito ASIC* to come up with the PCI registers uninitialised, so do them here*/BONITO_INIT(BONITO_PCICLASS,(PCI_CLASS_BRIDGE << PCI_CLASS_SHIFT) | (PCI_SUBCLASS_BRIDGE_HOST << PCI_SUBCLASS_SHIFT))BONITO_INIT(BONITO_PCICMD, BONITO_PCICMD_PERR_CLR | BONITO_PCICMD_SERR_CLR | BONITO_PCICMD_MABORT_CLR | BONITO_PCICMD_MTABORT_CLR | BONITO_PCICMD_TABORT_CLR | BONITO_PCICMD_MPERR_CLR )//BONITO_INIT(BONITO_PCILTIMER, 0)BONITO_INIT(BONITO_PCILTIMER, 255)BONITO_INIT(BONITO_PCIBASE0, 0)BONITO_INIT(BONITO_PCIBASE1, 0)BONITO_INIT(BONITO_PCIBASE2, 0)BONITO_INIT(BONITO_PCIEXPRBASE, 0)BONITO_INIT(BONITO_PCIINT, 0)BONITO_BIS(BONITO_PCICMD, BONITO_PCICMD_PERRRESPEN)BONITO_BIS(BONITO_PCICMD, PCI_COMMAND_IO_ENABLE|PCI_COMMAND_MEM_ENABLE|PCI_COMMAND_MASTER_ENABLE)BONITO_BIC(BONITO_BONGENCFG, 0x80)  #½ûÖ¹iobc#BONITO_BIS(BONITO_BONGENCFG, BONITO_BONGENCFG_BUSERREN)/* Set debug mode */BONITO_BIS(BONITO_BONGENCFG, BONITO_BONGENCFG_DEBUGMODE)/******** added to init southbridge*/
#ifdef VGA_NOTEBOOK_V2ISA_BRMW_INIT(0,0x74,0xeb,0x0)ISA_BRMW_INIT(0,0x75,0xff,0x20)ISABWWR_INIT(4,0x48,0xb000)ISABBWR_INIT(4,0x41,0x80)RMW_INIT(MOD_W,(PCI_IO_SPACE+0xb04c),0xffffffdf,0x0)
#endif// SouthBridge settings/* Set the SMB base address */ISABWWR_INIT(4, SMBUS_IO_BASE_ADDR, SMBUS_IO_BASE_VALUE | 0x1)/* enable the host controller */ISABHWR_INIT(4, SMBUS_HOST_CONFIG_ADDR, SMBUS_HOST_CONFIG_ENABLE_BIT)/* enable the SMB IO ports */ISABBWR_INIT(4, PCI_COMMAND_STATUS_REG, PCI_COMMAND_IO_ENABLE)ISARD_INIT(CTC_PORT+PT_CONTROL)/* program i8254 ISA refresh counter */ISAWR_INIT(CTC_PORT+PT_CONTROL,PTCW_SC(PT_REFRESH)|PTCW_16B|PTCW_MODE(MODE_RG))ISAWR_INIT(CTC_PORT+PT_REFRESH, ISAREFRESH & 0xff)ISAWR_INIT(CTC_PORT+PT_REFRESH, ISAREFRESH >> 8)EXIT_INIT(0)
这些宏实际上不是语句,看定义后就知道它们只是定义了一些数据参数,在ROM中占据了一定的长度。/* * EXIT(STATUS) */bne    t4, OP_EXIT, 8f        // OP_EXIT is 0x00000000nopmove v0, t0                // now v0 is the content of 4 bytes offset from 0xbfc000xxb    .donenop
接着就运行
bne t4, OP_EXIT, 8f
这句了,在这里做是否初始化寄存器完成的判断,如果没有完成,就会跳到后面8标号处运行,然后经历一系列的设置(后面接着的那片代码)
DELAY(CYCLES)
READ(ADDR)
WRITE(ADDR,VAL) RMW(ADDR,AND,OR)
WAIT(ADDR,MASK,VAL)
后,直到 OP_EXIT 标志出现,才退出这个设置循环。看到前面有一行 EXIT_INIT(0),表示那个参数数据段结束了,它的宏定义如下:
#define EXIT_INIT(status) .word OP_EXIT, (status); .word 0,0
所以在最后一项的数据记录被读取后,总是能退出这个初始化循环的,接着就会跳到.done这个标号里运行。不过,这段代码到底是要设置什么?由DELAY,READ,WRITE,RMW,WAIT 这些符号所标示的代码段实现其相应的功能没有?我还不清楚。
8
la    s0, start
subu    s0, ra, s0
and    s0, 0xffff0000 这段代码是为了访问数据,因为这段汇编在Rom执行,而编译出来的数据段在0x8002xxxx,为了能够访问数据段的数据,需要进行一个地址的修正,s0这是起到这种修正的目的。
la      v0, initmips
jalr    v0
nop从此代码便到内存中间去了,从这开始因为可以读写内存,所以有了栈,故可以用C的代码了,所以以后的程序便是C代码了.
4
接着看下面一段代码
.done:    bal superio_init        /* initialize the southbridge config register */nopbal    initserial            /* initialize the output of serial port, after this step */nop                        /* pmon can output some infomations from COM port*/PRINTSTR("\r\nPMON2000 MIPS Initializing. Standby...\r\n")/* begin to check some config registers on CP0 */PRINTSTR("ERRORPC=")mfc0    a0, COP_0_ERROR_PCbal    hexserialnopPRINTSTR(" CONFIG=")mfc0    a0, COP_0_CONFIGbal    hexserialnopPRINTSTR("\r\n")PRINTSTR(" PRID=")mfc0    a0, COP_0_PRIDbal    hexserialnopPRINTSTR("\r\n")=====================
解释:
在这段程序里,主要做了两件大事情,一是初始化南桥芯片VIA686B,一是初始化串口输出。
初始化VIA686B是调用子函数superio_init 实现的。初始化串口是调用子函数initserial实现的。
为了尽快地从串口输出调试信息,所以要先初始化VIA686B芯片,才能输出信息出来。
由于 VIA686B芯片包括所有外面接口的功能,比如串口, PS2,USB,并口,还有软盘等等。
只要能从串口输出字符,就已经是成功的第一步了。
在嵌入式的软件开发中,调试软件是最难的,只能根据芯片的管脚电平,或者串口发些调信息出来。
使用管脚调试,最简单的办法,就是加一个指示灯,这也叫“点灯大法”。
只要串口能输出字符串后,使用串口调试就成为基本的方法了。
后面,输出三个CP0寄存器的值,第一个寄存器是出错信息,第二个寄存器是CP0配置信息,第三个寄存器是CP0处理器的ID信息。
=====================
5
下面一段代码从内存条上的SPD(eeprom)中读取内存参数,并且初始化内存窗口。这段代码放到另一篇文章中专门讲解吧。这里就不多说了。
/* * Now determine DRAM configuration and size by* reading the I2C EEROM (SPD) on the DIMMS (DDR)*/PRINTSTR("DIMM read\r\n")/* only one memory slot, slave address is 10100001b */li  a1, 0x0
1:li    a0, 0xa1    /* a0: slave address, a1: reg index to read */bal    i2creadnop/* save a1 */move t1, a1/* print */move a0, v0bal  hexserialnopPRINTSTR("\r\n")    /* restore a1 */move  a1,t1addiu a1,a1,1li   v0, 0x20bleu  a1, v0, 1b        /* repeat for 32 times */nopli    msize, 0            /* msize is register s2 *//* set some parameters for DDR333rank number and DDR type field will be filled laterto check: fix TCAS?*/li    sdCfg, 0x341043df        /* sdCfg is register s6 *//* read DIMM memory type (must be DDRAM) */
#if 0li    a0,0xa1li    a1,2bal    i2creadnopbne    v0,7,.nodimmnopPRINTSTR("read memory type\r\n")
#endif/* read DIMM number of rows */li    a0, 0xa1li    a1, 3bal    i2creadnop    move    a0, v0        // v0 is the return value registersubu    v0, 12move    s1, v0        // save for later usebgtu    v0, 2, .nodimm        // if v0 > 2 then jump to .nodimmnopPRINTSTR("read number of rows\r\n")2:    /* read DIMM number of cols */li    a0, 0xa1li    a1, 4bal    i2creadnopsubu    v0, 8                // v0 saved the return valuebgtu    v0, 4, .nodimmnop// read and check ddr type, the combination of t1 and v0 represents a ddr typemove    t1, s1bne    t1, 0, 10fnopbne    v0, 2, 20fnopli    v0, 0b    .ddrtypenop
20:    bne    v0, 1, 21fnopli    v0, 1b    .ddrtypenop
21:    bne    v0, 0, 22fnopli    v0, 2b    .ddrtypenop
22:    bne    v0, 3, 33fnopli    v0, 3b    .ddrtypenop
10:    bne    t1, 1, 11fnopbne    v0, 3, 20fnopli    v0, 4b    .ddrtypenop
20:    bne    v0, 2, 21fnopli    v0, 5b    .ddrtypenop
21:    bne    v0, 1, 22fnopli    v0, 6b    .ddrtypenop
22:    bne    v0, 4, 33fnopli    v0, 7b    .ddrtypenop
11:    bne    t1, 2, 33fnopbne    v0, 4, 20fnopli    v0, 8b    .ddrtypenop
20:    bne    v0, 3, 21fnopli    v0, 9b    .ddrtypenop
21:    bne    v0, 2, 33fnopli    v0, 10b    .ddrtypenop
33:    PRINTSTR("DDR type not supported!\r\n");
34:    b    34bnop.ddrtype:#bit 25:22 is DDR type fieldsll    v0, 22 and    v0, 0x03c00000or    sdCfg, v0/* read DIMM memory size per side */li    a0, 0xa1li    a1, 31bal    i2creadnopbeqz    v0,.nodimmnopsll    tmpsize,v0,22        # multiply by 4MPRINTSTR("read memory size per side\r\n") 2:    /* read DIMM number of blocks-per-ddrram */li    a1,17bal    i2creadnopbeq    v0,2,2fnopbne    v0,4,.nodimmnopPRINTSTR("read blocks per ddrram\r\n")2:    /* read DIMM number of sides (banks) */li    a1,5bal    i2creadnopbeq    v0,1,2fnopbne    v0,2,.nodimmnopsll    tmpsize,1    # msize *= 2    or  sdCfg, 0x1<<27PRINTSTR("read number of sides\r\n") 2:    /* read DIMM width */li    a1,6bal    i2creadnopbleu    v0,36,2fnopbgtu    v0,72,.nodimmnopPRINTSTR("read width\r\n") 2:    addu    msize,tmpsizeb    2fnop    .nodimm:move    dbg,a0        // dbg is s5PRINTSTR ("\r\nNo DIMM in slot ")move    a0,dbgbal    hexserialnopPRINTSTR("\r\n")move    a0,dbg#li  msize,0x10000000#li    sdCfg,0x3d9043df    #~133MHzli  msize,0x20000000li    sdCfg,0x3d5043df     #~133MHz2:PRINTSTR("DIMM SIZE=")move    a0,msizebal    hexserialnopPRINTSTR("\r\n")li    t0, 0xbff00008sd    sdCfg, 0(t0)nopnop/* (uint32_t *)0xbfe00040 = 0x80000000* means only address below 1G will be sent to CPU*/lui    t0, 0xbfe0li    t1, 0x80000000sw    t1, 0x40(t0)nop#### gx 2006-03-17: mode #####li    t1,0x20li    t1,0x28li    t0, 0xbff00000sd    t1,0(t0)nopli    t1,0x0li    t0, 0xbff00000sd    t1,0x30(t0)nop##fixed base address reg##sd    zero, 0x10(t0)noplui    t1,0x2000sd    t1,0x20(t0)nopli      t1, 0x10000000blt     msize, t1, 1fnop####bigger than 256MB####sd    t1, 0x18(t0)nopmove    a0, msizesubu    a0, t1nopnopnopsd    a0, 0x28(t0)nopb    2f1:nopnopsd    msize, 0x18(t0)nopnopnopsd    zero, 0x28(t0)nopnopnop2:PRINTSTR("sdcfg=");move    a0,sdCfgbal    hexserialnopPRINTSTR("\r\n");PRINTSTR("msize=");move    a0,msizebal    hexserialnopPRINTSTR("\r\n")skipdimm:li    t1,0        # accumulate pcimembasecfg settings/* set bar0 mask and translation to point to SDRAM */sub    t0,msize,1not    t0srl    t0,BONITO_PCIMEMBASECFG_ASHIFT-BONITO_PCIMEMBASECFG_MEMBASE0_MASK_SHIFTand    t0,BONITO_PCIMEMBASECFG_MEMBASE0_MASKor    t1,t0li    t0,0x00000000srl    t0,BONITO_PCIMEMBASECFG_ASHIFT-BONITO_PCIMEMBASECFG_MEMBASE0_TRANS_SHIFTand    t0,BONITO_PCIMEMBASECFG_MEMBASE0_TRANSor    t1,t0or    t1,BONITO_PCIMEMBASECFG_MEMBASE0_CACHED/* set bar1 to minimum size to conserve PCI space */li    t0, ~0srl    t0,BONITO_PCIMEMBASECFG_ASHIFT-BONITO_PCIMEMBASECFG_MEMBASE1_MASK_SHIFTand    t0,BONITO_PCIMEMBASECFG_MEMBASE1_MASKor    t1,t0li    t0,0x00000000srl    t0,BONITO_PCIMEMBASECFG_ASHIFT-BONITO_PCIMEMBASECFG_MEMBASE1_TRANS_SHIFTand    t0,BONITO_PCIMEMBASECFG_MEMBASE1_TRANSor    t1,t0or    t1,BONITO_PCIMEMBASECFG_MEMBASE1_CACHEDsw    t1,BONITO_PCIMEMBASECFG(bonito)/* enable configuration cycles now */lw    t0,BONITO_BONPONCFG(bonito)and    t0,~BONITO_BONPONCFG_CONFIG_DISsw    t0,BONITO_BONPONCFG(bonito)PRINTSTR("Init SDRAM Done!\r\n");
6
下面这段是缓存配置的代码
/**  Reset and initialize caches to a known state.*/
#define IndexStoreTagI    0x08
#define IndexStoreTagD    0x09
#define IndexStoreTagS    0x0b
#define IndexStoreTagT    0x0a
#define FillI        0x14/**  caches config register bits.*/
#define CF_7_SE         (1 << 3)        /* Secondary cache enable */
#define CF_7_SC         (1 << 31)       /* Secondary cache not present */
#define CF_7_TE         (1 << 12)       /* Tertiary cache enable */
#define CF_7_TC         (1 << 17)       /* Tertiary cache not present */
#define CF_7_TS         (3 << 20)       /* Tertiary cache size */
#define CF_7_TS_AL      20              /* Shift to align */
#define NOP8 nop;nop;nop;nop;nop;nop;nop;nop
do_caches:TTYDBG("Sizing caches...\r\n");mfc0    t3, COP_0_CONFIG    /* t3 = original config */and    t3, 0xffffeff0        /* Make sure coherency is OK */and    t3, ~(CF_7_TE|CF_7_SE|CF_7_TC|CF_7_SC)  /* disable L2/L3 cache */mtc0    t3, COP_0_CONFIGli    t2, 4096srl    t1, t3, 9and    t1, 3sllv    s3, t2, t1        /* s3 = I cache size */#ifdef CONFIG_CACHE_64K_4WAY sll     s3,2
#endifand    t1, t3, 0x20srl    t1, t1, 1addu    s4, t1, 16        /* s4 = I cache line size */srl    t1, t3, 6and    t1, 3sllv    s5, t2, t1        /* s5 = D cache size */#ifdef CONFIG_CACHE_64K_4WAYsll     s5,2
#endifand    t1, t3, 0x10addu    s6, t1, 16        /* s6 = D cache line size */TTYDBG("Init caches...\r\n")li    s7, 0                   /* no L2 cache */li    s8, 0                   /* no L3 cache */#if 0mfc0    a0, COP_0_PRIDli      a1, 0x6301bne     a0,a1,1fnop
#endifTTYDBG("godson2 caches found\r\n")bal     godson2_cache_initnop
#####xuhua########open cp1
#if 1mfc0   t0,COP_0_STATUS_REGand    t0,0xdbffffffor     t0,t0,0x24000000 mtc0   t0,COP_0_STATUS_REG
#endif
#################/* close L2 cache */li      a0, 0xbfe00164sw      zero, 0(a0);mfc0   a0,COP_0_CONFIGand    a0,a0,~((1<<12) | 3)or     a0,a0,2mtc0   a0,COP_0_CONFIG#ifdef DEBUG_LOCORETTYDBG("Init caches done, cfg = ")mfc0    a0, COP_0_CONFIGbal    hexserialnopTTYDBG("\r\n\r\n")
#endif
7
下面这段代码是把PMON自身从ROM中拷贝到RAM中去
// copy self code segmentTTYDBG("Copy PMON to execute location...\r\n")
#ifdef DEBUG_LOCORETTYDBG("  start = 0x")la    a0, startbal    hexserialnopTTYDBG("\r\n  s0 = 0x")move    a0, s0bal    hexserialnopTTYDBG("\r\n")
#endifla    a0, startli    a1, 0xbfc00000la    a2, _edataor      a0, 0xa0000000or      a2, 0xa0000000subu    t1, a2, a0srl    t1, t1, 2move    t0, a0move    t1, a1move    t2, a2/* copy text section */1:    and    t3,t0,0x0000ffffbnez    t3,2fnopmove    a0,t0bal    hexserialnopli    a0,'\r'bal     tgt_putcharnop
2:    lw    t3, 0(t1)nopsw    t3, 0(t0)addu    t0, 4addu    t1, 4bne    t2, t0, 1bnopPRINTSTR("\ncopy text section done.\r\n")/* Clear BSS */la    a0, _edatala    a2, _end
2:    sw    zero, 0(a0)bne    a2, a0, 2baddu    a0, 4TTYDBG("Copy PMON to execute location done.\r\n")
@@@
下面这段代码从汇编世界跳到C世界中去了。
TTYDBG("sp=");move a0, spbal    hexserialnop#if 1mfc0   a0,COP_0_CONFIGand    a0,a0,0xfffffff8or     a0,a0,0x3mtc0   a0,COP_0_CONFIG
#endifli    a0, 4096*1024sw    a0, CpuTertiaryCacheSize /* Set L3 cache size */move    a0,msizesrl    a0,20/* pass pointer to kseg1 tgt_putchar */la  a1, tgt_putcharaddu a1,a1,s0            // la    s0,start// subu    s0,ra,s0            ??? ra is the returning address// and    s0,0xffff0000        ??? now what does s0 mean?la  a2, stringserialaddu a2,a2,s0la    v0, initmips        // further ENTRY of PMONjalr    v0nop