- 添加动态背景
- 添加背景图片
- 侧边栏设置
- 头像设置(圆形+旋转)
- 浏览页面显示当前浏览进度
- 添加顶部加载条
- Hexo-Next代码复制功能
1. 添加动态背景
动态背景就是我的博客背景中动的那些粒子。
只需修改主题配置文件 /themes/next/_config.yml
# Canvas-nest
canvas_nest: false# three_waves
three_waves: false# canvas_lines
canvas_lines: true
上面三个,想开哪个背景,就把哪个改为true。
2. 添加背景图片
1>. 首先,找一张大一点的图片,
建议在Bing引擎B上找。比如我找到这么一张,分辨率是1920*1080,在此给它命名为bk1.jpg
把这张图片存在/themes/next/source/images,然后配置程序,
2>. \themes\next\source\css_custom中,加入以下代码,
body {background: url(/images/bk1.jpg);       //https://source.unsplash.com/randombackground-repeat: no-repeat;background-attachment:fixed;background-position:50% 50%;background-size:cover;
}
- background: url(/images/bk1.jpg); //这里是图片的路径 我后面给的网址填进去可以让每次打开博客都有不同的背景图片。
- background-repeat: no-repeat;//让图片不重复出现。比如,如果你的图片比较小,网页又比较短,这个背景图就会生成多个同样的图片去覆盖整个页面,样式很丑。💩
- background-position:50% 50%; //这里是设置图片大小,默认设置最合适不过了,不用修改。
- background-size:cover; //完美覆盖。👍
3>. 修改透明度
背景图片遮盖文章内容,让阅读者很难受,所以需要调整文章背景的透明度。
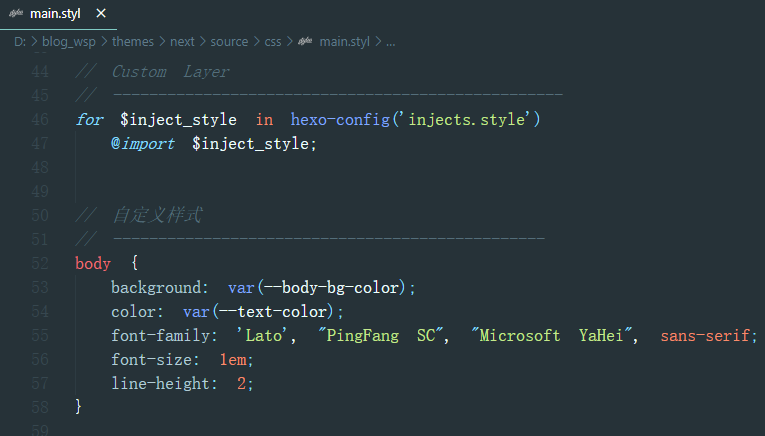
到\themes\next\source\css_custom,在里面加入以下代码
.main-inner { margin-top: 60px;padding: 60px 60px 60px 60px;background: #FFFFF0;opacity: 0.8;min-height: 500px;
}
- margin-top: 60px; padding: 60px 60px 60px 60px; //文章背景框框的大小这样挺合适的,不用改。(针对一般用户)
- background: #FFFFF0;//修改文章背景框内部颜色。
- opacity: 0.8; //设置透明度,博主调了很多数值,个人认为0.8最合适。(0是全透明,1是不透明)
- min-height: 500px; //顾名思义,背景高度。
效果你现在就可以看到我的博客背景及文章样式,在此就不脱裤子放p(–多此一举)了呢!😁
3. 侧边栏设置
1>. 修改合适的主题方案
首先打开主题配置文件
/themes/next/_config.yml,找到以下代码,
# Schemes
#scheme: Muse
scheme: Mist
#scheme: Pisces
#scheme: Gemini
需要哪个方案就把哪个主题前面的“#”去掉,这里需要强调的是有些主题方案是不带侧边栏的,所以选择时需要注意。
2>. 修改侧边栏参数
(contrl+F)在主题配置文件搜索sidebar,找到以下代码段
# Sidebar Avatar
# in theme directory(source/images): /images/avatar.gif
# in site  directory(source/uploads): /uploads/avatar.gif
avatar: /images/icon.jpg                    #设置你的头像的图片
#rounded: true
#opacity: 0.5
#rotated: true
# Table Of Contents in the Sidebar
toc:enable: true                               #文章打开时显示目录# Automatically add list number to toc.number: false# If true, all words will placed on next lines if header width longer then sidebar width.wrap: false# Creative Commons 4.0 International License.
# http://creativecommons.org/
# Available: by | by-nc | by-nc-nd | by-nc-sa | by-nd | by-sa | zero
#creative_commons: by-nc-sa
#creative_commons:sidebar:# Sidebar Position, available value: left | right (only for Pisces | Gemini).position: right                                 #侧边栏显示的位置#position: left# Sidebar Display, available value (only for Muse | Mist):#  - post    expand on posts automatically. Default.#  - always  expand for all pages automatically#  - hide    expand only when click on the sidebar toggle icon.#  - remove  Totally remove sidebar including sidebar toggle.display: post                        #侧边栏只在看文章时自动打开,其他时候需要手动点击按钮#display: always					   #侧边栏一直打开#display: hide					   #侧边栏保持隐藏,需要手动打开#display: remove					   #取消侧边栏的存在# Sidebar offset from top menubar in pixels (only for Pisces | Gemini).offset: 12                          # Back to top in sidebar (only for Pisces | Gemini).b2t: false# Scroll percent label in b2t button.   返回按钮上的百分比显示scrollpercent: true# Enable sidebar on narrow view (only for Muse | Mist).onmobile: false
博主昵称和站点描述你需要在站点配置文件(不好好注意这几个字的都不是乖宝宝😡)中修改,设置author和description。
3>. 设置社交链接
侧边栏链接的修改包括两个部分,||前面时链接,||后面是链接图标。这里都是在主题配置(/themes/_config.yml)文件修改。
# Social Links.
# Usage: `Key: permalink || icon`
# Key is the link label showing to end users.
# Value before `||` delimeter is the target permalink.
# Value after `||` delimeter is the name of FontAwesome icon. If icon (with or without delimeter) is not specified, globe icon will be loaded.
social:                 #GitHub: https://github.com/yourname || githubE-Mail: mailto:mlf2410211674@qq.com || envelopeQQ: http://wpa.qq.com/msgrd?v=3&uin=2410211674&site=qq&menu=yes || qq#Google: https://plus.google.com/yourname || google#Twitter: https://twitter.com/yourname || twitter#FB Page: https://www.facebook.com/yourname || facebook#VK Group: https://vk.com/yourname || vk#StackOverflow: https://stackoverflow.com/yourname || stack-overflow#YouTube: https://youtube.com/yourname || youtube#Instagram: https://instagram.com/yourname || instagram#Skype: skype:yourname?call|chat || skypesocial_icons:enable: trueicons_only: falsetransition: false# Blog rolls
links_icon: link
links_title: Links
links_layout: block
#links_layout: inline
links:
优惠券领取网: http:www.meilinfengdaiwang.cn
Next内置了很多网站的链接,需要哪个就打开哪个,例如
social: #GitHub: https://github.com/yourname || githubE-Mail: mailto:mlf2410211674@qq.com || envelope
也可以添加它本来没有设置的网站链接,如我的QQ链接
QQ: http://wpa.qq.com/msgrd?v=3&uin=2410211674&site=qq&menu=yes || qq
这里大家想要把自己的QQ链接放在侧边栏,可以复制上面的代码,只需改变QQ号就行。
4>. 设置友情链接
links:
优惠券领取网: http:www.meilinfengdaiwang.cn
此处添加你的友情链接,我在这里放了一个优惠券领取网,是我前段时间学习建站做出来的网站。
4. 头像设置(圆形+旋转)
1>. 先打开主题配置文件
/themes/_config.yml
找到
# Sidebar Avatar
# in theme directory(source/images): /images/avatar.gif
# in site  directory(source/uploads): /uploads/avatar.gif
avatar: /images/icon.jpg
rounded: true                #设置圆形
opacity: 0.5                 #透明度
rotated: true                #设置旋转
#Table Of Contents in the Sidebar
在命令行,分3步(不要写$符号)
$ hexo clean
$ hexo g
$ hexo s --debug
检查侧边栏的头像,看看有没有设置成功,如果没成功,说明和博主的Next版本差不多,请继续往下看。
2>. /themes/next/sourse/css/_commen/components/sidebar/sidebar-author.syl
打开,找到或添加以下代码
.site-author-image {display: block;margin: 0 auto;padding: $site-author-image-padding;max-width: $site-author-image-width;height: $site-author-image-height;border: $site-author-image-border-width solid $site-author-image-border-color;//修改头像边框border-radius: 50%;-webkit-border-radius: 50%;-moz-border-radius: 50%;//设置旋转transition: 1.4s all;
}// 可旋转的圆形头像,`hover`动作.site-author-image:hover {-webkit-transform: rotate(360deg); -moz-transform: rotate(360deg); -ms-transform: rotate(360deg);-transform: rotate(360deg);
}
你需要加入我用中文注释的那三段代码。
至此,头像圆形特效应该就设置成功了。
5. 浏览页面显示当前浏览进度
打开主题配置文件/themes/_config.yml,搜索关键字scrollpercent,把false改为true即可。
b2t: false 这个是设置把top按钮放在侧边栏里边,但是只适用于Pisces 、Gemini两种主题方案,如果要打开,改成true即可。
# Back to top in sidebar (only for Pisces | Gemini).b2t: false# Scroll percent label in b2t button.返回按钮上的百分比显示scrollpercent: true6. 添加顶部加载条
打开主题配置文件/themes/_config.yml,搜索关键字pace,设置为true
# Progress bar in the top during page loading.
pace: false
# Themes list:
#pace-theme-big-counter
#pace-theme-bounce
#pace-theme-barber-shop
#pace-theme-center-atom
#pace-theme-center-circle
#pace-theme-center-radar
#pace-theme-center-simple
#pace-theme-corner-indicator
#pace-theme-fill-left
#pace-theme-flash
#pace-theme-loading-bar
#pace-theme-mac-osx
#pace-theme-minimal
# For example
# pace_theme: pace-theme-center-simple
pace_theme: pace-theme-minimal
以上加载样式自行选择,博主实在欣赏不来,就是用默认的了。😜
7. Hexo-Next代码复制功能
1>. 下载clipboard.js
点击链接下载 https://github.com/zenorocha/clipboard.js
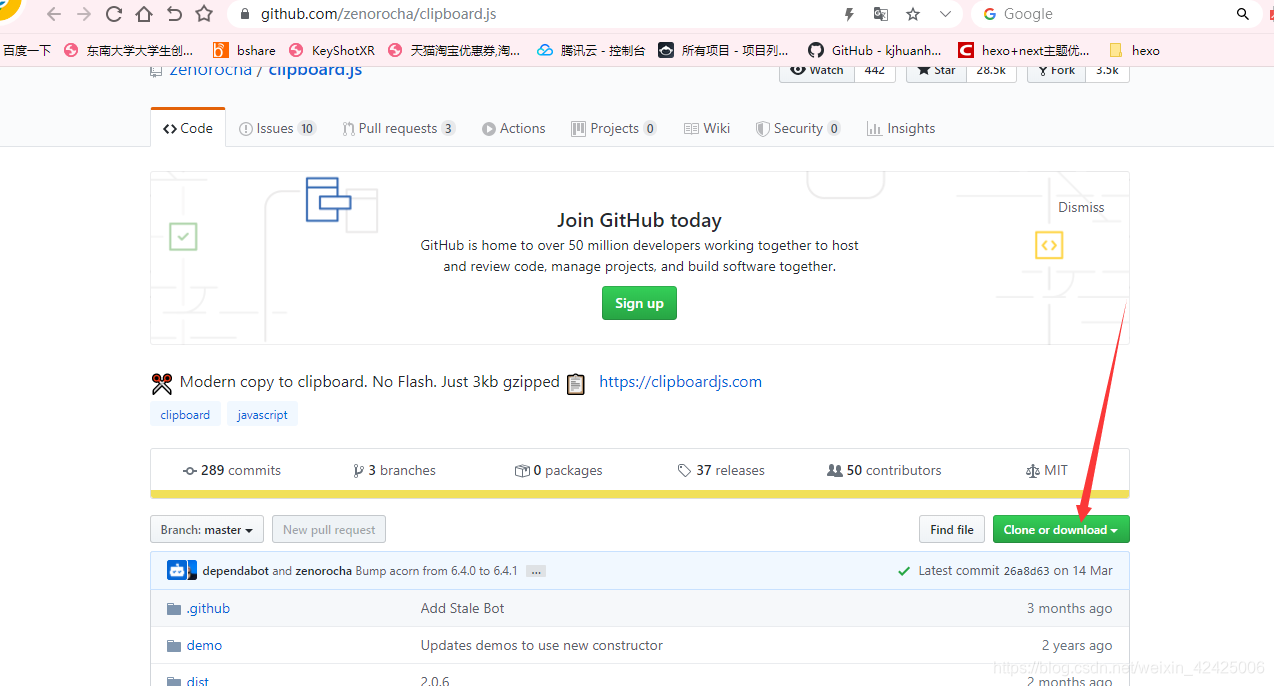
clipboard.js-master里面找到里边的clipboard.js和clipboard.min.js文件(注意是两个文件,如果设置了第一个文件,页面代码段右上角有显示复制的按钮,但是却没有功能,不要问我是怎么知道的😅)放置在./themes/next/sourse/js/src下。
2>. clipboard.js的使用
也是在.\themes\next\source\js\src目录下,创建clipboard-use.js,文件内容如下:
/*页面载入完成后,创建复制按钮*/
!function (e, t, a) { /* code */var initCopyCode = function(){var copyHtml = '';copyHtml += '<button class="btn-copy" data-clipboard-snippet="">';copyHtml += '  <i class="fa fa-globe"></i><span>copy</span>';copyHtml += '</button>';$(".highlight .code pre").before(copyHtml);new ClipboardJS('.btn-copy', {target: function(trigger) {return trigger.nextElementSibling;}});}initCopyCode();
}(window, document);然后在.\themes\next\source\css\_custom\custom.styl样式文件中添加下面代码:
//代码块复制按钮
.highlight{//方便copy代码按钮(btn-copy)的定位position: relative;
}
.btn-copy {display: inline-block;cursor: pointer;background-color: #eee;background-image: linear-gradient(#fcfcfc,#eee);border: 1px solid #d5d5d5;border-radius: 3px;-webkit-user-select: none;-moz-user-select: none;-ms-user-select: none;user-select: none;-webkit-appearance: none;font-size: 13px;font-weight: 700;line-height: 20px;color: #333;-webkit-transition: opacity .3s ease-in-out;-o-transition: opacity .3s ease-in-out;transition: opacity .3s ease-in-out;padding: 2px 6px;position: absolute;right: 5px;top: 5px;opacity: 0;
}
.btn-copy span {margin-left: 5px;
}
.highlight:hover .btn-copy{opacity: 1;
}
3>. 引用
在.\themes\next\layout\_layout.swig文件中,添加引用(注:在 swig 末尾或 body 结束标签(</body>)之前添加):
<!-- 代码块复制功能 --><script type="text/javascript" src="/js/src/clipboard.min.js"></script> <script type="text/javascript" src="/js/src/clipboard-use.js"></script>效果如下