前言
需要在Hexo下配置next主题
Hexo配置next主题教程:点我跳转
更改配置以后使用素质三连:hexo clean && hexo g && hexo s即可本地看到效果。
hexo clean && hexo g && hexo s
注:部分参考自互联网,感谢各位大佬的教程
主题注入
在myblog/themes/next/_config.yml里面找到custom_file_path
把前面的注释去掉,开启主题注入功能
custom_file_path:style: source/_data/styles.styl
找到myblog\blog\source\_data\styles.styl如果没有就创建一个
资源文件文件在myblog\blog\themes\xuande\source\images目录下配置
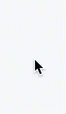
鼠标样式
注意开启主题注入功能
在myblog\blog\source\_data\styles.styl里面添加如下代码即可
/*鼠标样式*/
* {cursor: url(/images/Arrow.cur),auto;
}
:active {// cursor: url(/images/Hand.cur),auto
}
:link {cursor: url(/images/Hand.cur),auto
}
// 鼠标样式补充
a, span.exturl {cursor: url(/images/Hand.cur),auto
}
.posts-expand .post-meta time {cursor: url(/images/Hand.cur),auto
}
这里的url路径就是myblog\blog\themes\xuande\source\images\Arrow.cur,下面同理
背景图片
注意开启主题注入功能
在myblog\blog\source\_data\styles.styl里面添加如下代码即可
// 添加背景图片
body {background: url(/images/background.png);//自己喜欢的图片地址background-size: cover;background-repeat: no-repeat;background-attachment: fixed;background-position: 50% 50%;
}
自定义回到顶部样式
注意开启主题注入功能
在myblog\blog\source\_data\styles.styl里面添加如下代码即可
//自定义回到顶部样式
.back-to-top {//right: 60px;width: 70px;  //图片素材宽度height: 900px;  //图片素材高度top: -900px;bottom: unset;transition: all .5s ease-in-out;background: url("/images/scroll.png");//隐藏箭头图标> i {display: none;}&.back-to-top-on {bottom: unset;top: 100vh < (900px + 200px) ? calc( 100vh - 900px - 200px ) : 0px;}
}
自定义网站图标
在myblog/themes/next/_config.yml里面找到favicon,在这里就可以配置图标的路径,一般情况下只需要设置small和medium两个就可以
favicon:small: /images/16x16-paimeng.pngmedium: /images/32x32-paimeng.pngapple_touch_icon: /images/apple-touch-icon-next.pngsafari_pinned_tab: /images/logo.svg
png文件在myblog\blog\themes\xuande\source\images目录下配置即可
效果:
设置侧边栏
在myblog/themes/next/_config.yml里面找到sidebar
修改为如下配置:
sidebar:# Sidebar Position.position: left#position: right# Manual define the sidebar width. If commented, will be default for:# Muse | Mist: 320# Pisces | Gemini: 240#width: 300# Sidebar Display (only for Muse | Mist), available values:# - post expand on posts automatically. Default.# - always expand for all pages automatically.# - hide expand only when click on the sidebar toggle icon.# - remove totally remove sidebar including sidebar toggle.display: post# Sidebar padding in pixels.padding: 18# Sidebar offset from top menubar in pixels (only for Pisces | Gemini).offset: 12
开启返回顶部功能
在myblog/themes/next/_config.yml里面找到back2top
修改为如下配置:
back2top:enable: true# Back to top in sidebar.sidebar: false# Scroll percent label in b2t button.scrollpercent: false
侧边栏头像设置
在myblog/themes/next/_config.yml里面找到avatr
# 侧栏头像
# Sidebar Avatar
avatar:url: /images/avatar.pngrounded: truerotated: truesite_state: true
图片在myblog\blog\themes\xuande\source\images目录下配置即可
鼠标移动特效
在myblog\themes\next\source\js\中新建fairyDustCursor.js文件,并添加以下代码
(function fairyDustCursor() {var possibleColors = ["#D61C59", "#E7D84B", "#1B8798"]var width = window.innerWidth;var height = window.innerHeight;var cursor = {x: width/2, y: width/2};var particles = [];function init() {bindEvents();loop();}// Bind events that are neededfunction bindEvents() {document.addEventListener('mousemove', onMouseMove);document.addEventListener('touchmove', onTouchMove);document.addEventListener('touchstart', onTouchMove);window.addEventListener('resize', onWindowResize);}function onWindowResize(e) {width = window.innerWidth;height = window.innerHeight;}function onTouchMove(e) {if( e.touches.length > 0 ) {for( var i = 0; i < e.touches.length; i++ ) {addParticle( e.touches[i].clientX, e.touches[i].clientY, possibleColors[Math.floor(Math.random()*possibleColors.length)]);}}}function onMouseMove(e) {    cursor.x = e.clientX;cursor.y = e.clientY;addParticle( cursor.x, cursor.y, possibleColors[Math.floor(Math.random()*possibleColors.length)]);}function addParticle(x, y, color) {var particle = new Particle();particle.init(x, y, color);particles.push(particle);}function updateParticles() {for( var i = 0; i < particles.length; i++ ) {particles[i].update();}for( var i = particles.length -1; i >= 0; i-- ) {if( particles[i].lifeSpan < 0 ) {particles[i].die();particles.splice(i, 1);}}}function loop() {requestAnimationFrame(loop);updateParticles();}function Particle() {this.character = "*";this.lifeSpan = 120; //msthis.initialStyles ={"position": "fixed","top": "0", //必须加"display": "block","pointerEvents": "none","z-index": "10000000","fontSize": "20px","will-change": "transform"};this.init = function(x, y, color) {this.velocity = {x:  (Math.random() < 0.5 ? -1 : 1) * (Math.random() / 2),y: 1};this.position = {x: x - 10, y: y - 20};this.initialStyles.color = color;console.log(color);this.element = document.createElement('span');this.element.innerHTML = this.character;applyProperties(this.element, this.initialStyles);this.update();document.body.appendChild(this.element);};this.update = function() {this.position.x += this.velocity.x;this.position.y += this.velocity.y;this.lifeSpan--;this.element.style.transform = "translate3d(" + this.position.x + "px," + this.position.y + "px,0) scale(" + (this.lifeSpan / 120) + ")";}this.die = function() {this.element.parentNode.removeChild(this.element);}}function applyProperties( target, properties ) {for( var key in properties ) {target.style[ key ] = properties[ key ];}}init();
})();
然后在myblog\themes\next\layout_layout.njk文件里内部引用:
<!-- 樱花特效 -->{% if theme.sakura.enable %}<script async src="/js/src/fairyDustCursor.js"></script>{% endif %}
最后打开myblog/themes/next/_config.yml在最下面添加如下代码
# 樱花飘落动特效
sakura:enable: true
鼠标点击特效
首先在themes\next\source\js\cursor\ 目录下创建love.min.js
在里面添加如下代码:
!function(e,t,a){function n(){c(".heart{width: 10px;height: 10px;position: fixed;background: #f00;transform: rotate(45deg);-webkit-transform: rotate(45deg);-moz-transform: rotate(45deg);}.heart:after,.heart:before{content: '';width: inherit;height: inherit;background: inherit;border-radius: 50%;-webkit-border-radius: 50%;-moz-border-radius: 50%;position: fixed;}.heart:after{top: -5px;}.heart:before{left: -5px;}"),o(),r()}function r(){for(var e=0;e<d.length;e++)d[e].alpha<=0?(t.body.removeChild(d[e].el),d.splice(e,1)):(d[e].y--,d[e].scale+=.004,d[e].alpha-=.013,d[e].el.style.cssText="left:"+d[e].x+"px;top:"+d[e].y+"px;opacity:"+d[e].alpha+";transform:scale("+d[e].scale+","+d[e].scale+") rotate(45deg);background:"+d[e].color+";z-index:99999");requestAnimationFrame(r)}function o(){var t="function"==typeof e.onclick&&e.onclick;e.onclick=function(e){t&&t(),i(e)}}function i(e){var a=t.createElement("div");a.className="heart",d.push({el:a,x:e.clientX-5,y:e.clientY-5,scale:1,alpha:1,color:s()}),t.body.appendChild(a)}function c(e){var a=t.createElement("style");a.type="text/css";try{a.appendChild(t.createTextNode(e))}catch(t){a.styleSheet.cssText=e}t.getElementsByTagName("head")[0].appendChild(a)}function s(){return"rgb("+~~(255*Math.random())+","+~~(255*Math.random())+","+~~(255*Math.random())+")"}var d=[];e.requestAnimationFrame=function(){return e.requestAnimationFrame||e.webkitRequestAnimationFrame||e.mozRequestAnimationFrame||e.oRequestAnimationFrame||e.msRequestAnimationFrame||function(e){setTimeout(e,1e3/60)}}(),n()}(window,document);
text.js浮出文字代码
var a_idx = 0;
jQuery(document).ready(function($) {$("body").click(function(e) {var a = new Array("喜欢我", "不喜欢我");var $i = $("<span/>").text(a[a_idx]);var x = e.pageX,y = e.pageY;$i.css({"z-index": 99999,"top": y - 28,"left": x - a[a_idx].length * 8,"position": "absolute","color": "#ff7a45"});$("body").append($i);$i.animate({"top": y - 180,"opacity": 0}, 1500, function() {$i.remove();});a_idx = (a_idx + 1) % a.length;});
});
fireworks.js礼花特效代码
class Circle {constructor({ origin, speed, color, angle, context }) {this.origin = originthis.position = { ...this.origin }this.color = colorthis.speed = speedthis.angle = anglethis.context = contextthis.renderCount = 0}draw() {this.context.fillStyle = this.colorthis.context.beginPath()this.context.arc(this.position.x, this.position.y, 2, 0, Math.PI * 2)this.context.fill()}move() {this.position.x = (Math.sin(this.angle) * this.speed) + this.position.xthis.position.y = (Math.cos(this.angle) * this.speed) + this.position.y + (this.renderCount * 0.3)this.renderCount++}
}class Boom {constructor ({ origin, context, circleCount = 16, area }) {this.origin = originthis.context = contextthis.circleCount = circleCountthis.area = areathis.stop = falsethis.circles = []}randomArray(range) {const length = range.lengthconst randomIndex = Math.floor(length * Math.random())return range[randomIndex]}randomColor() {const range = ['8', '9', 'A', 'B', 'C', 'D', 'E', 'F']return '#' + this.randomArray(range) + this.randomArray(range) + this.randomArray(range) + this.randomArray(range) + this.randomArray(range) + this.randomArray(range)}randomRange(start, end) {return (end - start) * Math.random() + start}init() {for(let i = 0; i < this.circleCount; i++) {const circle = new Circle({context: this.context,origin: this.origin,color: this.randomColor(),angle: this.randomRange(Math.PI - 1, Math.PI + 1),speed: this.randomRange(1, 6)})this.circles.push(circle)}}move() {this.circles.forEach((circle, index) => {if (circle.position.x > this.area.width || circle.position.y > this.area.height) {return this.circles.splice(index, 1)}circle.move()})if (this.circles.length == 0) {this.stop = true}}draw() {this.circles.forEach(circle => circle.draw())}
}class CursorSpecialEffects {constructor() {this.computerCanvas = document.createElement('canvas')this.renderCanvas = document.createElement('canvas')this.computerContext = this.computerCanvas.getContext('2d')this.renderContext = this.renderCanvas.getContext('2d')this.globalWidth = window.innerWidththis.globalHeight = window.innerHeightthis.booms = []this.running = false}handleMouseDown(e) {const boom = new Boom({origin: { x: e.clientX, y: e.clientY },context: this.computerContext,area: {width: this.globalWidth,height: this.globalHeight}})boom.init()this.booms.push(boom)this.running || this.run()}handlePageHide() {this.booms = []this.running = false}init() {const style = this.renderCanvas.stylestyle.position = 'fixed'style.top = style.left = 0style.zIndex = '999999999999999999999999999999999999999999'style.pointerEvents = 'none'style.width = this.renderCanvas.width = this.computerCanvas.width = this.globalWidthstyle.height = this.renderCanvas.height = this.computerCanvas.height = this.globalHeightdocument.body.append(this.renderCanvas)window.addEventListener('mousedown', this.handleMouseDown.bind(this))window.addEventListener('pagehide', this.handlePageHide.bind(this))}run() {this.running = trueif (this.booms.length == 0) {return this.running = false}requestAnimationFrame(this.run.bind(this))this.computerContext.clearRect(0, 0, this.globalWidth, this.globalHeight)this.renderContext.clearRect(0, 0, this.globalWidth, this.globalHeight)this.booms.forEach((boom, index) => {if (boom.stop) {return this.booms.splice(index, 1)}boom.move()boom.draw()})this.renderContext.drawImage(this.computerCanvas, 0, 0, this.globalWidth, this.globalHeight)}
}const cursorSpecialEffects = new CursorSpecialEffects()
cursorSpecialEffects.init()然后我们在主题自定义布局文件hexo/source/_data/body-end.swig中,没有就创建一个,在里面添加以下代码:
{# 鼠标点击特效 #}
{% if theme.cursor_effect == "fireworks" %}<script async src="/js/cursor/fireworks.js"></script>
{% elseif theme.cursor_effect == "explosion" %}<canvas class="fireworks" style="position: fixed;left: 0;top: 0;z-index: 1; pointer-events: none;" ></canvas><script src="//cdn.bootcss.com/animejs/2.2.0/anime.min.js"></script><script async src="/js/cursor/explosion.min.js"></script>
{% elseif theme.cursor_effect == "love" %}<script async src="/js/cursor/love.min.js"></script>
{% elseif theme.cursor_effect == "text" %}<script async src="/js/cursor/text.js"></script>
{% endif %}
在主题注入里取消 body-end.swig 的注释(主题注入教程在上面)
custom_file_path:
bodyEnd: source/_data/body-end.swig
最后打开myblog/themes/next/_config.yml在最下面添加如下代码
# 鼠标点击特效
# mouse click effect: fireworks | explosion | love | text
cursor_effect: love# 打字特效
# typing effect
typing_effect:colorful: false  # 礼花特效shake: false    # 震动特效
自定义侧栏时间
效果如图:

首先打开myblog\blog\themes\xuande\layout\_macro\sidebar.njk
添加如下代码:
<!-- canvas粒子时钟 -->{% if theme.diy_time.clock.enable %} {% include '../_custom/clock.swig' %}{% endif %}<!-- 网站运行时间 -->{% if theme.diy_time.runtime.enable %} {% include '../_custom/runtime.swig' %}{% endif %}

然后打开myblog\blog\themes\xuande\layout_custom新建clock.swig文件
在里面添加如下代码:
<!-- canvas粒子时钟 https://www.cnblogs.com/xiaohuochai/p/6368039.htmlhttps://www.html5tricks.com/html5-canvas-dance-time.html-->
<div id=""><canvas id="canvas" style="width:60%;">
</div>
<script async>
(function(){var WINDOW_WIDTH = 820;var WINDOW_HEIGHT = 250;var RADIUS = 7; //球半径var NUMBER_GAP = 10; //数字之间的间隙var u=0.65; //碰撞能量损耗系数var context; //Canvas绘制上下文var balls = []; //存储彩色的小球const colors = ["#33B5E5","#0099CC","#AA66CC","#9933CC","#99CC00","#669900","#FFBB33","#FF8800","#FF4444","#CC0000"]; //彩色小球的颜色var currentNums = []; //屏幕显示的8个字符var digit =[[[0,0,1,1,1,0,0],[0,1,1,0,1,1,0],[1,1,0,0,0,1,1],[1,1,0,0,0,1,1],[1,1,0,0,0,1,1],[1,1,0,0,0,1,1],[1,1,0,0,0,1,1],[1,1,0,0,0,1,1],[0,1,1,0,1,1,0],[0,0,1,1,1,0,0]],//0[[0,0,0,1,1,0,0],[0,1,1,1,1,0,0],[0,0,0,1,1,0,0],[0,0,0,1,1,0,0],[0,0,0,1,1,0,0],[0,0,0,1,1,0,0],[0,0,0,1,1,0,0],[0,0,0,1,1,0,0],[0,0,0,1,1,0,0],[1,1,1,1,1,1,1]],//1[[0,1,1,1,1,1,0],[1,1,0,0,0,1,1],[0,0,0,0,0,1,1],[0,0,0,0,1,1,0],[0,0,0,1,1,0,0],[0,0,1,1,0,0,0],[0,1,1,0,0,0,0],[1,1,0,0,0,0,0],[1,1,0,0,0,1,1],[1,1,1,1,1,1,1]],//2[[1,1,1,1,1,1,1],[0,0,0,0,0,1,1],[0,0,0,0,1,1,0],[0,0,0,1,1,0,0],[0,0,1,1,1,0,0],[0,0,0,0,1,1,0],[0,0,0,0,0,1,1],[0,0,0,0,0,1,1],[1,1,0,0,0,1,1],[0,1,1,1,1,1,0]],//3[[0,0,0,0,1,1,0],[0,0,0,1,1,1,0],[0,0,1,1,1,1,0],[0,1,1,0,1,1,0],[1,1,0,0,1,1,0],[1,1,1,1,1,1,1],[0,0,0,0,1,1,0],[0,0,0,0,1,1,0],[0,0,0,0,1,1,0],[0,0,0,1,1,1,1]],//4[[1,1,1,1,1,1,1],[1,1,0,0,0,0,0],[1,1,0,0,0,0,0],[1,1,1,1,1,1,0],[0,0,0,0,0,1,1],[0,0,0,0,0,1,1],[0,0,0,0,0,1,1],[0,0,0,0,0,1,1],[1,1,0,0,0,1,1],[0,1,1,1,1,1,0]],//5[[0,0,0,0,1,1,0],[0,0,1,1,0,0,0],[0,1,1,0,0,0,0],[1,1,0,0,0,0,0],[1,1,0,1,1,1,0],[1,1,0,0,0,1,1],[1,1,0,0,0,1,1],[1,1,0,0,0,1,1],[1,1,0,0,0,1,1],[0,1,1,1,1,1,0]],//6[[1,1,1,1,1,1,1],[1,1,0,0,0,1,1],[0,0,0,0,1,1,0],[0,0,0,0,1,1,0],[0,0,0,1,1,0,0],[0,0,0,1,1,0,0],[0,0,1,1,0,0,0],[0,0,1,1,0,0,0],[0,0,1,1,0,0,0],[0,0,1,1,0,0,0]],//7[[0,1,1,1,1,1,0],[1,1,0,0,0,1,1],[1,1,0,0,0,1,1],[1,1,0,0,0,1,1],[0,1,1,1,1,1,0],[1,1,0,0,0,1,1],[1,1,0,0,0,1,1],[1,1,0,0,0,1,1],[1,1,0,0,0,1,1],[0,1,1,1,1,1,0]],//8[[0,1,1,1,1,1,0],[1,1,0,0,0,1,1],[1,1,0,0,0,1,1],[1,1,0,0,0,1,1],[0,1,1,1,0,1,1],[0,0,0,0,0,1,1],[0,0,0,0,0,1,1],[0,0,0,0,1,1,0],[0,0,0,1,1,0,0],[0,1,1,0,0,0,0]],//9[[0,0,0,0],[0,0,0,0],[0,1,1,0],[0,1,1,0],[0,0,0,0],[0,0,0,0],[0,1,1,0],[0,1,1,0],[0,0,0,0],[0,0,0,0]]//:];function drawDatetime(cxt){var nums = [];context.fillStyle="#005eac"var date = new Date();var offsetX = 70, offsetY = 30;var hours = date.getHours();var num1 = Math.floor(hours/10);var num2 = hours%10;nums.push({num: num1});nums.push({num: num2});nums.push({num: 10}); //冒号var minutes = date.getMinutes();var num1 = Math.floor(minutes/10);var num2 = minutes%10;nums.push({num: num1});nums.push({num: num2});nums.push({num: 10}); //冒号var seconds = date.getSeconds();var num1 = Math.floor(seconds/10);var num2 = seconds%10;nums.push({num: num1});nums.push({num: num2});for(var x = 0;x<nums.length;x++){nums[x].offsetX = offsetX;offsetX = drawSingleNumber(offsetX,offsetY, nums[x].num,cxt);//两个数字连一块,应该间隔一些距离if(x<nums.length-1){if((nums[x].num!=10) &&(nums[x+1].num!=10)){offsetX+=NUMBER_GAP;}}}//说明这是初始化if(currentNums.length ==0){currentNums = nums;}else{//进行比较for(var index = 0;index<currentNums.length;index++){if(currentNums[index].num!=nums[index].num){//不一样时,添加彩色小球addBalls(nums[index]);currentNums[index].num=nums[index].num;}}}renderBalls(cxt);updateBalls();return date;}function addBalls (item) {var num = item.num;var numMatrix = digit[num];for(var y = 0;y<numMatrix.length;y++){for(var x = 0;x<numMatrix[y].length;x++){if(numMatrix[y][x]==1){var ball={offsetX:item.offsetX+RADIUS+RADIUS*2*x,offsetY:30+RADIUS+RADIUS*2*y,color:colors[Math.floor(Math.random()*colors.length)],g:1.5+Math.random(),vx:Math.pow(-1, Math.ceil(Math.random()*10))*4+Math.random(),vy:-5}balls.push(ball);}}}}function renderBalls(cxt){for(var index = 0;index<balls.length;index++){cxt.beginPath();cxt.fillStyle=balls[index].color;cxt.arc(balls[index].offsetX, balls[index].offsetY, RADIUS, 0, 2*Math.PI);cxt.fill();}}function updateBalls () {var i =0;for(var index = 0;index<balls.length;index++){var ball = balls[index];ball.offsetX += ball.vx;ball.offsetY += ball.vy;ball.vy+=ball.g;if(ball.offsetY > (WINDOW_HEIGHT-RADIUS)){ball.offsetY= WINDOW_HEIGHT-RADIUS;ball.vy=-ball.vy*u;}if(ball.offsetX>RADIUS&&ball.offsetX<(WINDOW_WIDTH-RADIUS)){balls[i]=balls[index];i++;}}//去除出边界的球for(;i<balls.length;i++){balls.pop();}}function drawSingleNumber(offsetX, offsetY, num, cxt){var numMatrix = digit[num];for(var y = 0;y<numMatrix.length;y++){for(var x = 0;x<numMatrix[y].length;x++){if(numMatrix[y][x]==1){cxt.beginPath();cxt.arc(offsetX+RADIUS+RADIUS*2*x,offsetY+RADIUS+RADIUS*2*y,RADIUS,0,2*Math.PI);cxt.fill();}}}cxt.beginPath();offsetX += numMatrix[0].length*RADIUS*2;return offsetX;}var canvas = document.getElementById("canvas");canvas.width=WINDOW_WIDTH;canvas.height=WINDOW_HEIGHT;context = canvas.getContext("2d");//记录当前绘制的时刻var currentDate = new Date();setInterval(function(){//清空整个Canvas,重新绘制内容context.clearRect(0, 0, context.canvas.width, context.canvas.height);drawDatetime(context);}, 50)
})();
</script>最后打开myblog/themes/next/_config.yml在最下面添加如下代码
# 侧栏自定义时间
diy_time:runtime:enable: true #运行时间birthday: "07/25/2022 12:00:00"clock:enable: true # 粒子
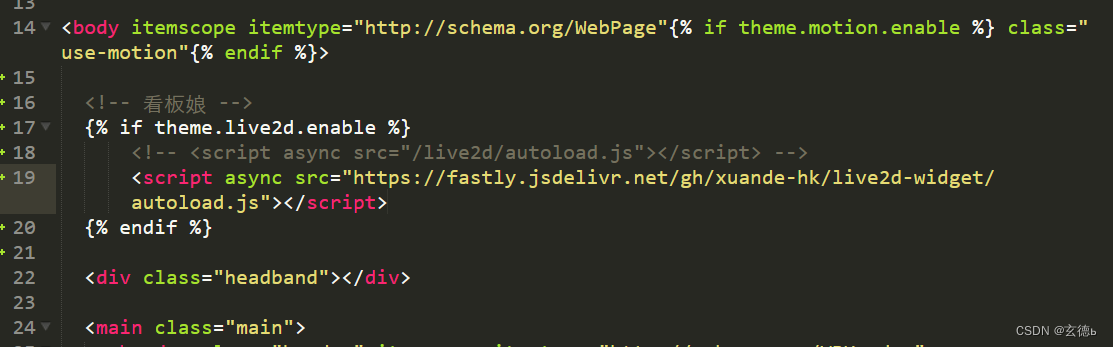
live2d高级看板娘
简单Demo
导入 Font Awesome 图标支持
<link rel="stylesheet" href="https://fastly.jsdelivr.net/npm/@fortawesome/fontawesome-free@6/css/all.min.css">
把下面代码放入你的博客根目录下\themes\xuande\layout\_layout.njk里面(也可能是_layout.swig,取决于你的next版本)
<script src="https://fastly.jsdelivr.net/gh/stevenjoezhang/live2d-widget@latest/autoload.js"></script>
放置位置如下:
最后在打开myblog/themes/next/_config.yml在最下面添加如下代码
# 看板娘
live2d:enable: true
注:也可以把这两行代码删掉,可以防止与自带看板娘冲突
{% if theme.live2d.enable %} {% endif %}
这样一个萌萌哒的看板娘就出来啦

注:如果跟自带的看板娘冲突,请先卸载自带的看板娘
自定义看板娘
首先,先把文件克隆到你的博客的source目录下(根目录下和主题目录下的sources都可以)
git clone https://github.com/stevenjoezhang/live2d-widget.git
其次,更改一下引用路径
_layout.njk:

source\live2d\autoload.js:

这样,就可以在waifu-tips.js和waifu-tips.json里面更改活动检测和对话内容了
(注:gitee有文字检测功能,如果提示违规就删掉waifu-tips.json里的"click"对话的部分文字,这gitee的检测机制我是真的服。。。。)
补充
以上是在本地更改,也可以在GitHub上Fork一份,然后用cdn加载也是可以的,条条大路通罗马嘛
如果cdn访问不了的话,不妨试试api
source\live2d\autoload.js:

添加看板娘模型:
这里我没试过,但思路是有的,留个期待,以后完善
轮播图设置
第一步:添加配置
找到博客目录下的themes\next\layout下的index文件
添加下面这一行代码
{% include '_macro/carousel.swig' %}

第二步:添加文件
在themes\next\layout\macro文件下创建carousel.swig文件。
写入以下内容:
{% if theme.carousel.enable %}
<script src="https://cdn.staticfile.org/jquery/2.1.1/jquery.min.js"></script>
<script src="https://cdn.staticfile.org/twitter-bootstrap/3.3.7/js/bootstrap.min.js"></script><style type="text/css">.glyphicon-chevron-left:before{content: "《"
}
.glyphicon-chevron-right:before{content: "》"
}@media (max-width: 767px){.rights{display: none;}.carousel{width: 100% !important;height: 100% !important;}.slide{width: 100% !important;height: 100% !important;}}.carousel{width: 100%;height: 100%;position: relative;
}.carousel-inner {position: relative;overflow: hidden;width: 100%;
}
.carousel-inner > .item {display: none;position: relative;-webkit-transition: 0.6s ease-in-out left;-o-transition: 0.6s ease-in-out left;transition: 0.6s ease-in-out left;
}
.carousel-inner > .item > img,
.carousel-inner > .item > a > img {line-height: 1;
}
@media all and (transform-3d), (-webkit-transform-3d) {.carousel-inner > .item {-webkit-transition: -webkit-transform 0.6s ease-in-out;-moz-transition: -moz-transform 0.6s ease-in-out;-o-transition: -o-transform 0.6s ease-in-out;transition: transform 0.6s ease-in-out;-webkit-backface-visibility: hidden;-moz-backface-visibility: hidden;backface-visibility: hidden;-webkit-perspective: 1000px;-moz-perspective: 1000px;perspective: 1000px;}.carousel-inner > .item.next,.carousel-inner > .item.active.right {-webkit-transform: translate3d(100%, 0, 0);transform: translate3d(100%, 0, 0);left: 0;}.carousel-inner > .item.prev,.carousel-inner > .item.active.left {-webkit-transform: translate3d(-100%, 0, 0);transform: translate3d(-100%, 0, 0);left: 0;}.carousel-inner > .item.next.left,.carousel-inner > .item.prev.right,.carousel-inner > .item.active {-webkit-transform: translate3d(0, 0, 0);transform: translate3d(0, 0, 0);left: 0;}
}
.carousel-inner > .active,
.carousel-inner > .next,
.carousel-inner > .prev {display: block;
}
.carousel-inner > .active {left: 0;
}
.carousel-inner > .next,
.carousel-inner > .prev {position: absolute;top: 0;width: 100%;
}
.carousel-inner > .next {left: 100%;
}
.carousel-inner > .prev {left: -100%;
}
.carousel-inner > .next.left,
.carousel-inner > .prev.right {left: 0;
}
.carousel-inner > .active.left {left: -100%;
}
.carousel-inner > .active.right {left: 100%;
}
.carousel-control {position: absolute;top: 0;left: 0;bottom: 0;width: 15%;opacity: 0.5;filter: alpha(opacity=50);font-size: 20px;color: #fff;text-align: center;text-shadow: 0 1px 2px rgba(0, 0, 0, 0.6);background-color: rgba(0, 0, 0, 0);
}
.carousel-control.left {background-image: -webkit-linear-gradient(left, rgba(0, 0, 0, 0.5) 0%, rgba(0, 0, 0, 0.0001) 100%);background-image: -o-linear-gradient(left, rgba(0, 0, 0, 0.5) 0%, rgba(0, 0, 0, 0.0001) 100%);background-image: linear-gradient(to right, rgba(0, 0, 0, 0.5) 0%, rgba(0, 0, 0, 0.0001) 100%);background-repeat: repeat-x;filter: progid:DXImageTransform.Microsoft.gradient(startColorstr='#80000000', endColorstr='#00000000', GradientType=1);
}
.carousel-control.right {left: auto;right: 0;background-image: -webkit-linear-gradient(left, rgba(0, 0, 0, 0.0001) 0%, rgba(0, 0, 0, 0.5) 100%);background-image: -o-linear-gradient(left, rgba(0, 0, 0, 0.0001) 0%, rgba(0, 0, 0, 0.5) 100%);background-image: linear-gradient(to right, rgba(0, 0, 0, 0.0001) 0%, rgba(0, 0, 0, 0.5) 100%);background-repeat: repeat-x;filter: progid:DXImageTransform.Microsoft.gradient(startColorstr='#00000000', endColorstr='#80000000', GradientType=1);
}
.carousel-control:hover,
.carousel-control:focus {outline: 0;color: #fff;text-decoration: none;opacity: 0.9;filter: alpha(opacity=90);
}
.carousel-control .icon-prev,
.carousel-control .icon-next,
.carousel-control .glyphicon-chevron-left,
.carousel-control .glyphicon-chevron-right {position: absolute;top: 50%;margin-top: -10px;z-index: 5;display: inline-block;
}
.carousel-control .icon-prev,
.carousel-control .glyphicon-chevron-left {left: 50%;margin-left: -10px;
}
.carousel-control .icon-next,
.carousel-control .glyphicon-chevron-right {right: 50%;margin-right: -10px;
}
.carousel-control .icon-prev,
.carousel-control .icon-next {width: 20px;height: 20px;line-height: 1;font-family: serif;
}
.carousel-control .icon-prev:before {content: '\2039';
}
.carousel-control .icon-next:before {content: '\203a';
}
.carousel-indicators {position: absolute;bottom: 10px;left: 50%;z-index: 15;width: 60%;margin-left: -30%;padding-left: 0;list-style: none;text-align: center;
}
.carousel-indicators li {display: inline-block;width: 10px;height: 10px;margin: 1px;text-indent: -999px;border: 1px solid #fff;border-radius: 10px;cursor: pointer;background-color: #000 \9;background-color: rgba(0, 0, 0, 0);
}
.carousel-indicators .active {margin: 0;width: 12px;height: 12px;background-color: #fff;
}
.carousel-caption {position: absolute;left: 15%;right: 15%;bottom: 20px;z-index: 10;padding-top: 20px;padding-bottom: 20px;color: #fff;text-align: center;text-shadow: 0 1px 2px rgba(0, 0, 0, 0.6);
}
.carousel-caption .btn {text-shadow: none;
}
@media screen and (min-width: 768px) {.carousel-control .glyphicon-chevron-left,.carousel-control .glyphicon-chevron-right,.carousel-control .icon-prev,.carousel-control .icon-next {width: 30px;height: 30px;margin-top: -10px;font-size: 30px;}.carousel-control .glyphicon-chevron-left,.carousel-control .icon-prev {margin-left: -10px;}.carousel-control .glyphicon-chevron-right,.carousel-control .icon-next {margin-right: -10px;}.carousel-caption {left: 20%;right: 20%;padding-bottom: 30px;}.carousel-indicators {bottom: 20px;}
}
</style>
<div width="100%" height="320px" style="border: 0px; overflow: hidden; border-radius: 10px;" scrolling="no"><div id="myCarousel" class="carousel slide" data-ride="carousel" data-interval="3500" ><!-- 轮播(Carousel)指标 --><ol class="carousel-indicators">{% set index = 0 %}{% for item in theme.carousel.item %}<li data-target="#myCarousel" data-slide-to="{{index}}"></li>{% set index = index+1 %}{% endfor %}</ol><!-- 轮播(Carousel)项目 --><div class="carousel-inner" style="height: 280px; border-radius: 10px; width: 100%;">{% set act = 0 %}{% for item in theme.carousel.item %}{% if act===0 %}<a class="item active" href="{{ url_for(item.link) }}" target="_blank" style="height: 100%;"><img src="{{item.img}}"   style="width: 100%; height: 100%" ></a>{% set act = 1 %}{% elseif act===1 %}<a class="item" href="{{ url_for(item.link) }}" target="_blank" style="height: 100%;"><img src="{{item.img}}"  style="width: 100%; height: 100%;" ></a>{% endif %}{% endfor %}</div><!-- 轮播(Carousel)导航 --><a class="left carousel-control" href="#myCarousel" role="button" data-slide="prev"><span class="glyphicon glyphicon-chevron-left" aria-hidden="true"></span></a><a class="right carousel-control" href="#myCarousel" role="button" data-slide="next"><span class="glyphicon glyphicon-chevron-right" aria-hidden="true"></span></a></div>
</div>{% endif %}
第三步:配置文件中配置图片及链接
在next主题目录下的_config.xml主题配置文件中末尾添加如下配置:
# 主页轮播图 使用 620x310 的图片
#Home carousel map, from means link, img means picture
carousel: enable: trueitem: [{'link':'文章链接1','img':'图片链接1'},{'link':'文章链接2','img':'图片链接2'},]
ps:注意:开启这种轮播图形式的时候,在主题配置文件中不要开启fancybox,这个设置需要设置为false,不然在点击图片进行跳转时会出现The requested content cannot be loaded.Please try again later.错误