Hexo版本:6.2.0、NextT版本:7.8.0
一、主题安装
打开Git Bash,cd到站点根目录,输入
git clone https://github.com/theme-next/hexo-theme-next themes/next
打开站点根目录下的_config.yml文件,landscape修改为next
## Themes: https://hexo.io/themes/
theme: next
二、使用须知
Hexo根目录下的配置文件_config.yml,以下称作站点配置文件
Hexo根目录/theme/next下的配置文件_config.yml,以下称作主题配置文件
站点配置文件修改后,一定需要以下指令才能生效
若是其他配置文件修改后,没有生效,也可以先尝试上面的指令
hexo clean && hexo g && hexo
最终效果,可以来我的博客看看。
三、个性化配置
(一)基础配置
1. 语言修改
打开站点配置文件,查找language,添加zh-CN
language: zh-CN
2. 主题切换
next主题自带四种样式
打开主题配置文件,查找scheme,选择自己喜欢的样式,去掉#
# Schemes
#scheme: Muse
#scheme: Mist
#scheme: Pisces
scheme: Gemini
3. 主题配置文件修改(推荐)
Hexo 在合并主题配置时,Hexo 配置文件
_config.yml中的theme_config配置项的优先级最高,其次是_config.[theme].yml文件,最后是位于主题目录下的_config.yml文件。
打开站点根目录,添加_config.next.yml,将themes/next/_config.yml里的内容复制进去

3. 自定义样式
打开主题配置文件,查找custom_file_path,去掉style前面的#
custom_file_path:#head: source/_data/head.swig#header: source/_data/header.swig#sidebar: source/_data/sidebar.swig#postMeta: source/_data/post-meta.swig#postBodyEnd: source/_data/post-body-end.swig#footer: source/_data/footer.swig#bodyEnd: source/_data/body-end.swig#variable: source/_data/variables.styl#mixin: source/_data/mixins.stylstyle: source/_data/styles.styl
在source/_data下面新建styles.styl,后文会在该文件中添加样式
4. 样式修改示例
打开source/_data/styles.styl,添加以下内容
//网站背景图片设置
body {background:url(/images/background.png);background-repeat: no-repeat;background-attachment: fixed; //不重复background-size: cover;       //填充background-position: 50% 20%; //缩放设置,百分比越小则图片被放大
}
//文章的透明度
.content-wrap {opacity: 0.9;
}
//主页标题的背景颜色
.site-brand-container {background: #50616d;
}
//主页标题的颜色和字体
.site-meta .site-title {font-weight: bold;
}
//网页顶部的进度栏
.headband {background: #eea2a4;
}
//菜单栏透明度
.header-inner {background: rgba(255,255,255,0.9);
}
//侧边栏的透明度
.sidebar {opacity: 0.9;
}
(二)导航区域配置
1. 新建标签页
以新建标签页tags为例,其余页面类似。
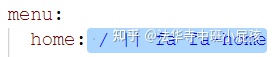
打开主题配置文件,查找menu,去掉tags前的#,其余可按此方法自行选择添加
menu:home: / || home#about: /about/ || usertags: /tags/ || tags#categories: /categories/ || tharchives: /archives/ || archive#schedule: /schedule/ || calendar#sitemap: /sitemap.xml || sitemap#commonweal: /404/ || heartbeat
打开Git Bash,cd到站点根目录,输入以下指令新建文件夹
hexo n page tags
打开source/tags/index.md,配置type。以上指令生成的文件夹会有默认的文件
---
title: tags
type: "tags"
---
menu中 tags,对应 source/tags/
例如:留言: /guestbook/ || fa fa-book,对应source/guestbook/
2. 菜单栏鼠标悬浮颜色
打开主题配置文件,查找custom_file_path,去掉variables前面的#
custom_file_path:variable: source/_data/variables.styl
在source/_data下新建variables.swig,并添加以下内容
//更改菜单栏鼠标悬浮的颜色//236, 155, 173
$menu-item-bg-color           = rgba(248, 105, 129, .4);
效果截图

3. 标签/分类/归档的数量显示
打开主题配置文件,查找menu_settings
menu_settings:icons: true # 是否显示图标badges: true # 是否显示数量
效果截图见上菜单栏鼠标悬浮颜色
4. 星标
打开https://tholman.com/github-corners/ ,复制喜欢的样式
打开themes/next/layout/_layout.swig,在<div class="headband"></div>下添加复制的内容
效果截图

4. 留言板
留言板使用的前提是,已经设置了评论插件-valine或者其他评论插件
打开Git Bash,cd到站点根目录,输入以下指令新建page
hexo new page guestbook
打开source/guestbook/index.md,配置type。
---
title: 给我留言吧
date: 2022-02-18 20:04:25
type: "guestbook"
---
# 欢迎来到我的博客!> 欢迎在这里留言!
打开主题配置文件,查找menu,添加留言板
menu:留言: /guestbook/ || fa fa-book
效果截图

(三)侧边区域配置
1. 头像设置
打开主题配置文件,查找avatar
avatar:url: /images/avatar.jpg# 是否设置为圆形rounded: false# 是否鼠标悬浮时旋转rotated: false
效果截图

2. 浏览进度显示
打开主题配置文件,查找scrollpercent,改为true
back2top:enable: true# Back to top in sidebar.sidebar: false# Scroll percent label in b2t button.scrollpercent: true
3. 本地搜索Local Search
打开Git Bash,cd到站点根目录,安装hexo-generator-searchdb
npm install hexo-generator-searchdb --save
打开站点配置文件,末尾添加以下内容
# 搜索功能
search:path: search.xmlfield: postformat: htmllimit: 10000
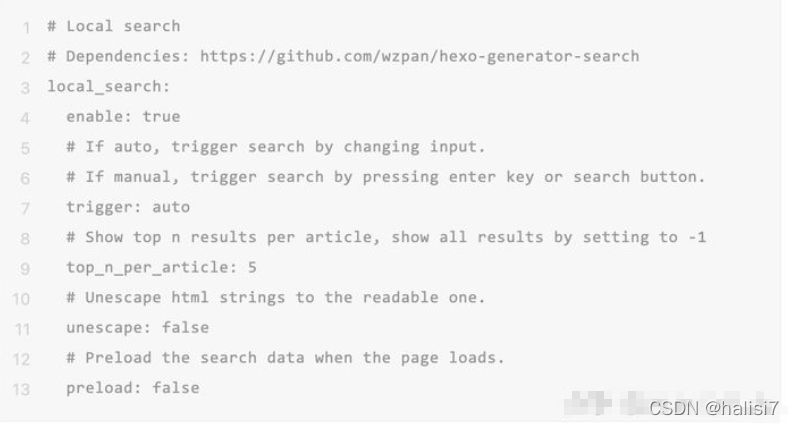
打开主题配置文件,查找local_search,改为true
local_search:enable: true# -1列出所有,此处设置列出3top_n_per_article: 3
效果截图

4. 网易云音乐外链
浏览器打开网易云,找到想要添加的歌曲或歌单,点击生成外链播放器

选择尺寸和播放模式,然后复制代码

打开主题配置文件,查找custom_file_path,去掉head前面的#
custom_file_path:sidebar: source/_data/sidebar.swig
在source/_data下新建sidebar.swig,并添加以下内容
<!-- 侧边栏添加网易云音乐 -->
<div id="music163player"><iframe frameborder="no" border="0" marginwidth="0" marginheight="0" width=280 height=52 src="//music.163.com/outchain/player?type=0&id=3099434842&auto=0&height=32"></iframe>
</div>
(四)内容区域配置
1. 文章添加阴影
打开source/_data/styles.styl,添加以下内容
//主页文章添加阴影效果
.main-inner .post-block {border-radius: 10px;-webkit-box-shadow: 3px 3px 7px rgba(192, 111, 152, 1);-moz-box-shadow: 3px 3px 7px rgba(238, 162, 164, .5);
}
2. 链接样式修改
打开source/_data/styles.styl,添加以下内容
//博客内容中的超链接颜色
.post-body p a {color: #eea2a4;border-bottom: none;&:hover {color: #0593d3;text-decoration: underline;}
}
3. 文章底部#修改
打开主题配置文件,查找tag_icon,改为true
tag_icon: true
效果截图

4. 文章加密访问
打开主题配置文件,查找custom_file_path,去掉head前面的#
custom_file_path:head: source/_data/head.swig
在source/_data下新建head.swig,并添加以下内容
<script> (function(){if('{{ page.password }}'){if (prompt('请输入文章密码') !== '{{ page.password }}'){alert('密码错误!');history.back();}}})();
</script>
在想要加密的文章的front-matter里,加上password
---
title: Hello World
categories:
- Diary
password: 123456
---
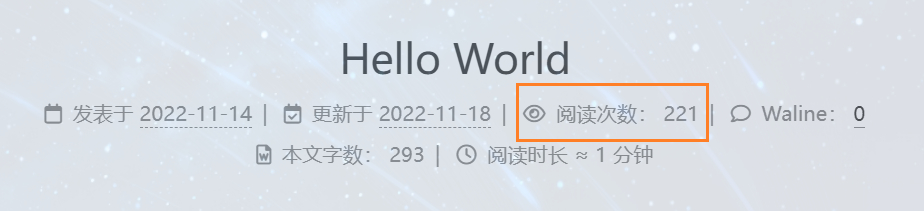
5. 字数统计和阅读时长
打开Git Bash,cd到站点根目录,安装hexo-symbols-count-time
npm install hexo-symbols-count-time --save
打开站点配置文件,末尾添加以下内容
symbols_count_time:symbols: true # 是否启用time: true # 估计阅读时间total_symbols: true # 页脚部分中所有帖子字数total_time: true # 页脚部分中所有帖子的估计阅读时间exclude_codeblock: falseawl: 4 # 平均字长wpm: 275 # 每分钟的平均单词数suffix: "mins."
打开主题配置文件,查找symbols_count_time
symbols_count_time:separated_meta: false # 以分隔线显示单词计数和估计读取时间item_text_post: true # 显示单词计数和估计阅读时间的文本描述item_text_total: false # 在页脚部分显示单词计数和估计阅读时间的文本描述
效果截图

6. 文章置顶
打开Git Bash,cd到站点根目录,卸载hexo-generator-index
npm uninstall hexo-generator-index --save
安装hexo-generator-index-pin-top
npm install hexo-generator-index-pin-top --save
使用时,只需要在所需文章的Front-matter中添加。设置多篇文章时数值大的在上
---
top: true
或者
top: 数值
---
设置置顶图标
打开/themes/next/layout/_macro/post.swig文件,在<div class="post-meta">下方,添加以下内容
{% if post.top %}<i class="fa fa-thumb-tack"></i><span style="color:#50616d;font-weight:bold;">TOP</span><span class="post-meta-divider">|</span>
{% endif %}
效果截图

7. 摘要显示
打开Git Bash,cd到站点根目录,安装hexo-excerpt
npm install hexo-excerpt --save
打开站点配置文件,末尾添加以下内容
excerpt:depth: 4 #按层来算,也就是按代码块来算excerpt_excludes: []more_excludes: []hideWholePostExcerpts: true
效果截图

8. 文章末尾添加分割线
打开主题配置文件,查找custom_file_path,去掉postBodyEnd前面的#
custom_file_path:postBodyEnd: source/_data/post-body-end.swig
在source/_data下新建post-body-end.swig,并添加以下内容
<!-- 文章末尾分割线 -->
<div><hr/>
</div>
9. 代码块复制选项
打开主题配置文件,查找codeblock
codeblock:
# 设置代码块主题
highlight_theme: normal
copy_button:enable: true# 是否显示复制结果show_result: true# 代码块风格: default | flat | macstyle: default
10. 文章链接修改
hexo-next文章链接默认的生成规则是:
:year/:month/:day/:title,不简洁
打开Git Bash,cd到站点根目录,安装hexo-abbrlink
npm install hexo-abbrlink --save
若是安装不成功,可以使用cnpm。安装cnpm,再安装hexo-abbrlink
npm install -g cnpm --registry=https://registry.npm.taobao.org
打开站点配置文件,修改以下内容
permalink: posts/:abbrlink/
abbrlink:alg: crc16   #算法: crc16(default) and crc32rep: dec     #进制: dec(default) and hex
11. 文章版权信息
打开主题配置文件,查找creative_commons,post改为true
creative_commons:license: by-nc-sasidebar: falsepost: truelanguage:
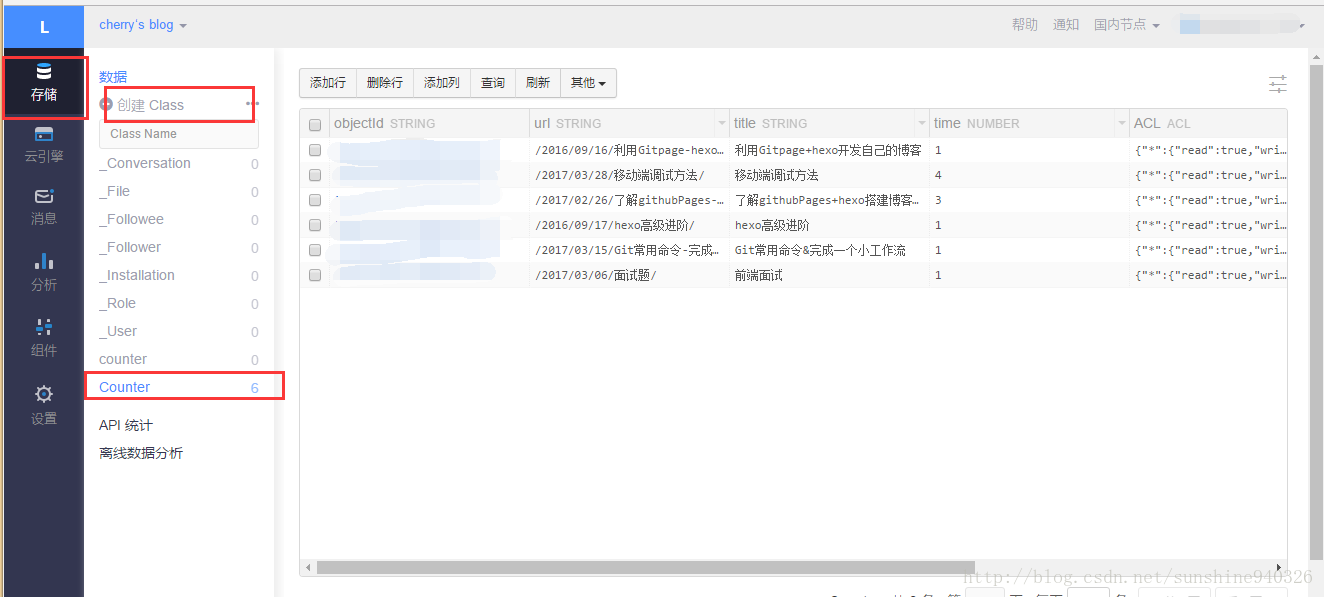
12. 不算子插件-访客数
打开主题配置文件,查找busuanzi_count
busuanzi_count:enable: truetotal_visitors: truetotal_visitors_icon: fa fa-usertotal_views: truetotal_views_icon: fa fa-eyepost_views: truepost_views_icon: fa fa-eye
13. 打赏功能
打开主题配置文件,查找busuanzi_count
reward_settings:enable: trueanimation: falsecomment: 若是看得爽了,给个赏钱吧! # 设置显示的文字
reward:wechatpay: /images/wechatpay.png # 微信收款码的图片alipay: /images/alipay.png	   # 支付宝收款的图片
14. 评论插件-valine
注册Leancloud账号:https://console.leancloud.cn/login
注册完成后进入控制台,创建应用,默认开发版即可

创建完成后,点击设置

点击应用凭证,复制AppID和AppKey

点击安全中心,添加自己的域名

打开主题配置文件,查找valine,改为true
comments:style: tabs # 配置评论显示的样式active: valine # 配置评论的插件
valine:enable: trueappid: # 填写上面复制的AppIDappkey: # 填写上面复制的AppKeyplaceholder: Welcome to comment # 填写评论框里提示的内容avatar: robohash # 评论者的默认头像pageSize: 7 # 每页显示的评论数量visitor: false # 是否显示阅读次数。若有busuanzi插件,建议关闭recordIP: true # 是否显示评论者IP
15. 文章/页面评论功能是否开启
在文章Front-matter中,添加comments属性
---
title: categories
type: "categories"
comments: false
---
(五)底部区域配置
1. 强力驱动隐藏
打开主题配置文件,查找powered,改为false
# Powered by Hexo & NexT
powered: false
2. 其余设置
打开主题配置文件,查找footer,其余设置均在这里
footer:since: 2019 #建站时间icon:name: fa fa-heart #FontAwesome图标animated: true #图标是否闪动color: "#808080" #图标颜色copyright: #没有设置的话默认显示作者powered:enable: false #是否显示 Powered by hexoversion: false #是否显示Hexo版本theme:enable: false #是否显示主题信息version: false #是否显示主题版本beian:enable: false #是否显示网站备案信息icp:
(六)其他配置
1. 加载特效
打开主题配置文件,查找pace,改为true
pace:enable: true# 样式列表详情见配置文件theme: bounce
2. 彩色标签云
在next/source/js下新建tag-color.js,输入以下内容
var alltags = document.getElementsByClassName('tag-cloud-tags');
var tags = alltags[0].getElementsByTagName('a');
for (var i = tags.length - 1; i >= 0; i--) {var r=Math.floor(Math.random()*75+130);var g=Math.floor(Math.random()*75+100);var b=Math.floor(Math.random()*75+80);tags[i].style.background = "rgb("+r+","+g+","+b+")";
}
打开source/_data/styles.styl,添加以下内容
/*-------彩色标签云-------*/
.tag-cloud-tags{/*font-family: Helvetica, Tahoma, Arial;*//*font-weight: 100;*/text-align: center;counter-reset: tags;
}
.tag-cloud-tags a{border-radius: 6px;padding-right: 5px;padding-left: 5px;margin: 8px 5px 0px 0px;
}
.tag-cloud-tags a:before{content: "☁";
}
.tag-cloud-tags a:hover{box-shadow: 0px 5px 15px 0px rgba(0,0,0,.4);transform: scale(1.1);/*box-shadow: 10px 10px 15px 2px rgba(0,0,0,.12), 0 0 6px 0 rgba(104, 104, 105, 0.1);*/transition-duration: 0.15s;
}
打开next/layout/page.swig,在<div class="tag-cloud">结束标签后添加
<!-- 彩色标签页 --><script type="text/javascript" src="/js/tag-color.js"></script>
效果截图

3. 鼠标点击红心特效
在/themes/next/source/js/src下新建文件 clicklove.js,添加以下内容
!function(e,t,a){function n(){c(".heart{width: 10px;height: 10px;position: fixed;background: #f00;transform: rotate(45deg);-webkit-transform: rotate(45deg);-moz-transform: rotate(45deg);}.heart:after,.heart:before{content: '';width: inherit;height: inherit;background: inherit;border-radius: 50%;-webkit-border-radius: 50%;-moz-border-radius: 50%;position: fixed;}.heart:after{top: -5px;}.heart:before{left: -5px;}"),o(),r()}function r(){for(var e=0;e<d.length;e++)d[e].alpha<=0?(t.body.removeChild(d[e].el),d.splice(e,1)):(d[e].y--,d[e].scale+=.004,d[e].alpha-=.013,d[e].el.style.cssText="left:"+d[e].x+"px;top:"+d[e].y+"px;opacity:"+d[e].alpha+";transform:scale("+d[e].scale+","+d[e].scale+") rotate(45deg);background:"+d[e].color+";z-index:99999");requestAnimationFrame(r)}function o(){var t="function"==typeof e.onclick&&e.onclick;e.onclick=function(e){t&&t(),i(e)}}function i(e){var a=t.createElement("div");a.className="heart",d.push({el:a,x:e.clientX-5,y:e.clientY-5,scale:1,alpha:1,color:s()}),t.body.appendChild(a)}function c(e){var a=t.createElement("style");a.type="text/css";try{a.appendChild(t.createTextNode(e))}catch(t){a.styleSheet.cssText=e}t.getElementsByTagName("head")[0].appendChild(a)}function s(){return"rgb("+~~(255*Math.random())+","+~~(255*Math.random())+","+~~(255*Math.random())+")"}var d=[];e.requestAnimationFrame=function(){return e.requestAnimationFrame||e.webkitRequestAnimationFrame||e.mozRequestAnimationFrame||e.oRequestAnimationFrame||e.msRequestAnimationFrame||function(e){setTimeout(e,1e3/60)}}(),n()}(window,document);
打开主题配置文件,查找custom_file_path,去掉body-end前面的#
custom_file_path:bodyEnd: source/_data/body-end.swig
在source/_data下新建body-end.swig,并添加以下内容
<!-- 页面点击小红心 -->
<script type="text/javascript" src="/js/clicklove.js"></script>
效果截图

4. 404页面
打开Git Bash,cd到站点根目录,输入以下指令新建page
hexo n page 404
打开source/404/index.md,配置front-matter
---
layout: false
comments: false
title: 404
permalink: /404
---
打开https://404.life/ ,选择一个喜欢的404页面。其他网站均可
将html代码放入index.md中,注意不能有空行。如果有空行,可以如下添加{% raw %}{%{% endraw %} raw %}和{% raw %}{%{% endraw %} endraw %}
---
layout: false
---
{% raw %}
xxxxxxxxxxxxx
xx HTML代码 xx
xxxxxxxxxxxxx
{% endraw %}
若是有css和js,可以放入之前生成的404目录下,和index.md同级,然后修改html的引用
若是本地服务器,浏览器手动输入http://localhost:4000/404/
若是远程服务器,错误地址会自动转到该页面
【参考链接】:
- https://blog.csdn.net/nightmare_dimple/article/details/86661502
- https://blog.csdn.net/qq_41518277/article/details/101766036
- https://blog.csdn.net/vpqtxzmzezeqjj9977/article/details/123010779
- https://blog.csdn.net/steptoboss/article/details/108158067
- https://blog.csdn.net/qq_29654777/article/details/108225034