Rook使用简介(Ceph)
1、简介
Rook是一个自管理的分布式存储编排系统,可以为Kubernetes提供便利的存储解决方案。Rook本身并不提供存储,而是在kubernetes和存储系统之间提供适配层,简化存储系统的部署与维护工作。目前,rook支持的存储系统包括:Ceph、CockroachDB、Cassandra、EdgeFS、Minio、NFS,其中Ceph为Stable状态,其余均为Alpha。本文仅介绍Ceph相关内容。
Rook由Operator和Cluster两部分组成:
- Operator:由一些CRD和一个All in one镜像构成,包含包含启动和监控存储系统的所有功能。
- Cluster:负责创建CRD对象,指定相关参数,包括ceph镜像、元数据持久化位置、磁盘位置、dashboard等等…
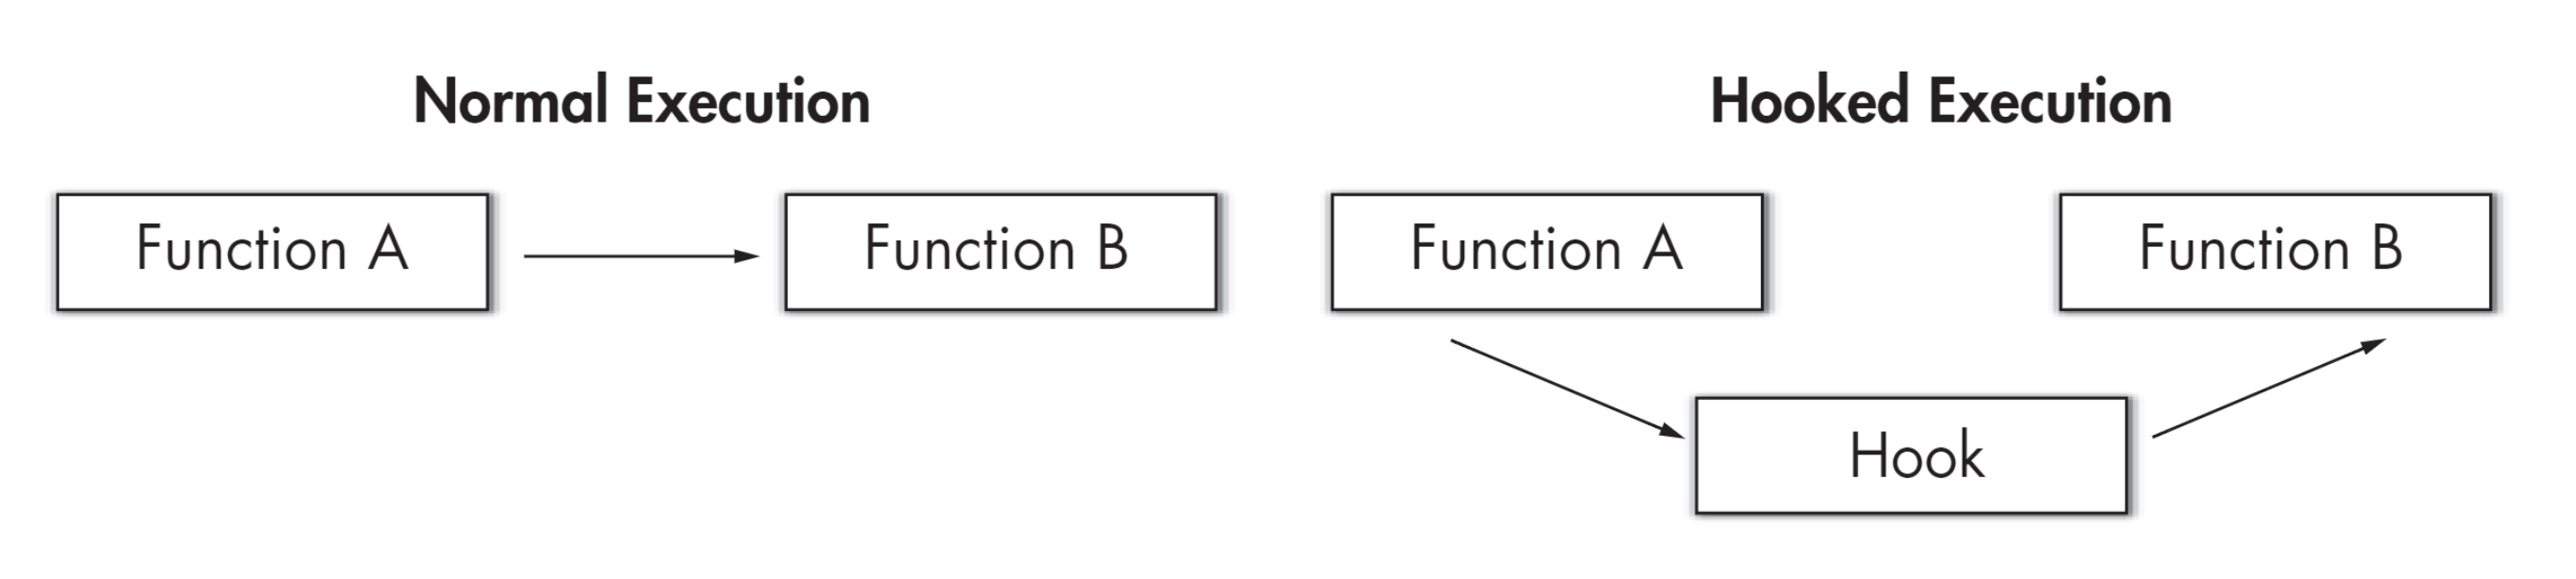
下图是Rook的体系结构图,Operator启动之后,首先创建Agent和Discover容器,负责监视和管理各个节点上存储资源。然后创建Cluster,Cluster是创建Operator时定义的CRD。Operator根据Cluster的配置信息启动Ceph的相关容器。存储集群启动之后,使用kubernetes元语创建PVC为应用容器所用。

2、部署
2.1、环境说明
[root@master-0 ~]# kubectl get nodes -o wide
NAME       STATUS   ROLES    AGE   VERSION   INTERNAL-IP   EXTERNAL-IP   OS-IMAGE                KERNEL-VERSION          CONTAINER-RUNTIME
master-0   Ready    master   24m   v1.13.0   172.16.7.11   <none>        CentOS Linux 7 (Core)   3.10.0-862.el7.x86_64   docker://18.9.2
worker-0   Ready    worker   23m   v1.13.0   172.16.7.12   <none>        CentOS Linux 7 (Core)   3.10.0-862.el7.x86_64   docker://18.9.2
worker-1   Ready    worker   23m   v1.13.0   172.16.7.13   <none>        CentOS Linux 7 (Core)   3.10.0-862.el7.x86_64   docker://18.9.2[root@master-0 ~]# lsblk
NAME            MAJ:MIN RM  SIZE RO TYPE MOUNTPOINT
sda               8:0    0   20G  0 disk
├─sda1            8:1    0    1G  0 part /boot
└─sda2            8:2    0   19G  0 part ├─centos-root 253:0    0   17G  0 lvm  /└─centos-swap 253:1    0    2G  0 lvm
sdb               8:16   0   20G  0 disk
sr0              11:0    1 1024M  0 rom
每个节点两块磁盘,第二块sdb用来做ceph的数据盘
2.2、部署Operator
[root@master-0 ~]# kubectl apply -f https://raw.githubusercontent.com/rook/rook/master/cluster/examples/kubernetes/ceph/operator.yaml[root@master-0 ~]# kubectl get pods --all-namespaces
NAMESPACE          NAME                                                   READY   STATUS    RESTARTS   AGE
<snip>
rook-ceph-system   rook-ceph-agent-4tf9h                                  1/1     Running     0          17m
rook-ceph-system   rook-ceph-agent-4zg9t                                  1/1     Running     0          17m
rook-ceph-system   rook-ceph-agent-r82n7                                  1/1     Running     0          17m
rook-ceph-system   rook-ceph-operator-b996864dd-zbn29                     1/1     Running     0          18m
rook-ceph-system   rook-discover-88zkc                                    1/1     Running     0          17m
rook-ceph-system   rook-discover-ffsns                                    1/1     Running     0          17m
rook-ceph-system   rook-discover-wt942                                    1/1     Running     0          17m[root@master-0 ~]# kubectl get ds --all-namespaces
NAMESPACE          NAME                             DESIRED   CURRENT   READY   UP-TO-DATE   AVAILABLE   NODE SELECTOR                     AGE
<snip>
rook-ceph-system   rook-ceph-agent                  3         3         3       3            3           <none>                            17m
rook-ceph-system   rook-discover                    3         3         3       3            3           <none>                            17m
需要重点关注的是deployment:rook-ceph-operator,rook-ceph-operator启动之后会以DS启动Agent和Discover
2.3、部署Cluster
### 设置label,标记哪些节点用来部署哪些应用 ###
[root@master-0 ~]# kubectl label node master-0 role=storage-node
node/master-0 labeled
[root@master-0 ~]# kubectl label node worker-0 role=storage-node
node/worker-0 labeled
[root@master-0 ~]# kubectl label node worker-1 role=storage-node
node/worker-1 labeled
[root@master-0 ~]# kubectl get nodes -L role
NAME       STATUS   ROLES    AGE   VERSION   ROLE
master-0   Ready    master   26m   v1.13.0   storage-node
worker-0   Ready    worker   25m   v1.13.0   storage-node
worker-1   Ready    worker   25m   v1.13.0   storage-node
这里仅设置一个label,ceph的mon、ose、mgr都运行在这个label对应的节点上,当然也可以分别设置~
### cluster.yml ###
apiVersion: v1
kind: Namespace
metadata:name: rook-ceph
---
apiVersion: v1
kind: ServiceAccount
metadata:name: rook-ceph-osdnamespace: rook-ceph
---
apiVersion: v1
kind: ServiceAccount
metadata:name: rook-ceph-mgrnamespace: rook-ceph
---
kind: Role
apiVersion: rbac.authorization.k8s.io/v1beta1
metadata:name: rook-ceph-osdnamespace: rook-ceph
rules:
- apiGroups: [""]resources: ["configmaps"]verbs: [ "get", "list", "watch", "create", "update", "delete" ]
---
# Aspects of ceph-mgr that require access to the system namespace
kind: Role
apiVersion: rbac.authorization.k8s.io/v1beta1
metadata:name: rook-ceph-mgr-systemnamespace: rook-ceph
rules:
- apiGroups:- ""resources:- configmapsverbs:- get- list- watch
---
# Aspects of ceph-mgr that operate within the cluster's namespace
kind: Role
apiVersion: rbac.authorization.k8s.io/v1beta1
metadata:name: rook-ceph-mgrnamespace: rook-ceph
rules:
- apiGroups:- ""resources:- pods- servicesverbs:- get- list- watch
- apiGroups:- batchresources:- jobsverbs:- get- list- watch- create- update- delete
- apiGroups:- ceph.rook.ioresources:- "*"verbs:- "*"
---
# Allow the operator to create resources in this cluster's namespace
kind: RoleBinding
apiVersion: rbac.authorization.k8s.io/v1beta1
metadata:name: rook-ceph-cluster-mgmtnamespace: rook-ceph
roleRef:apiGroup: rbac.authorization.k8s.iokind: ClusterRolename: rook-ceph-cluster-mgmt
subjects:
- kind: ServiceAccountname: rook-ceph-systemnamespace: rook-ceph-system
---
# Allow the osd pods in this namespace to work with configmaps
kind: RoleBinding
apiVersion: rbac.authorization.k8s.io/v1beta1
metadata:name: rook-ceph-osdnamespace: rook-ceph
roleRef:apiGroup: rbac.authorization.k8s.iokind: Rolename: rook-ceph-osd
subjects:
- kind: ServiceAccountname: rook-ceph-osdnamespace: rook-ceph
---
# Allow the ceph mgr to access the cluster-specific resources necessary for the mgr modules
kind: RoleBinding
apiVersion: rbac.authorization.k8s.io/v1beta1
metadata:name: rook-ceph-mgrnamespace: rook-ceph
roleRef:apiGroup: rbac.authorization.k8s.iokind: Rolename: rook-ceph-mgr
subjects:
- kind: ServiceAccountname: rook-ceph-mgrnamespace: rook-ceph
---
# Allow the ceph mgr to access the rook system resources necessary for the mgr modules
kind: RoleBinding
apiVersion: rbac.authorization.k8s.io/v1beta1
metadata:name: rook-ceph-mgr-systemnamespace: rook-ceph-system
roleRef:apiGroup: rbac.authorization.k8s.iokind: Rolename: rook-ceph-mgr-system
subjects:
- kind: ServiceAccountname: rook-ceph-mgrnamespace: rook-ceph
---
# Allow the ceph mgr to access cluster-wide resources necessary for the mgr modules
kind: RoleBinding
apiVersion: rbac.authorization.k8s.io/v1beta1
metadata:name: rook-ceph-mgr-clusternamespace: rook-ceph
roleRef:apiGroup: rbac.authorization.k8s.iokind: ClusterRolename: rook-ceph-mgr-cluster
subjects:
- kind: ServiceAccountname: rook-ceph-mgrnamespace: rook-ceph
---
apiVersion: ceph.rook.io/v1
kind: CephCluster
metadata:name: rook-cephnamespace: rook-ceph
spec:cephVersion:# The container image used to launch the Ceph daemon pods (mon, mgr, osd, mds, rgw).# v12 is luminous, v13 is mimic, and v14 is nautilus.# RECOMMENDATION: In production, use a specific version tag instead of the general v13 flag, which pulls the latest release and could result in different# versions running within the cluster. See tags available at https://hub.docker.com/r/ceph/ceph/tags/.image: 192.168.101.88:5000/ceph/ceph:v13.1 # Whether to allow unsupported versions of Ceph. Currently only luminous and mimic are supported.# After nautilus is released, Rook will be updated to support nautilus.# Do not set to true in production.allowUnsupported: false# The path on the host where configuration files will be persisted. If not specified, a kubernetes emptyDir will be created (not recommended).# Important: if you reinstall the cluster, make sure you delete this directory from each host or else the mons will fail to start on the new cluster.# In Minikube, the '/data' directory is configured to persist across reboots. Use "/data/rook" in Minikube environment.dataDirHostPath: /var/lib/rook# set the amount of mons to be startedmon:count: 3allowMultiplePerNode: true# enable the ceph dashboard for viewing cluster statusdashboard:enabled: true# serve the dashboard under a subpath (useful when you are accessing the dashboard via a reverse proxy)# urlPrefix: /ceph-dashboard# serve the dashboard at the given port.# port: 8443# serve the dashboard using SSL# ssl: truenetwork:# toggle to use hostNetworkhostNetwork: falserbdMirroring:# The number of daemons that will perform the rbd mirroring.# rbd mirroring must be configured with "rbd mirror" from the rook toolbox.workers: 0# To control where various services will be scheduled by kubernetes, use the placement configuration sections below.# The example under 'all' would have all services scheduled on kubernetes nodes labeled with 'role=storage-node' and# tolerate taints with a key of 'storage-node'.placement:all:nodeAffinity:requiredDuringSchedulingIgnoredDuringExecution:nodeSelectorTerms:- matchExpressions:- key: roleoperator: Invalues:- storage-node
#      podAffinity:
#      podAntiAffinity:tolerations:- key: node-role.kubernetes.io/masteroperator: Existseffect: NoSchedule
# The above placement information can also be specified for mon, osd, and mgr components
#    mon:
#    osd:
#    mgr:resources:
# The requests and limits set here, allow the mgr pod to use half of one CPU core and 1 gigabyte of memory
#    mgr:
#      limits:
#        cpu: "500m"
#        memory: "1024Mi"
#      requests:
#        cpu: "500m"
#        memory: "1024Mi"
# The above example requests/limits can also be added to the mon and osd components
#    mon:
#    osd:storage: # cluster level storage configuration and selectionuseAllNodes: falseuseAllDevices: falsedeviceFilter:location:config:# The default and recommended storeType is dynamically set to bluestore for devices and filestore for directories.# Set the storeType explicitly only if it is required not to use the default.# storeType: bluestoredatabaseSizeMB: "1024" # this value can be removed for environments with normal sized disks (100 GB or larger)# journalSizeMB: "1024"  # this value can be removed for environments with normal sized disks (20 GB or larger)osdsPerDevice: "1" # this value can be overridden at the node or device level
# Cluster level list of directories to use for storage. These values will be set for all nodes that have no `directories` set.
#    directories:
#    - path: /rook/storage-dir
# Individual nodes and their config can be specified as well, but 'useAllNodes' above must be set to false. Then, only the named
# nodes below will be used as storage resources.  Each node's 'name' field should match their 'kubernetes.io/hostname' label.nodes:- name: "master-0"devices:- name: "sdb"- name: "worker-0"devices:- name: "sdb"- name: "worker-1"devices:- name: "sdb"
#    - name: "172.17.4.101"
#      directories: # specific directories to use for storage can be specified for each node
#      - path: "/rook/storage-dir"
#      resources:
#        limits:
#          cpu: "500m"
#          memory: "1024Mi"
#        requests:
#          cpu: "500m"
#          memory: "1024Mi"
#    - name: "172.17.4.201"
#      devices: # specific devices to use for storage can be specified for each node
#      - name: "sdb"
#      - name: "nvme01" # multiple osds can be created on high performance devices
#        config:
#          osdsPerDevice: "5"
#      config: # configuration can be specified at the node level which overrides the cluster level config
#        storeType: filestore
#    - name: "172.17.4.301"
#      deviceFilter: "^sd."
CephCluster中需要重点注意啊的几个地方:
- spec.dataDirHostPath:存放rook元数据,确保在服务器重启后能正常运行,重新部署时 需要手动删除遗留文件
- spec.storage.useAllNodes:是否根据配置将所有节点用于存储,如果指定了nodes,该值必须设置为false
- spec.storage.config:根据实际磁盘大小,可以删除config下的某些配置
- spec.storage.nodes:分别设置各个节点的存储路径,可以说磁盘或者目录
[root@master-0 ~]# kubectl apply -f cluster.yml
namespace/rook-ceph created
serviceaccount/rook-ceph-osd created
serviceaccount/rook-ceph-mgr created
role.rbac.authorization.k8s.io/rook-ceph-osd created
clusterrole.rbac.authorization.k8s.io/rook-ceph-mgr-system created
role.rbac.authorization.k8s.io/rook-ceph-mgr created
rolebinding.rbac.authorization.k8s.io/rook-ceph-cluster-mgmt created
rolebinding.rbac.authorization.k8s.io/rook-ceph-osd created
rolebinding.rbac.authorization.k8s.io/rook-ceph-mgr created
rolebinding.rbac.authorization.k8s.io/rook-ceph-mgr-system created
clusterrolebinding.rbac.authorization.k8s.io/rook-ceph-mgr-cluster created
cephcluster.ceph.rook.io/rook-ceph created[root@master-0 ~]# kubectl get pods --all-namespaces
<snip>
rook-ceph-system   rook-ceph-agent-4tf9h                                  1/1     Running     0          19m
rook-ceph-system   rook-ceph-agent-4zg9t                                  1/1     Running     0          19m
rook-ceph-system   rook-ceph-agent-r82n7                                  1/1     Running     0          19m
rook-ceph-system   rook-ceph-operator-b996864dd-zbn29                     1/1     Running     0          20m
rook-ceph-system   rook-discover-88zkc                                    1/1     Running     0          19m
rook-ceph-system   rook-discover-ffsns                                    1/1     Running     0          19m
rook-ceph-system   rook-discover-wt942                                    1/1     Running     0          19m
rook-ceph          rook-ceph-mgr-a-7b9667498-j4bdx                        1/1     Running     0          16m
rook-ceph          rook-ceph-mon-a-749779c884-bqm9b                       1/1     Running     0          17m
rook-ceph          rook-ceph-mon-b-b97f6cbdb-hmrln                        1/1     Running     0          17m
rook-ceph          rook-ceph-mon-c-67d7dcc89f-pcjpn                       1/1     Running     0          16m
rook-ceph          rook-ceph-osd-0-86dff67f75-mvjkc                       1/1     Running     0          15m
rook-ceph          rook-ceph-osd-1-6cdd46dcdc-p62zq                       1/1     Running     0          15m
rook-ceph          rook-ceph-osd-2-c7b97f7bf-65r6d                        1/1     Running     0          15m
rook-ceph          rook-ceph-osd-prepare-master-0-vvp6c                   0/2     Completed   0          16m
rook-ceph          rook-ceph-osd-prepare-worker-0-spfbn                   0/2     Completed   0          16m
rook-ceph          rook-ceph-osd-prepare-worker-1-blmsz                   0/2     Completed   0          16m
这一步如果有问题,可以查看operator的日志~
### rook会自动将磁盘分区 ###
[root@master-0 ~]# lsblk
NAME            MAJ:MIN RM  SIZE RO TYPE MOUNTPOINT
sda               8:0    0   20G  0 disk
├─sda1            8:1    0    1G  0 part /boot
└─sda2            8:2    0   19G  0 part ├─centos-root 253:0    0   17G  0 lvm  /└─centos-swap 253:1    0    2G  0 lvm
sdb               8:16   0   20G  0 disk
├─sdb1            8:17   0  576M  0 part
├─sdb2            8:18   0    1G  0 part
└─sdb3            8:19   0 18.4G  0 part
sr0              11:0    1 1024M  0 rom
- 给rook使用的sdb实现不要自己分区,rook会自行分区
- 从事例配置来看,除了device外,rook还可以配置directory做存储,这里就先不尝试了~
3、测试
3.1、访问dashboard
[root@master-0 ~]# kubectl get svc --all-namespaces
NAMESPACE       NAME                                     TYPE        CLUSTER-IP       EXTERNAL-IP   PORT(S)          AGE
<snip>
rook-ceph       rook-ceph-mgr                            ClusterIP   10.100.35.42     <none>        9283/TCP         19m
rook-ceph       rook-ceph-mgr-dashboard                  NodePort    10.109.82.52     <none>        8443/TCP   19m
rook-ceph       rook-ceph-mon-a                          ClusterIP   10.107.76.183    <none>        6789/TCP         20m
rook-ceph       rook-ceph-mon-b                          ClusterIP   10.99.3.203      <none>        6789/TCP         20m
rook-ceph       rook-ceph-mon-c                          ClusterIP   10.97.73.46      <none>        6789/TCP         19m
### 修改dashboard的访问方式为NodePort ###
[root@master-0 ~]# kubectl edit svc -n rook-ceph rook-ceph-mgr-dashboard
[root@master-0 ~]# kubectl get svc -n rook-ceph rook-ceph-mgr-dashboard
NAME                      TYPE       CLUSTER-IP     EXTERNAL-IP   PORT(S)          AGE
rook-ceph-mgr-dashboard   NodePort   10.109.82.52   <none>        8443:30372/TCP   20m### 获得dashboard的登录密码,用户为admin ###
[root@master-0 ~]# kubectl get secrets -n rook-ceph rook-ceph-dashboard-password -o jsonpath='{.data.password}' | base64 -d
eXnScTg7nm
浏览器登录:https://172.16.7.11:30372


3.2、创建CephBlockPool和StorageClass
### 块存 ###
apiVersion: ceph.rook.io/v1
kind: CephBlockPool
metadata:name: replicapoolnamespace: rook-ceph
spec:failureDomain: hostreplicated:size: 3### sc ###
apiVersion: storage.k8s.io/v1
kind: StorageClass
metadata:name: rook-ceph-block
provisioner: ceph.rook.io/block
parameters:blockPool: replicapool# The value of "clusterNamespace" MUST be the same as the one in which your rook cluster existclusterNamespace: rook-ceph# Specify the filesystem type of the volume. If not specified, it will use `ext4`.fstype: xfs
# Optional, default reclaimPolicy is "Delete". Other options are: "Retain", "Recycle" as documented in https://kubernetes.io/docs/concepts/storage/storage-classes/
reclaimPolicy: Retain
### 使用busybox测试 ###
---
kind: PersistentVolumeClaim
apiVersion: v1
metadata:name: ceph-block-volume
spec:accessModes:- ReadWriteOnceresources:requests:storage: 1GistorageClassName: rook-ceph-block
---
apiVersion: apps/v1
kind: Deployment
metadata:labels:app: busyboxname: busybox
spec:replicas: 1selector:matchLabels:app: busyboxtemplate:metadata:labels:app: busyboxspec:containers:- name: busyboximage: busyboxcommand: ["sh", "-c", "sleep 3600"]volumeMounts:- name: volumemountPath: /volumevolumes:- name: volumepersistentVolumeClaim:claimName: ceph-block-volume
[root@master-0 ~]# kubectl get pvc
NAME                STATUS   VOLUME                                     CAPACITY   ACCESS MODES   STORAGECLASS      AGE
ceph-block-volume   Bound    pvc-066408f1-5059-11e9-95ad-005056260373   1Gi        RWO            rook-ceph-block   23s
[root@master-0 ~]# kubectl get pods
NAME                      READY   STATUS    RESTARTS   AGE
busybox-578db44c4-vwszl   1/1     Running   0          25s
[root@master-0 ~]# kubectl exec -ti busybox-578db44c4-vwszl sh
/ # df -h
Filesystem                Size      Used Available Use% Mounted on
overlay                  17.0G      4.3G     12.6G  26% /
tmpfs                    64.0M         0     64.0M   0% /dev
tmpfs                     1.8G         0      1.8G   0% /sys/fs/cgroup
/dev/rbd0              1014.0M     32.3M    981.7M   3% /volume
<snip>
3.3、文件存储和对象存储
文件存储和对象存储和上面类型,先创建CRD对象,然后使用。但是文件系统目前还不支持使用StorageClass,当使用RWX时,不太好用,后面考虑使用 ganesha 导出NFS服务实现RWX功能。
4、参考
https://rook.io/docs/rook/v0.9/