后续拓展:要点初见:安装教程与二度拓展——基于SUMO的Flow Project(附代码链接)
通俗来讲,微观交通模型仿真就是从车辆个体的视角(看动画)进行交通流仿真,对车辆个体随时间、空间的变化进行跟踪描述。常用的微观交通仿真方法包括在Matlab中建立元胞自动机模型、在Vissim中画车道调参数。但前者存在仿真系统太简易粗糙,不足以体现复杂的交通影响因素;后者又存在太依赖GUI界面,COM接口编程只支持高版本正版(这东西贼难搞)、C++编程,只能获得车辆通过设定的检测点的时空坐标而非各个时刻各车辆的坐标,让后续能进行的坐标分析操作变得很局限。
但就博主在Github上寻找(现成的)微观交通模型元胞自动机代码找到快要绝望的时候,Flow Project冒了出来,这是一个由加州大学伯克利分校的移动传感实验室使用亚马逊AWS机器学习研究基金,基于SUMO开发出的用于交通微观模拟的深度强化学习和控制实验的计算框架,不仅开源,开发语言还是当下火热的Python,依赖的操作系统还是Ubuntu。博主仔细研读了一下项目源码、Document,真是相见恨晚,让人忍不住想说:
Talk is cheap,show me the code. 先放链接:
Flow Project的Github链接(或在Github中搜“Flow SUMO”)是:https://github.com/flow-project/flow
Flow Project的官网链接是:https://flow-project.github.io/
Flow Project的Document链接是:https://flow.readthedocs.io/en/latest/flow_setup.html#installing-flow-and-sumo
对Flow Project有任何疑惑可以在StackOverflow的专题链接中提问(带上flow-project的标签,回的贼快):https://stackoverflow.com/questions/tagged/flow-project
本博文主要从对Flow Project的介绍、Flow Project的安装、用Python运行模型输出坐标三个部分进行介绍,附加博主改源码增加改变车身长度功能的方法介绍。
1 Flow Project的介绍
Flow Project是基于开源框架SUMO的二次开发项目(其也可基于收费软件Aimsun、强化学习库RLlib,此文中暂不介绍),SUMO的全称Simulation of Urban Mobility,是一款欧洲开源的微观交通仿真框架,但开源的另一面也意味着放养、不更新……所以单论SUMO相比于Vissim不仅功能少而且还难用。
SUMO有个知名(难用)的Python接口TraCI(Traffic Control Interface),这个久远的接口博主至今也还没研究懂,但从源码中可以看出Flow Project的开发者们恰恰是利用这个接口,对SUMO进行了二次封装,从而让我们能通过短短几十行可读性强的Python代码创建出功能齐全的微观异质交通流仿真模型。Flow Project的核心在于完美接入强化学习,但Flow Project在仿真有人车辆上也完全绰绰有余,还能加入强化学习的自动驾驶车辆,可拓展性非常强,博主未来也会继续研究该项目。
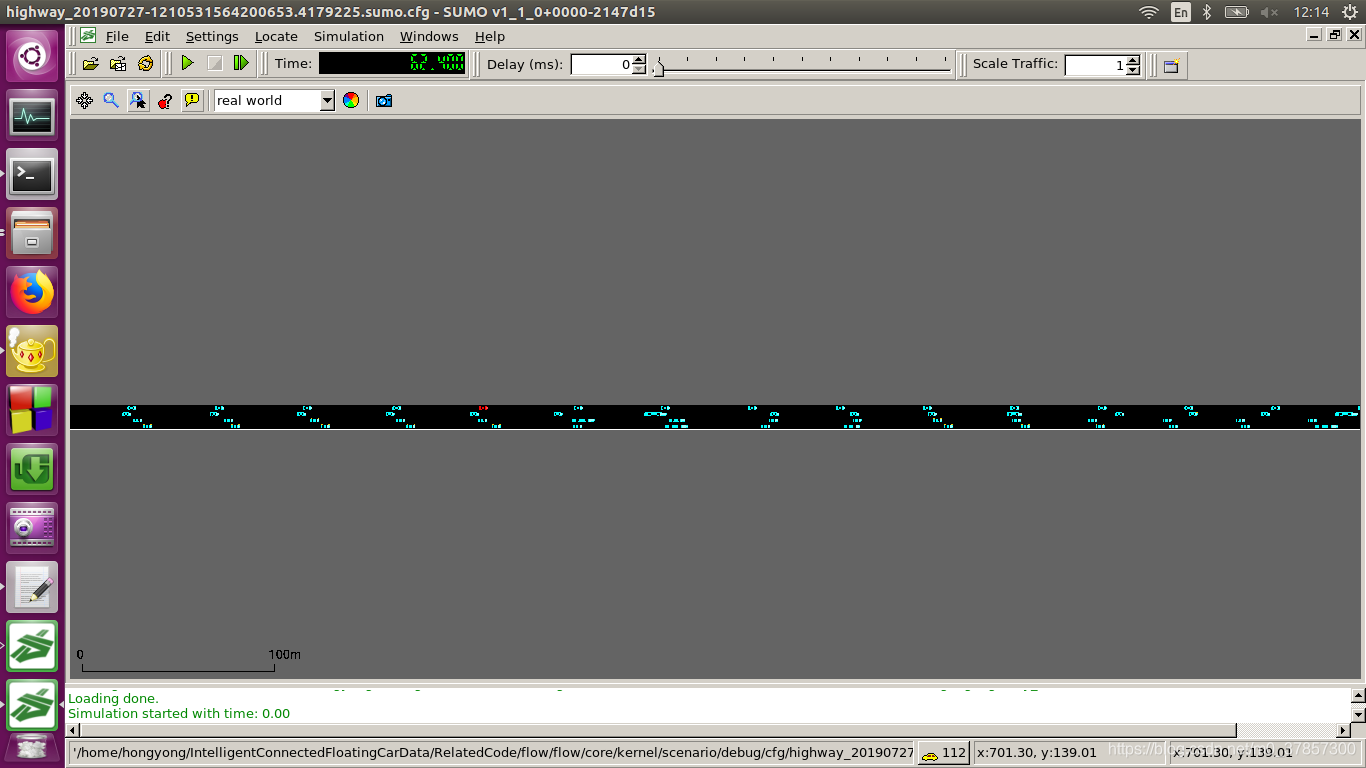
在Ubuntu系统中运行Flow Project,仿真界面大概如下:
2 Flow Project的安装
Flow Project的安装方法主要参考官方Document:https://flow.readthedocs.io/en/latest/flow_setup.html#testing-your-installation,简单说就是在Terminal中:
(1)下载Flow Project项目:
git clone https://github.com/flow-project/flow.git
cd flow
(2)安装anaconda2(参考anaconda官网https://www.anaconda.com/),之后在flow目录下创建专属运行环境并安装依赖:
conda env create -f environment.yml
source activate flow
(3)安装Flow Project和SUMO:
pip install -e .
./scripts/setup_sumo_ubuntu1404.sh(对于Ubuntu 14.04)
./scripts/setup_sumo_ubuntu1604.sh(对于Ubuntu 16.04)
./scripts/setup_sumo_ubuntu1804.sh(对于Ubuntu 18.04)
./scripts/setup_sumo_osx.sh(对于Mac)
检查SUMO是否安装成功:
which sumo
sumo --version
启动SUMO图形界面:
sumo-gui
如果系统显示未找到相关命令,则运行source ~/.bashrc或打开一个新的Terminal来更新环境变量。
(4)检查flow是否安装成功:
source activate flow
python examples/sumo/sugiyama.py
这步大概率是不成功的,或是在重启后再运行不成功,会发生没法激活flow的问题亦或Python版本导致的报错,因为博主系统默认的python版本是/usr/bin下的Python2.7,但Flow Project又是依赖anaconda目录下的python3.5,而随便改系统的环境变量又容易把很多框架的依赖弄崩。博主找到的解决方法是:在每次开机第一次运行Flow Project的脚本前运行如下三句话(第三行的UBUNTU改成你的home目录名):
export PATH=/usr/local/anaconda2/bin:$PATH
source activate flow
export PYTHONPATH="/home/UBUNTU/.conda/envs/flow/lib/python3.5/site-packages:$PYTHONPATH"
这之后在flow目录下的Terminal中输入python examples/sumo/sugiyama.py或examples/sumo/下的其他脚本即可成功运行仿真,这也意味着你的flow安装好了,欢迎来到用Python进行交通流仿真的时代~
3 用Python运行模型、输出坐标
从官方新手教程中可以看到,仿真的核心在于examples/sumo/目录下的脚本,笔者就以该目录下的单向N车道高速公路仿真创建脚本highway.py的更改、拓展为例,介绍如何用Python运行仿真并输出各时刻各车辆在道路上的坐标。
Flow Project中的道路形态有限,新道路的创建应该是基于SUMO底层进行定制,还有待未来研究。就在官方给出的几种道路形态中,N车道高速公路是较简单的一个模型,原脚本的运行效果如上文中仿真图像介绍部分。但博主因为论文研究需要,对该脚本进行了爆改:
(1)改源码增加改变车身长度的功能
Flow Project的Python脚本里不能直接改变每辆输入车辆的车身长度,需要更改源码。参考博主在StackOverflow中提出的相关问题https://stackoverflow.com/questions/56891526/how-to-change-sizes-of-vehicle-in-flow-simulation,需要更改flow/flow/core目录下的params.py中的class VehicleParams中的def add()函数,增加加粗的这几行:
def add(self,
veh_id,
length=5,
acceleration_controller=(SimCarFollowingController, {}),
lane_change_controller=(SimLaneChangeController, {}),
routing_controller=None,
initial_speed=0,
num_vehicles=1,
car_following_params=None,
lane_change_params=None):
"""Add a sequence of vehicles to the list of vehicles in the network.
Parameters
----------
veh_id : str
base vehicle ID for the vehicles (will be appended by a number)
acceleration_controller : tup, optional
1st element: flow-specified acceleration controller
2nd element: controller parameters (may be set to None to maintain
default parameters)
lane_change_controller : tup, optional
1st element: flow-specified lane-changer controller
2nd element: controller parameters (may be set to None to maintain
default parameters)
routing_controller : tup, optional
1st element: flow-specified routing controller
2nd element: controller parameters (may be set to None to maintain
default parameters)
initial_speed : float, optional
initial speed of the vehicles being added (in m/s)
num_vehicles : int, optional
number of vehicles of this type to be added to the network
car_following_params : flow.core.params.SumoCarFollowingParams
Params object specifying attributes for Sumo car following model.
lane_change_params : flow.core.params.SumoLaneChangeParams
Params object specifying attributes for Sumo lane changing model.
"""
if car_following_params is None:
# FIXME: depends on simulator
car_following_params = SumoCarFollowingParams()
if lane_change_params is None:
# FIXME: depends on simulator
lane_change_params = SumoLaneChangeParams()
type_params = {}
type_params.update(car_following_params.controller_params)
type_params.update(lane_change_params.controller_params)
# If a vehicle is not sumo or RL, let the minGap be zero so that it
# does not tamper with the dynamics of the controller
if acceleration_controller[0] != SimCarFollowingController \
and acceleration_controller[0] != RLController:
type_params["minGap"] = 0.0
type_params['length'] = length
# This dict will be used when trying to introduce new vehicles into
# the network via a Flow. It is passed to the vehicle kernel object
# during environment instantiation.
self.type_parameters[veh_id] = \
{"length": length,
"acceleration_controller": acceleration_controller,
"lane_change_controller": lane_change_controller,
"routing_controller": routing_controller,
"initial_speed": initial_speed,
"car_following_params": car_following_params,
"lane_change_params": lane_change_params}
# TODO: delete?
self.initial.append({
"veh_id":
veh_id,
"length":
length,
"acceleration_controller":
acceleration_controller,
"lane_change_controller":
lane_change_controller,
"routing_controller":
routing_controller,
"initial_speed":
initial_speed,
"num_vehicles":
num_vehicles,
"car_following_params":
car_following_params,
"lane_change_params":
lane_change_params
})
# This is used to return the actual headways from the vehicles class.
# It is passed to the vehicle kernel class during environment
# instantiation.
self.minGap[veh_id] = type_params["minGap"]
for i in range(num_vehicles):
v_id = veh_id + '_%d' % i
# add the vehicle to the list of vehicle ids
self.ids.append(v_id)
self.__vehicles[v_id] = dict()
# specify the type
self.__vehicles[v_id]["type"] = veh_id
# update the number of vehicles
self.num_vehicles += 1
if acceleration_controller[0] == RLController:
self.num_rl_vehicles += 1
# increase the number of unique types of vehicles in the network, and
# add the type to the list of types
self.num_types += 1
self.types.append({"veh_id": veh_id, "type_params": type_params})
这样就可以在Python文件中改变输入车辆的长度了。
(2)让我们来更改Python脚本吧:
先看一下highway.py改后的全貌:
"""Example of an open multi-lane network with human-driven vehicles."""from flow.controllers import IDMController, SimLaneChangeController, ContinuousRouter, RLController
from flow.core.experiment import Experiment
from flow.core.params import SumoParams, EnvParams, \NetParams, InitialConfig, InFlows, SumoLaneChangeParams, SumoCarFollowingParams
from flow.core.params import VehicleParams
from flow.envs.loop.lane_changing import LaneChangeAccelEnv, \ADDITIONAL_ENV_PARAMS
from flow.scenarios.highway import HighwayScenario, ADDITIONAL_NET_PARAMS#from flow.core.params import SimParamsdef highway_example(render=None):"""Perform a simulation of vehicles on a highway.Parameters----------render : bool, optionalspecifies whether to use the gui during executionReturns-------exp: flow.core.experiment.ExperimentA non-rl experiment demonstrating the performance of human-drivenvehicles on a figure eight."""sim_params = SumoParams(restart_instance=True, sim_step=0.1, emission_path="./data/",render=True, sight_radius=30, pxpm=3, show_radius=True)if render is not None:sim_params.render = rendervehicles = VehicleParams()vehicles.add(veh_id="rlcar",# Lincoln MKC 4552*1864*1654length = 4.552,acceleration_controller=(RLController, {}),car_following_params=SumoCarFollowingParams(speed_mode="obey_safe_speed",),initial_speed=0,num_vehicles=1)vehicles.add(veh_id="humancar",# Volkswagen LAVIDA 4670*1806*1474 max:120km/hlength = 4.67,#v0 : desirable velocity, in m/s (default: 30) in flow/flow/controllers/car_following_models.py 352acceleration_controller=(IDMController,{'v0':32}),# 115km/hlane_change_controller=(SimLaneChangeController, {}),lane_change_params=SumoLaneChangeParams(lane_change_mode="strategic",# Human cars make lane changes in accordance with SUMO to provide speed boosts),num_vehicles=1)vehicles.add(veh_id="humanbus_lane2",# YUTONG ZK6826BEV 8245*2500*3240 max:100km/hlength = 8.245,acceleration_controller=(IDMController, {'v0':26.4}),# 95km/h#lane_change_controller=(SimLaneChangeController, {}),#lane_change_params=SumoLaneChangeParams(#    lane_change_mode="strategic",# Human cars make lane changes in accordance with SUMO to provide speed boosts#),num_vehicles=1)vehicles.add(veh_id="humanbus_lane1",# YUTONG ZK6826BEV 8245*2500*3240 max:100km/hlength = 8.245,acceleration_controller=(IDMController, {'v0':26.4}),# 95km/hnum_vehicles=1)vehicles.add(veh_id="humanbus_lane0",# YUTONG ZK6826BEV 8245*2500*3240 max:100km/hlength = 8.245,acceleration_controller=(IDMController, {'v0':26.4}),# 95km/hnum_vehicles=1)vehicles.add(veh_id="humantruck_lane2",# FOTON BJ5319XXY-AB 12000*2550*3950 max:100km/hlength = 12,acceleration_controller=(IDMController, {'v0':25}),# 90km/h#lane_change_controller=(SimLaneChangeController, {}),#lane_change_params=SumoLaneChangeParams(#    lane_change_mode="strategic",# Human cars make lane changes in accordance with SUMO to provide speed boosts#),num_vehicles=1)vehicles.add(veh_id="humantruck_lane1",# FOTON BJ5319XXY-AB 12000*2550*3950 max:100km/hlength = 12,acceleration_controller=(IDMController, {'v0':25}),# 90km/hnum_vehicles=1)vehicles.add(veh_id="humantruck_lane0",# FOTON BJ5319XXY-AB 12000*2550*3950 max:100km/hlength = 12,acceleration_controller=(IDMController, {'v0':25}),# 90km/hnum_vehicles=1)env_params = EnvParams(additional_params=ADDITIONAL_ENV_PARAMS)inflow = InFlows()inflow.add(veh_type="rlcar",edge="highway_0",#probability=0.025,# 0.25 probability for emitting a vehicle each second (not together with vehsPerHour or period)vehs_per_hour=250,departLane=3,# the index of the lane, starting with rightmost=0departSpeed=30)inflow.add(veh_type="humancar",edge="highway_0",#probability=0.85,# 0.25 probability for emitting a vehicle each second (not together with vehsPerHour or period)vehs_per_hour=15000,departLane="random",#free random allowed best firstdepartSpeed=30)inflow.add(veh_type="humanbus_lane2",edge="highway_0",#probability=0.1,vehs_per_hour=486,departLane=2,departSpeed=26.4)inflow.add(veh_type="humanbus_lane1",edge="highway_0",#probability=0.1,vehs_per_hour=486,departLane=1,departSpeed=26.4)inflow.add(veh_type="humanbus_lane0",edge="highway_0",#probability=0.1,vehs_per_hour=486,departLane=0,departSpeed=26.4)inflow.add(veh_type="humantruck_lane2",edge="highway_0",#probability=0.05,vehs_per_hour=486,departLane=2,departSpeed=25)inflow.add(veh_type="humantruck_lane1",edge="highway_0",#probability=0.05,vehs_per_hour=486,departLane=1,departSpeed=25)inflow.add(veh_type="humantruck_lane0",edge="highway_0",#probability=0.05,vehs_per_hour=486,departLane=0,departSpeed=25)initial_config = InitialConfig(spacing="uniform", shuffle=True)# initial position in roadscenario = HighwayScenario(#3:110-120 2:90-120 3:90-120 4:60-120 [G1503 2019.5 daily car:180000 bus/truck:70000]name="highway",vehicles=vehicles,net_params=NetParams(inflows=inflow,additional_params={'length': 6000,'lanes': 4,'speed_limit': 33.3,'num_edges': 1}),initial_config=initial_config)env = LaneChangeAccelEnv(env_params, sim_params, scenario)return Experiment(env)if __name__ == "__main__":# import the experiment variableexp = highway_example()# run for a set number of rollouts / time steps#exp.run(1, 1000, convert_to_csv = False)exp.run(1, 5000, convert_to_csv = True)
分解到单步,用Flow Project创建微观交通流主要分为设定全局参数、添加既有车辆、添加输入流、设定道路场景、开始仿真5个步骤:
a.设定全局参数
sim_params = SumoParams(restart_instance=True, sim_step=0.1, emission_path="./data/",render=True, sight_radius=30, pxpm=3, show_radius=True)if render is not None:sim_params.render = render此处restart_instance的作用是避免先前有未关闭的SUMO窗口,设定为True后每次运行脚本时会在点击仿真界面播放键后关闭窗口再重新开一个。
sim_step是记录坐标的间隔时间,此处为0.1s记录一次所有道路上车辆的当前坐标;
emission_path决定了坐标文件的保存位置,运行自然结束后(车辆跑完还会有一段较长的记录时间)会在flow/data/目录下找到一个csv和一个xml文件。
后续的参数是对网络仿真功能生效的参数,会在网络仿真中在每辆车周身显示一圈“探测范围圈”,在此仿真中未涉及,保持上述参数即可。
b.添加既有车辆
vehicles = VehicleParams()vehicles.add(veh_id="rlcar",# Lincoln MKC 4552*1864*1654length = 4.552,acceleration_controller=(RLController, {}),car_following_params=SumoCarFollowingParams(speed_mode="obey_safe_speed",),initial_speed=0,num_vehicles=1)vehicles.add(veh_id="humancar",# Volkswagen LAVIDA 4670*1806*1474 max:120km/hlength = 4.67,#v0 : desirable velocity, in m/s (default: 30) in flow/flow/controllers/car_following_models.py 352acceleration_controller=(IDMController,{'v0':32}),# 115km/hlane_change_controller=(SimLaneChangeController, {}),lane_change_params=SumoLaneChangeParams(lane_change_mode="strategic",# Human cars make lane changes in accordance with SUMO to provide speed boosts),num_vehicles=1)此段的作用是在刚开始仿真时于既有道路上添加车辆,同时此处设定的该种类车辆的长度也会作用于后续添加的flow中。车辆将会以相同的间隔在道路上均匀分布,避免刚开始仿真时道路上无车的情况(让车流充分混合)。
vehicles即为创建的对象,add里的参数veh_id代表车辆的类型,需和后方创建flow时对应车辆的类型名相同,在最后生成的坐标文件中该类型名也是搜索遍历的关键变量。
length是车辆的长度,单位是m。
acceleration_controller是该种车辆的加速控制逻辑,可以选择RL、IDM等加速控制逻辑,并在各加速控制逻辑函数中用字典的形式设置初始车速(单位为m/s)等变量(具体变量详见flow/flow/core目录下的params.py中的VehicleParams源码)。
car_following_params设定了该种车辆的跟车逻辑,其中speed_mode有"right_of_way"(默认)、"obey_safe_speed"、"no_collide"、"aggressive"、"all_checks"几种模式,具体解释同样见flow/flow/core目录下的params.py中的VehicleParams源码。
lane_change_controller设定了该种车辆的换道逻辑,具体的换道参数在lane_change_params中设定,lane_change_mode同样包括"no_lat_collide"(默认)、"strategic"、"aggressive"这几种选择,具体见params.py。
initial_speed设定了这些在道路上的既有车辆的初始速度,和后续在flow中添加的车流的出发速度无关。num_vehicles则是添加既有车辆的数量,因博主的仿真不依赖初始的车辆,故随便设了个1。
因为Flow Project暂时还没有设定各条车道车速上下限的功能,只能同时设定四条车道的最大车速,故博主选择在各条车道上建立不同初速度、期望速度的不同种类车流,在c中将有所体现。
c.添加输入流
inflow = InFlows()inflow.add(veh_type="rlcar",edge="highway_0",#probability=0.025,# 0.25 probability for emitting a vehicle each second (not together with vehsPerHour or period)vehs_per_hour=250,departLane=3,# the index of the lane, starting with rightmost=0departSpeed=30)仿真模型不能只有道上车辆而没有输入,故Inflow()函数就是为在道路上建立输入车流而准备的。
inflow作为创建的对象,add函数中veh_type对应上文中VehicleParams()创建的车流,必须使用上文中创建过的车辆种类。
edge是选择车辆输入的道路端,_0一般是左边,另一边自然就是_1啦。
关于输入车流的车流量,这里存在probability和vehs_per_hour两种方式进行车流量设定。probabilty是一种基于概率的车流生成方式,代表每秒生成车流的概率,最大为1,也只能为1了……所以这种生成方法存在着一个生成上限的问题(然而一秒一辆的路还能开车?)为了解决这种不太自由的限制,Flow Project还借助TraCI给出了vehs_per_hour的参数,就是喜闻乐见的每小时输入车辆数。
departLane则是选择该种车流的初始车道,它有着“free”、“ random”、“ allowed”、“ best”和“first”这几种选择(具体见http://sumo.dlr.de/wiki/Definition_of_Vehicles,_Vehicle_Types,_and_Routes),但这里还可以选择车道数字,譬如四车道就是从左到右0到3,这样这辆车就会不停地在这条车道上生成。
departSpeed是该种车流的出发速度,单位为m/s。
d.设定道路场景
initial_config = InitialConfig(spacing="uniform", shuffle=True)# initial position in roadscenario = HighwayScenario(#3:110-120 2:90-120 3:90-120 4:60-120 [G1503 2019.5 daily car:180000 bus/truck:70000]name="highway",vehicles=vehicles,net_params=NetParams(inflows=inflow,additional_params={'length': 6000,'lanes': 4,'speed_limit': 33.3,'num_edges': 1}),initial_config=initial_config)env = LaneChangeAccelEnv(env_params, sim_params, scenario)这里是Flow Project最强大,也最不自由的地方,通过这么一小段话就能构建出一个系统中既有的复杂场景。emmm……系统中既有之外的不行。
HighwayScenario()可以看出这是专门为单向四车道高速公路场景设立的函数。因为Flow Project本意是用来训练简单场景下的强化学习车辆(复杂场景请考虑GTA等等游戏),因此没有太复杂的车辆网络(官方:有待诸位改源码扩展)。
其中inflow输入先前创建的InFlow()对象即可,length指的是道路长度(单位:m,千万别太长,否则运行后的数据记录会中断),lanes是车道数,可以增减,speed_limit是这整条道路每条车道上车辆不会超过的最大车速(单位:m/s),num_edges指的是道路的端口数(没尝试增加过,或许可以变成双向?)。
e.开始仿真
exp.run(1, 5000, convert_to_csv = True)主函数中的这句话代表着仿真开始,其中1指的是仿真的次数(不是仿真的开始时刻!!),5000指的是仿真的秒数(太长的话数据记录会中断),convert_to_csv指是否把仿真产生的xml文件自动转为csv文件。如果仿真网络一定要大的话,就不要选择自动转换了,会崩而且极其占内存,可以考虑自己写程序将仿真产生的xml文件转成csv(博主没试过……)。
后续博主还会在后续博客中给出对Flow Project产生的csv文件进行处理的Python脚本,关于Flow Project或有什么其他更方便的微观交通流仿真模型代码创建方法,欢迎交流讨论!Flow Project好像比较小众,Github上就300+Stars,加州伯克利他们组是不是快要放弃这个项目了呢……