1.生成模型原理
1)CGAN的原理
传统的GAN或者其他的GAN都是通过一堆的训练数据,最后训练出了G网络,随机输入噪声最后产生的数据是这些训练数据类别中之一,我们提前无法预测是那哪一个?
因此,我们有的时候需要定向指定生成某些数据,比如我们想让G生成飞机,数字9,等等的图片数据。
假设现在要做一个项目:输入一段文字,输出一张图片,要让这张图片足够清晰并且符合这段文字的描述。我们搭建一个传统的NeuralNetwork(下称NN)去训练。
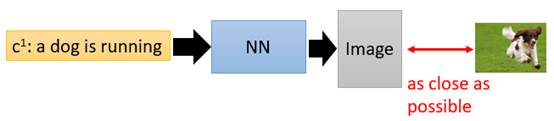
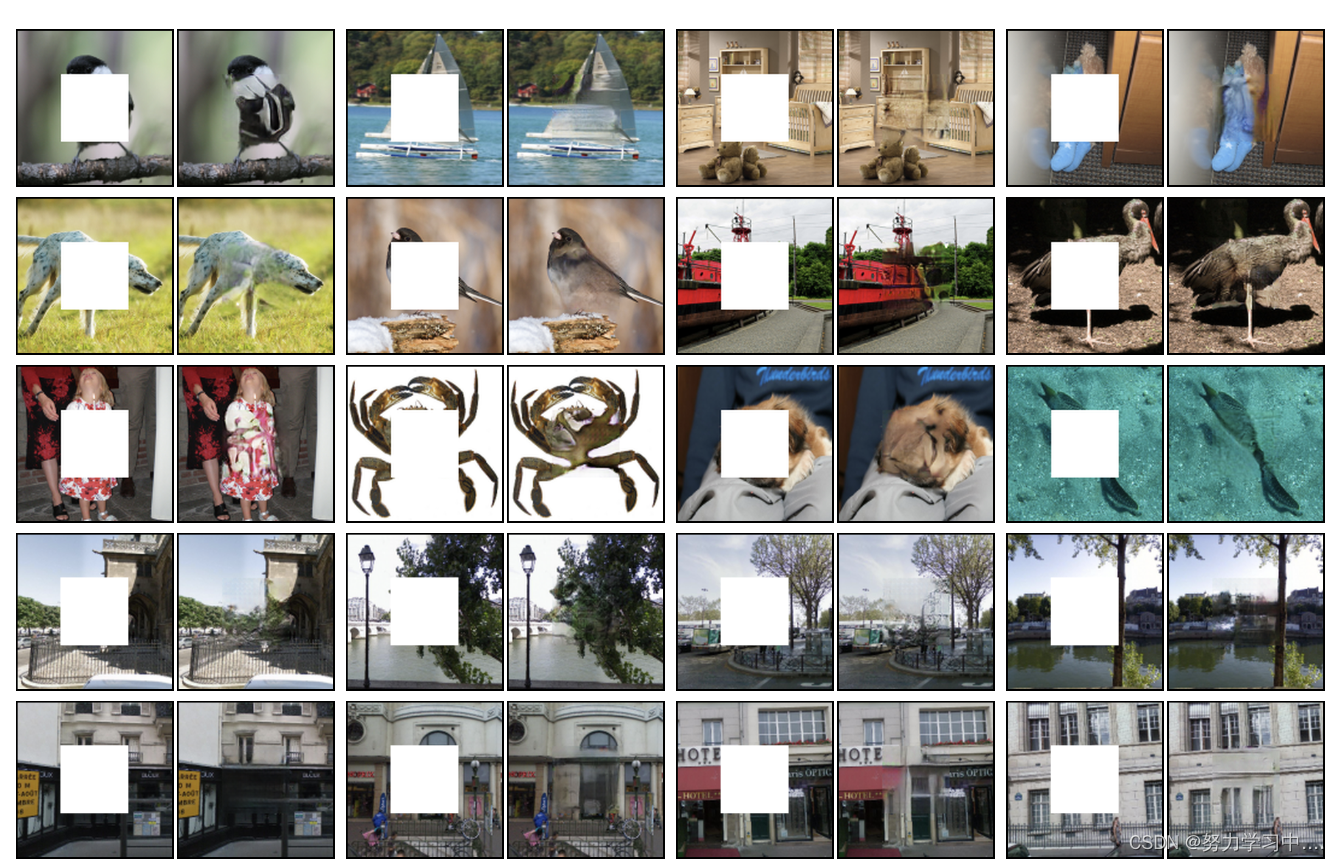
考虑我们输入的文字是“train”,希望NN能输出清晰的火车照片,那在数据集中,下面左图是正面的火车,它们统统都是正确的火车图片;下面右图是侧面的火车,它们也统统都是正确的火车。
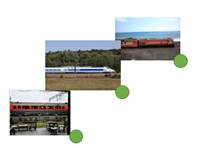
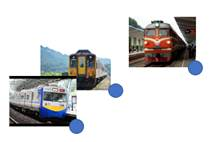
那在训练这个NN的时候,network会觉得说,火车既要长得像左边的图片,也要长得像右边的图片,那最终network的output就会变成这一大堆images的平均,可想而知那会是一张非常模糊并且错误的照片。
我们需要引入GANs技术来保证NN产生清晰准确的照片。
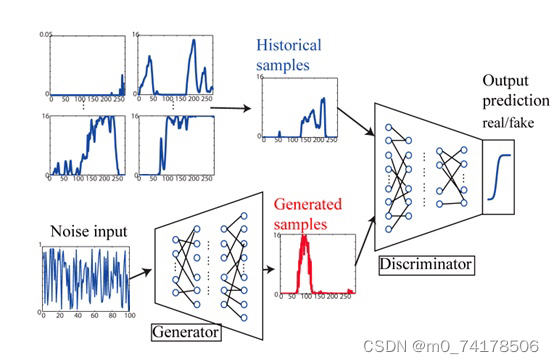
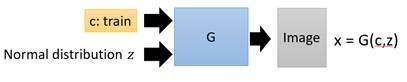
我们把原始的NN叫做G(Generator),现在它吃两个输入,一个是条件word:c,另外一个是从原始图片中sample出的分布z,它的输出是一个image:x,它希望这个x尽可能地符合条件c的描述,同时足够清晰,如下图。
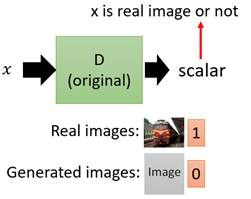
在GANs中为了保证输出image的质量会引入一个D(Discriminator),这个D用来判断输入的x是真实图片还是伪造图片,如下图。
但是传统GANs只能保证让x尽可能地像真实图片,它忽略了让x符合条件描述c的要求。于是,为了解决这一问题,CGAN便被提出了。
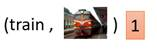
我们的目的是,既要让输出的图片真实,也要让输出的图片符合条件c的描述。Discriminator输入便被改成了同时输入c和x,输出要做两件事情,一个是判断x是否是真实图片,另一个是x和c是否是匹配的。

比如说,在下面这个情况中,条件c是train,图片x也是一张清晰的火车照片,那么D的输出就会是1。
而在下面两个情况中,左边虽然输出图片清晰,但不符合条件c;右边输出图片不真实。因此两种情况中D的输出都会是0。

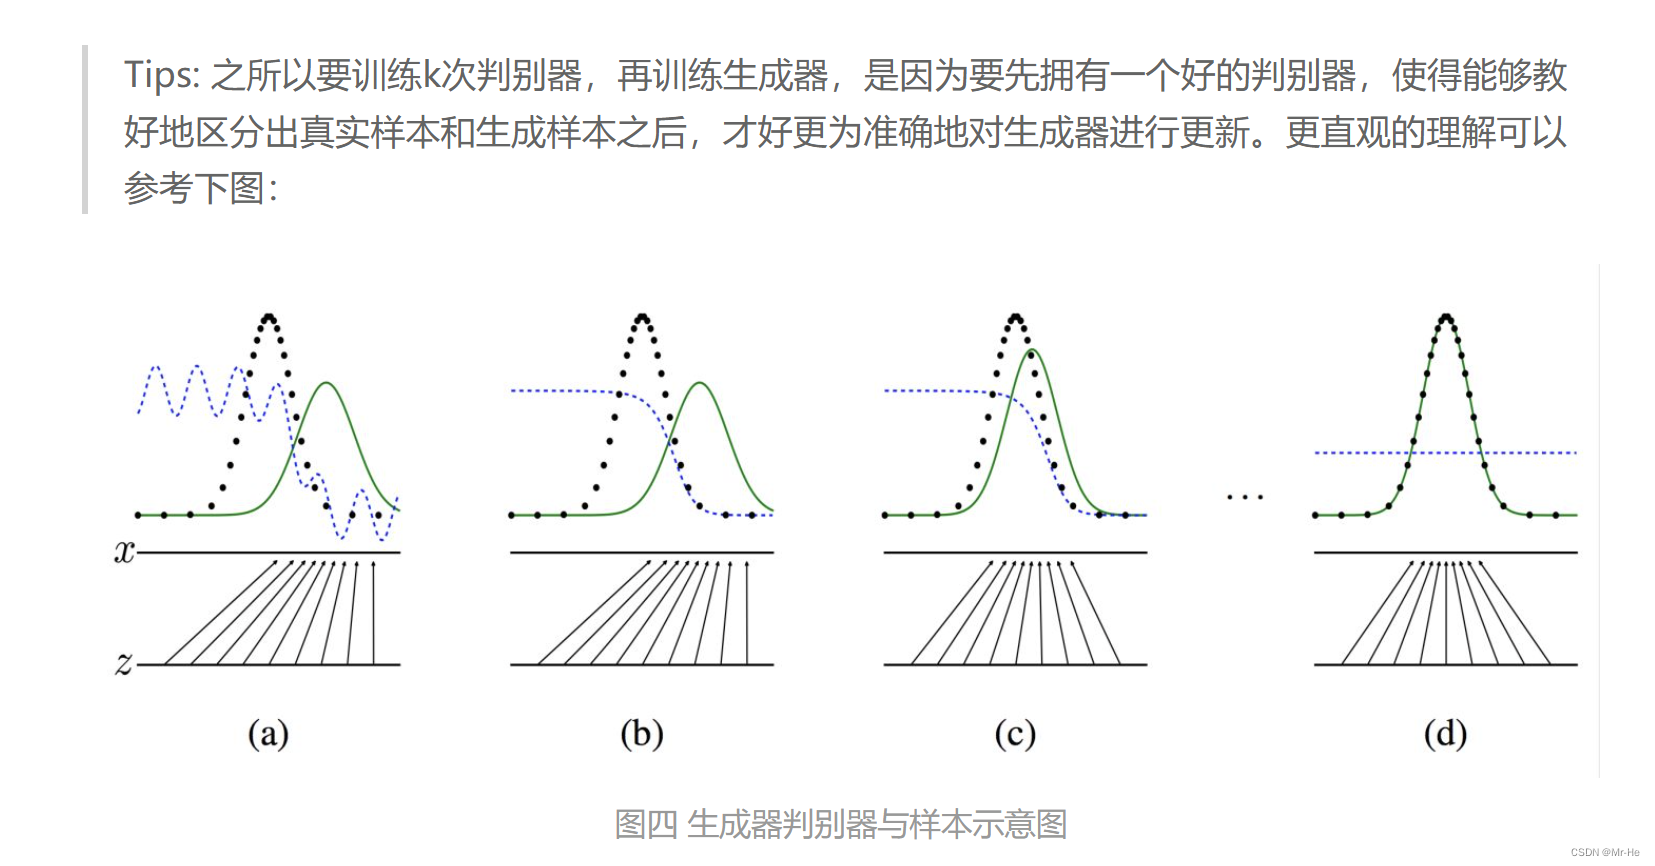
那CGAN的基本思路就是这样,下面我们具体看一下CGAN的算法实现。

因为CGAN是supervised学习,采样的每一项都是文字和图片的pair。CGAN的核心就是判断什么样的pair给高分,什么样的pair给低分。
2)做法
1:就是给网络的输入噪声数据增加一些类别上的信息,就是说给定某些类别条件下,生成指定的数据,所以输入数据会有一些变化;
2:然后在损失函数那里,我们目标不再是输出1/0,也就是不再是简单的输出真实和构造。当判定是真实数据的时候,还需要判定出是哪一类别的图片。一般使用one-hot表示。

上图表示,改变输入噪声数据,给z增加类别y信息,怎么增加呢,就是简单的维度拼接,y可以是一个one-hot向量,或者其他表达形式(此处采用词向量来表示,详情见代码部分)。对于真实数据x不做变化,只用y来获取D的输出结果。
判别器D最后也应该输出是哪个类别,并且按照类别最小化来训练,也就是希望D(X)尽可能接近y。
2.生成模型训练参考代码
train.py
import torch
from torch import nn
from torchvision import datasets
from torchvision import transforms
from torch.utils.data import DataLoader
from torchvision.utils import save_image
from torch import optim
import os
import numpy as np# 设置超参数
batch_size = 100
learning_rate = 0.0002
epochsize = 90
sample_dir = "images3"# 创建生成图像的目录
if not os.path.exists(sample_dir):os.makedirs(sample_dir)# 生成器结构
class Generator(nn.Module):def __init__(self):super(Generator, self).__init__()self.label_emb = nn.Embedding(10, 10)self.model = nn.Sequential(nn.Linear(110, 128),nn.LeakyReLU(0.2, inplace=True),nn.Linear(128, 256),nn.BatchNorm1d(256, 0.8),nn.LeakyReLU(0.2, inplace=True),nn.Linear(256, 512),nn.BatchNorm1d(512, 0.8),nn.LeakyReLU(0.2, inplace=True),nn.Linear(512, 1024),nn.BatchNorm1d(1024, 0.8),nn.LeakyReLU(0.2, inplace=True),nn.Linear(1024, 784),nn.Tanh())def forward(self, noise, label):out = torch.cat((noise, self.label_emb(label)), -1)img = self.model(out)     # torch.Size([64, 784])img = img.view(img.size(0), 1, 28, 28)     # torch.Size([64, 1, 32, 32])return img# 鉴别器结构
class Discriminator(nn.Module):def __init__(self):super(Discriminator, self).__init__()self.label_emb = nn.Embedding(10, 10)self.model = nn.Sequential(nn.Linear(794, 512),nn.LeakyReLU(0.2, inplace=True),nn.Linear(512, 512),nn.Dropout(0.4),nn.LeakyReLU(0.2, inplace=True),nn.Linear(512, 512),nn.Dropout(0.4),nn.LeakyReLU(0.2, inplace=True),nn.Linear(512, 1),nn.Sigmoid())def forward(self, img, label):img = img.view(img.size(0), -1)     # torch.Size([100, 784])x = torch.cat((img, self.label_emb(label)), -1)     # torch.Size([100, 794])x = self.model(x)   # torch.Size([100, 1])return x# 训练集下载
mnist_traindata = datasets.MNIST('E:/学习/机器学习/数据集/MNIST', train=True, transform=transforms.Compose([transforms.ToTensor(),transforms.Normalize(mean=[0.5], std=[0.5])
]), download=False)
mnist_train = DataLoader(mnist_traindata, batch_size=batch_size, shuffle=True, pin_memory=True)# GPU加速
# device = torch.device('cuda')
# torch.cuda.set_device(0)G = Generator()
D = Discriminator()# 导入之前的训练模型
G.load_state_dict(torch.load('G_plus.ckpt'))
D.load_state_dict(torch.load('D_plus.ckpt'))# 设置优化器与损失函数,二分类的时候使用BCELoss较好,BCEWithLogitsLoss是自带一层Sigmoid
# criteon = nn.BCEWithLogitsLoss()
criteon = nn.BCELoss()
G_optimizer = optim.Adam(G.parameters(), lr=learning_rate)
D_optimizer = optim.Adam(D.parameters(), lr=learning_rate)# 开始训练
print("start training")
for epoch in range(epochsize):D_loss_total = 0G_loss_total = 0total_num = 0# 这里的RealImageLabel是没有用上的for batchidx, (realimage, realimage_label) in enumerate(mnist_train):# realimage = realimage.to(device)realscore = torch.ones(realimage.size(0), 1)   # value:1 torch.Size([128, 1])fakescore = torch.zeros(realimage.size(0), 1)   # value:0 torch.Size([128, 1])# 随机sample出噪声与标签,生成假图像z = torch.randn(realimage.size(0), 100)fakeimage_label = torch.LongTensor(np.random.randint(0, 10, realimage.size(0)))fakeimage = G(z, fakeimage_label)# 训练鉴别器————总的损失为两者相加d_realimage_loss = criteon(D(realimage, realimage_label), realscore)d_fakeimage_loss = criteon(D(fakeimage, fakeimage_label), fakescore)D_loss = d_realimage_loss + d_fakeimage_loss# 参数训练三个步骤D_optimizer.zero_grad()D_loss.backward()D_optimizer.step()# 计算一次epoch的总损失D_loss_total += D_loss# 训练生成器————损失只有一个# 上一次的梯度信息以消除,重新生成假图像fakeimage = G(z, fakeimage_label)G_loss = criteon(D(fakeimage, fakeimage_label), realscore)# 参数训练三个步骤G_optimizer.zero_grad()G_loss.backward()G_optimizer.step()# 计算一次epoch的总损失G_loss_total += G_loss# 打印相关的loss值if batchidx % 200 == 0:print("batchidx:{}/{}, D_loss:{}, G_loss:{}".format(batchidx, len(mnist_train), D_loss, G_loss))# 打印一次训练的loss值print('Epoch:{}/{}, D_loss:{}, G_loss:{}'.format(epoch, epochsize, D_loss_total / len(mnist_train),G_loss_total / len(mnist_train)))# 保存生成图像z = torch.randn(batch_size, 100)label = torch.LongTensor(np.array([num for _ in range(10) for num in range(10)]))save_image(G(z, label).data, os.path.join(sample_dir, 'images-{}.png'.format(epoch + 61)), nrow=10, normalize=True)# 保存网络结构torch.save(G.state_dict(), 'G_plus.ckpt')torch.save(D.state_dict(), 'D_plus.ckpt')
test.py
import torch
from torch import nn
from torchvision.utils import save_image
import os
import numpy as np# 设置超参数
batch_size = 100
# learning_rate = 0.0002
# epochsize = 80
sample_dir = "test_images"# 创建生成图像的目录
if not os.path.exists(sample_dir):os.makedirs(sample_dir)# 生成器结构
class Generator(nn.Module):def __init__(self):super(Generator, self).__init__()self.label_emb = nn.Embedding(10, 10)self.model = nn.Sequential(nn.Linear(110, 128),nn.LeakyReLU(0.2, inplace=True),nn.Linear(128, 256),nn.BatchNorm1d(256, 0.8),nn.LeakyReLU(0.2, inplace=True),nn.Linear(256, 512),nn.BatchNorm1d(512, 0.8),nn.LeakyReLU(0.2, inplace=True),nn.Linear(512, 1024),nn.BatchNorm1d(1024, 0.8),nn.LeakyReLU(0.2, inplace=True),nn.Linear(1024, 784),nn.Tanh())def forward(self, noise, label):out = torch.cat((noise, self.label_emb(label)), -1)img = self.model(out)     # torch.Size([64, 784])img = img.view(img.size(0), 1, 28, 28)     # torch.Size([64, 1, 32, 32])return img# 导入训练好的模型
G = Generator()
G.load_state_dict(torch.load('G_plus.ckpt'))# 保存图像
z = torch.randn(batch_size, 100)
# label = torch.LongTensor(np.array([num for _ in range(10) for num in range(10)]))
label = torch.tensor([7,8,1,3,4,2,6,5,9,0]*10)
# label = torch.full([100], 9)# label = []
# for i in range(10):
#     for j in range(10):
#         label.append(i)
#
# label = torch.tensor(label)
print(label)
print("label.shape:", label.size())save_image(G(z, label).data, os.path.join(sample_dir, 'images.png'), nrow=10, normalize=True)
3.生成模型结果展示
由于电脑配置不行,只能用cpu跑了,跑得比较慢,下面是结果展示:

epoch10 生成的图像

epoch50 生成的图像

epoch200 生成的图像
但是存一个问题,CGAN只能全部条件的图像,不能生成单一条件的图像。也就是无论数字的顺序如何排列,cgan都能准确的生成出来,如图所示:


但是想让其生成单一的数字,比如全部生成数字“1”,就无法正常生成图像。如图所示

参考资料:
- 李宏毅老师的b站视频
- https://blog.csdn.net/a312863063/article/details/83573968
- https://blog.csdn.net/qq_29367075/article/details/109149211