Android-APK加固-简单版
- Proguard的使用与配置
- 介绍
- 开启proguard
- 常用配置
- 加固
- 大体思路
- 源码(浅析)
- 思路
- 撸码
- 解密
- 工具类-AES(解密时用)
- 工具类-Zip(压缩、解压)
- 工具类-Utils(反射操作)
- 解密开始
- 加密
- 截图
Proguard的使用与配置
介绍
Proguard是一个代码优化和混淆工具。
能够提供对Java类文件的压缩、优化、混淆,和预校验。压缩的步骤是检测并移除未使用的类、字段、方法和属性。优化的步骤是分析和优化方法的字节码。混淆的步骤是使用短的毫无意义的名称重命名剩余的类、字段和方法。压缩、优化、混淆使得代码更小,更高效。
开启proguard
minifyEnabled true
buildTypes {release {minifyEnabled falseproguardFiles getDefaultProguardFile('proguard-android.txt'), 'proguard-rules.pro'}debug {minifyEnabled trueproguardFiles getDefaultProguardFile('proguard-android.txt'), 'proguard-rules.pro'}}
常用配置
	-keep 指定类和类成员(变量和方法)不被混淆。(保护了类名)-keep class com.lk.proxy.guard.test.Bug(保护了 public static void的没有参数的函数 不被混淆)-keep class com.lk.proxy.guard.test.Bug{public static void *();}(保护com.dongnao.proxy.guard.test.Bug类里面所有 不被混淆)-keep class com.lk.proxy.guard.test.Bug{*;}-keepclassmembers 指定类成员不被混淆(就是-keep的缩小版,不管类名了)。-keepclassmembersclass com.lk.proxy.guard.test.Bug(都被混淆了)
-keepclasseswithmembers 指定类和类成员不被混淆,前提是指定的类成员存在。-keepclasseswithmembers class 	com.lk.proxy.guard.test.Bug(保护类名,但是没指定成员,所以函数名被混淆)-keepclasseswithmembers class   	com.lk.proxy.guard.test.Bug{native <methods>;	//这个类里面的native方法不被混淆}
加固
大体思路

思路
1、编写一个Tools工具(java项目)负责把APK解压出来的所有dex文件抽出来进行加密(注意这不是在运行时做的);
2、加密后再和APK解压出来的其他文件一起打包得到一个全新的APK;
里面需要创建一个ProxyApplication(代理Application),让这个代理去和Android的系统对接,这个代理需要负责解密再交给Android系统去对接执行;确保程序能正常运行;
和Android系统对接的这个过程,就是插桩…
这个插桩听着是不是很熟悉,Tinker热修复里面的dex是进行插桩修复…
源码(浅析)
我们再来看看这个系统的源码 - -!我们只看关键部分,我这里是6.0的源码;其他版本的源码,需要自己去做适配;
打印出来的 ClassLoader 是:dalvik.system.PathClassLoader
public class MainActivity extends AppCompatActivity {@Overrideprotected void onCreate(Bundle savedInstanceState) {super.onCreate(savedInstanceState);setContentView(R.layout.activity_main);Log.i("Kai",getClassLoader().toString());}
}
dalvik.system.PathClassLoader
跟进来,发现PathClassLoader这个类里面基本没干什么事,就是继承了BaseDexClassLoader,和两个构造方法;所以我们得到BaseDexClassLoader这个类里面去看看;
package dalvik.system;public class PathClassLoader extends BaseDexClassLoader {public PathClassLoader(String dexPath, ClassLoader parent) {super(dexPath, null, null, parent);}public PathClassLoader(String dexPath, String librarySearchPath, ClassLoader parent) {super(dexPath, null, librarySearchPath, parent);}
}
dalvik.system.BaseDexClassLoader
成员属性 DexPathList 类:看这个名字,就应该知道这个是存放dex文件路径的集合类
findClass方法:从dexpathList类中的findClass方法获取到类的字节码;
package dalvik.system;......
/*** Base class for common functionality between various dex-based* {@link ClassLoader} implementations.*/
public class BaseDexClassLoader extends ClassLoader {//看这个名字,就应该知道这个是存放dex文件路径的集合类private final DexPathList pathList;public BaseDexClassLoader(String dexPath, File optimizedDirectory,String librarySearchPath, ClassLoader parent) {super(parent);//初始化这个 存放dex文件路径的集合类this.pathList = new DexPathList(this, dexPath, librarySearchPath, optimizedDirectory);}//查找类的方法@Overrideprotected Class<?> findClass(String name) throws ClassNotFoundException {List<Throwable> suppressedExceptions = new ArrayList<Throwable>();//从dexpathList类中的findClass方法获取到类的字节码Class c = pathList.findClass(name, suppressedExceptions);if (c == null) {ClassNotFoundException cnfe = new ClassNotFoundException("Didn't find class \"" + name + "\" on path: " + pathList);for (Throwable t : suppressedExceptions) {cnfe.addSuppressed(t);}throw cnfe;}return c;}/*** @hide*/public void addDexPath(String dexPath) {pathList.addDexPath(dexPath, null /*optimizedDirectory*/);}............
}
dalvik.system.DexPathList
看到这个类里面的findClass方法,我们也就能明白:dex文件都是存放在dexElements这个数组里面;
dexElements的初始化时通过 makePathElements方法;
注意:6.0这个里面还是通过makePatrhElements方法初始化这个数组,但是到了7.0的时候就是用makeDexElements这个和方法初始化这个数组了,所以如果需要反射系统层面的东西,需要做好适配…
package dalvik.system;
......
/*package*/ final class DexPathList {
/*** Finds the named class in one of the dex files pointed at by* this instance. This will find the one in the earliest listed* path element. If the class is found but has not yet been* defined, then this method will define it in the defining* context that this instance was constructed with.** @param name of class to find* @param suppressed exceptions encountered whilst finding the class* @return the named class or {@code null} if the class is not* found in any of the dex files*/......//存放了 Dex文件的数组private Element[] dexElements;......public DexPathList(ClassLoader definingContext, String dexPath,String librarySearchPath, File optimizedDirectory) {......// dexElements 数组的初始化 makePathElements方法// save dexPath for BaseDexClassLoaderthis.dexElements = makePathElements(splitDexPath(dexPath), optimizedDirectory,suppressedExceptions);......}....../*** Makes an array of dex/resource path elements, one per element of* the given array.*/private static Element[] makePathElements(List<File> files, File optimizedDirectory,List<IOException> suppressedExceptions) {List<Element> elements = new ArrayList<>();/** Open all files and load the (direct or contained) dex files* up front.*/for (File file : files) {File zip = null;File dir = new File("");DexFile dex = null;String path = file.getPath();String name = file.getName();if (path.contains(zipSeparator)) {String split[] = path.split(zipSeparator, 2);zip = new File(split[0]);dir = new File(split[1]);} else if (file.isDirectory()) {// We support directories for looking up resources and native libraries.// Looking up resources in directories is useful for running libcore tests.elements.add(new Element(file, true, null, null));} else if (file.isFile()) {if (name.endsWith(DEX_SUFFIX)) {// Raw dex file (not inside a zip/jar).try {dex = loadDexFile(file, optimizedDirectory);} catch (IOException ex) {System.logE("Unable to load dex file: " + file, ex);}} else {zip = file;try {dex = loadDexFile(file, optimizedDirectory);} catch (IOException suppressed) {/** IOException might get thrown "legitimately" by the DexFile constructor if* the zip file turns out to be resource-only (that is, no classes.dex file* in it).* Let dex == null and hang on to the exception to add to the tea-leaves for* when findClass returns null.*/suppressedExceptions.add(suppressed);}}} else {System.logW("ClassLoader referenced unknown path: " + file);}if ((zip != null) || (dex != null)) {elements.add(new Element(dir, false, zip, dex));}}return elements.toArray(new Element[elements.size()]);}......public Class findClass(String name, List<Throwable> suppressed) {//dex文件都是存放在 dexElements这个数组里面for (Element element : dexElements) {//获取到dex文件  DexFile类DexFile dex = element.dexFile;if (dex != null) {//通过dex文件  DexFile类的loadClassBinaryName方法获取到Class字节码Class clazz = dex.loadClassBinaryName(name, definingContext, suppressed);if (clazz != null) {return clazz;}}}if (dexElementsSuppressedExceptions != null) {suppressed.addAll(Arrays.asList(dexElementsSuppressedExceptions));}return null;}
}
思路
通过上面的源码,和前面写的Tinker热修复的插桩原理,我们可以了解到:
1、程序的ClassLoader类加载器是一个PathClassLoader;
2、这个ClassLoader继承了BaseDexClassLoader这个父类;
3、这个父类中的findClass方法中,通过pathList.findClass获取Class字节码,而pathList是DexPathList对象;
4、跟进DexPathList类的findClass方法中,发现遍历的是一个Element数组—dexElements,数组里面的元素通过.dexFile获取到DexFile对象,也就是可以理解成Dex文件;
5、这个dex文件其实就是程序的dex文件,也就是我们上面说的交给系统的dex文件;
思路
我们只需要反射到这个dexElements数组,把我们解密后dex文件与这个dexElements数组合并到一起,然后再赋值给系统;
而dexElements的初始化是通过makePathElements方法获取的;
可以通过反射makePathElements方法来获取到dexElements对象
也可以直接反射dexElements变量获取到dexElements对象(这种方式的获取,可以去看看我的Tinker热修复这一篇)
Android-Tinker热修复原理
撸码
我们从解密开始看~~
解密
我们上面说过解密是需要用代理ProxyApplication来做解密,并且把解密后的dex文件交给Android系统去加载;
我们需要新建一个Android Library;这个是用来代理、解密、和系统对接操作时用的;
工具类-AES(解密时用)
package com.example.proxy_core;import java.security.InvalidKeyException;
import java.security.NoSuchAlgorithmException;import javax.crypto.BadPaddingException;
import javax.crypto.Cipher;
import javax.crypto.IllegalBlockSizeException;
import javax.crypto.NoSuchPaddingException;
import javax.crypto.spec.SecretKeySpec;public class AES {//16字节public static final String DEFAULT_PWD = "abcdefghijklmnop";//填充方式private static final String algorithmStr = "AES/ECB/PKCS5Padding";private static Cipher encryptCipher;private static Cipher decryptCipher;public static void init(String password) {try {// 生成一个实现指定转换的 Cipher 对象。encryptCipher = Cipher.getInstance(algorithmStr);decryptCipher = Cipher.getInstance(algorithmStr);// algorithmStrbyte[] keyStr = password.getBytes();SecretKeySpec key = new SecretKeySpec(keyStr, "AES");encryptCipher.init(Cipher.ENCRYPT_MODE, key);decryptCipher.init(Cipher.DECRYPT_MODE, key);} catch (NoSuchAlgorithmException e) {e.printStackTrace();} catch (NoSuchPaddingException e) {e.printStackTrace();} catch (InvalidKeyException e) {e.printStackTrace();}}public static byte[] encrypt(byte[] content) {try {byte[] result = encryptCipher.doFinal(content);return result;} catch (IllegalBlockSizeException e) {e.printStackTrace();} catch (BadPaddingException e) {e.printStackTrace();}return null;}public static byte[] decrypt(byte[] content) {try {byte[] result = decryptCipher.doFinal(content);return result;} catch (IllegalBlockSizeException e) {e.printStackTrace();} catch (BadPaddingException e) {e.printStackTrace();}return null;}
}
工具类-Zip(压缩、解压)
也可以自己去用第三方的来压缩和解压
package com.example.proxy_core;import java.io.File;
import java.io.FileInputStream;
import java.io.FileOutputStream;
import java.io.InputStream;
import java.util.Enumeration;
import java.util.zip.CRC32;
import java.util.zip.CheckedOutputStream;
import java.util.zip.ZipEntry;
import java.util.zip.ZipFile;
import java.util.zip.ZipOutputStream;public class Zip {private static void deleteFile(File file){if (file.isDirectory()){File[] files = file.listFiles();for (File f: files) {deleteFile(f);}}else{file.delete();}}/*** 解压zip文件至dir目录* @param zip* @param dir*/public static void unZip(File zip, File dir) {try {deleteFile(dir);ZipFile zipFile = new ZipFile(zip);//zip文件中每一个条目Enumeration<? extends ZipEntry> entries = zipFile.entries();//遍历while (entries.hasMoreElements()) {ZipEntry zipEntry = entries.nextElement();//zip中 文件/目录名String name = zipEntry.getName();//原来的签名文件 不需要了if (name.equals("META-INF/CERT.RSA") || name.equals("META-INF/CERT.SF") || name.equals("META-INF/MANIFEST.MF")) {continue;}//空目录不管if (!zipEntry.isDirectory()) {File file = new File(dir, name);//创建目录if (!file.getParentFile().exists()) {file.getParentFile().mkdirs();}//写文件FileOutputStream fos = new FileOutputStream(file);InputStream is = zipFile.getInputStream(zipEntry);byte[] buffer = new byte[2048];int len;while ((len = is.read(buffer)) != -1) {fos.write(buffer, 0, len);}is.close();fos.close();}}zipFile.close();} catch (Exception e) {e.printStackTrace();}}/*** 压缩目录为zip* @param dir 待压缩目录* @param zip 输出的zip文件* @throws Exception*/public static void zip(File dir, File zip) throws Exception {zip.delete();// 对输出文件做CRC32校验CheckedOutputStream cos = new CheckedOutputStream(new FileOutputStream(zip), new CRC32());ZipOutputStream zos = new ZipOutputStream(cos);//压缩compress(dir, zos, "");zos.flush();zos.close();}/*** 添加目录/文件 至zip中* @param srcFile 需要添加的目录/文件* @param zos   zip输出流* @param basePath  递归子目录时的完整目录 如 lib/x86* @throws Exception*/private static void compress(File srcFile, ZipOutputStream zos,String basePath) throws Exception {if (srcFile.isDirectory()) {File[] files = srcFile.listFiles();for (File file : files) {// zip 递归添加目录中的文件compress(file, zos, basePath + srcFile.getName() + "/");}} else {compressFile(srcFile, zos, basePath);}}private static void compressFile(File file, ZipOutputStream zos, String dir)throws Exception {// temp/lib/x86/libdn_ssl.soString fullName = dir + file.getName();// 需要去掉tempString[] fileNames = fullName.split("/");//正确的文件目录名 (去掉了temp)StringBuffer sb = new StringBuffer();if (fileNames.length > 1){for (int i = 1;i<fileNames.length;++i){sb.append("/");sb.append(fileNames[i]);}}else{sb.append("/");}//添加一个zip条目ZipEntry entry = new ZipEntry(sb.substring(1));zos.putNextEntry(entry);//读取条目输出到zip中FileInputStream fis = new FileInputStream(file);int len;byte data[] = new byte[2048];while ((len = fis.read(data, 0, 2048)) != -1) {zos.write(data, 0, len);}fis.close();zos.closeEntry();}}
工具类-Utils(反射操作)
package com.example.proxy_core;import java.io.File;
import java.io.RandomAccessFile;
import java.lang.reflect.Field;
import java.lang.reflect.Method;
import java.util.Arrays;public class Utils {/*** 读取文件* @param file* @return* @throws Exception*/public static byte[] getBytes(File file) throws Exception {RandomAccessFile r = new RandomAccessFile(file, "r");byte[] buffer = new byte[(int) r.length()];r.readFully(buffer);r.close();return buffer;}/*** 反射获得 指定对象(当前-》父类-》父类...)中的 成员属性* @param instance* @param name* @return* @throws NoSuchFieldException*/public static Field findField(Object instance, String name) throws NoSuchFieldException {Class clazz = instance.getClass();//反射获得while (clazz != null) {try {Field field = clazz.getDeclaredField(name);//如果无法访问 设置为可访问if (!field.isAccessible()) {field.setAccessible(true);}return field;} catch (NoSuchFieldException e) {//如果找不到往父类找clazz = clazz.getSuperclass();}}throw new NoSuchFieldException("Field " + name + " not found in " + instance.getClass());}/*** 反射获得 指定对象(当前-》父类-》父类...)中的 函数* @param instance* @param name* @param parameterTypes* @return* @throws NoSuchMethodException*/public static Method findMethod(Object instance, String name, Class... parameterTypes)throws NoSuchMethodException {Class clazz = instance.getClass();while (clazz != null) {try {Method method = clazz.getDeclaredMethod(name, parameterTypes);if (!method.isAccessible()) {method.setAccessible(true);}return method;} catch (NoSuchMethodException e) {//如果找不到往父类找clazz = clazz.getSuperclass();}}throw new NoSuchMethodException("Method " + name + " with parameters " + Arrays.asList(parameterTypes) + " not found in " + instance.getClass());}
}
解密开始
上面的准备工作,工具类准备好了后,准备开始;
先用meta-data标签,把最终需要加载的MyApplication全类名、解密后的dex目录都定义出来;
是需要解密后把项目的MyApplication运行出来;
这两个meta-data标签的数据,需要等会儿反射拿到;
<!--真实的Application的全名--><meta-data android:name="app_name" android:value="com.lk.reinforce_demo.MyApplication"/><!--用于dex后的目录名_版本号--><meta-data android:name="app_version" android:value="\dexDir_1.0"/>
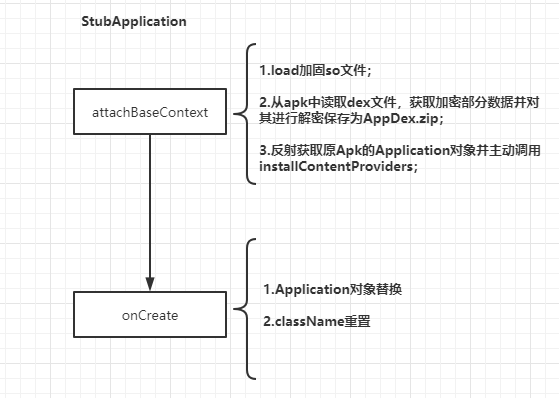
attachBaseContext方法中,获取到主项目的meta-data标签里面的值(终需要加载的MyApplication全类名、dex解密后需要存放的目录)
/*** ActivityThread创建Application之后调用的第一个方法* 可以在这个方法中进行解密,同时把dex交给android去加载*/@Overrideprotected void attachBaseContext(Context base) {super.attachBaseContext(base);//获取定义的的metadatagetMetaData();}/*** 读取 meta-data标签的值*/private void getMetaData() {try{//获取 ApplicationInfo`applicationInfo = getPackageManager().getApplicationInfo(getPackageName(), PackageManager.GET_META_DATA);Bundle metaData=applicationInfo.metaData;if(null!=metaData){//获取到清单文件里面的 meta-data 标签里面的数据if(metaData.containsKey("app_name")){//获取到的是 最终需要加载的MyApplication全类名app_name=metaData.getString("app_name");}if(metaData.containsKey("app_version")){app_version=metaData.getString("app_version");}}}catch(Exception e){e.printStackTrace();}}
把apk解压后;
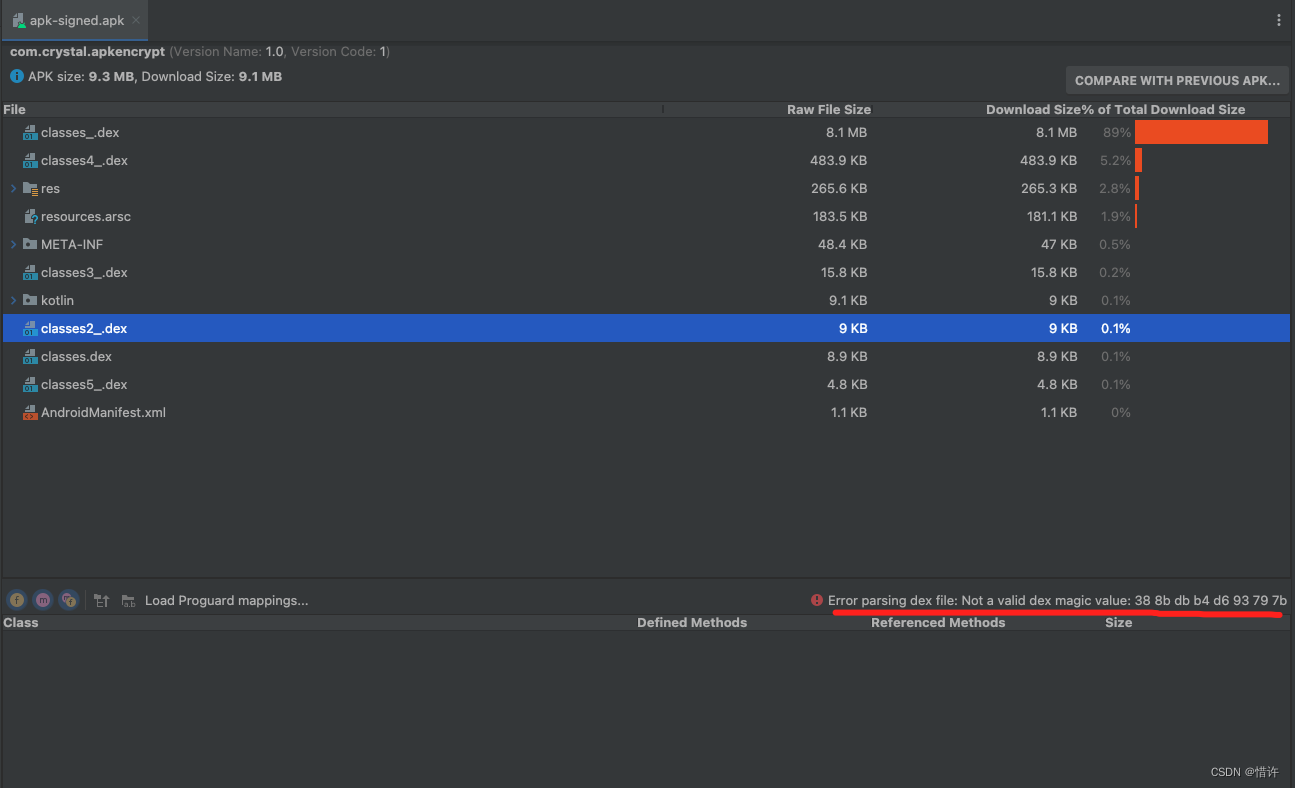
classes.dex 是存放我们这个代理 ProxyApplication的,所以我们加密的时候也不会把是这个classes.dex进行加密,所以这里不需要解密;
解密后再写入文件中,然后将文件存入到集合,后面方便我们将所有的dex文件给到系统去对接;
//得到当前加密了的APK文件File apkFile=new File(getApplicationInfo().sourceDir);//把apk解压 app_name+"_"+app_version目录中的内容 别的应用需要boot权限才能用File versionDir = getDir(app_name+"_"+app_version,MODE_PRIVATE);//创建两个目录//这个目录用来存放 apk解压后,除了dex以外的文件File appDir=new File(versionDir,"app");//这个目录用来存放dex文件File dexDir=new File(appDir,"dexDir");//得到我们需要加载的Dex文件List<File> dexFiles=new ArrayList<>();//进行解密(最好做MD5文件校验)if(!dexDir.exists() || dexDir.list().length==0){//把apk解压到appDirZip.unZip(apkFile,appDir);//获取目录下所有的文件File[] files=appDir.listFiles();for (File file : files) {String name=file.getName();//classes.dex 是存放我们这个代理 ProxyApplication的// 所以我们加密的时候也不会把是这个classes.dex进行加密,所以这里不需要解密if(name.endsWith(".dex") && !TextUtils.equals(name,"classes.dex")){try{AES.init(AES.DEFAULT_PWD);//读取文件内容byte[] bytes=Utils.getBytes(file);//解密byte[] decrypt=AES.decrypt(bytes);//写到指定的目录FileOutputStream fos=new FileOutputStream(file);fos.write(decrypt);fos.flush();fos.close();dexFiles.add(file);}catch (Exception e){e.printStackTrace();}}}}else{for (File file : dexDir.listFiles()) {dexFiles.add(file);}}
将我们解密后的dex文件集合,与系统对接;
也就是反射将dex文件存放到系统的dexElements这个数组中;
//将我们解密后的dex文件集合,与系统对接
private void loadDex(List<File> dexFiles, File versionDir) throws Exception{//1.获取pathlistField pathListField = Utils.findField(getClassLoader(), "pathList");Object pathList = pathListField.get(getClassLoader());//2.获取数组dexElementsField dexElementsField=Utils.findField(pathList,"dexElements");Object[] dexElements=(Object[])dexElementsField.get(pathList);//3.反射到初始化dexElements的方法Method makeDexElements=Utils.findMethod(pathList,"makePathElements",List.class,File.class,List.class);ArrayList<IOException> suppressedExceptions = new ArrayList<IOException>();Object[] addElements=(Object[])makeDexElements.invoke(pathList,dexFiles,versionDir,suppressedExceptions);//合并数组Object[] newElements= (Object[])Array.newInstance(dexElements.getClass().getComponentType(),dexElements.length+addElements.length);System.arraycopy(dexElements,0,newElements,0,dexElements.length);System.arraycopy(addElements,0,newElements,dexElements.length,addElements.length);//替换classloader中的element数组dexElementsField.set(pathList,newElements);}
一定要注意的点:这个主项目的application用到的是 代理的ProxyApplication,不然是没法运行到代理去进行解密dex、和系统对接的!!!!!!
<applicationandroid:name="com.example.proxy_core.ProxyApplication"android:allowBackup="true"android:icon="@mipmap/ic_launcher"android:label="@string/app_name"android:roundIcon="@mipmap/ic_launcher_round"android:supportsRtl="true"android:theme="@style/AppTheme">
加密
这里用java项目来做加密操作,因为是编译操作的加密,所以这里用到一个java项目来做的;
这里有时候执行命令的时候process.exitValue()会不等于0,建议先把指令打印出来,再执行命令通不过的地方去用cmd执行~~
加密的步骤:
1、将Android Library生成的aar文件解压到自己定义的目录中;
2、解压之后会有个classes.jar,将这个jar用dx命令,生成dex文件,classes.dex
3、解压我们主的APK文件到临时目录,并将解压后的所有的.dex后缀的文件,读取字节,然后进行加密,再变成新的文件;
4、然后将第二步生成的classes.dex文件拷入到这个临时目录中,然后压缩成apk,这个时候的apk就是没有签名对齐的apk,里面除了classes.dex文件没有加密以外,其余的dex文件都是加密的;
5、然后对新生成的apk,进行签名和对齐;
package com.example.proxy_tools;import java.io.File;
import java.io.FileOutputStream;
import java.io.FilenameFilter;public class Main {public static void main(String[] args) throws Exception {/*** 1.制作只包含解密代码的dex文件*/File aarFile=new File("proxy_core/build/outputs/aar/proxy_core-debug.aar");File aarTemp=new File("proxy_tools/temp");Zip.unZip(aarFile,aarTemp);File classesJar=new File(aarTemp,"classes.jar");File classesDex=new File(aarTemp,"classes.dex");String dxStr = "cmd /c dx --dex --output "+classesDex.getAbsolutePath()+" "+classesJar.getAbsolutePath();   System.out.println("dxStr::"+dxStr);//dx --dex --output F:\AndroidTools\AndroidObj\dn\Lsn_11_Demo2\proxy_tools\temp\classes.dex F:\AndroidTools\AndroidObj\dn\Lsn_11_Demo2\proxy_tools\temp\classes.jar//dx --dex --output out.dex in.jarProcess process=Runtime.getRuntime().exec(dxStr);process.waitFor();if(process.exitValue()!=0){throw new RuntimeException("dex error");}/*** 2.加密APK中所有的dex文件*/File apkFile=new File("app/build/outputs/apk/debug/app-debug.apk");File apkTemp=new File("app/build/outputs/apk/debug/temp");Zip.unZip(apkFile,apkTemp);//只要dex文件拿出来加密File[] dexFiles=apkTemp.listFiles(new FilenameFilter() {@Overridepublic boolean accept(File file, String s) {return s.endsWith(".dex");}});//AES加密了AES.init(AES.DEFAULT_PWD);for (File dexFile : dexFiles) {byte[] bytes = Utils.getBytes(dexFile);byte[] encrypt = AES.encrypt(bytes);FileOutputStream fos=new FileOutputStream(new File(apkTemp,"secret-"+dexFile.getName()));fos.write(encrypt);fos.flush();fos.close();dexFile.delete();}/*** 3.把dex放入apk解压目录,重新压成apk文件*/classesDex.renameTo(new File(apkTemp,"classes.dex"));File unSignedApk=new File("app/build/outputs/apk/debug/app-unsigned.apk");Zip.zip(apkTemp,unSignedApk);/*** 4.对齐和签名*/
//        zipalign -v -p 4 my-app-unsigned.apk my-app-unsigned-aligned.apkFile alignedApk=new File("app/build/outputs/apk/debug/app-unsigned-aligned.apk");// 可以用cmd执行命令:zipalign -v -p 4 F:\AndroidTools\AndroidObj\dn\Lsn_11_Demo2\app\build\outputs\apk\debug\app-unsigned.apk F:\AndroidTools\AndroidObj\dn\Lsn_11_Demo2\app\build\outputs\apk\debug\app-unsigned-aligned.apkprocess=Runtime.getRuntime().exec("cmd /c zipalign -v -p 4 "+unSignedApk.getAbsolutePath()+" "+alignedApk.getAbsolutePath());process.waitFor();if(process.exitValue()!=0){throw new RuntimeException("dex error");}//        apksigner sign --ks my-release-key.jks --out my-app-release.apk my-app-unsigned-aligned.apk
//        apksigner sign  --ks jks文件地址 --ks-key-alias 别名 --ks-pass pass:jsk密码 --key-pass pass:别名密码 --out  out.apk in.apkFile signedApk=new File("app/build/outputs/apk/debug/app-signed-aligned.apk");File jks=new File("proxy_tools/proxy2.jks");//可以用cmd执行命令:apksigner sign --ks F:\AndroidTools\AndroidObj\dn\Lsn_11_Demo2\proxy_tools\proxy2.jks --ks-key-alias jett --ks-pass pass:123456 --key-pass pass:123456 --out F:\AndroidTools\AndroidObj\dn\Lsn_11_Demo2\app\build\outputs\apk\debug\app-signed-aligned.apk F:\AndroidTools\AndroidObj\dn\Lsn_11_Demo2\app\build\outputs\apk\debug\app-unsigned-aligned.apkprocess=Runtime.getRuntime().exec("cmd /c apksigner sign --ks "+jks.getAbsolutePath()+" --ks-key-alias kaizi --ks-pass pass:123456 --key-pass pass:123456 --out "+signedApk.getAbsolutePath()+" "+alignedApk.getAbsolutePath());process.waitFor();if(process.exitValue()!=0){throw new RuntimeException("dex error");}System.out.println("执行成功");}
}
截图
1、解压aar后的存放目录
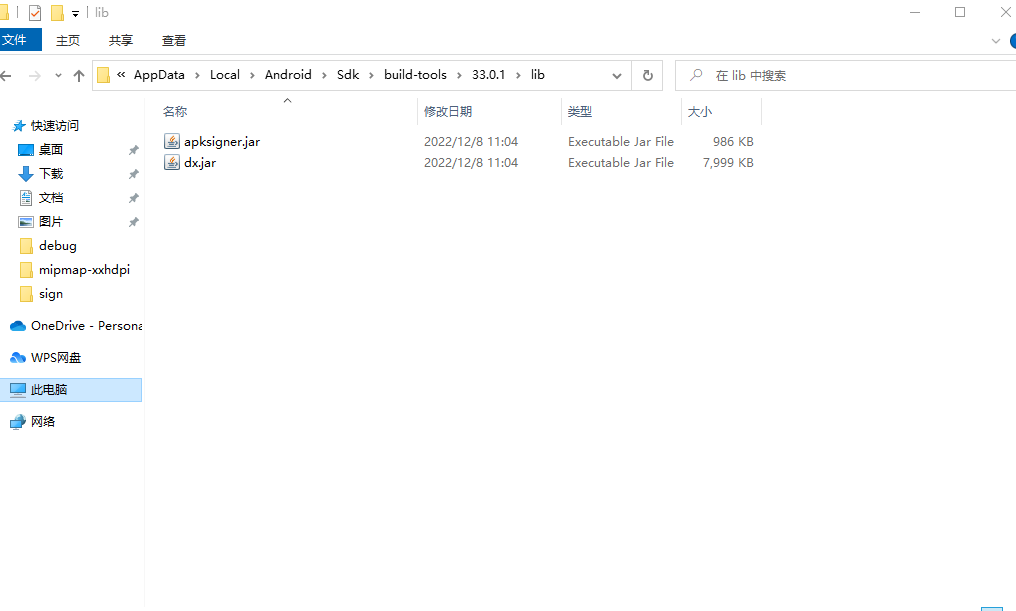
2、将这个jar用dx命令,生成dex文件,classes.dex

3、解压我们主的APK文件到临时目录,并将解压后的所有的.dex后缀的文件,读取字节,然后进行加密,再变成新的文件;这里的classes.dex是有第四步的:将第二步生成的classes.dex文件拷入到这个临时目录中了
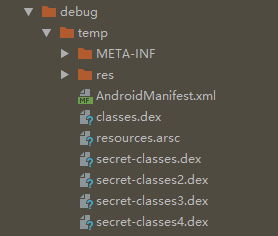
后续的压缩apk,签名对齐的操作生成的apk,最终app-signed-aligned.apk这个apk是最后需要的apk

缺点:第一次启动的时候,会慢一点,想要后续不响应速度,我们就需要自己去做个md5的文件效验,看看文件是否已经解密过了~
后续的替换MyApplication的操作,童鞋们可以自己去研究下~~
辛苦各位童鞋观看到最后,如果博客中有不对的地方望指出,大神勿喷,谢谢~~