一、前言
之前使用的360加固,挺好用的,从2021年底的时候限制每天每个账号仅上传2次apk(免费的,不知道VIP的是不是这样)。通过这个事情,感觉技术还是掌握在自己手里稳妥点,不用受制于人,想怎么玩就怎么玩。
通过技术调研有两条路子可以走:
-
方式一:直接对apk进行加密,启动应用时通过壳程序去加载apk运行;
-
方式二:仅对原apk的dex文件进行加密,启动应用时对dex解密,通过DexClassLoader进行加载;
本文主要是参考了360免费加固的思路,所以主要研究的方式二。
二、原理
先看下流程,然后再来详细讲下具体的步骤
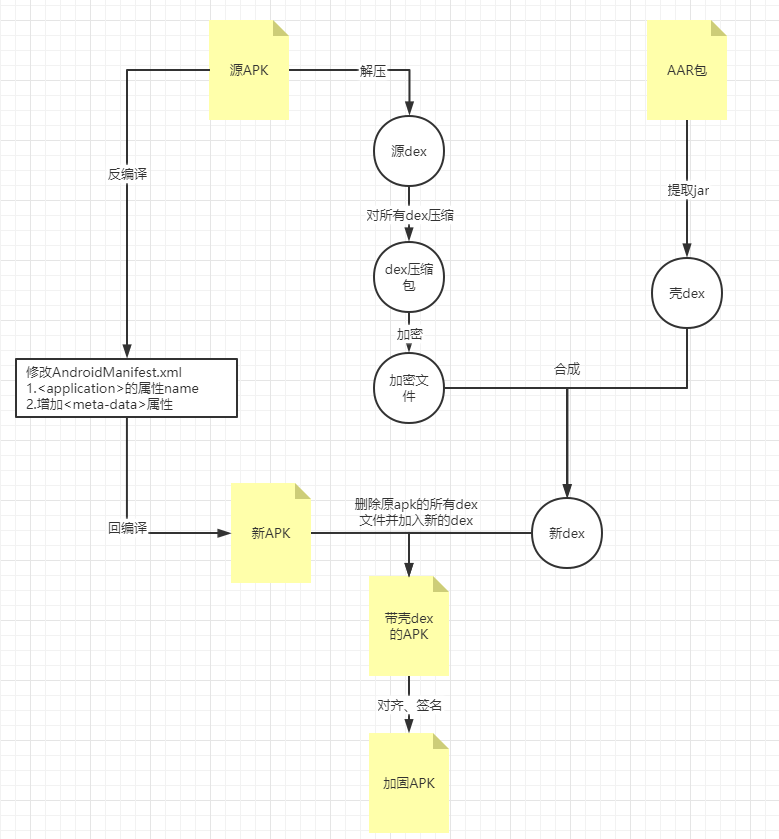
根据上流程图可以总结如下七个步骤:
步骤一:将加固壳中的aar中的jar利用dx工具转成dex文件
步骤二:将需要加固的APK解压,并将所有dex文件打包成一个zip包,方便后续进行加密处理
步骤三:对步骤二的zip包进行加密,并与壳dex合成新dex文件
步骤四:修改AndroidManifest(替换Application的android:name属性和新增)
步骤五:将步骤三生成的新dex文件替换apk中的所有dex文件
步骤六:APK对齐处理
步骤七:对生成的APK进行签名
到这其实就把APK加固流程讲完了,下面就来结合项目对各步骤进行详解。
三、项目案例
从上步骤中可以看到,加固会涉及到三个工程为:demo、jiagu_shell、jiaguLib,如下图: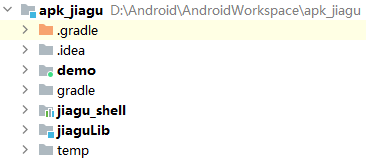
demo工程
普通的app工程,即我们平时开发的工程。主要用于生成待加固的apk。
jiaguLib工程
apk加固主工程,完成apk的加固工作。
1.将加固壳中的aar中的jar利用dx工具转成dex文件
生成Aar包:选中jiagu_shell工程,Build - Make Module ‘apkjiagu.jiagu_shell’,会在jiagu_shell - build - outputs - aar目录中生成jiagu_shell-debug.aar。
aar包生成后,就可以利用dx工具生成dex了,如下核心代码:
/*** 步骤一:将加固壳中的aar中的jar转成dex文件* @throws Exception 异常*/private File shellAar2Dex() throws Exception{logTitle("步骤一:将加固壳中的aar中的jar转成dex文件");//步骤一:将加固壳中的aar中的jar转成dex文件File aarFile = new File(ROOT+"aar/jiagu_shell-release.aar");File aarTemp = new File(OUT_TMP+"shell");ZipUtil.unZip(aarFile, aarTemp);File classesJar = new File(aarTemp, "classes.jar");File classesDex = new File(aarTemp, "classes.dex");boolean ret = ProcessUtil.executeCommand(String.format(Locale.CHINESE,"dx --dex --output %s %s",classesDex.getAbsolutePath(),classesJar.getAbsolutePath()));if (ret){System.out.println("已生成======"+classesDex.getPath());}return classesDex;}
ZipUtil中unZip方法:
public static void unZip(File apkFile,File destDir) throws Exception{// 判断源文件是否存在if (!apkFile.exists()) {throw new Exception(apkFile.getPath() + "所指文件不存在");}//开始解压//构建解压输入流ZipInputStream zIn = new ZipInputStream(new FileInputStream(apkFile));ZipEntry entry = null;File file = null;while ((entry = zIn.getNextEntry()) != null) {if (!entry.isDirectory() && !entry.getName().equals("")) {file = new File(destDir, entry.getName());if (!file.exists()) {file.getParentFile().mkdirs();//创建此文件的上级目录}FileOutputStream fos = new FileOutputStream(file);int len = -1;byte[] buf = new byte[1024];while ((len = zIn.read(buf)) != -1) {fos.write(buf, 0, len);}// 关流顺序,先打开的后关闭fos.flush();fos.close();}else {file = new File(destDir, entry.getName());//是文件夹的时候创建目录if (!file.exists()){file.mkdirs();}}zIn.closeEntry();}zIn.close();}
ProcessUtil中executeCommand为执行命令方法,如下:
public static boolean executeCommand(String cmd) throws Exception{System.out.println("开始执行命令===>"+cmd);Process process = Runtime.getRuntime().exec("cmd /c "+cmd);ProcessUtil.consumeInputStream(process.getInputStream());ProcessUtil.consumeInputStream(process.getErrorStream());process.waitFor();if (process.exitValue() != 0) {throw new RuntimeException("执行命令错误===>"+cmd);}return true;}
jar转dex的命令
命令:dx --dex --output [输出dex] [输入的jar]
2.对待加固的APK解压,并将所有dex文件打包成一个zip包
直接对待加固的apk进行unzip,然后拿到解压目录中的所有dex文件,并打包成一个新的zip。代码如:
private File apkUnzipAndZipDexFiles(){logTitle("步骤二:将需要加固的APK解压,并将所有dex文件打包成一个zip包,方便后续进行加密处理");//下面加密码APK中所有的dex文件File apkFile = new File(ORIGIN_APK);File apkTemp = new File(OUT_TMP+"unzip/");try {//首先把apk解压出来ZipUtil.unZip(apkFile, apkTemp);//其次获取解压目录中的dex文件File dexFiles[] = apkTemp.listFiles(new FilenameFilter() {@Overridepublic boolean accept(File file, String s) {return s.endsWith(".dex");}});if (dexFiles == null) return null;//三:将所有的dex文件压缩为AppDex.zip文件File outTmpFile = new File(OUT_TMP);File outputFile = new File(outTmpFile,"AppDex.zip");//创建目录if (!outTmpFile.exists()){outTmpFile.mkdirs();}if (outputFile.exists()){outputFile.delete();}Zip4jUtil.zipFiles(dexFiles,outputFile);System.out.println("已生成======"+outputFile.getAbsolutePath());FileUtils.deleteFile(apkTemp.getAbsolutePath());return outputFile;}catch (Exception e){e.printStackTrace();}return null;}
这一步比较简单,仅涉及文件的解压和压缩操作。
值得注意:采用系统自带的ZipOutputSteam对dex压缩会存在Bad size问题,故这里采用zip4j包进行压缩。
3.对上述生成的zip进行加密,然后合并到壳dex中
这一步比较关键,涉及到dex文件格式,需要对dex格式进行一定了解。
可以参考Dex文件结构
我们只需要关注以下三个部分:
checksum,文件校验码 ,使用alder32 算法校验文件除去 maigc ,checksum 外余下的所有文件区域 ,用于检查文件错误 。signature,使用 SHA-1 算法 hash 除去 magic ,checksum 和 signature 外余下的所有文件区域 ,用于唯一识别本文件 。file_size,Dex文件的总长度。
为什么说我们只需要关注这三个字段呢?
因为我们需要将一个文件(加密之后的源dex包)写入到Dex中,那么我们肯定需要修改文件校验码(checksum).因为他是检查文件是否有错误。那么signature也是一样,也是唯一识别文件的算法。还有就是需要修改dex文件的大小。
不过这里还需要一个操作,就是标注一下我们加密的Zip的大小,当我们脱壳的时候,需要知道Zip的大小,才能正确的得到Zip。这个值直接放到文件的末尾就可以了。
所以总结一下我们需要做:修改Dex的三个文件头,将源Apk的dex包大小追加到壳dex的末尾就可以了。
我们修改之后得到新的Dex文件样式如下:
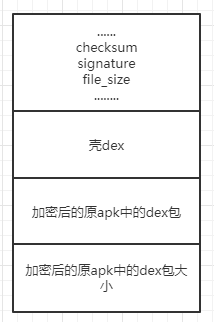
具体实现代码如下:
private File combine2NewDexFile(File shellDexFile,File originalDexZipFile){logTitle("步骤三:对步骤二的zip包进行加密,并与壳dex合成新dex文件");try {AESUtil aesUtil = new AESUtil();byte[] data = readFileBytes(originalDexZipFile);System.out.println("加密前数据大小为:"+data.length);byte[] payloadArray = aesUtil.encrypt(data);//以二进制形式读出zip,并进行加密处理//对源Apk进行加密操作byte[] unShellDexArray = readFileBytes(shellDexFile);//以二进制形式读出dexint payloadLen = payloadArray.length;int unShellDexLen = unShellDexArray.length;int totalLen = payloadLen + unShellDexLen +4;//多出4字节是存放长度的。byte[] newdex = new byte[totalLen]; // 申请了新的长度//添加解壳代码System.arraycopy(unShellDexArray, 0, newdex, 0, unShellDexLen);//先拷贝dex内容//添加加密后的解壳数据System.arraycopy(payloadArray, 0, newdex, unShellDexLen, payloadLen);//再在dex内容后面拷贝apk的内容//添加解壳数据长度System.arraycopy(intToByte(payloadLen), 0, newdex, totalLen-4, 4);//最后4为长度//修改DEX file size文件头fixFileSizeHeader(newdex);//修改DEX SHA1 文件头fixSHA1Header(newdex);//修改DEX CheckSum文件头fixCheckSumHeader(newdex);String str = OUT_TMP + "classes.dex";File file = new File(str);if (!file.exists()) {file.createNewFile();}//输出成新的dex文件FileOutputStream localFileOutputStream = new FileOutputStream(str);localFileOutputStream.write(newdex);localFileOutputStream.flush();localFileOutputStream.close();System.out.println("已生成新的Dex文件======"+str);//删除dex的zip包FileUtils.deleteFile(originalDexZipFile.getAbsolutePath());return file;} catch (Exception e) {e.printStackTrace();}return null;}
注意:为了提高破解难度,本文加解密代码采用C写的,并编译成dll文件被java工程引用。若不想那么麻烦可自行修改加密方式。
将C/C++编译成dll供Java工程使用
readFileBytes方法:
private byte[] readFileBytes(File file) throws IOException {byte[] arrayOfByte = new byte[1024];ByteArrayOutputStream localByteArrayOutputStream = new ByteArrayOutputStream();FileInputStream fis = new FileInputStream(file);while (true) {int i = fis.read(arrayOfByte);if (i != -1) {localByteArrayOutputStream.write(arrayOfByte, 0, i);} else {return localByteArrayOutputStream.toByteArray();}}}
修改文件大小方法,fixFileSizeHeader方法:
private void fixFileSizeHeader(byte[] dexBytes) {//新文件长度byte[] newfs = intToByte(dexBytes.length);System.out.println("fixFileSizeHeader ===== size : " + dexBytes.length);byte[] refs = new byte[4];//高位在前,低位在前掉个个for (int i = 0; i < 4; i++) {refs[i] = newfs[newfs.length - 1 - i];}System.arraycopy(refs, 0, dexBytes, 32, 4);//修改(32-35)}
修改dex头中的sinature方法,fixSHA1Header:
/*** 修改dex头 sha1值* @param dexBytes* @throws NoSuchAlgorithmException*/private void fixSHA1Header(byte[] dexBytes)throws NoSuchAlgorithmException {MessageDigest md = MessageDigest.getInstance("SHA-1");md.update(dexBytes, 32, dexBytes.length - 32);//从32为到结束计算sha--1byte[] newdt = md.digest();System.arraycopy(newdt, 0, dexBytes, 12, 20);//修改sha-1值(12-31)//输出sha-1值,可有可无String hexstr = "";for (int i = 0; i < newdt.length; i++) {hexstr += Integer.toString((newdt[i] & 0xff) + 0x100, 16).substring(1);}}
修改CheckSum值
/*** 修改dex头,CheckSum 校验码* @param dexBytes*/private void fixCheckSumHeader(byte[] dexBytes) {Adler32 adler = new Adler32();adler.update(dexBytes, 12, dexBytes.length - 12);//从12到文件末尾计算校验码long value = adler.getValue();int va = (int) value;byte[] newcs = intToByte(va);//高位在前,低位在前掉个个byte[] recs = new byte[4];for (int i = 0; i < 4; i++) {recs[i] = newcs[newcs.length - 1 - i];}System.arraycopy(recs, 0, dexBytes, 8, 4);//效验码赋值(8-11)}
到这里,我们就生成了加密后的dex文件,这时在Android studio中查看,你会发现仅能看到脱壳的类信息。
4.修改原APK中的AndroidManifest.xml文件
为了保证能正常使用apktool命令对apk正常反编译和回编译,我们要先修改AndroidManifest.xml,再对dex进行替换。若先替换dex,在对apk进行回编译时,加密的数据回丢失,导致包错误。
在这一步,主要采用apktool对apk进行反编译,通过代码修改AndroidManifest.xml,然后在进行回编译重新生成新的Apk。
具体实现代码如下:
private String modifyOriginApkManifest() throws Exception{String apkPath = ORIGIN_APK;String outputPath = OUT_TMP + "apk/";logTitle("步骤四:修改AndroidManifest(Application的android:name属性和新增<meta-data>)");String path = "";long start = System.currentTimeMillis();//1:执行命令进行反编译原apkSystem.out.println("开始反编译原apk ......");boolean ret = ProcessUtil.executeCommand("apktool d -o " + outputPath + " " + apkPath);if (ret){//2.修改AndroidManifest.xml,使用壳的Application替换原Application,并将原Application名称配置在meta-data中modifyAndroidManifest(new File(outputPath,"AndroidManifest.xml"));//3:重新编译成apk,仍以原来名称命名System.out.println("开始回编译apk ......");String apk = OUT_TMP + apkPath.substring(apkPath.lastIndexOf("/")+1);ret = ProcessUtil.executeCommand(String.format(Locale.CHINESE,"apktool b -o %s %s",apk,outputPath));if (ret){path = apk;}System.out.println("=== modifyOriginApkManifest ==== "+(System.currentTimeMillis()-start)+"ms");}return path;}
修改AndroidManifest.xml主要做的内容为:
1.替换标签中android:name值为com.zhh.jiagu.shell.StubApplication;
2.添加记录原application配置的name值,
<meta-data android:name="APPLICATION_CLASS_NAME" android:value="原apk的Application name"/>;
具体代码如下:
private void modifyAndroidManifest(File xmlFile){if (xmlFile == null){System.out.println("请设置AndroidManifest.xml文件");return;}if (!xmlFile.exists()){System.out.println("指定的AndroidManifest.xml文件不存在");return;}System.out.println("开始修改AndroidManifest.xml......");String shellApplicationName = "com.zhh.jiagu.shell.StubApplication";String metaDataName = "APPLICATION_CLASS_NAME";String attrName = "android:name";//采用Dom读取AndroidManifest.xml文件try {//1.实例化Dom工厂DocumentBuilderFactory factory = DocumentBuilderFactory.newInstance();//2.构建一个builderDocumentBuilder builder = factory.newDocumentBuilder();//3.通过builder解析xml文件Document document = builder.parse(xmlFile);NodeList nl = document.getElementsByTagName("application");if (nl != null){Node app = nl.item(0);//获取原APK中applicationString applicationName = "android.app.Application";NamedNodeMap attrMap = app.getAttributes();//有属性时Node node = app.getAttributes().getNamedItem(attrName);//默认为系统的Applicationif (node != null){applicationName = node.getNodeValue();node.setNodeValue(shellApplicationName);}else {//不存在该属性时,则创建一个Attr attr = document.createAttribute(attrName);attr.setValue(shellApplicationName);attrMap.setNamedItem(attr);}//添加<meta-data>数据,记录原APK的applicationElement metaData = document.createElement("meta-data");metaData.setAttribute("android:name",metaDataName);metaData.setAttribute("android:value",applicationName);app.appendChild(metaData);//重新写入文件xml文件TransformerFactory outFactory = TransformerFactory.newInstance();Transformer transformer = outFactory.newTransformer();Source xmlSource = new DOMSource(document);Result outResult = new StreamResult(xmlFile);transformer.transform(xmlSource,outResult);System.out.println("已完成修改AndroidManifest文件======");}}catch (Exception e){e.printStackTrace();}}
这一步使用的命令为:
apktool d -o [输出目录] [apk]
apktool b -o [输出apk] [回编译目录]
5.将新编译的apk中的所有dex删除,并将上述生成的新dex文件添加进apk中
删除dex文件方法:
public static void deleteDexFromZip(String zipFilePath) throws ZipException{ZipFile zipFile = new ZipFile(zipFilePath);List<FileHeader> files = zipFile.getFileHeaders();List<String> dexFiles = new ArrayList<>();for (FileHeader file : files) {if (file.getFileName().endsWith(".dex")) {dexFiles.add(file.getFileName());}}zipFile.removeFiles(dexFiles);}
添加dex到apk中的方法:
public static void addFile2Zip(String zip,String filepath,String rootFolder) throws ZipException{ZipFile zipFile = new ZipFile(zip);ZipParameters parameters = new ZipParameters();/** 压缩方式* COMP_STORE = 0;(仅打包,不压缩)* COMP_DEFLATE = 8;(默认)* COMP_AES_ENC = 99; 加密压缩*/parameters.setCompressionMethod(CompressionMethod.DEFLATE);/** 压缩级别* DEFLATE_LEVEL_FASTEST = 1; (速度最快,压缩比最小)* DEFLATE_LEVEL_FAST = 3; (速度快,压缩比小)* DEFLATE_LEVEL_NORMAL = 5; (一般)* DEFLATE_LEVEL_MAXIMUM = 7;* DEFLATE_LEVEL_ULTRA = 9;*/parameters.setCompressionLevel(CompressionLevel.NORMAL);// 目标路径if (rootFolder == null){rootFolder = "";}parameters.setRootFolderNameInZip(rootFolder);zipFile.addFile(filepath, parameters);}
如果将加密和解密通过JNI调用的,则记得要把so文件复制仅apk中(示例中就采用这种方式,有些可能仅采用Java加密,故复制so代码部分就不贴出来了,若感兴趣可以查看文章末尾的源码)。
6.apk对齐处理
到了这一步APK加固的主要工作其实已经完成了,只剩下对APK进行对齐处理和签名工作了。
apk对齐命令:zipalign -v -p 4 [输入的apk] [对齐后的apk]。
具体实现代码如下:
private File zipalignApk(File unAlignedApk) throws Exception{logTitle("步骤六:重新对APK进行对齐处理.....");//步骤四:重新对APK进行对齐处理File alignedApk = new File(unAlignedApk.getParent(),unAlignedApk.getName().replace(".apk","_align.apk"));boolean ret = ProcessUtil.executeCommand("zipalign -v -p 4 " + unAlignedApk.getAbsolutePath() + " " + alignedApk.getAbsolutePath());if (ret){System.out.println("已完成APK进行对齐处理======");}//删除未对齐的包FileUtils.deleteFile(unAlignedApk.getAbsolutePath());return alignedApk;}
7.签名
在Android系统中,未签名的Apk是无法正常安装运行的,因此我们要对上述对齐后的apk进行一次签名处理。
命令:apksigner sign --ks [签名文件] --ks-key-alias [alias名字] --min-sdk-version 21 --ks-pass pass:[keystore密码] --key-pass pass:[key密码] --out [输出apk] [输入apk]
具体实现代码为:
private File resignApk(File unSignedApk) throws Exception{logTitle("步骤七:对生成的APK进行签名");KeyStore store = KeyStoreUtil.readKeyStoreConfig((isRelease ? "":"jiaguLib/")+KEYSTORE_CFG);//步骤五:对APK进行签名File signedApk = new File(ROOT+"out",unSignedApk.getName().replace(".apk","_signed.apk"));//创建保存加固后apk目录if (!signedApk.getParentFile().exists()){signedApk.getParentFile().mkdirs();}String signerCmd = String.format("apksigner sign --ks %s --ks-key-alias %s --min-sdk-version 21 --ks-pass pass:%s --key-pass pass:%s --out %s %s",store.storeFile,store.alias,store.storePassword,store.keyPassword,signedApk.getAbsolutePath(),unSignedApk.getAbsolutePath());boolean ret = ProcessUtil.executeCommand(signerCmd);System.out.println("已完成签名======"+signedApk.getPath());//删除未对齐的包FileUtils.deleteFile(unSignedApk.getAbsolutePath());return signedApk;}
其实核心代码为:
String signerCmd = String.format("apksigner sign --ks %s --ks-key-alias %s --min-sdk-version 21 --ks-pass pass:%s --key-pass pass:%s --out %s %s",  store.storeFile,store.alias,store.storePassword,store.keyPassword,signedApk.getAbsolutePath(),unSignedApk.getAbsolutePath());
boolean ret = ProcessUtil.executeCommand(signerCmd);
由于笔者为了方便其他apk加固,采用读取签名配置的方式获取签名文件相关数据信息。
public static KeyStore readKeyStoreConfig(String configPath){File cf = new File(configPath);if (!cf.exists()){System.out.println("签名配置文件不存在");return null;}try {List<String> lines = Files.readAllLines(cf.toPath());if (lines == null || lines.size() <= 0){System.out.println("签名配置文件内容为空");return null;}KeyStore store = new KeyStore();for (String line : lines){if (line.trim().startsWith("storeFile")){store.storeFile = line.split("=")[1].trim();}else if (line.trim().startsWith("storePassword")){store.storePassword = line.split("=")[1].trim();}else if (line.trim().startsWith("alias")){store.alias = line.split("=")[1].trim();}else if (line.trim().startsWith("keyPassword")){store.keyPassword = line.split("=")[1].trim();}}return store;}catch (Exception e){e.printStackTrace();}return null;}
好了,到这里已经完成了APK的加固工作,可以正常安装apk了。
那么如何让我们加固后的APK进行脱壳呢?接下来就来看下jiagu_shell工程
jiagu_shell工程
该工程主要提供APK脱壳工作。
根据app启动流程不难发现脱壳工作必须要在壳Application中进行,先来看下脱壳的流程:
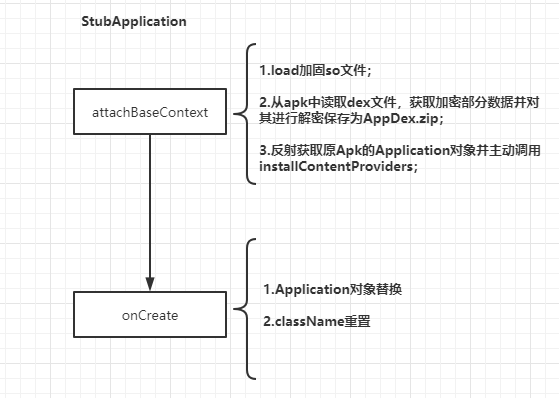
attachBaseContext中的主要工作为:
- 从apk中读取dex文件,获取加密的dex数据,并对其进行解密保存;
- 通过DexClassLoader动态加载AppDex.zip;
- 主动调用ActivityThread中的
installContentProviders方法(后续问题中会提到这点);
onCreate主要工作:
- 替换Application对象,并运行新的Application的create方法;
解析apk,读取dex文件数据进行解密,然后采用DexClassLoader动态加载:
public static boolean decodeDexAndReplace(Application context, int appVersionCode){try {//创建两个文件夹payload_odex,payload_lib 私有的,可写的文件目录File odex = context.getDir("payload_odex", Application.MODE_PRIVATE);
//            File libs = context.getDir("payload_lib", Application.MODE_PRIVATE);String odexPath = odex.getAbsolutePath();//按版本号来标记zipString dexFilePath = String.format(Locale.CHINESE,"%s/AppDex.zip",odexPath);LogUtil.info("decodeDexAndReplace =============================开始");File dexFile = new File(dexFilePath);LogUtil.info("apk size ===== "+dexFile.length());if (dexFile.exists()){dexFile.delete();}//第一次加载APPif (!dexFile.exists()) {//先清空odexPath目录中文件,防止数据越来越多File[] children = odex.listFiles();if (children != null && children.length > 0){for (File child : children){child.delete();}}LogUtil.info( " ===== App is first loading.");long start = System.currentTimeMillis();dexFile.createNewFile();  //在payload_odex文件夹内,创建payload.apkString apkPath = context.getApplicationInfo().sourceDir;// 读取程序classes.dex文件byte[] dexdata = Utils.readDexFileFromApk(apkPath);//从classes.dex中再取出AppDex.zip解密后存放到/AppDex.zip,及其so文件放到payload_lib下Utils.releaseAppDexFile(dexdata,dexFilePath);LogUtil.info("解压和解密耗时 ===== "+(System.currentTimeMillis() - start) + "  === " + dexFile.exists());}// 配置动态加载环境//获取主线程对象Object currentActivityThread = getCurrentActivityThread();String packageName = context.getPackageName();//当前apk的包名LogUtil.info("packageName ===== "+packageName);//下面两句不是太理解ArrayMap mPackages = (ArrayMap) RefInvoke.getFieldOjbect("android.app.ActivityThread", currentActivityThread, "mPackages");LogUtil.info("反射得到的mPackages ===== "+mPackages);WeakReference wr = (WeakReference) mPackages.get(packageName);ClassLoader mClassLoader = (ClassLoader) RefInvoke.getFieldOjbect("android.app.LoadedApk", wr.get(), "mClassLoader");//创建被加壳apk的DexClassLoader对象  加载apk内的类和本地代码(c/c++代码)DexClassLoader dLoader = new DexClassLoader(dexFilePath, odexPath, context.getApplicationInfo().nativeLibraryDir, mClassLoader);LogUtil.info("反射得到的dLoader ===== "+dLoader);//base.getClassLoader(); 是不是就等同于 (ClassLoader) RefInvoke.getFieldOjbect()? 有空验证下//?//把当前进程的DexClassLoader 设置成了被加壳apk的DexClassLoader  ----有点c++中进程环境的意思~~RefInvoke.setFieldOjbect("android.app.LoadedApk", "mClassLoader", wr.get(), dLoader);LogUtil.info("decodeDexAndReplace ============================= 结束");return true;} catch (Exception e) {LogUtil.error( "error ===== "+Log.getStackTraceString(e));e.printStackTrace();}return false;}
获取classes.dex数据的方法,其实就是解压的方式,代码如下:
public static byte[] readDexFileFromApk(String apkPath) throws IOException {LogUtil.info("从classes.dex解析出加密的原包的dex数据");ByteArrayOutputStream dexByteArrayOutputStream = new ByteArrayOutputStream();//获取当前zip进行解压ZipInputStream zipInputStream = new ZipInputStream(new BufferedInputStream(new FileInputStream(apkPath)));while (true) {ZipEntry entry = zipInputStream.getNextEntry();if (entry == null) {zipInputStream.close();break;}if (entry.getName().equals("classes.dex")) {byte[] arrayOfByte = new byte[1024];while (true) {int i = zipInputStream.read(arrayOfByte);if (i == -1)break;dexByteArrayOutputStream.write(arrayOfByte, 0, i);}}zipInputStream.closeEntry();}zipInputStream.close();return dexByteArrayOutputStream.toByteArray();}
接着从classes.dex中获取加密的数据并解密和输出到AppDex.zip文件:
public static void releaseAppDexFile(byte[] apkdata,String apkFileName) throws Exception {int length = apkdata.length;//取被加壳apk的长度 这里的长度取值,对应加壳时长度的赋值都可以做些简化byte[] dexlen = new byte[4];System.arraycopy(apkdata, length - 4, dexlen, 0, 4);ByteArrayInputStream bais = new ByteArrayInputStream(dexlen);DataInputStream in = new DataInputStream(bais);int readInt = in.readInt();LogUtil.info("============ 读取原Dex压缩文件大小 ======"+readInt);byte[] newdex = new byte[readInt];//把被加壳apk内容拷贝到newdex中System.arraycopy(apkdata, length - 4 - readInt, newdex, 0, readInt);LogUtil.info("============ 开始对加密dex进行解密======" + newdex.length);//对zip包进行解密newdex = AESUtil.decrypt(newdex);LogUtil.info("============ 解密后的大小为======" + newdex.length);//写入AppDex.zip文件File file = new File(apkFileName);try {FileOutputStream localFileOutputStream = new FileOutputStream(file);localFileOutputStream.write(newdex);localFileOutputStream.close();} catch (IOException localIOException) {throw new RuntimeException(localIOException);}}
最后通过反射获取原Application对象,在通过反射调用ActivityThread中的installContentProviders方法。
public static Application makeApplication(String srcApplicationClassName){LogUtil.info( "makeApplication ============== " + srcApplicationClassName);if (TextUtils.isEmpty(srcApplicationClassName)){LogUtil.error("请配置原APK的Application ===== ");return null;}//调用静态方法android.app.ActivityThread.currentActivityThread获取当前activity所在的线程对象Object currentActivityThread = getCurrentActivityThread();LogUtil.info("currentActivityThread ============ "+currentActivityThread);//获取当前currentActivityThread的mBoundApplication属性对象,//该对象是一个AppBindData类对象,该类是ActivityThread的一个内部类Object mBoundApplication = getBoundApplication(currentActivityThread);LogUtil.info("mBoundApplication ============ "+mBoundApplication);//读取mBoundApplication中的info信息,info是LoadedApk对象Object loadedApkInfo = getLoadApkInfoObj(mBoundApplication);LogUtil.info("loadedApkInfo ============ "+loadedApkInfo);//先从LoadedApk中反射出mApplicationInfo变量,并设置其className为原Application的className//todo:注意:这里一定要设置,否则makeApplication还是壳Application对象,造成一直在attach中死循环ApplicationInfo mApplicationInfo = (ApplicationInfo) RefInvoke.getFieldOjbect("android.app.LoadedApk", loadedApkInfo, "mApplicationInfo");mApplicationInfo.className = srcApplicationClassName;//执行 makeApplication(false,null)Application app = (Application) RefInvoke.invokeMethod("android.app.LoadedApk", "makeApplication", loadedApkInfo, new Class[] { boolean.class, Instrumentation.class }, new Object[] { false, null });LogUtil.info("makeApplication ============ app : "+app);//由于源码ActivityThread中handleBindApplication方法绑定Application后会调用installContentProviders,//此时传入的context仍为壳Application,故此处进手动安装ContentProviders,调用完成后,清空原providersinstallContentProviders(app,currentActivityThread,mBoundApplication);return app;}
反射调用ActivityThread中的installContentProviders方法:
private static void installContentProviders(Application app,Object currentActivityThread,Object boundApplication){if (app == null) return;LogUtil.info("执行installContentProviders =================");List providers = (List) RefInvoke.getFieldOjbect("android.app.ActivityThread$AppBindData",boundApplication, "providers");LogUtil.info( "反射拿到providers = " + providers);if (providers != null) {RefInvoke.invokeMethod("android.app.ActivityThread","installContentProviders",currentActivityThread,new Class[]{Context.class,List.class},new Object[]{app,providers});providers.clear();}}
最后新旧Application对象的替换工作。如下代码:
public static void replaceAndRunMainApplication(Application app){if (app == null){return;}LogUtil.info( "onCreate ===== 开始替换=====");// 如果源应用配置有Appliction对象,则替换为源应用Applicaiton,以便不影响源程序逻辑。final String appClassName = app.getClass().getName();//调用静态方法android.app.ActivityThread.currentActivityThread获取当前activity所在的线程对象Object currentActivityThread = getCurrentActivityThread();//获取当前currentActivityThread的mBoundApplication属性对象,//该对象是一个AppBindData类对象,该类是ActivityThread的一个内部类Object mBoundApplication = getBoundApplication(currentActivityThread);//读取mBoundApplication中的info信息,info是LoadedApk对象Object loadedApkInfo = getLoadApkInfoObj(mBoundApplication);//检测loadApkInfo是否为空if (loadedApkInfo == null){LogUtil.error( "loadedApkInfo ===== is null !!!!");}else {LogUtil.info( "loadedApkInfo ===== "+loadedApkInfo);}//把当前进程的mApplication 设置成了原application,RefInvoke.setFieldOjbect("android.app.LoadedApk", "mApplication", loadedApkInfo, app);Object oldApplication = RefInvoke.getFieldOjbect("android.app.ActivityThread", currentActivityThread, "mInitialApplication");LogUtil.info( "oldApplication ===== "+oldApplication);ArrayList<Application> mAllApplications = (ArrayList<Application>) RefInvoke.getFieldOjbect("android.app.ActivityThread", currentActivityThread, "mAllApplications");//将壳oldApplication从ActivityThread#mAllApplications列表中移除mAllApplications.remove(oldApplication);//将原Application赋值给mInitialApplicationRefInvoke.setFieldOjbect("android.app.ActivityThread", "mInitialApplication", currentActivityThread, app);
//        ApplicationInfo appinfo_In_LoadedApk = (ApplicationInfo) RefInvoke.getFieldOjbect(
//                "android.app.LoadedApk", loadedApkInfo, "mApplicationInfo");ApplicationInfo appinfo_In_AppBindData = (ApplicationInfo) RefInvoke.getFieldOjbect("android.app.ActivityThread$AppBindData", mBoundApplication, "appInfo");
//        appinfo_In_LoadedApk.className = appClassName;appinfo_In_AppBindData.className = appClassName;ArrayMap mProviderMap = (ArrayMap) RefInvoke.getFieldOjbect("android.app.ActivityThread", currentActivityThread, "mProviderMap");Iterator it = mProviderMap.values().iterator();while (it.hasNext()) {Object providerClientRecord = it.next();Object localProvider = RefInvoke.getFieldOjbect("android.app.ActivityThread$ProviderClientRecord", providerClientRecord, "mLocalProvider");RefInvoke.setFieldOjbect("android.content.ContentProvider", "mContext", localProvider, app);}LogUtil.info( "app ===== "+app + "=====开始执行原Application");app.onCreate();}
至此脱壳工作完成,运行APP了。
中间涉及JNI层代码这里就不多说明,可以看后续的源码。
四、加固工具及命令
1.jar转dex
命令:dx --dex --output [输出dex] [输入的jar]
2.apktool反编译与回编译
反编译:apktool d -o [输出目录] [apk]
回编译:apktool b -o [输出apk] [回编译目录]
3.apk对齐命令
命令:zipalign -v -p 4 [输入的apk] [对齐后的apk]
4.签名命令
命令:apksigner sign --ks [签名文件] --ks-key-alias [alias名字] --min-sdk-version 21 --ks-pass pass:[keystore密码] --key-pass pass:[key密码] --out [输出apk] [输入apk]
5.AndroidManifest二进制文件修改器(备用)
AXMLEditor强大的AndroidManifest.xml二进制修改器,无需对APK进行反编译和回编译,节约时间。
注:由于apktool反编译和回编译apk太过耗时,想采用该工具直接修改AndroidManifest.xml,提升打包效率,不知道为什么打包后,始终无法运行,不执行壳Application,最后不得不放弃,待后面有时间在好好研究吧。如果该方案可行,打包效率会提高几十倍。
五、遇到问题
问题1:解密后加载dex,提示文件大小问题(Bad size …)?
解决:采用ZipOutputStream进行压缩,导致的问题。所以改用了Zip4j进行压缩,解压时仍可使用系统提供的解压方式。
问题2:提示找不到androidx.core.content.FileProviders类问题?
原因:通过查阅源码(ActivityThread - handleBindApplication())发现,makeApplication后会若providers不为空,则会执行初始化ContentProvider的操作(installContentProviders()),而在makeApplication中会执行Application的attachBaseContext方法,若在此将providers清空,后面就不会初始化ContentProvider的操作了,但是又不能不执行初始化。
解决:
获取原Application对象 -> 通过反射手动调用installContentProviders() -> 清空providers列表
问题3:通过反射调用LoadedApk类中的makeApplication方法后,运行出现一直重复执行Application的attachBaseContext方法?
原因:执行
makeApplication时反射的类是mApplicationInfo.className,而该值仍为壳Application类,因此反射后获取的Application与壳Application类一样,导致重复执行。解决:在反射
makeApplication前,先获取LoadedApk中的mApplicationInfo对象,并设置其className属性的值为原Application的类名,这样在调用makeApplication实例化Application对象就可以了。
问题4:应用启动后,原Application也替换成功了,初始化操作的时候提示找不到so文件?
解决:在实例化DexClassLoader对象时,传入的librarySearchPath不正确,应当使用app的nativeLibraryDir目录,即:
context.getApplicationInfo().nativeLibraryDir
问题5:加固时如何采用JNI对数据进行加密?
采用vs studio将C/C++代码编译成dll文件,在java工程中引用。
System.load()可以加载绝对路径的dll库,
System.loadLibrary()加载jre/bin中的dll文件。
欢迎留言,一起学习,共同进步!
github - 示例源码
gitee - 示例源码


![[uboot 移植]uboot 移植过程](https://img-blog.csdnimg.cn/77c65a5a9067470ca6ab33669554c56b.png)