树莓派——智能推送
本教程为python实训作业的笔记,包括了从如何烧系统到最后作品成型我所踩过的坑,走过的弯路(说多都是泪啊_)
开头篇
首先,老爷保号,bug远离我。
随着科技的发展,广告行业的技术发展日新月异,网络大数据精准投送广告技术已经很成熟了。但是在现在场景中,却少有应用,所以,智能推送将应用与如商场,电梯,KTV,人脸支付等公共场景。
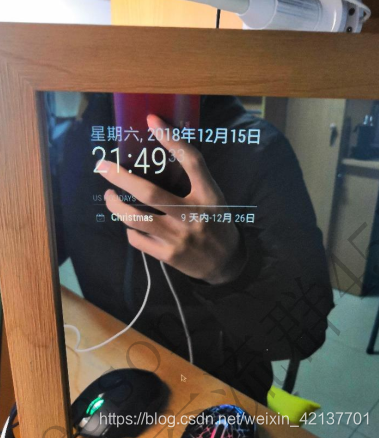
智能推送,类似于现在市面上的魔镜之类的产品,他可以与用户之间实现一种非常nice的交互效果。所有智能推送系统将参考魔镜的交互方式,并把她运用在电梯,商场等。就先酱了,接下来就是枯燥的教程啦!
安装树莓派
树莓派官网
1、格式化SD卡
2、把树莓派系统烧进去 工具下载
众所周知,在我大天朝,有一种叫墙的东西,so?镜像就应运而生了,在树莓派下载安装东西,我们最好都给它来个镜像。fq?dddd啊。烧完系统,在boot同一路径下建一个txt文件,命名为ssh,注意去掉".txt"。
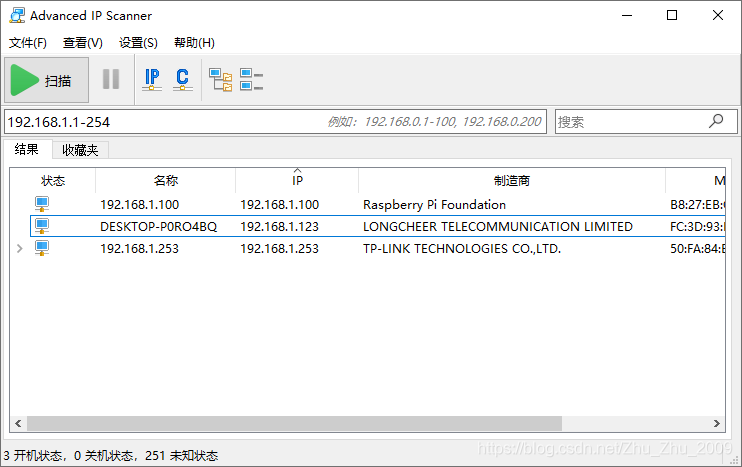
获取树莓派IP
1、WiFi
在boot同一路径下建一个txt文件,命名为wpa_supplicant.conf里面写入
country=CN
ctrl_interface=DIR=/var/run/wpa_supplicant GROUP=netdev
update_config=1network={
ssid="WiFi-A"
psk="12345678"
key_mgmt=WPA-PSK
priority=1
}network={
ssid="WiFi-B"
psk="12345678"
key_mgmt=WPA-PSK
priority=2
scan_ssid=1
}
ssid:网络的ssid
psk:密码
key_mgmt:加密类型
priority:连接优先级,数字越大优先级越高(不可以是负数)
scan_ssid:连接隐藏WiFi时需要指定该值为1
配置好开机后,就可在WiFi官网上看到树莓派的IP了
2、网线
直接将网线连接电脑和树莓派,树莓派网口闪绿灯,然后就直接在电脑上查看IP了
SSH远程连接
下载VNC直接用ip连接
 默认用户名:pi
默认密码:raspberry
恭喜!到此为止,树莓派就算是开机成功了
(如果不幸失败,就格式化再弄一次吧!)
更新树莓派
由于树莓派的服务器是在英国,要给所有的资源下载都改成国内的镜像。网上常见的教程往往都是替换软件更新源(/etc/apt/sources.list),实际上还存在一个系统更新(/etc/apt/sources./raspi.list)。我们对这两个文件进行修改,将其中的源网址更换为国内镜像站点即可。(个人觉得nano是个不错的文本编辑器)
sudo nano/etc/apt/sources.list
修改为:
deb http://mirrors.ustc.edu.cn/raspbian/raspbian/ buster main contrib non-free rpi
deb-src http://mirrors.ustc.edu.cn/raspbian/raspbian/ buster main contrib non-free rpi
sudo nano /etc/apt/sources.list.d/raspi.list
修改为:
deb http://mirrors.ustc.edu.cn/archive.raspberrypi.org/debian/ buster main
deb-src http://mirrors.ustc.edu.cn/archive.raspberrypi.org/debian/ buster main
接下来就可以快速更新了,执行:
sudo apt-get update
sudo apt-get upgrade
安装python3
1、安装依赖包
sudo apt-get install -y make build-essential libssl-dev zlib1g-dev
sudo apt-get install -y libbz2-dev libreadline-dev libsqlite3-dev wget curl llvm
sudo apt-get install -y libncurses5-dev  libncursesw5-dev xz-utils tk-dev
python官网下载
2、解压
解压结束 进入生成的目录python-3.7.3
安装python
安装完成,创建软连接,打印版本测试。
sudo tar -zxvf Python-3.7.3.tgz
cd Python-3.7.3
sudo ./configure --prefix=/usr/local/python3
sudo make
ln -s /usr/local/python3/bin/python3 /usr/local/bin/python3
ln -s /usr/local/python3/bin/pip3 /usr/local/bin/pip3
python3 -V
pip3 -V
安装opencv-python
安装依赖库
sudo apt-get install libjpeg-dev
sudo apt-get install libatlas-base-dev
sudo apt-get install libtiff5-dev
sudo apt-get install libpng12-dev
sudo apt-get install libqtgui4 libqt4-test
sudo apt-get install libjasper-dev
没想到吧,安装就一句命令的事儿
sudo pip3 install opencv-python
如果在命令行import cv2成功,安装就算成功啦
人脸识别算法
先在GitHub下载六个识别模型

把他们放在和py文件一个目录下
下方高能链接
深度神经网络(DNN)模型与前向传播算法
代码
一、后端
后端代码分为4个模块,
1、人脸识别(识别到返回年龄段和性别)
#-*- coding: utf-8 -*-
import cv2 as cv
import time# 检测人脸并绘制人脸bounding box
def getFaceBox(net, frame, conf_threshold=0.7):frameOpencvDnn = frame.copy()frameHeight = frameOpencvDnn.shape[0]  # 高就是矩阵有多少行frameWidth = frameOpencvDnn.shape[1]  # 宽就是矩阵有多少列blob = cv.dnn.blobFromImage(frameOpencvDnn, 1.0, (300, 300), [104, 117, 123], True, False)#  blobFromImage(image[, scalefactor[, size[, mean[, swapRB[, crop[, ddepth]]]]]]) -> retval  返回值   # swapRB是交换第一个和最后一个通道   返回按NCHW尺寸顺序排列的4 Mat值net.setInput(blob)detections = net.forward()  # 网络进行前向传播,检测人脸bboxes = []for i in range(detections.shape[2]):confidence = detections[0, 0, i, 2]if confidence > conf_threshold:x1 = int(detections[0, 0, i, 3] * frameWidth)y1 = int(detections[0, 0, i, 4] * frameHeight)x2 = int(detections[0, 0, i, 5] * frameWidth)y2 = int(detections[0, 0, i, 6] * frameHeight)bboxes.append([x1, y1, x2, y2])  # bounding box 的坐标cv.rectangle(frameOpencvDnn, (x1, y1), (x2, y2), (0, 255, 0), int(round(frameHeight / 150)),8)  # rectangle(img, pt1, pt2, color[, thickness[, lineType[, shift]]]) -> imgreturn frameOpencvDnn, bboxes
def getInfo():ages=[]genders=[]# 网络模型  和  预训练模型faceProto ="opencv_face_detector.pbtxt"faceModel = "opencv_face_detector_uint8.pb"ageProto ="age_deploy.prototxt"ageModel ="age_net.caffemodel"genderProto ="gender_deploy.prototxt"genderModel = "gender_net.caffemodel"# 模型均值MODEL_MEAN_VALUES = (78.4263377603, 87.7689143744, 114.895847746)ageList = ['(0-2)', '(4-6)', '(8-12)', '(15-20)', '(25-32)', '(38-43)', '(48-53)', '(60-100)']genderList = ['Male', 'Female']# 加载网络ageNet = cv.dnn.readNet(ageModel, ageProto)genderNet = cv.dnn.readNet(genderModel, genderProto)# 人脸检测的网络和模型faceNet = cv.dnn.readNet(faceModel, faceProto)# 打开一个视频文件或一张图片或一个摄像头cap = cv.VideoCapture(0)padding = 20#定义一个识别次数20,取平均数count=10while cv.waitKey(1) < 0:count-=1# Read framet = time.time()hasFrame, frame = cap.read()frame = cv.flip(frame, 1)if not hasFrame:cv.waitKey()breakframeFace, bboxes = getFaceBox(faceNet, frame)if not bboxes:print("No face Detected, Checking next frame")continuefor bbox in bboxes:# print(bbox)   # 取出box框住的脸部进行检测,返回的是脸部图片face = frame[max(0, bbox[1] - padding):min(bbox[3] + padding, frame.shape[0] - 1),max(0, bbox[0] - padding):min(bbox[2] + padding, frame.shape[1] - 1)]print("=======", type(face), face.shape)  #  <class 'numpy.ndarray'> (166, 154, 3)#blob = cv.dnn.blobFromImage(face, 1.0, (227, 227), MODEL_MEAN_VALUES, swapRB=False)print("======", type(blob), blob.shape)  # <class 'numpy.ndarray'> (1, 3, 227, 227)genderNet.setInput(blob)   # blob输入网络进行性别的检测genderPreds = genderNet.forward()   # 性别检测进行前向传播print("++++++", type(genderPreds), genderPreds.shape, genderPreds)   # <class 'numpy.ndarray'> (1, 2)  [[9.9999917e-01 8.6268375e-07]]  变化的值gender = genderList[genderPreds[0].argmax()]   # 分类  返回性别类型# print("Gender Output : {}".format(genderPreds))print("Gender : {}, conf = {:.3f}".format(gender, genderPreds[0].max()))ageNet.setInput(blob)agePreds = ageNet.forward()age = ageList[agePreds[0].argmax()]ages.append(age)genders.append(gender)print("--------------------识别到年龄:",age)print("--------------------识别到性别:", gender)cv.waitKey(1)# time.sleep(1)print(agePreds[0].argmax())  # 3print("*********", agePreds[0])   #  [4.5557402e-07 1.9009208e-06 2.8783199e-04 9.9841607e-01 1.5261240e-04 1.0924522e-03 1.3928890e-05 3.4708322e-05]print("Age Output : {}".format(agePreds))print("Age : {}, conf = {:.3f}".format(age, agePreds[0].max()))label = "{},{}".format(gender, age)cv.putText(frameFace, label, (bbox[0], bbox[1] - 10), cv.FONT_HERSHEY_SIMPLEX, 0.8, (0, 255, 255), 2,#显示头像年龄性别信息cv.LINE_AA)  # putText(img, text, org, fontFace, fontScale, color[, thickness[, lineType[, bottomLeftOrigin]]]) -> imgcv.imshow("Age Gender Demo", frameFace)#显示识别窗口if count<0:print("=================识别结束==================")# 传入两个识别到的年龄和性别数据,取其众数age = max(ages, key=ages.count)gender = max(genders,key=genders.count)return age,genderbreakprint("time : {:.3f} ms".format(time.time() - t))#识别一次花费的时间
2、音乐爬取模块(根据关键字去爬取相关的音乐,歌词,海报,音乐信息)
库:requests
'''
通过咪咕音乐爬取音乐。可以以关键字去搜索,返回一个json数据,再去爬取音乐,海报,歌词,歌曲信息等,保存到特定目录下
'''
import requests
import json
import os
import timedef download(key):head = {'User-Agent': 'Mozilla/5.0 (Windows NT 10.0; Win64; x64) AppleWebKit/537.36 (KHTML, like Gecko) Chrome/83.0.4103.116 Safari/537.36','Cookie':'migu_cn_cookie_id=1bdd01cf-0863-4626-807a-dde117f8ac62; Hm_lvt_ec5a5474d9d871cb3d82b846d861979d=1604933806; WT_FPC=id=259a9a71452bc6439d71594005492106:lv=1605184011867:ss=1605184011867','Accept':'image/avif,image/webp,image/apng,image/*,*/*;q=0.8'}r = requests.get(f"http://pd.musicapp.migu.cn/MIGUM3.0/v1.0/content/search_all.do?&ua=Android_migu&version=5.0.1&text={key}&pageNo=1&pageSize=30&searchSwitch="+"{%22song%22:1,%22album%22:0,%22singer%22:0,%22tagSong%22:0,%22mvSong%22:0,%22songlist%22:0,%22bestShow%22:1}",verify=False)j=json.loads(r.text)print(j['code'])print(j['info'])print(j['songResultData']['result'][0])#歌手idsingersId = j['songResultData']['result'][0]['singers'][0]['id']#歌手名字singersName = j['songResultData']['result'][0]['singers'][0]['name']#歌曲标签tags =j['songResultData']['result'][0]['tags']#图片url,列表类型imgUrl = [i['img'] for i in j['songResultData']['result'][0]['imgItems']]print(imgUrl)print(singersId)print(singersName)print(tags)print(len(j['songResultData']['result']))print()name = j['songResultData']['result'][0]['name']print(name)SongUrl = r"https://freetyst.nf.migu.cn"+j['songResultData']['result'][0]['rateFormats'][0]['url'][24:]print(r"https://freetyst.nf.migu.cn"+j['songResultData']['result'][0]['rateFormats'][0]['url'][24:])print(SongUrl)print(j['songResultData']['result'][0]['lyricUrl'])# qq = requests.get(r'https://freetyst.nf.migu.cn/public/ringmaker01/n17/2017/07/%E6%97%A0%E6%8D%9F/2009%E5%B9%B406%E6%9C%8826%E6%97%A5%E5%8D%9A%E5%B0%94%E6%99%AE%E6%96%AF/alac/%E6%99%B4%E5%A4%A9-%E5%91%A8%E6%9D%B0%E4%BC%A6.m4a').content# p = open('d:\\aa.m4a','wb')# p.write(qq)# p.close()print('--------------------------------歌词下载中------------------------------------------')##创建song子目录(音乐名)# os.mkdir('d:\\song\\lyrics\\{}'.format(name))##歌词lyricUrl = j['songResultData']['result'][0]['lyricUrl']lyricResponse = requests.get(lyricUrl,verify=False).textlyric = open('/home/pi/raspberry/song/lyrics/{}.txt'.format(name, name), 'wb')lyric.write(lyricResponse.encode("utf-8"))lyric.close()print('--------------------------------歌词下载成功------------------------------------------')print('--------------------------------歌词信息下载中------------------------------------------')#歌曲信息songInfo = open('/home/pi/raspberry/song/song_info/{}.txt'.format(name), 'wb')#歌手songInfo.write(('歌手:'+j['songResultData']['result'][0]['singers'][0]['name']+'\n').encode('utf-8'))#歌手idsongInfo.write(('歌手id:'+j['songResultData']['result'][0]['singers'][0]['id']).encode('utf-8'))songInfo.close()print('--------------------------------歌词信息下载成功------------------------------------------')print('--------------------------------图片下载中------------------------------------------')#处理图片urli = 0for url in imgUrl:i = i+1imgResponse = requests.get(url,verify=False).contentimg = open('/home/pi/raspberry/song/pictures/{}.png'.format(name+str(i)),'wb')img.write(imgResponse)img.close()print('--------------------------------图片下载成功------------------------------------------')print('--------------------------------音乐下载中------------------------------------------')songResponse = requests.get(SongUrl,verify=False).contentsong = open('/home/pi/raspberry/song/songs/{}.mp3'.format(name), 'wb')song.write(songResponse)song.close()print('--------------------------------音乐下载成功------------------------------------------')print('--------------------------------音乐信息下载成功------------------------------------------')# songInfoResponse  = requests.get().text
def songList():os.listdir('/home/pi/raspberry/song/')if __name__ == '__main__':download('十年')
3、广告推送模块(根据人脸识别返回的信息去资源库拿权重高资源到界面展示,资源有轮播图,视频,海报)
import get_age_gender as ag
import os
import random
'''
需求:根据识别到的信息在广告库里面选取照片、视频、二维码.每张照片,每个视频都有相应的权重
功能:返回一组照片,一个视频,一个二维码
注意照片,二维码,视频的大小格式,分配到相应的位置上,并且展示
在收集广告图片时,必须注意图片的大小比例和图片的命名,更重要的是存放的位置,酱就ok啦
'''#返回该性别和年龄段的图片路径和视频路径
def pic_dir(ag):if ag[1]=='Male':files = os.listdir(r'/home/pi/raspberry/video/Male/')file = random.choice(files)if ag[0]=='(15-20)':return r'/home/pi/raspberry/Male/15-20/',r'/home/pi/raspberry/video/Male/'+fileelif ag[0] == '(0-2)':return r'/home/pi/raspberry/Male/0-2/',r'/home/pi/raspberry/video/Male/'+fileelif ag[0] == '(4-6)':return r'/home/pi/raspberry/Male/4-6/',r'/home/pi/raspberry/video/Male/'+fileelif ag[0] == '(8-12)':return r'/home/pi/raspberry/Male/8-12/',r'/home/pi/raspberry/video/Male/'+fileelif ag[0] == '(25-32)':return r'/home/pi/raspberry/Male/25-32/',r'/home/pi/raspberry/video/Male/'+fileelif ag[0] == '(38-43)':return r'/home/pi/raspberry/Male/38-43/',r'/home/pi/raspberry/video/Male/'+fileelif ag[0] == '(48-53)':return r'/home/pi/raspberry/Male/48-53/',r'/home/pi/raspberry/video/Male/'+fileelif ag[0] == '(60-100)':return r'/home/pi/raspberry/Male/60-100/',r'/home/pi/raspberry/video/Male/'+fileelse:print('出错啦!年龄未识别到')return -1elif ag[1]=='Female':files = os.listdir(r'/home/pi/raspberry/video/Female/')file = random.choice(files)if ag[0]=='(15-20)':return r'/home/pi/raspberry/Female/15-20/',r'/home/pi/raspberry/video/Female/' +fileelif ag[0] == '(0-2)':return r'/home/pi/raspberry/Female/0-2/',r'/home/pi/raspberry/video/Female/' +fileelif ag[0] == '(4-6)':return r'/home/pi/raspberry/Female/4-6/',r'/home/pi/raspberry/video/Female/' +fileelif ag[0] == '(8-12)':return r'/home/pi/raspberry/Female/8-12/',r'/home/pi/raspberry/video/Female/' +fileelif ag[0] == '(25-32)':return r'/home/pi/raspberry/Female/25-32/',r'/home/pi/raspberry/video/Female/' +fileelif ag[0] == '(38-43)':return r'/home/pi/raspberry/Female/38-43/',r'/home/pi/raspberry/video/Female/' +fileelif ag[0] == '(48-53)':return r'/home/pi/raspberry/Female/48-53/',r'/home/pi/raspberry/video/Female/' +fileelif ag[0] == '(60-100)':return r'/home/pi/raspberry/Female/60-100/',r'/home/pi/raspberry/video/Female/' +fileelse:print('出错啦!年龄未识别到')return -1else:print('出错啦!性别未识别到!')#随机返回左下方海报路径
def pos_dir():files = os.listdir(r'/home/pi/raspberry/poster/')file = random.choice(files)return r'/home/pi/raspberry/poster/' + file#随机返回
def QR_dir():files = os.listdir(r'/home/pi/raspberry/QRcode/')file = random.choice(files)return r'/home/pi/raspberry/QRcode/' + file# print(pic_dir(ag.getInfo()))
# print(pic_dir(ag.getInfo()))
还有二维码的生成
# coding=utf-8
import qrcode
import osdef qr(str):ipa = strqr = qrcode.QRCode(version=1,error_correction=qrcode.constants.ERROR_CORRECT_L,box_size=8,border=8,)qr.add_data(ipa)qr.make(fit=True)img = qr.make_image()img.save(r'C:\Users\25454\Desktop\raspberry\QRcode\\6.png')qr("https://item.jd.com/17858507406.html")
4、音乐模块(功能有音量调节,暂停播放,上下一曲,信息展示)
import requests
import json
import os
import timedef download(key):head = {'User-Agent': 'Mozilla/5.0 (Windows NT 10.0; Win64; x64) AppleWebKit/537.36 (KHTML, like Gecko) Chrome/83.0.4103.116 Safari/537.36','Cookie':'migu_cn_cookie_id=1bdd01cf-0863-4626-807a-dde117f8ac62; Hm_lvt_ec5a5474d9d871cb3d82b846d861979d=1604933806; WT_FPC=id=259a9a71452bc6439d71594005492106:lv=1605184011867:ss=1605184011867','Accept':'image/avif,image/webp,image/apng,image/*,*/*;q=0.8'}r = requests.get(f"http://pd.musicapp.migu.cn/MIGUM3.0/v1.0/content/search_all.do?&ua=Android_migu&version=5.0.1&text={key}&pageNo=1&pageSize=30&searchSwitch="+"{%22song%22:1,%22album%22:0,%22singer%22:0,%22tagSong%22:0,%22mvSong%22:0,%22songlist%22:0,%22bestShow%22:1}",verify=False)j=json.loads(r.text)print(j['code'])print(j['info'])print(j['songResultData']['result'][0])#歌手idsingersId = j['songResultData']['result'][0]['singers'][0]['id']#歌手名字singersName = j['songResultData']['result'][0]['singers'][0]['name']#歌曲标签tags =j['songResultData']['result'][0]['tags']#图片url,列表类型imgUrl = [i['img'] for i in j['songResultData']['result'][0]['imgItems']]print(imgUrl)print(singersId)print(singersName)print(tags)print(len(j['songResultData']['result']))print()name = j['songResultData']['result'][0]['name']print(name)SongUrl = r"https://freetyst.nf.migu.cn"+j['songResultData']['result'][0]['rateFormats'][0]['url'][24:]print(r"https://freetyst.nf.migu.cn"+j['songResultData']['result'][0]['rateFormats'][0]['url'][24:])print(SongUrl)print(j['songResultData']['result'][0]['lyricUrl'])# qq = requests.get(r'https://freetyst.nf.migu.cn/public/ringmaker01/n17/2017/07/%E6%97%A0%E6%8D%9F/2009%E5%B9%B406%E6%9C%8826%E6%97%A5%E5%8D%9A%E5%B0%94%E6%99%AE%E6%96%AF/alac/%E6%99%B4%E5%A4%A9-%E5%91%A8%E6%9D%B0%E4%BC%A6.m4a').content# p = open('d:\\aa.m4a','wb')# p.write(qq)# p.close()print('--------------------------------歌词下载中------------------------------------------')##创建song子目录(音乐名)# os.mkdir('d:\\song\\lyrics\\{}'.format(name))##歌词lyricUrl = j['songResultData']['result'][0]['lyricUrl']lyricResponse = requests.get(lyricUrl,verify=False).textlyric = open('/home/pi/raspberry/song/lyrics/{}.txt'.format(name, name), 'wb')lyric.write(lyricResponse.encode("utf-8"))lyric.close()print('--------------------------------歌词下载成功------------------------------------------')print('--------------------------------歌词信息下载中------------------------------------------')#歌曲信息songInfo = open('/home/pi/raspberry/song/song_info/{}.txt'.format(name), 'wb')#歌手songInfo.write(('歌手:'+j['songResultData']['result'][0]['singers'][0]['name']+'\n').encode('utf-8'))#歌手idsongInfo.write(('歌手id:'+j['songResultData']['result'][0]['singers'][0]['id']).encode('utf-8'))songInfo.close()print('--------------------------------歌词信息下载成功------------------------------------------')print('--------------------------------图片下载中------------------------------------------')#处理图片urli = 0for url in imgUrl:i = i+1imgResponse = requests.get(url,verify=False).contentimg = open('/home/pi/raspberry/song/pictures/{}.png'.format(name+str(i)),'wb')img.write(imgResponse)img.close()print('--------------------------------图片下载成功------------------------------------------')print('--------------------------------音乐下载中------------------------------------------')songResponse = requests.get(SongUrl,verify=False).contentsong = open('/home/pi/raspberry/song/songs/{}.mp3'.format(name), 'wb')song.write(songResponse)song.close()print('--------------------------------音乐下载成功------------------------------------------')print('--------------------------------音乐信息下载成功------------------------------------------')# songInfoResponse  = requests.get().text
def songList():os.listdir('/home/pi/raspberry/song/')
2、前端
前端包括一个轮播图,一个视频,一张海报,一张二维码和KTV音乐模块,给他们分配
5个线程,代码:
from tkinter import Tk, BOTH, CENTER, NORMAL
from tkinter.ttk import Frame, Label, Style
import os
import sys
import threading
import tkinter as tk
import time
from PIL import ImageTk, Image
import cv2
import pygame
import get_song
import choosePic as cp
import get_age_gender as agagPath = cp.pic_dir(ag.getInfo())
root = Tk()
root.attributes("-fullscreen", True)
# Create a frame
app = Frame(root,height=1000, width=2000)
app.grid()
# Create a label in the frame
lmain = Label(app)
lmain.place(x=600,y=0)cap = cv2.VideoCapture(agPath[1])
# 视频播放
def video_stream():try:# Capture from local_, frame = cap.read()cv2image = cv2.cvtColor(frame, cv2.COLOR_BGR2RGBA)img = Image.fromarray(cv2image).resize((480,400))imgtk = ImageTk.PhotoImage(image=img)lmain.imgtk = imgtklmain.configure(image=imgtk)lmain.after(40, video_stream)#递归except Exception as e:print("Exception: %s " % e)#右下方二维
def QR():img1_in = Image.open(cp.QR_dir())  # 加载最后图片img_out1 = img1_in.resize((100, 100))  # 重新设置大小img1 = ImageTk.PhotoImage(img_out1)  # 用 PhotoImage 打开图片panel1 = tk.Label(root, image=img1)panel1.configure(image=img1)panel1.image = img1# Label 自适应图片大小panel1.place(x=600, y=400)
#左下方的广告图
def left_down_p():scaler1 = Image.ANTIALIAS  # 设定 ANTIALIAS ,即抗锯齿img1_in = Image.open(cp.pos_dir())  # 加载第一张图片img_out1 = img1_in.resize((600, 250	))  # 重新设置大小img1 = ImageTk.PhotoImage(img_out1)  # 用 PhotoImage 打开图片panel1 = tk.Label(root, image=img1)panel1.configure(image=img1)panel1.image = img1# Label 自适应图片大小panel1.place(x=0, y=400)#广告轮播图
resolution = (1200, 500)  # 分辨率
Path = agPath[0]  # 相册路径
Interval = 3  # 播放间隔.单位:s
Index = 0  # 当前照片计数#获取图片文件名。
def getfiles():files = os.listdir(agPath[0])for x in files:if not (x.endswith('.jpg') or x.endswith('.JPG') or x.endswith('.png')):files.remove(x)return filesfiles = getfiles()
print(files)
scaler = Image.ANTIALIAS  # 设定 ANTIALIAS ,即抗锯齿img_in = Image.open(Path + files[0])  # 加载第一张图片
img_out = img_in.resize((600,400), scaler)  # 重新设置大小
img = ImageTk.PhotoImage(img_out)  # 用 PhotoImage 打开图片
panel = tk.Label(root, image=img)  # Label 自适应图片大小
panel.place(x=0,y=0)def image_change():"""自动切换图片。"""try:global Indextime.sleep(3)while 1:for i, x in enumerate(files):# 判断文件是否存在if not os.path.isfile(Path + '%s' % x):breakif i != Index:  # 跳过已播放的图片continueprint('自动处理图片', x, Index)img_in = Image.open(Path + '%s' % x)img_out = img_in.resize((600,400), scaler)img2 = ImageTk.PhotoImage(img_out)panel.configure(image=img2)panel.image = img2Index += 1if Index >= len(files):Index = 0time.sleep(Interval)except Exception as e:print("Exception: %s " % e)sys.exit(1)
#音乐模块
#歌单按钮新窗口
def create():top = tk.Toplevel()top.title('歌单')top.geometry('1000x500')r = 0c = 0for a in os.listdir(r'/home/pi/raspberry/song/songs/'):b=a.split('(')[0]b = tk.Button(top,text=b,width=25,height=1).grid(row=r,column=c)r = r + 1if r==16:r=0c = c + 1
#搜索框
e = tk.Entry(root, show=None,width=35)  # 显示成明文形式
e.place(x=720,y=445)#下载
def download():key = e.get()get_song.download(key)#显示音乐信息
def song_info():label = Label(root, text='音乐下载成功...',font=("微软雅黑", 9))label.place(x=730,y=475)def d_thread():d = threading.Thread(target=download)d.setDaemon(True)d.start()s = threading.Thread(target=song_info)s.setDaemon(True)s.start()#歌单按钮
b2 = tk.Button(root, text='歌单', width=8,height=1, command=create).place(x=730,y=490)
# 搜索按钮
b1 = tk.Button(root, text='下载', width=8,height=1, command=d_thread).place(x=850,y=490)# ----------------------一、音乐文本读取--------------------
filePath = r'/home/pi/raspberry/song/songs/'
SongName = os.listdir(filePath)
SongPath = [filePath + i for i in SongName]Number = 0
volume = 0.3Switch = True# ----------------------二、功能区--------------------------------------def fun1():filePath = r'/home/pi/raspberry/song/songs/'SongName = os.listdir(filePath)SongPath = [filePath + i for i in SongName]global NumberNumber = Number + 1if Number > len(SongPath) - 1:Number = 0pygame.mixer.music.load(SongPath[Number])pygame.mixer.music.play(-1)entry_var.set(SongName[Number])passdef fun2():filePath = r'/home/pi/raspberrysong/songs/'SongName = os.listdir(filePath)SongPath = [filePath + i for i in SongName]global Numberglobal Switchpygame.mixer.music.set_volume(volume)if Switch == True:pygame.mixer.music.unpause()Switch = Falseelse:pygame.mixer.music.pause()Switch = Truepassdef fun3():filePath = r'/home/pi/raspberry/song/songs/'SongName = os.listdir(filePath)SongPath = [filePath + i for i in SongName]global NumberNumber = Number - 1if Number < 0:Number = len(SongPath) - 1pygame.mixer.music.load(SongPath[Number])pygame.mixer.music.play(-1)entry_var.set(SongName[Number])passdef fun4():global volumevolume += 0.1if volume > 1:volume = 1pygame.mixer.music.set_volume(volume)def fun5():global volumevolume -= 0.1if volume < 0:volume = 0pygame.mixer.music.set_volume(volume)# ------------------计时器的制作--------------------------def oss(time):if time < 10:return "0" + str(time)else:return str(time)def clock(seconds):if seconds >= 60:minutes = seconds // 60seconds = seconds - minutes * 60return oss(minutes) + ":" + oss(seconds)else:return "00:" + oss(seconds)# --------------------------------------------------------class Current_time(threading.Thread):def __init__(self):threading.Thread.__init__(self)passdef clock(seconds):if seconds >= 60:minutes = seconds // 60seconds = seconds - minutes * 60return os(minutes) + ":" + os(seconds)else:return "00:" + os(seconds)def run(self):while 1:playtime = pygame.mixer.music.get_pos()seconds = int(playtime) // 1000current_time = clock(seconds)entry_var1.set(current_time)time.sleep(1)# 1.文本框
lal = tk.Label(root, text="欢迎使用KTV音乐播放器")  # 在root中创建标签
lal.place(x=750, y=405, width=200, height=40)  # 向root放置标签# ---------------二、显示正在播放的歌曲--------------------------entry_var = tk.StringVar()
entry_var.set('欢迎使用')
en1 = tk.Entry(root, textvariable=entry_var, justify=CENTER, state=NORMAL)
en1.place(x=720, y=530, width=200, height=15)entry_var1 = tk.StringVar()
entry_var1.set('00:00')
en2 = tk.Entry(root, textvariable=entry_var1, justify=CENTER)
en2.place(x=610, y=530, width=80, height=15)# ---------------三、音量调节----------------------------b3 = tk.Button(root, text="+", command=fun4)
b3.place(x=620, y=550, width=40, height=30)b3 = tk.Button(root, text="-", command=fun5)
b3.place(x=660, y=550, width=40, height=30)# ---------------四、切换歌曲|暂停播放----------------------------------
# 1.上一曲按钮
b1 = tk.Button(root, text="上一曲", command=fun1)
b1.place(x=700, y=550,width=60, height=30)# 2.播放按钮
b1 = tk.Button(root, text="播放|暂停", command=fun2)  # 定义:按钮名称+按钮功能
b1.place(x=760, y=550,width=80, height=30)  # 定义:按钮大小+按钮位置# 3.下一曲按钮
b3 = tk.Button(root, text="下一曲", command=fun3)
b3.place(x=840, y=550,width=60, height=30)pygame.mixer.init()
c = Current_time()
c.start()def main():t = threading.Thread(target=image_change)  # 创建图片切换线程# # python 可以通过 threading module 来创建新的线程,然而在创建线程的线程(父线程)关闭之后,相应的子线程可能却没有关闭# # 需要把 setDaemon 函数放在 start 函数前面解决此问题t.setDaemon(True)t.start()  # 启动线程l = threading.Thread(target=left_down_p)l.setDaemon(True)l.start()q = threading.Thread(target=QR)q.setDaemon(True)q.start()v = threading.Thread(target=video_stream)v.setDaemon(True)v.start()root.mainloop()if __name__ == '__main__':main()
操作说明
一、识别模块
资源目录如下:
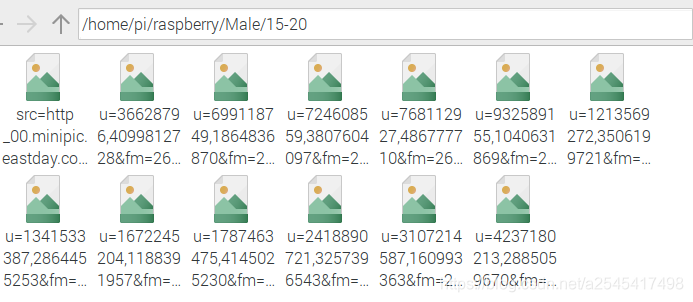

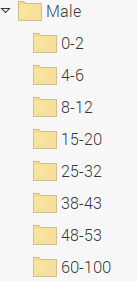
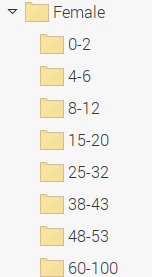
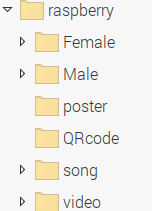
按照该目录去保存相应资源即可。
二、音乐模块


在搜索框输入音乐关键字(歌曲名,歌手名,模糊查询都可)即可在线爬取音乐的歌曲,海报,歌词,信息等,歌单即songs里面的音乐。(现在只支持循环播放,暂停,开始等功能)
效果图来啦

附电脑版代码:
#-*- coding: utf-8 -*-
import cv2 as cv
import time# 检测人脸并绘制人脸bounding box
def getFaceBox(net, frame, conf_threshold=0.7):frameOpencvDnn = frame.copy()frameHeight = frameOpencvDnn.shape[0]  # 高就是矩阵有多少行frameWidth = frameOpencvDnn.shape[1]  # 宽就是矩阵有多少列blob = cv.dnn.blobFromImage(frameOpencvDnn, 1.0, (300, 300), [104, 117, 123], True, False)#  blobFromImage(image[, scalefactor[, size[, mean[, swapRB[, crop[, ddepth]]]]]]) -> retval  返回值   # swapRB是交换第一个和最后一个通道   返回按NCHW尺寸顺序排列的4 Mat值net.setInput(blob)detections = net.forward()  # 网络进行前向传播,检测人脸bboxes = []for i in range(detections.shape[2]):confidence = detections[0, 0, i, 2]if confidence > conf_threshold:x1 = int(detections[0, 0, i, 3] * frameWidth)y1 = int(detections[0, 0, i, 4] * frameHeight)x2 = int(detections[0, 0, i, 5] * frameWidth)y2 = int(detections[0, 0, i, 6] * frameHeight)bboxes.append([x1, y1, x2, y2])  # bounding box 的坐标cv.rectangle(frameOpencvDnn, (x1, y1), (x2, y2), (0, 255, 0), int(round(frameHeight / 150)),8)  # rectangle(img, pt1, pt2, color[, thickness[, lineType[, shift]]]) -> imgreturn frameOpencvDnn, bboxes
def getInfo():ages=[]genders=[]# 网络模型  和  预训练模型faceProto ="opencv_face_detector.pbtxt"faceModel = "opencv_face_detector_uint8.pb"ageProto ="age_deploy.prototxt"ageModel ="age_net.caffemodel"genderProto ="gender_deploy.prototxt"genderModel = "gender_net.caffemodel"# 模型均值MODEL_MEAN_VALUES = (78.4263377603, 87.7689143744, 114.895847746)ageList = ['(0-2)', '(4-6)', '(8-12)', '(15-20)', '(25-32)', '(38-43)', '(48-53)', '(60-100)']genderList = ['Male', 'Female']# 加载网络ageNet = cv.dnn.readNet(ageModel, ageProto)genderNet = cv.dnn.readNet(genderModel, genderProto)# 人脸检测的网络和模型faceNet = cv.dnn.readNet(faceModel, faceProto)# 打开一个视频文件或一张图片或一个摄像头cap = cv.VideoCapture(0)padding = 20#定义一个识别次数20,取平均数count=20while cv.waitKey(1) < 0:count-=1# Read framet = time.time()hasFrame, frame = cap.read()frame = cv.flip(frame, 1)if not hasFrame:cv.waitKey()breakframeFace, bboxes = getFaceBox(faceNet, frame)if not bboxes:print("No face Detected, Checking next frame")continuefor bbox in bboxes:# print(bbox)   # 取出box框住的脸部进行检测,返回的是脸部图片face = frame[max(0, bbox[1] - padding):min(bbox[3] + padding, frame.shape[0] - 1),max(0, bbox[0] - padding):min(bbox[2] + padding, frame.shape[1] - 1)]print("=======", type(face), face.shape)  #  <class 'numpy.ndarray'> (166, 154, 3)#blob = cv.dnn.blobFromImage(face, 1.0, (227, 227), MODEL_MEAN_VALUES, swapRB=False)print("======", type(blob), blob.shape)  # <class 'numpy.ndarray'> (1, 3, 227, 227)genderNet.setInput(blob)   # blob输入网络进行性别的检测genderPreds = genderNet.forward()   # 性别检测进行前向传播print("++++++", type(genderPreds), genderPreds.shape, genderPreds)   # <class 'numpy.ndarray'> (1, 2)  [[9.9999917e-01 8.6268375e-07]]  变化的值gender = genderList[genderPreds[0].argmax()]   # 分类  返回性别类型# print("Gender Output : {}".format(genderPreds))print("Gender : {}, conf = {:.3f}".format(gender, genderPreds[0].max()))ageNet.setInput(blob)agePreds = ageNet.forward()age = ageList[agePreds[0].argmax()]ages.append(age)genders.append(gender)print("--------------------识别到年龄:",age)print("--------------------识别到性别:", gender)cv.waitKey(1)# time.sleep(1)print(agePreds[0].argmax())  # 3print("*********", agePreds[0])   #  [4.5557402e-07 1.9009208e-06 2.8783199e-04 9.9841607e-01 1.5261240e-04 1.0924522e-03 1.3928890e-05 3.4708322e-05]print("Age Output : {}".format(agePreds))print("Age : {}, conf = {:.3f}".format(age, agePreds[0].max()))label = "{},{}".format(gender, age)cv.putText(frameFace, label, (bbox[0], bbox[1] - 10), cv.FONT_HERSHEY_SIMPLEX, 0.8, (0, 255, 255), 2,#显示头像年龄性别信息cv.LINE_AA)  # putText(img, text, org, fontFace, fontScale, color[, thickness[, lineType[, bottomLeftOrigin]]]) -> imgcv.imshow("Age Gender Demo", frameFace)#显示识别窗口if count<0:print("=================识别结束==================")# 传入两个识别到的年龄和性别数据,取其众数age = max(ages, key=ages.count)gender = max(genders,key=genders.count)return age,genderbreakprint("time : {:.3f} ms".format(time.time() - t))#识别一次花费的时间if __name__ == '__main__':getInfo()
import requests
import json
import os
import timedef download(key):head = {'User-Agent': 'Mozilla/5.0 (Windows NT 10.0; Win64; x64) AppleWebKit/537.36 (KHTML, like Gecko) Chrome/83.0.4103.116 Safari/537.36','Cookie':'migu_cn_cookie_id=1bdd01cf-0863-4626-807a-dde117f8ac62; Hm_lvt_ec5a5474d9d871cb3d82b846d861979d=1604933806; WT_FPC=id=259a9a71452bc6439d71594005492106:lv=1605184011867:ss=1605184011867','Accept':'image/avif,image/webp,image/apng,image/*,*/*;q=0.8'}r = requests.get(f"http://pd.musicapp.migu.cn/MIGUM3.0/v1.0/content/search_all.do?&ua=Android_migu&version=5.0.1&text={key}&pageNo=1&pageSize=30&searchSwitch="+"{%22song%22:1,%22album%22:0,%22singer%22:0,%22tagSong%22:0,%22mvSong%22:0,%22songlist%22:0,%22bestShow%22:1}",verify=False)j=json.loads(r.text)print(j['code'])print(j['info'])print(j['songResultData']['result'][0])#歌手idsingersId = j['songResultData']['result'][0]['singers'][0]['id']#歌手名字singersName = j['songResultData']['result'][0]['singers'][0]['name']#歌曲标签tags =j['songResultData']['result'][0]['tags']#图片url,列表类型imgUrl = [i['img'] for i in j['songResultData']['result'][0]['imgItems']]print(imgUrl)print(singersId)print(singersName)print(tags)print(len(j['songResultData']['result']))print()name = j['songResultData']['result'][0]['name']print(name)SongUrl = r"https://freetyst.nf.migu.cn"+j['songResultData']['result'][0]['rateFormats'][0]['url'][24:]print(r"https://freetyst.nf.migu.cn"+j['songResultData']['result'][0]['rateFormats'][0]['url'][24:])print(SongUrl)print(j['songResultData']['result'][0]['lyricUrl'])# qq = requests.get(r'https://freetyst.nf.migu.cn/public/ringmaker01/n17/2017/07/%E6%97%A0%E6%8D%9F/2009%E5%B9%B406%E6%9C%8826%E6%97%A5%E5%8D%9A%E5%B0%94%E6%99%AE%E6%96%AF/alac/%E6%99%B4%E5%A4%A9-%E5%91%A8%E6%9D%B0%E4%BC%A6.m4a').content# p = open('d:\\aa.m4a','wb')# p.write(qq)# p.close()print('--------------------------------歌词下载中------------------------------------------')##创建song子目录(音乐名)# os.mkdir('d:\\song\\lyrics\\{}'.format(name))##歌词lyricUrl = j['songResultData']['result'][0]['lyricUrl']lyricResponse = requests.get(lyricUrl,verify=False).textlyric = open(r'C:\Users\25454\Desktop\raspberry\song\lyrics\{}.txt'.format(name, name), 'wb')lyric.write(lyricResponse.encode("utf-8"))lyric.close()print('--------------------------------歌词下载成功------------------------------------------')print('--------------------------------歌词信息下载中------------------------------------------')#歌曲信息songInfo = open(r'C:\Users\25454\Desktop\raspberry\song\song_info\{}.txt'.format(name), 'wb')#歌手songInfo.write(('歌手:'+j['songResultData']['result'][0]['singers'][0]['name']+'\n').encode('utf-8'))#歌手idsongInfo.write(('歌手id:'+j['songResultData']['result'][0]['singers'][0]['id']).encode('utf-8'))songInfo.close()print('--------------------------------歌词信息下载成功------------------------------------------')print('--------------------------------图片下载中------------------------------------------')#处理图片urli = 0for url in imgUrl:i = i+1imgResponse = requests.get(url,verify=False).contentimg = open(r'C:\Users\25454\Desktop\raspberry\song\pictures\{}.png'.format(name+str(i)),'wb')img.write(imgResponse)img.close()print('--------------------------------图片下载成功------------------------------------------')print('--------------------------------音乐下载中------------------------------------------')songResponse = requests.get(SongUrl,verify=False).contentsong = open(r'C:\Users\25454\Desktop\raspberry\song\songs\{}.mp3'.format(name), 'wb')song.write(songResponse)song.close()print('--------------------------------音乐下载成功------------------------------------------')print('--------------------------------音乐信息下载成功------------------------------------------')# songInfoResponse = requests.get().text
def songList():os.listdir(r'C:\Users\25454\Desktop\raspberry\song\\')# if __name__ == '__main__':
# download('十年')# coding=utf-8
import qrcode
import osdef qr(str):ipa = strqr = qrcode.QRCode(version=1,error_correction=qrcode.constants.ERROR_CORRECT_L,box_size=8,border=8,)qr.add_data(ipa)qr.make(fit=True)img = qr.make_image()img.save(r'C:\Users\25454\Desktop\raspberry\QRcode\\6.png')qr("https://item.jd.com/17858507406.html")
from tkinter import Tk, BOTH, CENTER, NORMAL
from tkinter.ttk import Frame, Label, Style
import os
import sys
import threading
import tkinter as tk
import time
from PIL import ImageTk, Image
import cv2
import choosePic as cp
import get_age_gender as ag
import get_song
import pygameagPath = cp.pic_dir(ag.getInfo())
root = Tk()
root.attributes("-fullscreen", True)
# Create a frame
app = Frame(root,height=540, width=2000)
app.grid()
# Create a label in the frame
lmain = Label(app)
lmain.place(x=900,y=0)cap = cv2.VideoCapture(agPath[1])
# 视频播放
def video_stream():try:# Capture from local_, frame = cap.read()cv2image = cv2.cvtColor(frame, cv2.COLOR_BGR2RGBA)img = Image.fromarray(cv2image).resize((700,600))imgtk = ImageTk.PhotoImage(image=img)lmain.imgtk = imgtklmain.configure(image=imgtk)lmain.after(40, video_stream)#递归except Exception as e:print("Exception: %s " % e)
#右下方二维码
#左下方的广告图
def QR():scaler1 = Image.ANTIALIAS  # 设定 ANTIALIAS ,即抗锯齿img1_in = Image.open(cp.QR_dir())  # 加载最后图片img_out1 = img1_in.resize((100, 100))  # 重新设置大小img1 = ImageTk.PhotoImage(img_out1)  # 用 PhotoImage 打开图片panel1 = tk.Label(root, image=img1)panel1.configure(image=img1)panel1.image = img1# Label 自适应图片大小panel1.place(x=900, y=540)#歌单按钮新窗口
def create():top = tk.Toplevel()top.title('歌单')top.geometry('1000x500')r = 0c = 0for a in os.listdir(r'C:\Users\25454\Desktop\raspberry\song\songs\\'):b=a.split('(')[0]b = tk.Button(top,text=b,width=25,height=1).grid(row=r,column=c)r = r + 1if r==16:r=0c = c + 1#左下方的广告图
def left_down_p():scaler1 = Image.ANTIALIAS  # 设定 ANTIALIAS ,即抗锯齿img1_in = Image.open(cp.pos_dir())  # 加载第一张图片img_out1 = img1_in.resize((900, 320))  # 重新设置大小img1 = ImageTk.PhotoImage(img_out1)  # 用 PhotoImage 打开图片panel1 = tk.Label(root, image=img1)panel1.configure(image=img1)panel1.image = img1# Label 自适应图片大小panel1.place(x=0, y=540)#广告轮播图
resolution = (1200, 500)  # 分辨率
Path = agPath[0]  # 相册路径
Interval = 3  # 播放间隔.单位:s
Index = 0  # 当前照片计数#获取图片文件名。
def getfiles():files = os.listdir(agPath[0])for x in files:if not (x.endswith('.jpg') or x.endswith('.JPG') or x.endswith('.png')):files.remove(x)return filesfiles = getfiles()
print(files)
scaler = Image.ANTIALIAS  # 设定 ANTIALIAS ,即抗锯齿img_in = Image.open(Path + files[0])  # 加载第一张图片
img_out = img_in.resize((900,540), scaler)  # 重新设置大小
img = ImageTk.PhotoImage(img_out)  # 用 PhotoImage 打开图片
panel = tk.Label(root, image=img)  # Label 自适应图片大小
panel.place(x=0,y=0)def image_change():"""自动切换图片。"""try:global Indextime.sleep(3)while 1:for i, x in enumerate(files):# 判断文件是否存在if not os.path.isfile(Path + '%s' % x):breakif i != Index:  # 跳过已播放的图片continueprint('自动处理图片', x, Index)img_in = Image.open(Path + '%s' % x)img_out = img_in.resize((900,540), scaler)img2 = ImageTk.PhotoImage(img_out)panel.configure(image=img2)panel.image = img2Index += 1if Index >= len(files):Index = 0time.sleep(Interval)except Exception as e:print("Exception: %s " % e)sys.exit(1)#音乐模块
#歌单按钮新窗口
def create():top = tk.Toplevel()top.title('歌单')top.geometry('1000x500')r = 0c = 0for a in os.listdir(r'C:\Users\25454\Desktop\raspberry\song\songs\\'):b=a.split('(')[0]b = tk.Button(top,text=b,width=25,height=1).grid(row=r,column=c)r = r + 1if r==16:r=0c = c + 1
#搜索框
e = tk.Entry(root, show=None,width=35)  # 显示成明文形式
e.place(x=1040,y=585)#下载
def download():key = e.get()get_song.download(key)#显示音乐信息
def song_info():label = Label(root, text='音乐下载成功...',font=("微软雅黑", 9))label.place(x=1050,y=610)def d_thread():d = threading.Thread(target=download)d.setDaemon(True)d.start()s = threading.Thread(target=song_info)s.setDaemon(True)s.start()#歌单按钮
b2 = tk.Button(root, text='歌单', width=8,height=1, command=create).place(x=1400,y=580)
# 搜索按钮
b1 = tk.Button(root, text='下载', width=8,height=1, command=d_thread).place(x=1300,y=580)# ----------------------一、音乐文本读取--------------------
filePath = r'C:/Users/25454/Desktop/raspberry/song/songs/'
SongName = os.listdir(filePath)
SongPath = [filePath + i for i in SongName]Number = 0
volume = 0.3
Switch = True# ----------------------二、功能区--------------------------------------def fun1():filePath = r'C:/Users/25454/Desktop/raspberry/song/songs/'SongName = os.listdir(filePath)SongPath = [filePath + i for i in SongName]global NumberNumber = Number + 1if Number > len(SongPath) - 1:Number = 0pygame.mixer.music.load(SongPath[Number])pygame.mixer.music.play(-1)entry_var.set(SongName[Number])passdef fun2():filePath =r'C:/Users/25454/Desktop/raspberry/song/songs/'SongName = os.listdir(filePath)SongPath = [filePath + i for i in SongName]global Numberglobal Switchpygame.mixer.music.set_volume(volume)if Switch == True:pygame.mixer.music.unpause()Switch = Falseelse:pygame.mixer.music.pause()Switch = Truepassdef fun3():filePath =r'C:/Users/25454/Desktop/raspberry/song/songs/'SongName = os.listdir(filePath)SongPath = [filePath + i for i in SongName]global NumberNumber = Number - 1if Number < 0:Number = len(SongPath) - 1pygame.mixer.music.load(SongPath[Number])pygame.mixer.music.play(-1)entry_var.set(SongName[Number])passdef fun4():global volumevolume += 0.1if volume > 1:volume = 1pygame.mixer.music.set_volume(volume)def fun5():global volumevolume -= 0.1if volume < 0:volume = 0pygame.mixer.music.set_volume(volume)# ------------------计时器的制作--------------------------def oss(time):if time < 10:return "0" + str(time)else:return str(time)def clock(seconds):if seconds >= 60:minutes = seconds // 60seconds = seconds - minutes * 60return oss(minutes) + ":" + oss(seconds)else:return "00:" + oss(seconds)# --------------------------------------------------------class Current_time(threading.Thread):def __init__(self):threading.Thread.__init__(self)passdef clock(seconds):if seconds >= 60:minutes = seconds // 60seconds = seconds - minutes * 60return os(minutes) + ":" + os(seconds)else:return "00:" + os(seconds)def run(self):while 1:playtime = pygame.mixer.music.get_pos()seconds = int(playtime) // 1000current_time = clock(seconds)entry_var1.set(current_time)time.sleep(1)# 1.文本框
lal = tk.Label(root, text="欢迎使用KTV音乐播放器")  # 在root中创建标签
lal.place(x=1050, y=545, width=200, height=40)  # 向root放置标签# ---------------二、显示正在播放的歌曲--------------------------entry_var = tk.StringVar()
entry_var.set('欢迎使用')
en1 = tk.Entry(root, textvariable=entry_var, justify=CENTER, state=NORMAL)
en1.place(x=1140, y=640, width=200, height=15)entry_var1 = tk.StringVar()
entry_var1.set('00:00')
en2 = tk.Entry(root, textvariable=entry_var1, justify=CENTER)
en2.place(x=1040, y=640, width=80, height=15)# ---------------三、音量调节----------------------------b3 = tk.Button(root, text="+", command=fun4)
b3.place(x=1040, y=670, width=40, height=30)b3 = tk.Button(root, text="-", command=fun5)
b3.place(x=1080, y=670, width=40, height=30)# ---------------四、切换歌曲|暂停播放----------------------------------
# 1.上一曲按钮
b1 = tk.Button(root, text="上一曲", command=fun1)
b1.place(x=1140, y=670,width=60, height=30)# 2.播放按钮
b1 = tk.Button(root, text="播放|暂停", command=fun2)  # 定义:按钮名称+按钮功能
b1.place(x=1220, y=670,width=80, height=30)  # 定义:按钮大小+按钮位置# 3.下一曲按钮
b3 = tk.Button(root, text="下一曲", command=fun3)
b3.place(x=1320, y=670,width=60, height=30)pygame.mixer.init()def main():t = threading.Thread(target=image_change)  # 创建图片切换线程# # python 可以通过 threading module 来创建新的线程,然而在创建线程的线程(父线程)关闭之后,相应的子线程可能却没有关闭# # 需要把 setDaemon 函数放在 start 函数前面解决此问题t.setDaemon(True)t.start()  # 启动线程l = threading.Thread(target=left_down_p)l.setDaemon(True)l.start()v = threading.Thread(target=video_stream)v.setDaemon(True)v.start()q = threading.Thread(target=QR)q.setDaemon(True)q.start()c = Current_time()c.setDaemon(True)c.start()root.mainloop()if __name__ == '__main__':main()
import get_age_gender as ag
import os
import random
'''
需求:根据识别到的信息在广告库里面选取照片、视频、二维码.每张照片,每个视频都有相应的权重
功能:返回一组照片,一个视频,一个二维码
注意照片,二维码,视频的大小格式,分配到相应的位置上,并且展示
在收集广告图片时,必须注意图片的大小比例和图片的命名,更重要的是存放的位置,酱就ok啦
'''#返回该性别和年龄段的图片路径和视频路径
def pic_dir(ag):if ag[1]=='Male':files = os.listdir(r'C:\Users\25454\Desktop\raspberry\video\Male\\')file = random.choice(files)if ag[0]=='(15-20)':return r'C:\Users\25454\Desktop\raspberry\Male\15-20\\',r'C:\Users\25454\Desktop\raspberry\video\Male\\'+fileelif ag[0] == '(0-2)':return r'C:\Users\25454\Desktop\raspberry\Male\0-2\\',r'C:\Users\25454\Desktop\raspberry\video\Male\\'+fileelif ag[0] == '(4-6)':return r'C:\Users\25454\Desktop\raspberry\Male\4-6\\',r'C:\Users\25454\Desktop\raspberry\video\Male\\'+fileelif ag[0] == '(8-12)':return r'C:\Users\25454\Desktop\raspberry\Male\8-12\\',r'C:\Users\25454\Desktop\raspberry\video\Male\\'+fileelif ag[0] == '(25-32)':return r'C:\Users\25454\Desktop\raspberry\Male\25-32\\',r'C:\Users\25454\Desktop\raspberry\video\Male\\'+fileelif ag[0] == '(38-43)':return r'C:\Users\25454\Desktop\raspberry\Male\38-43\\',r'C:\Users\25454\Desktop\raspberry\video\Male\\'+fileelif ag[0] == '(48-53)':return r'C:\Users\25454\Desktop\raspberry\Male\48-53\\',r'C:\Users\25454\Desktop\raspberry\video\Male\\'+fileelif ag[0] == '(60-100)':return r'C:\Users\25454\Desktop\raspberry\Male\60-100\\',r'C:\Users\25454\Desktop\raspberry\video\Male\\'+fileelse:print('出错啦!年龄未识别到')return -1elif ag[1]=='Female':files = os.listdir(r'C:\Users\25454\Desktop\raspberry\video\Female\\')file = random.choice(files)if ag[0]=='(15-20)':return r'C:\Users\25454\Desktop\raspberry\Female\15-20\\',r'C:\Users\25454\Desktop\raspberry\video\Female\\' +fileelif ag[0] == '(0-2)':return r'C:\Users\25454\Desktop\raspberry\Female\0-2\\',r'C:\Users\25454\Desktop\raspberry\video\Female\\' +fileelif ag[0] == '(4-6)':return r'C:\Users\25454\Desktop\raspberry\Female\4-6\\',r'C:\Users\25454\Desktop\raspberry\video\Female\\' +fileelif ag[0] == '(8-12)':return r'C:\Users\25454\Desktop\raspberry\Female\8-12\\',r'C:\Users\25454\Desktop\raspberry\video\Female\\' +fileelif ag[0] == '(25-32)':return r'C:\Users\25454\Desktop\raspberry\Female\25-32\\',r'C:\Users\25454\Desktop\raspberry\video\Female\\' +fileelif ag[0] == '(38-43)':return r'C:\Users\25454\Desktop\raspberry\Female\38-43\\',r'C:\Users\25454\Desktop\raspberry\video\Female\\' +fileelif ag[0] == '(48-53)':return r'C:\Users\25454\Desktop\raspberry\Female\48-53\\',r'C:\Users\25454\Desktop\raspberry\video\Female\\' +fileelif ag[0] == '(60-100)':return r'C:\Users\25454\Desktop\raspberry\Female\60-100\\',r'C:\Users\25454\Desktop\raspberry\video\Female\\' +fileelse:print('出错啦!年龄未识别到')return -1else:print('出错啦!性别未识别到!')#随机返回左下方海报路径
def pos_dir():files = os.listdir(r'C:\Users\25454\Desktop\raspberry\poster\\')file = random.choice(files)return r'C:\Users\25454\Desktop\raspberry\poster\\' + file#随机返回
def QR_dir():files = os.listdir(r'C:\Users\25454\Desktop\raspberry\QRcode\\')file = random.choice(files)return r'C:\Users\25454\Desktop\raspberry\QRcode\\' + file# print(pic_dir(ag.getInfo()))
# print(pic_dir(ag.getInfo()))
