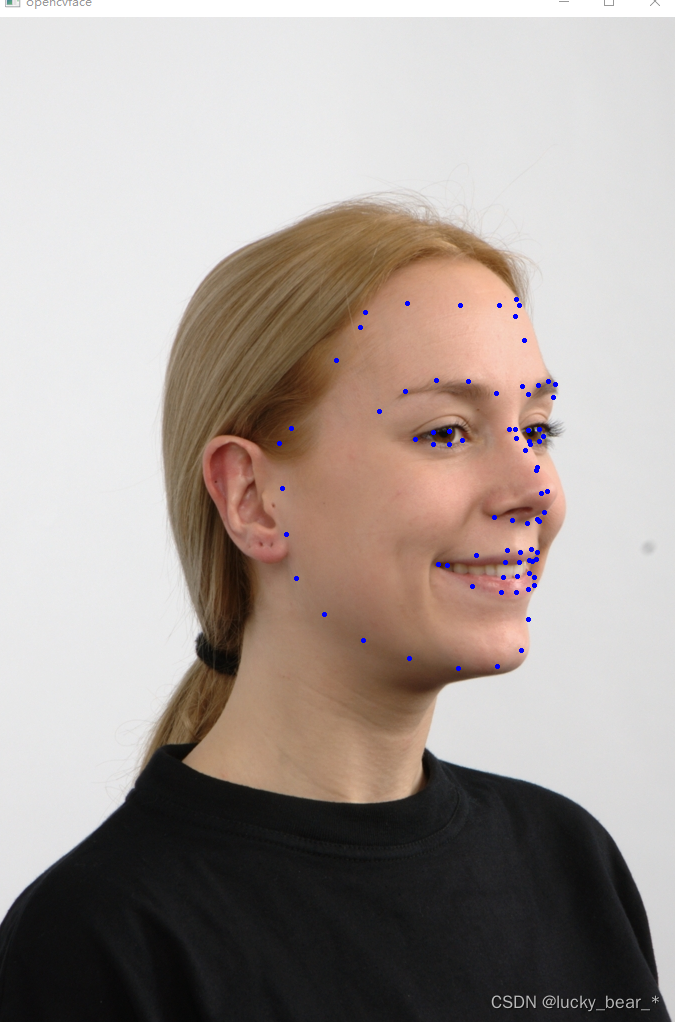
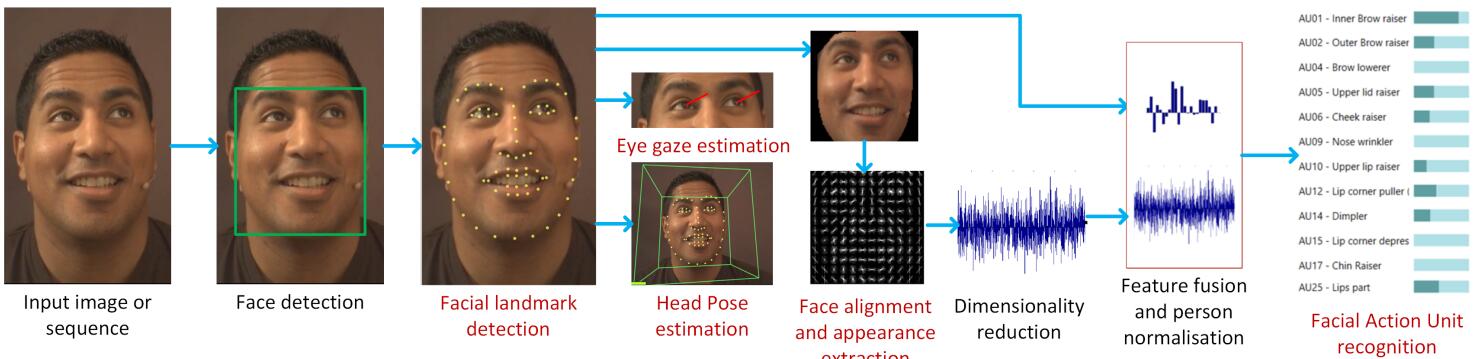
比较人脸识别OpenFace、Face-recognition、Insightface:

FaceNet源码运行
https://github.com/davidsandberg/facenet
1、使用Anaconda安装TensorFlow;
2、更新scipy库;
3、添加os.environ["KMP_DUPLICATE_LIB_OK"]="TRUE"
OMP: Error #15: Initializing libiomp5.dylib, but found libiomp5.dylib already initialized.4、下载模型:20180402-114759模型路径
python compare.py 20180402-114759 02.jpg 11.jpg"""Performs face alignment and calculates L2 distance between the embeddings of images."""# MIT License
#
# Copyright (c) 2016 David Sandberg
#
# Permission is hereby granted, free of charge, to any person obtaining a copy
# of this software and associated documentation files (the "Software"), to deal
# in the Software without restriction, including without limitation the rights
# to use, copy, modify, merge, publish, distribute, sublicense, and/or sell
# copies of the Software, and to permit persons to whom the Software is
# furnished to do so, subject to the following conditions:
#
# The above copyright notice and this permission notice shall be included in all
# copies or substantial portions of the Software.
#
# THE SOFTWARE IS PROVIDED "AS IS", WITHOUT WARRANTY OF ANY KIND, EXPRESS OR
# IMPLIED, INCLUDING BUT NOT LIMITED TO THE WARRANTIES OF MERCHANTABILITY,
# FITNESS FOR A PARTICULAR PURPOSE AND NONINFRINGEMENT. IN NO EVENT SHALL THE
# AUTHORS OR COPYRIGHT HOLDERS BE LIABLE FOR ANY CLAIM, DAMAGES OR OTHER
# LIABILITY, WHETHER IN AN ACTION OF CONTRACT, TORT OR OTHERWISE, ARISING FROM,
# OUT OF OR IN CONNECTION WITH THE SOFTWARE OR THE USE OR OTHER DEALINGS IN THE
# SOFTWARE.from __future__ import absolute_import
from __future__ import division
from __future__ import print_functionfrom scipy import misc
import tensorflow as tf
import numpy as np
import sys
import os
import copy
import argparse
import facenet
import align.detect_face
os.environ["KMP_DUPLICATE_LIB_OK"]="TRUE"def main(args):images = load_and_align_data(args.image_files, args.image_size, args.margin, args.gpu_memory_fraction)with tf.Graph().as_default():with tf.Session() as sess:# Load the modelfacenet.load_model(args.model)# Get input and output tensorsimages_placeholder = tf.get_default_graph().get_tensor_by_name("input:0")embeddings = tf.get_default_graph().get_tensor_by_name("embeddings:0")phase_train_placeholder = tf.get_default_graph().get_tensor_by_name("phase_train:0")# Run forward pass to calculate embeddingsfeed_dict = { images_placeholder: images, phase_train_placeholder:False }emb = sess.run(embeddings, feed_dict=feed_dict)nrof_images = len(args.image_files)print('Images:')for i in range(nrof_images):print('%1d: %s' % (i, args.image_files[i]))print('')# Print distance matrixprint('Distance matrix')print(' ', end='')for i in range(nrof_images):print(' %1d ' % i, end='')print('')for i in range(nrof_images):print('%1d ' % i, end='')for j in range(nrof_images):dist = np.sqrt(np.sum(np.square(np.subtract(emb[i,:], emb[j,:]))))print(' %1.4f ' % dist, end='')print('')def load_and_align_data(image_paths, image_size, margin, gpu_memory_fraction):minsize = 20 # minimum size of facethreshold = [ 0.6, 0.7, 0.7 ] # three steps's thresholdfactor = 0.709 # scale factorprint('Creating networks and loading parameters')with tf.Graph().as_default():gpu_options = tf.GPUOptions(per_process_gpu_memory_fraction=gpu_memory_fraction)sess = tf.Session(config=tf.ConfigProto(gpu_options=gpu_options, log_device_placement=False))with sess.as_default():pnet, rnet, onet = align.detect_face.create_mtcnn(sess, None)tmp_image_paths=copy.copy(image_paths)img_list = []for image in tmp_image_paths:img = misc.imread(os.path.expanduser(image), mode='RGB')img_size = np.asarray(img.shape)[0:2]bounding_boxes, _ = align.detect_face.detect_face(img, minsize, pnet, rnet, onet, threshold, factor)if len(bounding_boxes) < 1:image_paths.remove(image)print("can't detect face, remove ", image)continuedet = np.squeeze(bounding_boxes[0,0:4])bb = np.zeros(4, dtype=np.int32)bb[0] = np.maximum(det[0]-margin/2, 0)bb[1] = np.maximum(det[1]-margin/2, 0)bb[2] = np.minimum(det[2]+margin/2, img_size[1])bb[3] = np.minimum(det[3]+margin/2, img_size[0])cropped = img[bb[1]:bb[3],bb[0]:bb[2],:]aligned = misc.imresize(cropped, (image_size, image_size), interp='bilinear')prewhitened = facenet.prewhiten(aligned)img_list.append(prewhitened)images = np.stack(img_list)return imagesdef parse_arguments(argv):parser = argparse.ArgumentParser()parser.add_argument('model', type=str, help='Could be either a directory containing the meta_file and ckpt_file or a model protobuf (.pb) file')parser.add_argument('image_files', type=str, nargs='+', help='Images to compare')parser.add_argument('--image_size', type=int,help='Image size (height, width) in pixels.', default=160)parser.add_argument('--margin', type=int,help='Margin for the crop around the bounding box (height, width) in pixels.', default=44)parser.add_argument('--gpu_memory_fraction', type=float,help='Upper bound on the amount of GPU memory that will be used by the process.', default=1.0)return parser.parse_args(argv)if __name__ == '__main__':main(parse_arguments(sys.argv[1:]))
运行结果:
(py27tf) bash-3.2$ python compare.py 20180402-114759 02.jpg 11.jpg
Creating networks and loading parameters
2019-01-15 17:11:02.874055: I tensorflow/core/platform/cpu_feature_guard.cc:141] Your CPU supports instructions that this TensorFlow binary was not compiled to use: SSE4.1 SSE4.2 AVX AVX2 FMA
2019-01-15 17:11:02.874720: I tensorflow/core/common_runtime/process_util.cc:69] Creating new thread pool with default inter op setting: 8. Tune using inter_op_parallelism_threads for best performance.
Model directory: 20180402-114759
Metagraph file: model-20180402-114759.meta
Checkpoint file: model-20180402-114759.ckpt-275
WARNING:tensorflow:From /anaconda2/envs/py27tf/lib/python2.7/site-packages/tensorflow/python/training/queue_runner_impl.py:391: __init__ (from tensorflow.python.training.queue_runner_impl) is deprecated and will be removed in a future version.
Instructions for updating:
To construct input pipelines, use the `tf.data` module.
Images:
0: 02.jpg
1: 11.jpgDistance matrix0         1
0    0.0000    0.4207
1    0.4207    0.0000
MTCNN实时检测人脸:
from __future__ import absolute_import
from __future__ import division
from __future__ import print_function
from six import string_types, iteritemsimport sys
import os
import numpy as np
import tensorflow as tf
#from math import floor
import cv2
import detect_face
import random
from time import sleep
os.environ["KMP_DUPLICATE_LIB_OK"]="TRUE"video = cv2.VideoCapture(0)print('Creating networks and loading parameters')with tf.Graph().as_default():gpu_options = tf.GPUOptions(per_process_gpu_memory_fraction=1.0)sess = tf.Session(config=tf.ConfigProto(gpu_options=gpu_options, log_device_placement=False))with sess.as_default():pnet, rnet, onet = detect_face.create_mtcnn(sess, None)
minsize = 20
threshold = [0.6, 0.7, 0.7]
factor = 0.709
while True:ret, frame = video.read()bounding_boxes, _ = detect_face.detect_face(frame, minsize, pnet, rnet, onet, threshold, factor)nrof_faces = bounding_boxes.shape[0]print('face number :{}'.format(nrof_faces))for face_position in bounding_boxes:face_position = face_position.astype(int)cv2.rectangle(frame, (face_position[0], face_position[1]), (face_position[2], face_position[3]), (0, 255, 0), 2)cv2.imshow('show', frame)if cv2.waitKey(5) & 0xFF == ord('q'):break
video.release()
cv2.destroyAllWindows()