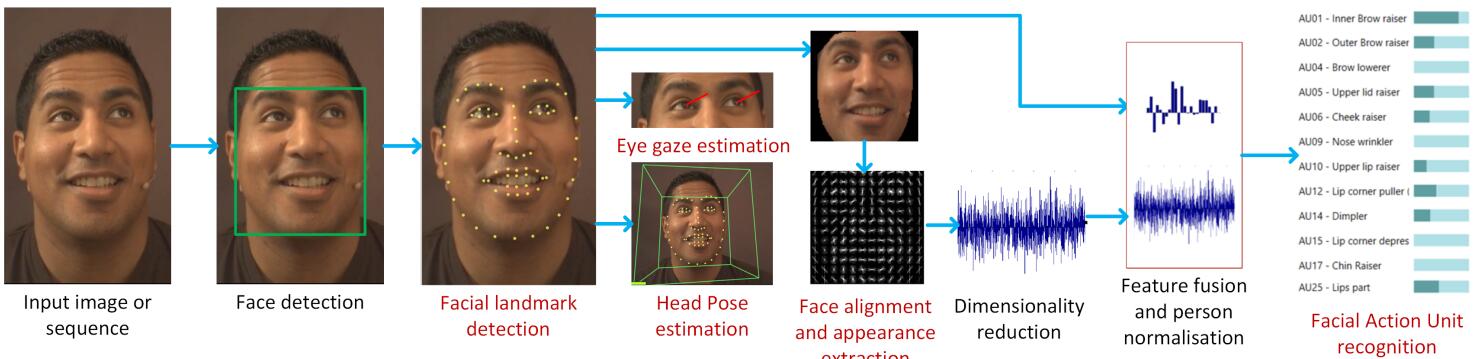
1.OpenFace简介
http://cmusatyalab.github.io/openface/
安装就按照官方教程来就好了
装完各种依赖之后运行一下命令
https://github.com/cmusatyalab/openface.git --recursive
cd openface
sudo python setup.py install
sh modles/get-models.sh
2.素材准备
准备两个人的不同角度的照片我这准备了李、王两个人各三十张照片作为训练集,各六张张做为测试集;训练数据放在openface/ws_train_data路径下


下图是训练集图片:

测试集数据:

这里需要注意的是bmp文件是不被支持用于目标检测的
3.预处理(目标检测)
进入openface的根目录,输入
$ ./util/align-dlib.py ws_train_data/ align outerEyesAndNose ws_pre_processws_train_data/这个路径下的使我们训练集的数据,ws_pre_process是预处理结果的路径
一切顺利的话,会看到类似下面的输出:

在相应的路径你会看到这两个人的预处理结果,人脸被单独地截取出来了


4.生成相应的脸部特征表示数据
./batch-represent/main.lua -outDir ws_represent_data -data ws_pre_process/ws_represent_data是输出路径,ws_pre_process/使我们的预处理结果路径

会在相应的ws_represent_data看到相应的两个CSV文件

5.训练模型
./demos/classifier.py train ws_represent_data/
会得到下列的输出

我在这里发现了一个Bug,就是在OpenFace根路径下的demos下的classifier.py文件中的LDA()函数已经不被sklearn库替换为了LinearDiscriminantAnalysis()
原先是这样的:
clf = Pipeline([('lda', LDA(n_components=args.ldaDim)),('clf', clf_final)])应该导入相应的模块,然后修改如下即可:
clf = Pipeline([('lda', LinearDiscriminantAnalysis(n_components=args.ldaDim)),('clf', clf_final)])这里贴出完整的classifier.py
#!/usr/bin/env python2
#
# Example to classify faces.
# Brandon Amos
# 2015/10/11
#
# Copyright 2015-2016 Carnegie Mellon University
#
# Licensed under the Apache License, Version 2.0 (the "License");
# you may not use this file except in compliance with the License.
# You may obtain a copy of the License at
#
#     http://www.apache.org/licenses/LICENSE-2.0
#
# Unless required by applicable law or agreed to in writing, software
# distributed under the License is distributed on an "AS IS" BASIS,
# WITHOUT WARRANTIES OR CONDITIONS OF ANY KIND, either express or implied.
# See the License for the specific language governing permissions and
# limitations under the License.import time
start = time.time()import argparse
import cv2
import os
import pickle
import sysfrom operator import itemgetterimport numpy as np
np.set_printoptions(precision=2)
import pandas as pdimport openface
from sklearn.discriminant_analysis import LinearDiscriminantAnalysis
from sklearn.pipeline import Pipeline
# from sklearn.lda import LDA
from sklearn.preprocessing import LabelEncoder
from sklearn.svm import SVC
from sklearn.grid_search import GridSearchCV
from sklearn.mixture import GMM
from sklearn.tree import DecisionTreeClassifier
from sklearn.naive_bayes import GaussianNBfileDir = os.path.dirname(os.path.realpath(__file__))
modelDir = os.path.join(fileDir, '..', 'models')
dlibModelDir = os.path.join(modelDir, 'dlib')
openfaceModelDir = os.path.join(modelDir, 'openface')def getRep(imgPath, multiple=False):start = time.time()bgrImg = cv2.imread(imgPath)if bgrImg is None:raise Exception("Unable to load image: {}".format(imgPath))rgbImg = cv2.cvtColor(bgrImg, cv2.COLOR_BGR2RGB)if args.verbose:print("  + Original size: {}".format(rgbImg.shape))if args.verbose:print("Loading the image took {} seconds.".format(time.time() - start))start = time.time()if multiple:bbs = align.getAllFaceBoundingBoxes(rgbImg)else:bb1 = align.getLargestFaceBoundingBox(rgbImg)bbs = [bb1]if len(bbs) == 0 or (not multiple and bb1 is None):raise Exception("Unable to find a face: {}".format(imgPath))if args.verbose:print("Face detection took {} seconds.".format(time.time() - start))reps = []for bb in bbs:start = time.time()alignedFace = align.align(args.imgDim,rgbImg,bb,landmarkIndices=openface.AlignDlib.OUTER_EYES_AND_NOSE)if alignedFace is None:raise Exception("Unable to align image: {}".format(imgPath))if args.verbose:print("Alignment took {} seconds.".format(time.time() - start))print("This bbox is centered at {}, {}".format(bb.center().x, bb.center().y))start = time.time()rep = net.forward(alignedFace)if args.verbose:print("Neural network forward pass took {} seconds.".format(time.time() - start))reps.append((bb.center().x, rep))sreps = sorted(reps, key=lambda x: x[0])return srepsdef train(args):print("Loading embeddings.")fname = "{}/labels.csv".format(args.workDir)labels = pd.read_csv(fname, header=None).as_matrix()[:, 1]labels = map(itemgetter(1),map(os.path.split,map(os.path.dirname, labels)))  # Get the directory.fname = "{}/reps.csv".format(args.workDir)embeddings = pd.read_csv(fname, header=None).as_matrix()le = LabelEncoder().fit(labels)labelsNum = le.transform(labels)nClasses = len(le.classes_)print("Training for {} classes.".format(nClasses))if args.classifier == 'LinearSvm':clf = SVC(C=1, kernel='linear', probability=True)elif args.classifier == 'GridSearchSvm':print("""Warning: In our experiences, using a grid search over SVM hyper-parameters onlygives marginally better performance than a linear SVM with C=1 andis not worth the extra computations of performing a grid search.""")param_grid = [{'C': [1, 10, 100, 1000],'kernel': ['linear']},{'C': [1, 10, 100, 1000],'gamma': [0.001, 0.0001],'kernel': ['rbf']}]clf = GridSearchCV(SVC(C=1, probability=True), param_grid, cv=5)elif args.classifier == 'GMM':  # Doesn't work bestclf = GMM(n_components=nClasses)# ref:# http://scikit-learn.org/stable/auto_examples/classification/plot_classifier_comparison.html#example-classification-plot-classifier-comparison-pyelif args.classifier == 'RadialSvm':  # Radial Basis Function kernel# works better with C = 1 and gamma = 2clf = SVC(C=1, kernel='rbf', probability=True, gamma=2)elif args.classifier == 'DecisionTree':  # Doesn't work bestclf = DecisionTreeClassifier(max_depth=20)elif args.classifier == 'GaussianNB':clf = GaussianNB()# ref: https://jessesw.com/Deep-Learning/elif args.classifier == 'DBN':from nolearn.dbn import DBNclf = DBN([embeddings.shape[1], 500, labelsNum[-1:][0] + 1],  # i/p nodes, hidden nodes, o/p nodeslearn_rates=0.3,# Smaller steps mean a possibly more accurate result, but the# training will take longerlearn_rate_decays=0.9,# a factor the initial learning rate will be multiplied by# after each iteration of the trainingepochs=300,  # no of iternation# dropouts = 0.25, # Express the percentage of nodes that# will be randomly dropped as a decimal.verbose=1)if args.ldaDim > 0:clf_final = clfclf = Pipeline([('lda', LinearDiscriminantAnalysis(n_components=args.ldaDim)),('clf', clf_final)])# clf = Pipeline([('lda', LDA(n_components=args.ldaDim)),#                 ('clf', clf_final)])clf.fit(embeddings, labelsNum)fName = "{}/classifier.pkl".format(args.workDir)print("Saving classifier to '{}'".format(fName))with open(fName, 'w') as f:pickle.dump((le, clf), f)def infer(args, multiple=False):with open(args.classifierModel, 'rb') as f:if sys.version_info[0] < 3:(le, clf) = pickle.load(f)else:(le, clf) = pickle.load(f, encoding='latin1')for img in args.imgs:print("\n=== {} ===".format(img))reps = getRep(img, multiple)if len(reps) > 1:print("List of faces in image from left to right")for r in reps:rep = r[1].reshape(1, -1)bbx = r[0]start = time.time()predictions = clf.predict_proba(rep).ravel()maxI = np.argmax(predictions)person = le.inverse_transform(maxI)confidence = predictions[maxI]if args.verbose:print("Prediction took {} seconds.".format(time.time() - start))if multiple:print("Predict {} @ x={} with {:.2f} confidence.".format(person.decode('utf-8'), bbx,confidence))else:print("Predict {} with {:.2f} confidence.".format(person.decode('utf-8'), confidence))if isinstance(clf, GMM):dist = np.linalg.norm(rep - clf.means_[maxI])print("  + Distance from the mean: {}".format(dist))if __name__ == '__main__':parser = argparse.ArgumentParser()parser.add_argument('--dlibFacePredictor',type=str,help="Path to dlib's face predictor.",default=os.path.join(dlibModelDir,"shape_predictor_68_face_landmarks.dat"))parser.add_argument('--networkModel',type=str,help="Path to Torch network model.",default=os.path.join(openfaceModelDir,'nn4.small2.v1.t7'))parser.add_argument('--imgDim', type=int,help="Default image dimension.", default=96)parser.add_argument('--cuda', action='store_true')parser.add_argument('--verbose', action='store_true')subparsers = parser.add_subparsers(dest='mode', help="Mode")trainParser = subparsers.add_parser('train',help="Train a new classifier.")trainParser.add_argument('--ldaDim', type=int, default=-1)trainParser.add_argument('--classifier',type=str,choices=['LinearSvm','GridSearchSvm','GMM','RadialSvm','DecisionTree','GaussianNB','DBN'],help='The type of classifier to use.',default='LinearSvm')trainParser.add_argument('workDir',type=str,help="The input work directory containing 'reps.csv' and 'labels.csv'. Obtained from aligning a directory with 'align-dlib' and getting the representations with 'batch-represent'.")inferParser = subparsers.add_parser('infer', help='Predict who an image contains from a trained classifier.')inferParser.add_argument('classifierModel',type=str,help='The Python pickle representing the classifier. This is NOT the Torch network model, which can be set with --networkModel.')inferParser.add_argument('imgs', type=str, nargs='+',help="Input image.")inferParser.add_argument('--multi', help="Infer multiple faces in image",action="store_true")args = parser.parse_args()if args.verbose:print("Argument parsing and import libraries took {} seconds.".format(time.time() - start))if args.mode == 'infer' and args.classifierModel.endswith(".t7"):raise Exception("""
Torch network model passed as the classification model,
which should be a Python pickle (.pkl)See the documentation for the distinction between the Torch
network and classification models:http://cmusatyalab.github.io/openface/demo-3-classifier/http://cmusatyalab.github.io/openface/training-new-models/Use `--networkModel` to set a non-standard Torch network model.""")start = time.time()align = openface.AlignDlib(args.dlibFacePredictor)net = openface.TorchNeuralNet(args.networkModel, imgDim=args.imgDim,cuda=args.cuda)if args.verbose:print("Loading the dlib and OpenFace models took {} seconds.".format(time.time() - start))start = time.time()if args.mode == 'train':train(args)elif args.mode == 'infer':infer(args, args.multi)
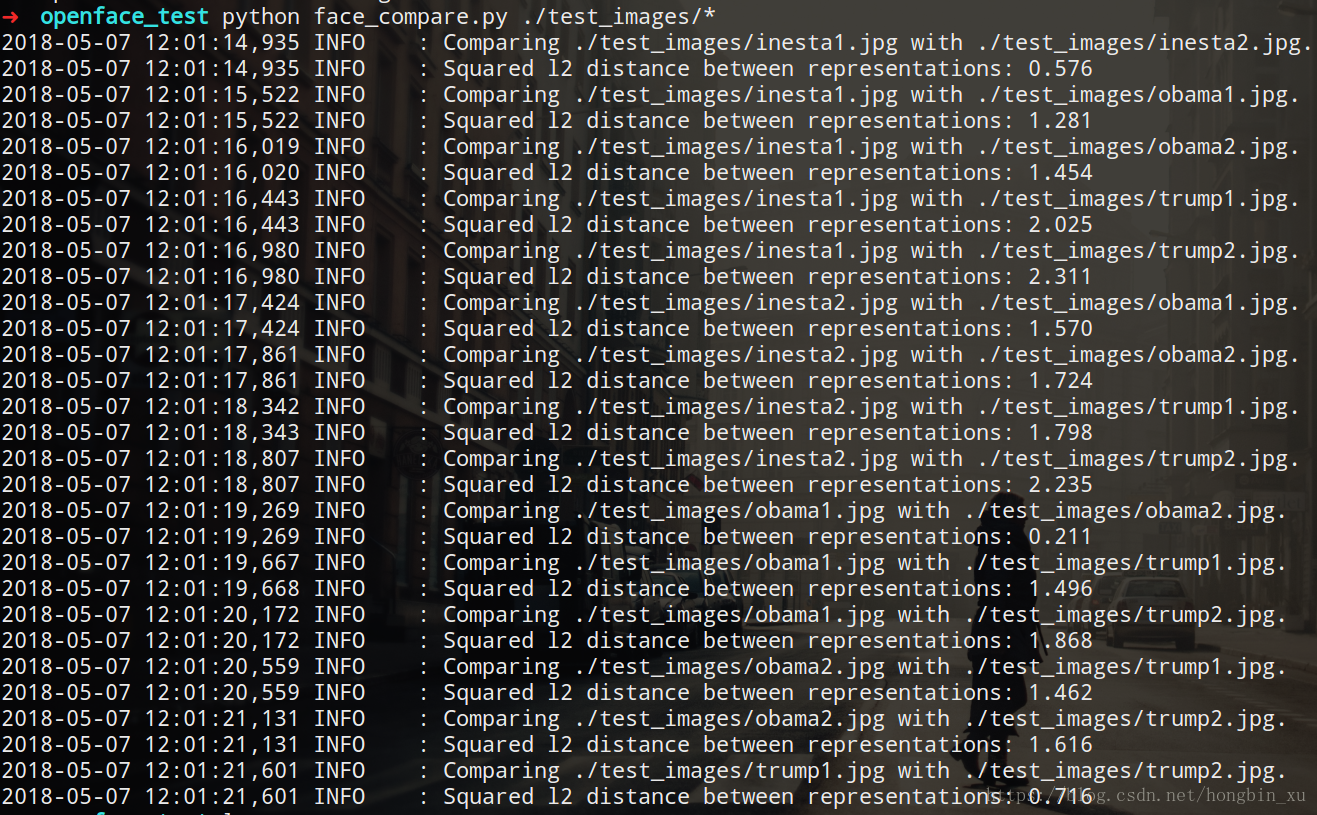
6.识别人脸
./demos/classifier.py infer ./ws_represent_data/classifier.pkl ws_test_data/{test6,test7}/*.jpg
从当前测试集合的测试结果来看,准确率100%
但是这里会出现一个问题,当系统在测试集中没有检测到人脸的时候会导致无法继续预测当前路径下的下一张图片

我想对classifier.py稍作修改应该可以解决这个问题。