OpenFace:
http://cmusatyalab.github.io/openface/
一、什么是Openface?
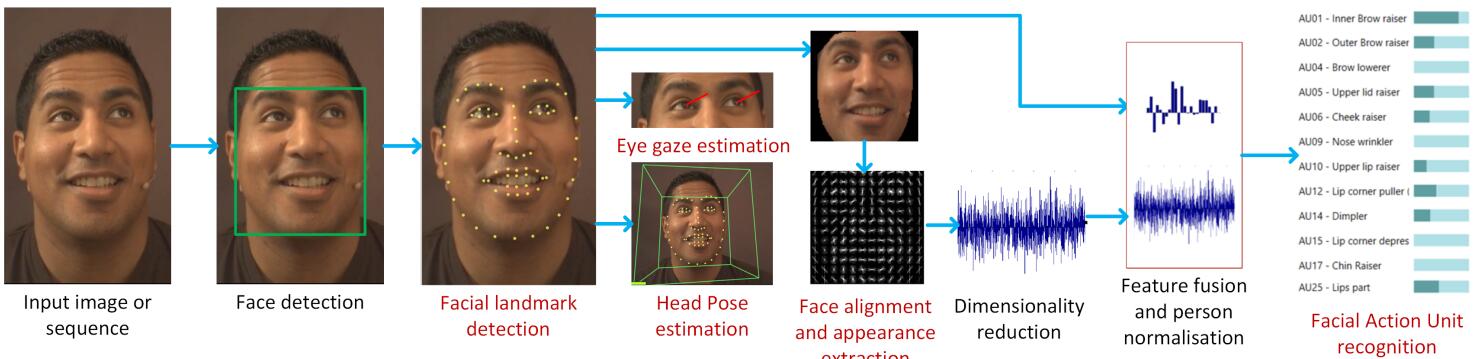
Openface是一个基于深度神经网络的开源人脸识别系统。该系统基于谷歌的文章FaceNet: A Unified Embedding for Face Recognition and Clustering。Openface是卡内基梅隆大学的 Brandon Amos主导的。
官方地址:http://cmusatyalab.github.io/openface/
代码:https://github.com/cmusatyalab/openface
二、Openface环境搭建
系统:Ubuntu 14.04 64位桌面操作系统
参考:http://cmusatyalab.github.io/openface/setup/
1、Ubuntu切换root用户
此处不详述,如果要用普通用户,请自行测试。
参考文章:
http://blog.csdn.net/itas109/article/details/50679251
2、安装前准备工作
安装必要的程序,可以用下面的批处理,也可以一个一个的进行安装。
[cpp] view plain copy ![]()
![]()
- #!/bin/sh
- sudo apt-get install build-essential -y
- sudo apt-get install cmake -y
- sudo apt-get install curl -y
- sudo apt-get install gfortran -y
- sudo apt-get install git -y
- sudo apt-get install libatlas-dev -y
- sudo apt-get install libavcodec-dev -y
- sudo apt-get install libavformat-dev -y
- sudo apt-get install libboost-all-dev -y
- sudo apt-get install libgtk2.0-dev -y
- sudo apt-get install libjpeg-dev -y
- sudo apt-get install liblapack-dev -y
- sudo apt-get install libswscale-dev -y
- sudo apt-get install pkg-config -y
- sudo apt-get install python-dev -y
- sudo apt-get install python-pip -y
- sudo apt-get install wget -y
- sudo apt-get install zip –y
3、安装必要的库
[cpp] view plain copy ![]()
![]()
- pip2 install numpy scipy pandas
- pip2 install scikit-learn scikit-image
[cpp] view plain copy ![]()
![]()
- pip2 install numpy scipy pandas
- pip2 install scikit-learn scikit-image
注意:
a.如果出现某一个安装失败的情况,可以一个一个的安装
b.提高pip安装速度
可以更换pip镜像加快下载速度
建立./pip/pip.conf,输入以下内容(或者其他可用镜像):
[cpp] view plain copy ![]()
![]()
- [global]
- timeout = 6000
- index-url = http://pypi.douban.com/simple
- [install]
- use-mirrors = true
- mirrors = <a target=_blank href="http://pypi.douban.com/">http://pypi.douban.com/</a>
[cpp] view plain copy ![]()
![]()
- [global]
- timeout = 6000
- index-url = http://pypi.douban.com/simple
- [install]
- use-mirrors = true
- mirrors = <a target=_blank href="http://pypi.douban.com/">http://pypi.douban.com/</a>
c.报错:SSLError: The read operation timed out
可以用下列指令将延时加长
[cpp] view plain copy ![]()
![]()
- pip2 -install scikit-image --timeout 100
[cpp] view plain copy ![]()
![]()
- pip2 -install scikit-image --timeout 100
4、安装Torch
a.安装依赖
[cpp] view plain copy ![]()
![]()
- curl -shttps://raw.githubusercontent.com/torch/ezinstall/master/install-deps | bash –e
[cpp] view plain copy ![]()
![]()
- curl -shttps://raw.githubusercontent.com/torch/ezinstall/master/install-deps | bash –e
b.安装
[cpp] view plain copy ![]()
![]()
- git clone https://github.com/torch/distro.git ~/torch --recursive
- cd ~/torch && ./install.sh
[cpp] view plain copy ![]()
![]()
- git clone https://github.com/torch/distro.git ~/torch --recursive
- cd ~/torch && ./install.sh
c.安装依赖
luarocks install $NAME, where $NAME is as listed below.
dpnn
nn
csvigo
cunn (使用CUDA)
fblualib (仅为了训练DNN)
torchx (仅为了训练DNN)
命令行,按照需要安装:
[cpp] view plain copy ![]()
![]()
- ~/torch/install/bin/luarocks install dpnn
- ~/torch/install/bin/luarocks install nn
- ~/torch/install/bin/luarocks install optim
- ~/torch/install/bin/luarocks install csvigo
- ~/torch/install/bin/luarocks install cunn
- ~/torch/install/bin/luarocks install fblualib
- ~/torch/install/bin/luarocks install torchx
d.验证是否安装依赖成功
用th命令验证
注意:
a.gitclone更新网络老中断
Git submodule update --init –recursive
或者torch目录下的
Update.sh
建议用Update.sh解决
b.错误:
Cloning into'extra/luaffifb'...
remote:Counting objects: 918, done.
error: RPCfailed; result=56, HTTP code = 200| 0 bytes/s
fatal: Theremote end hung up unexpectedly
fatal: earlyEOF
fatal:index-pack failed
Clone of 'https://github.com/facebook/luaffifb' intosubmodule path 'extra/luaffifb' failed
解决:
[cpp] view plain copy ![]()
![]()
- git config --global http.postBuffer 524288000
[cpp] view plain copy ![]()
![]()
- git config --global http.postBuffer 524288000
5、安装opencv
OpenCV版本为2.4.11,下载地址:https://github.com/Itseez/opencv/archive/2.4.11.zip
编译参考:http://docs.opencv.org/2.4/doc/tutorials/introduction/linux_install/linux_install.html
a.指令下载:
[cpp] view plain copy ![]()
![]()
- cd ~
- mkdir -p src
- cd src
- curl -L https://github.com/Itseez/opencv/archive/2.4.11.zip -o ocv.zip
[cpp] view plain copy ![]()
![]()
- cd ~
- mkdir -p src
- cd src
- curl -L https://github.com/Itseez/opencv/archive/2.4.11.zip -o ocv.zip
b.解压:
[cpp] view plain copy ![]()
![]()
- unzip ocv.zip
[cpp] view plain copy ![]()
![]()
- unzip ocv.zip
c.编译:
[cpp] view plain copy ![]()
![]()
- cd opencv-2.4.11
- mkdir release
- cd release
- cmake -D CMAKE_BUILD_TYPE=RELEASE -D CMAKE_INSTALL_PREFIX=/usr/local ..
- make -j8
- make install
[cpp] view plain copy ![]()
![]()
- cd opencv-2.4.11
- mkdir release
- cd release
- cmake -D CMAKE_BUILD_TYPE=RELEASE -D CMAKE_INSTALL_PREFIX=/usr/local ..
- make -j8
- make install
d.验证
import cv2
6、安装dlib
dlib v18.16下载地址:https://github.com/davisking/dlib/releases/download/v18.16/dlib-18.16.tar.bz2
a.安装编译
[html] view plain copy ![]()
![]()
- mkdir -p ~/src
- cd ~/src tar xf dlib-18.16.tar.bz2
- cd dlib-18.16/python_examples
- mkdir build
- cd build
- cmake ../../tools/python
- cmake --build . --config Release
- cp dlib.so /usr/local/lib/python2.7/dist-packages
[html] view plain copy ![]()
![]()
- mkdir -p ~/src
- cd ~/src tar xf dlib-18.16.tar.bz2
- cd dlib-18.16/python_examples
- mkdir build
- cd build
- cmake ../../tools/python
- cmake --build . --config Release
- cp dlib.so /usr/local/lib/python2.7/dist-packages
b.确保
在a中最后一条命令中,确保路径在默认的Python路径,可以在Python解释器里面用sys.path查找
For the final command, make sure the directory is in your default Python path, which can be found withsys.path in a Python interpreter.
c.验证
[cpp] view plain copy ![]()
![]()
- import dlib
[cpp] view plain copy ![]()
![]()
- import dlib
7、Git获取openface
a.下载Openface
[cpp] view plain copy ![]()
![]()
- git clone https://github.com/cmusatyalab/openface.git
- git submodule init
- git submodule update
[cpp] view plain copy ![]()
![]()
- git clone https://github.com/cmusatyalab/openface.git
- git submodule init
- git submodule update
b.在Openface根目录执行
[cpp] view plain copy ![]()
![]()
- sudo python2 setup.py install
[cpp] view plain copy ![]()
![]()
- sudo python2 setup.py install
python2一定要确保dlib和opencv安装成功
[cpp] view plain copy ![]()
![]()
- import cv2
- import dlib
[cpp] view plain copy ![]()
![]()
- import cv2
- import dlib
c.获取模型
[cpp] view plain copy ![]()
![]()
- models/get-models.sh
[cpp] view plain copy ![]()
![]()
- models/get-models.sh
8、运行demo
运行demo1:
./demos/compare.pyimages/examples/{lennon*,clapton*}
运行demo2:
./demos/classifier.py infermodels/openface/celeb-classifier.nn4.small2.v1.pkl ./images/examples/carell.jpg
运行demo3:
./demos/web/start-servers.sh
9、demo1可用浏览器
可用浏览器:
360浏览器极速模式
火狐浏览器
搜狗浏览器高速模式
不可用浏览器:
Chrome谷歌浏览器(可能与浏览器更新有关系,getUserMedia())
IE览器
Taily老段的微信公众号,欢迎交流学习

https://blog.csdn.net/taily_duan/article/details/81214815