resnet是什么
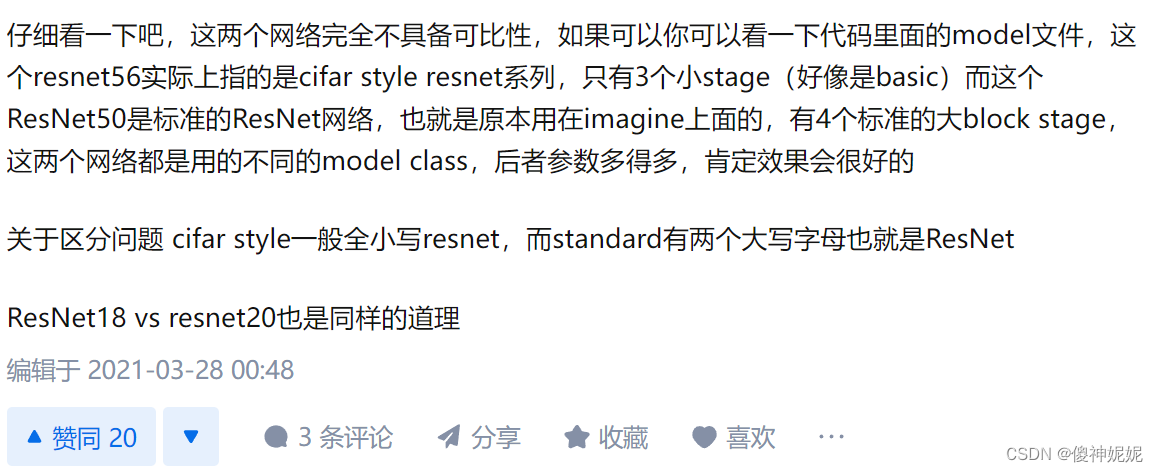
在论文中,存在resnet20和resnet56,之前没注意,现在仔细了解后才发觉和标准的ResNet有差异,可参考resnet-50 vs resnet-56(或者18 vs 20)的明显区别在哪,性能差的好多? - 知乎 (zhihu.com)
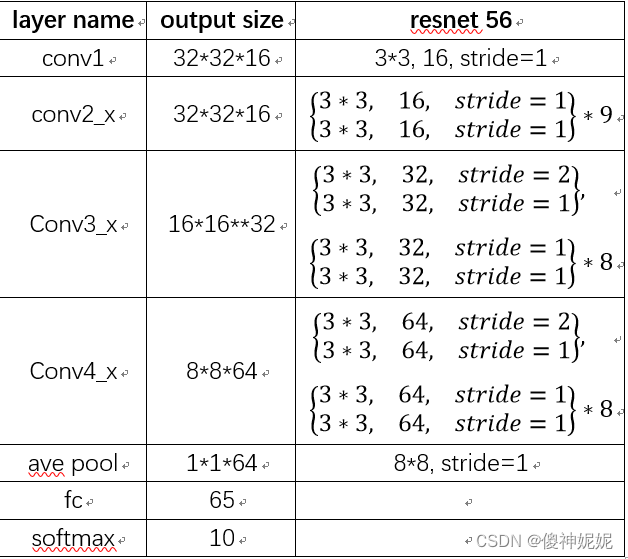
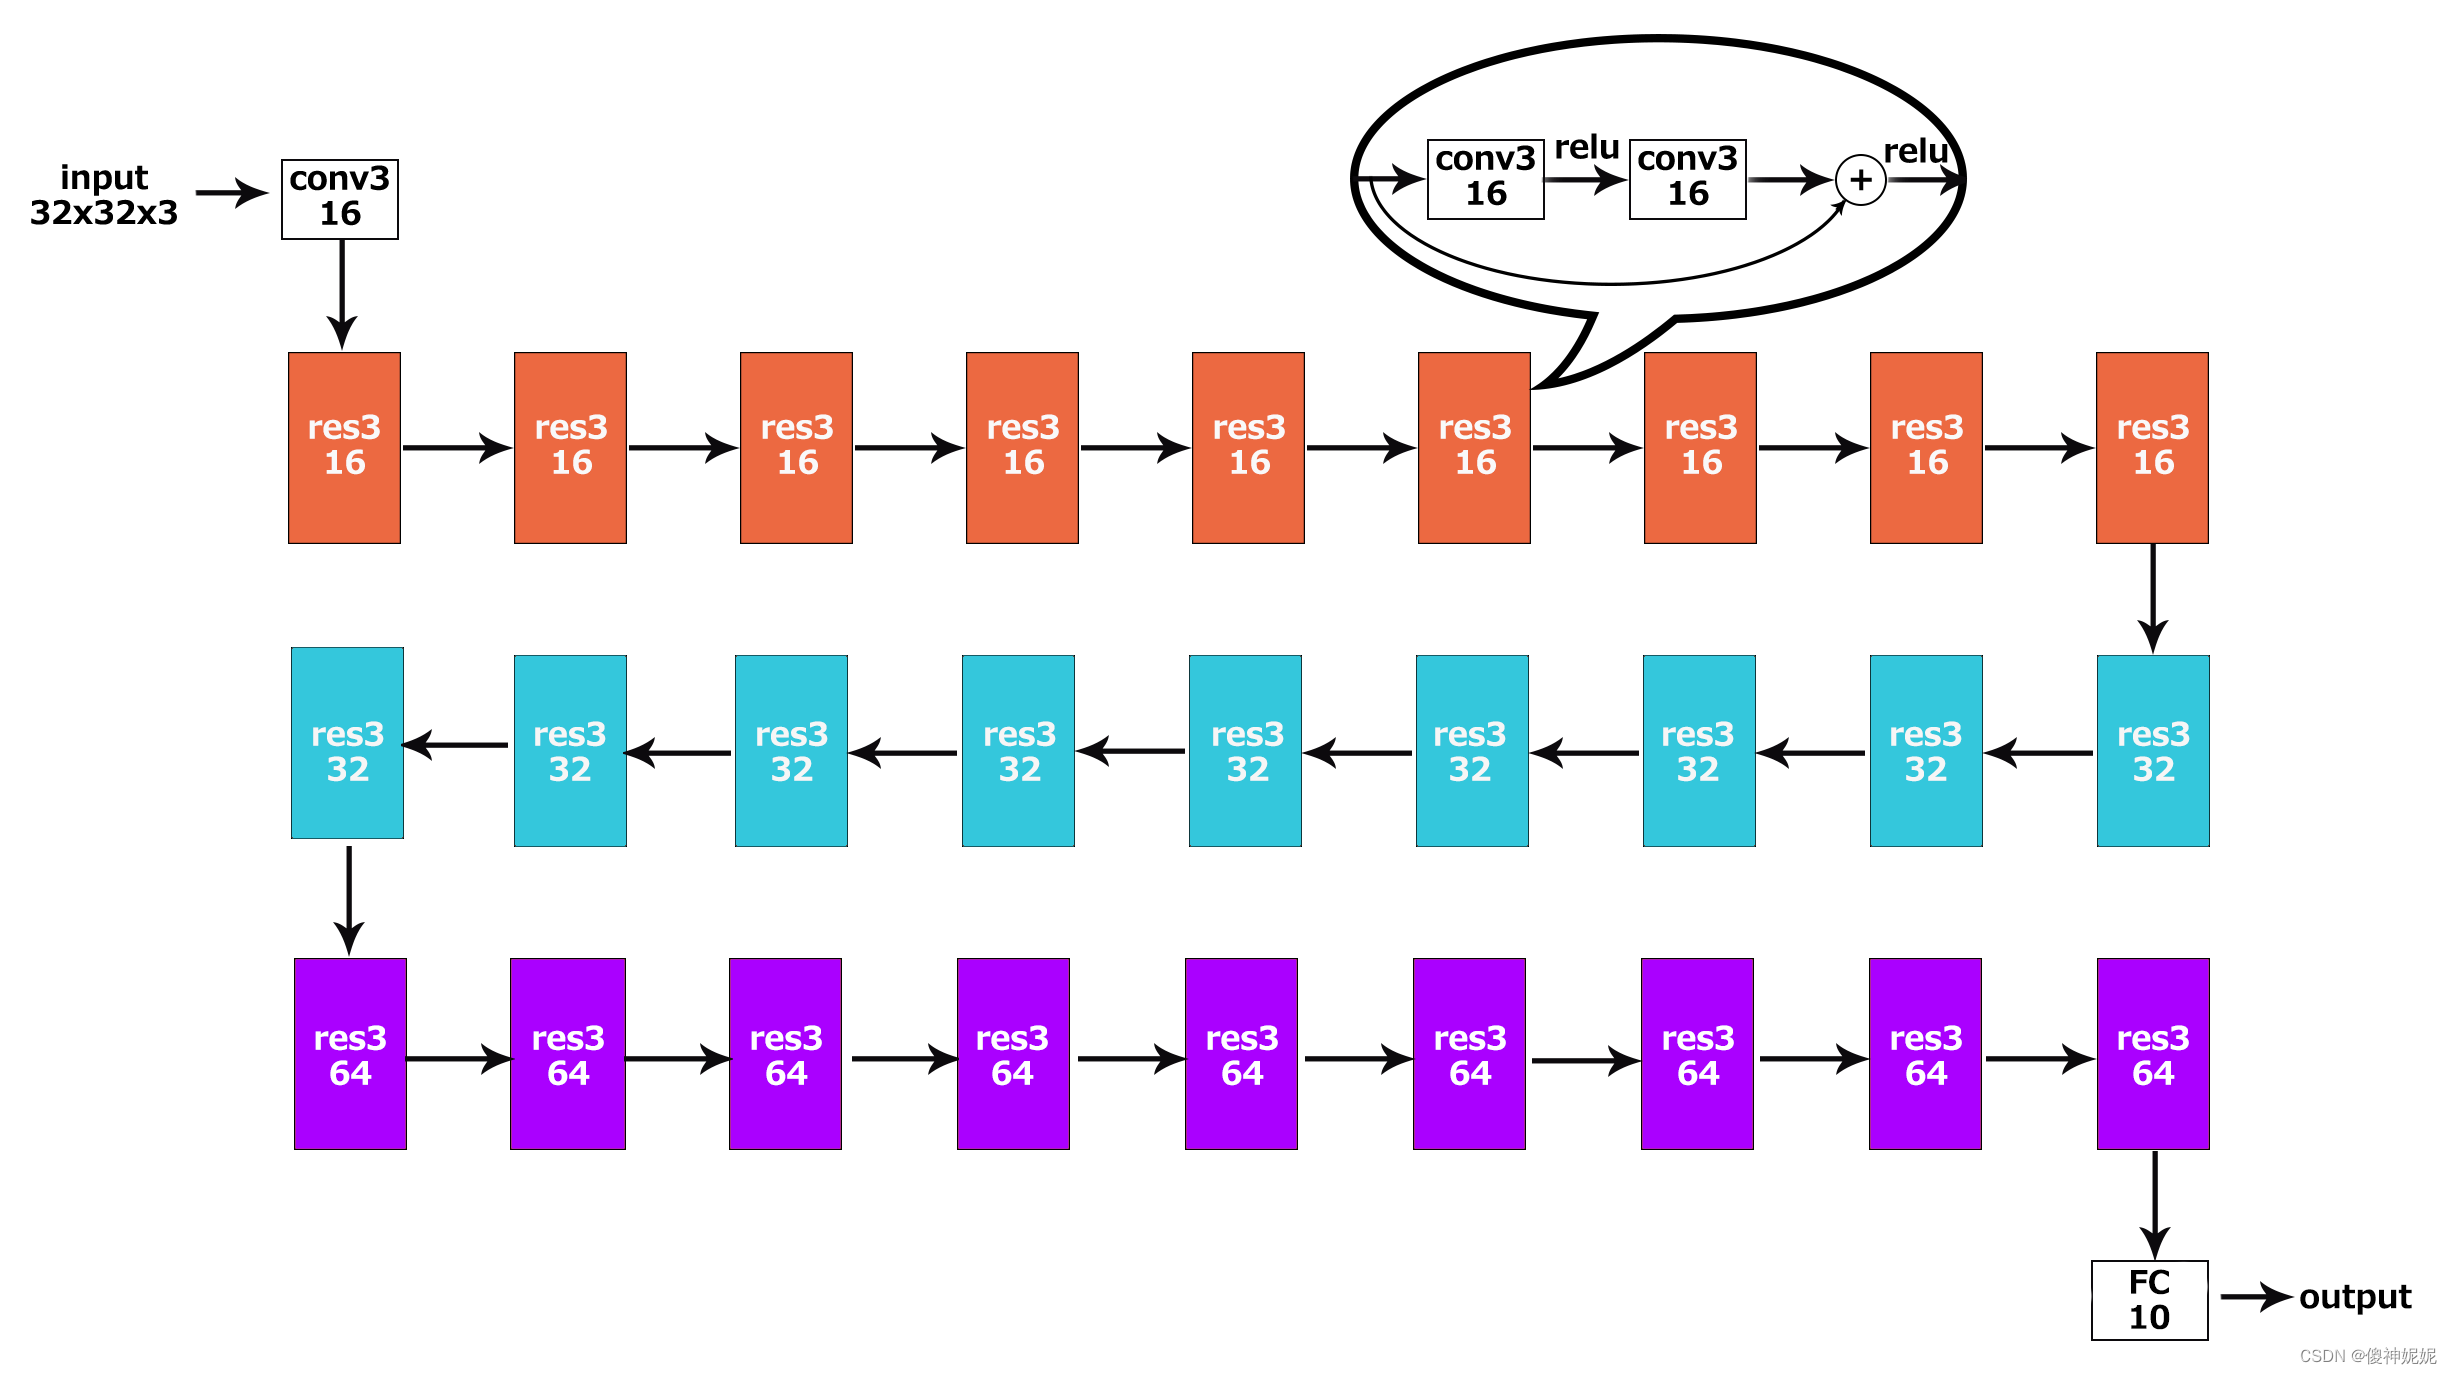
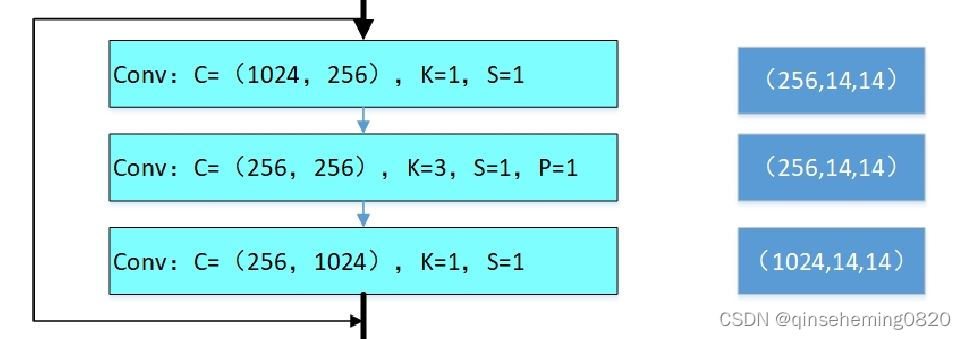
resnet的结构
resnet的代码keras实现:
from __future__ import print_function
import keras
from keras.layers import Dense, Conv2D, BatchNormalization, Activation
from keras.layers import AveragePooling2D, Input, Flatten
from keras.optimizers import Adam
from keras.callbacks import ModelCheckpoint, LearningRateScheduler
from keras.callbacks import ReduceLROnPlateau
from keras.preprocessing.image import ImageDataGenerator
from keras.regularizers import l2
from keras import backend as K
from keras.models import Model
from keras.datasets import cifar10
import numpy as np
import os# Training parameters
batch_size = 32  # orig paper trained all networks with batch_size=128
epochs = 200
data_augmentation = True
num_classes = 10# Subtracting pixel mean improves accuracy
subtract_pixel_mean = True# Model parameter
# ----------------------------------------------------------------------------
#           |      | 200-epoch | Orig Paper| 200-epoch | Orig Paper| sec/epoch
# Model     |  n   | ResNet v1 | ResNet v1 | ResNet v2 | ResNet v2 | GTX1080Ti
#           |v1(v2)| %Accuracy | %Accuracy | %Accuracy | %Accuracy | v1 (v2)
# ----------------------------------------------------------------------------
# ResNet20  | 3 (2)| 92.16     | 91.25     | -----     | -----     | 35 (---)
# ResNet32  | 5(NA)| 92.46     | 92.49     | NA        | NA        | 50 ( NA)
# ResNet44  | 7(NA)| 92.50     | 92.83     | NA        | NA        | 70 ( NA)
# ResNet56  | 9 (6)| 92.71     | 93.03     | 93.01     | NA        | 90 (100)
# ResNet110 |18(12)| 92.65     | 93.39+-.16| 93.15     | 93.63     | 165(180)
# ResNet164 |27(18)| -----     | 94.07     | -----     | 94.54     | ---(---)
# ResNet1001| (111)| -----     | 92.39     | -----     | 95.08+-.14| ---(---)
# ---------------------------------------------------------------------------
n = 3# Model version
# Orig paper: version = 1 (ResNet v1), Improved ResNet: version = 2 (ResNet v2)
version = 1# Computed depth from supplied model parameter n
if version == 1:depth = n * 6 + 2
elif version == 2:depth = n * 9 + 2# Model name, depth and version
model_type = 'ResNet%dv%d' % (depth, version)# Load the CIFAR10 data.
(x_train, y_train), (x_test, y_test) = cifar10.load_data()# Input image dimensions.
input_shape = x_train.shape[1:]# Normalize data.
x_train = x_train.astype('float32') / 255
x_test = x_test.astype('float32') / 255# If subtract pixel mean is enabled
if subtract_pixel_mean:x_train_mean = np.mean(x_train, axis=0)x_train -= x_train_meanx_test -= x_train_meanprint('x_train shape:', x_train.shape)
print(x_train.shape[0], 'train samples')
print(x_test.shape[0], 'test samples')
print('y_train shape:', y_train.shape)# Convert class vectors to binary class matrices.
y_train = keras.utils.to_categorical(y_train, num_classes)
y_test = keras.utils.to_categorical(y_test, num_classes)def lr_schedule(epoch):"""Learning Rate ScheduleLearning rate is scheduled to be reduced after 80, 120, 160, 180 epochs.Called automatically every epoch as part of callbacks during training.# Argumentsepoch (int): The number of epochs# Returnslr (float32): learning rate"""lr = 1e-3if epoch > 180:lr *= 0.5e-3elif epoch > 160:lr *= 1e-3elif epoch > 120:lr *= 1e-2elif epoch > 80:lr *= 1e-1print('Learning rate: ', lr)return lrdef resnet_layer(inputs,num_filters=16,kernel_size=3,strides=1,activation='relu',batch_normalization=True,conv_first=True):"""2D Convolution-Batch Normalization-Activation stack builder# Argumentsinputs (tensor): input tensor from input image or previous layernum_filters (int): Conv2D number of filterskernel_size (int): Conv2D square kernel dimensionsstrides (int): Conv2D square stride dimensionsactivation (string): activation namebatch_normalization (bool): whether to include batch normalizationconv_first (bool): conv-bn-activation (True) orbn-activation-conv (False)# Returnsx (tensor): tensor as input to the next layer"""conv = Conv2D(num_filters,kernel_size=kernel_size,strides=strides,padding='same',kernel_initializer='he_normal',kernel_regularizer=l2(1e-4))x = inputsif conv_first:x = conv(x)if batch_normalization:x = BatchNormalization()(x)if activation is not None:x = Activation(activation)(x)else:if batch_normalization:x = BatchNormalization()(x)if activation is not None:x = Activation(activation)(x)x = conv(x)return xdef resnet_v1(input_shape, depth, num_classes=10):"""ResNet Version 1 Model builder [a]Stacks of 2 x (3 x 3) Conv2D-BN-ReLULast ReLU is after the shortcut connection.At the beginning of each stage, the feature map size is halved (downsampled)by a convolutional layer with strides=2, while the number of filters isdoubled. Within each stage, the layers have the same number filters and thesame number of filters.Features maps sizes:stage 0: 32x32, 16stage 1: 16x16, 32stage 2:  8x8,  64The Number of parameters is approx the same as Table 6 of [a]:ResNet20 0.27MResNet32 0.46MResNet44 0.66MResNet56 0.85MResNet110 1.7M# Argumentsinput_shape (tensor): shape of input image tensordepth (int): number of core convolutional layersnum_classes (int): number of classes (CIFAR10 has 10)# Returnsmodel (Model): Keras model instance"""if (depth - 2) % 6 != 0:raise ValueError('depth should be 6n+2 (eg 20, 32, 44 in [a])')# Start model definition.num_filters = 16num_res_blocks = int((depth - 2) / 6)inputs = Input(shape=input_shape)x = resnet_layer(inputs=inputs)# Instantiate the stack of residual unitsfor stack in range(3):for res_block in range(num_res_blocks):strides = 1if stack > 0 and res_block == 0:  # first layer but not first stackstrides = 2  # downsampley = resnet_layer(inputs=x,num_filters=num_filters,strides=strides)y = resnet_layer(inputs=y,num_filters=num_filters,activation=None)if stack > 0 and res_block == 0:  # first layer but not first stack# linear projection residual shortcut connection to match# changed dimsx = resnet_layer(inputs=x,num_filters=num_filters,kernel_size=1,strides=strides,activation=None,batch_normalization=False)x = keras.layers.add([x, y])x = Activation('relu')(x)num_filters *= 2# Add classifier on top.# v1 does not use BN after last shortcut connection-ReLUx = AveragePooling2D(pool_size=8)(x)y = Flatten()(x)outputs = Dense(num_classes,activation='softmax',kernel_initializer='he_normal')(y)# Instantiate model.model = Model(inputs=inputs, outputs=outputs)return modeldef resnet_v2(input_shape, depth, num_classes=10):"""ResNet Version 2 Model builder [b]Stacks of (1 x 1)-(3 x 3)-(1 x 1) BN-ReLU-Conv2D or also known asbottleneck layerFirst shortcut connection per layer is 1 x 1 Conv2D.Second and onwards shortcut connection is identity.At the beginning of each stage, the feature map size is halved (downsampled)by a convolutional layer with strides=2, while the number of filter maps isdoubled. Within each stage, the layers have the same number filters and thesame filter map sizes.Features maps sizes:conv1  : 32x32,  16stage 0: 32x32,  64stage 1: 16x16, 128stage 2:  8x8,  256# Argumentsinput_shape (tensor): shape of input image tensordepth (int): number of core convolutional layersnum_classes (int): number of classes (CIFAR10 has 10)# Returnsmodel (Model): Keras model instance"""if (depth - 2) % 9 != 0:raise ValueError('depth should be 9n+2 (eg 56 or 110 in [b])')# Start model definition.num_filters_in = 16num_res_blocks = int((depth - 2) / 9)inputs = Input(shape=input_shape)# v2 performs Conv2D with BN-ReLU on input before splitting into 2 pathsx = resnet_layer(inputs=inputs,num_filters=num_filters_in,conv_first=True)# Instantiate the stack of residual unitsfor stage in range(3):for res_block in range(num_res_blocks):activation = 'relu'batch_normalization = Truestrides = 1if stage == 0:num_filters_out = num_filters_in * 4if res_block == 0:  # first layer and first stageactivation = Nonebatch_normalization = Falseelse:num_filters_out = num_filters_in * 2if res_block == 0:  # first layer but not first stagestrides = 2    # downsample# bottleneck residual unity = resnet_layer(inputs=x,num_filters=num_filters_in,kernel_size=1,strides=strides,activation=activation,batch_normalization=batch_normalization,conv_first=False)y = resnet_layer(inputs=y,num_filters=num_filters_in,conv_first=False)y = resnet_layer(inputs=y,num_filters=num_filters_out,kernel_size=1,conv_first=False)if res_block == 0:# linear projection residual shortcut connection to match# changed dimsx = resnet_layer(inputs=x,num_filters=num_filters_out,kernel_size=1,strides=strides,activation=None,batch_normalization=False)x = keras.layers.add([x, y])num_filters_in = num_filters_out# Add classifier on top.# v2 has BN-ReLU before Poolingx = BatchNormalization()(x)x = Activation('relu')(x)x = AveragePooling2D(pool_size=8)(x)y = Flatten()(x)outputs = Dense(num_classes,activation='softmax',kernel_initializer='he_normal')(y)# Instantiate model.model = Model(inputs=inputs, outputs=outputs)return modelif version == 2:model = resnet_v2(input_shape=input_shape, depth=depth)
else:model = resnet_v1(input_shape=input_shape, depth=depth)model.compile(loss='categorical_crossentropy',optimizer=Adam(lr=lr_schedule(0)),metrics=['accuracy'])
model.summary()
print(model_type)
参考:CIFAR-10 ResNet - Keras 中文文档
[code] ResNet56 with Cifar-10 - zzennin’s DeepLearning (chaelin0722.github.io)
resnet的结构如下,以resnet56为例,有3个stack,每个stack里有9个resblock,每个resblock里有两个3*3的卷积,每个卷积都带BN,第一个卷积后进行activate,第二个卷积+shortcut后进行activate。