基本思想:使用友善开发板进行目标检测和测试
第一步:查看教程和进行刷机http://wiki.friendlyelec.com/wiki/index.php/NanoPi_NEO/zh#.E4.B8.8B.E8.BD.BD.E7.B3.BB.E7.BB.9F.E5.9B.BA.E4.BB.B6


小开发板子还是蛮不错的~,友善也开始卷了。。。。
第二步:刷机完成之后,开始远程连接
(1)先执行搜索命令
:\Users\Administrator>for /L %i IN (1,1,254) DO ping -w 2 -n 1 192.168.10.%i(2)显示刚才缓存的信息
C:\Users\Administrator>arp -aInterface: 192.168.10.171 --- 0x8Internet Address Physical Address Type192.168.10.1 02-81-c1-21-49-bb dynamic192.168.10.37 02-81-c1-21-49-bb dynamic192.168.10.76 02-81-c1-21-49-bb dynamic192.168.10.80 02-81-c1-21-49-bb dynamic192.168.10.150 02-81-c1-21-49-bb dynamic192.168.10.152 02-81-c1-21-49-bb dynamic192.168.10.255 02-81-c1-21-49-bb static224.0.0.22 01-00-5e-00-00-16 static224.0.0.251 02-81-c1-21-49-bb static224.0.0.252 02-81-c1-21-49-bb static224.9.234.121 01-00-5e-09-ea-79 static224.149.203.115 02-81-c1-21-49-bb static225.96.85.110 02-81-c1-21-49-bb static225.138.111.106 02-81-c1-21-49-bb static226.96.85.110 01-00-5e-60-55-6e static231.96.85.110 01-00-5e-60-55-6e static231.252.216.115 01-00-5e-7c-d8-73 static232.96.85.110 01-00-5e-60-55-6e static233.96.85.110 01-00-5e-60-55-6e static234.62.83.49 02-81-c1-21-49-bb static234.96.85.110 01-00-5e-60-55-6e static235.96.85.110 01-00-5e-60-55-6e static235.169.186.202 01-00-5e-29-ba-ca static236.58.182.123 01-00-5e-3a-b6-7b static236.96.85.110 01-00-5e-60-55-6e static237.133.42.175 01-00-5e-05-2a-af static238.79.97.123 01-00-5e-4f-61-7b static238.93.203.115 01-00-5e-5d-cb-73 static239.255.255.250 01-00-5e-7f-ff-fa static255.255.255.255 ff-ff-ff-ff-ff-ff static测试一下 ,然后使用ssh连接,进行尝试连接这几个ip,哪个可以连接,就用哪个
ubuntu@sxj731533730:~$ ssh root@192.168.10.80
The authenticity of host '192.168.10.80 (192.168.10.80)' can't be established.
ECDSA key fingerprint is SHA256:Nt8JP5g2bNK/Nu3FxI22xNGj0KesVnMmPDKaWdRdzs4.
Are you sure you want to continue connecting (yes/no/[fingerprint])? yes
Warning: Permanently added '192.168.10.80' (ECDSA) to the list of known hosts.
root@192.168.10.80's password:
Permission denied, please try again.
root@192.168.10.80's password:
Connection closed by 192.168.10.80 port 22
ubuntu@sxj731533730:~$ ssh root@192.168.10.80
root@192.168.10.80's password:_____     _                _ _       _____ _     _____ ____
|  ___| __(_) ___ _ __   __| | |_   _| ____| |   | ____/ ___|
| |_ | '__| |/ _ \ '_ \ / _` | | | | |  _| | |   |  _|| |
|  _|| |  | |  __/ | | | (_| | | |_| | |___| |___| |__| |___
|_|  |_|  |_|\___|_| |_|\__,_|_|\__, |_____|_____|_____\____||___/Welcome to Ubuntu 16.04.2 LTS 4.14.111
System load:   0.06             Up time:       1 min            Local users:   2
Memory usage:  9 % of 491Mb     IP:            192.168.10.80
CPU temp:      21°C
Usage of /:    7% of 29G* Documentation: http://wiki.friendlyarm.com/Ubuntu* Forum: http://www.friendlyarm.com/Forum/root@NanoPi-NEO:~#
也可以使用window remote工具访问界面
 第二步、 先测试一下ncnn的benchmark,给up测个数据,因为后面的识别需要使用ncnn进行开发~暂且不用pytorch版本,因为官方提供了视频流的推流源代码,可以结合直接使用,就不用重复开发python代码检测+推流+调用摄像头代码~
root@NanoPi-NEO:~# git clone https://github.com/Tencent/ncnn
Cloning into 'ncnn'...
remote: Enumerating objects: 25669, done.
remote: Counting objects: 100% (830/830), done.
remote: Compressing objects: 100% (415/415), done.
remote: Total 25669 (delta 599), reused 561 (delta 415), pack-reused 24839
Receiving objects: 100% (25669/25669), 17.91 MiB | 2.53 MiB/s, done.
Resolving deltas: 100% (21438/21438), done.
Checking connectivity... done.
Checking out files: 100% (2639/2639), done.
root@NanoPi-NEO:~# cd ncnn/
root@NanoPi-NEO:~/ncnn# mkdir build
root@NanoPi-NEO:~/ncnn# cd build
root@NanoPi-NEO:~/ncnn/build# cmake ..
root@NanoPi-NEO:~/ncnn/build# make -j8
root@NanoPi-NEO:~/ncnn/build# sudo make install
测试一下,啥玩意,都测试不了。。。
root@NanoPi-NEO:~/ncnn/build# cd benchmark/
root@NanoPi-NEO:~/ncnn/build/benchmark# cp -r ../../benchmark/*.param .
root@NanoPi-NEO:~/ncnn/build/benchmark# ./benchncnn 1 4 0 -1 0
loop_count = 1
num_threads = 4
powersave = 0
gpu_device = -1
cooling_down = 0squeezenet  min =  686.84  max =  686.84  avg =  686.84squeezenet_int8  min =  601.06  max =  601.06  avg =  601.06mobilenet  min = 1251.82  max = 1251.82  avg = 1251.82mobilenet_int8  min =  988.78  max =  988.78  avg =  988.78mobilenet_v2  min =  846.36  max =  846.36  avg =  846.36mobilenet_v3  min =  678.72  max =  678.72  avg =  678.72shufflenet  min =  408.54  max =  408.54  avg =  408.54shufflenet_v2  min =  373.87  max =  373.87  avg =  373.87mnasnet  min =  736.88  max =  736.88  avg =  736.88proxylessnasnet  min =  950.14  max =  950.14  avg =  950.14efficientnet_b0  min = 1141.05  max = 1141.05  avg = 1141.05efficientnetv2_b0  min = 1259.52  max = 1259.52  avg = 1259.52regnety_400m  min =  995.64  max =  995.64  avg =  995.64blazeface  min =   98.81  max =   98.81  avg =   98.81googlenet  min = 2006.27  max = 2006.27  avg = 2006.27googlenet_int8  min = 1896.92  max = 1896.92  avg = 1896.92resnet18  min = 1699.50  max = 1699.50  avg = 1699.50resnet18_int8  min = 1482.52  max = 1482.52  avg = 1482.52alexnet  min = 1234.55  max = 1234.55  avg = 1234.55
Segmentation fault
root@NanoPi-NEO:~/ncnn/build/benchmark# ./benchncnn 1 2 0 -1 0
loop_count = 1
num_threads = 2
powersave = 0
gpu_device = -1
cooling_down = 0squeezenet  min = 1209.82  max = 1209.82  avg = 1209.82squeezenet_int8  min = 1086.96  max = 1086.96  avg = 1086.96mobilenet  min = 2371.86  max = 2371.86  avg = 2371.86mobilenet_int8  min = 1955.16  max = 1955.16  avg = 1955.16mobilenet_v2  min = 1440.63  max = 1440.63  avg = 1440.63mobilenet_v3  min = 1127.70  max = 1127.70  avg = 1127.70shufflenet  min =  686.27  max =  686.27  avg =  686.27shufflenet_v2  min =  748.49  max =  748.49  avg =  748.49mnasnet  min = 1354.21  max = 1354.21  avg = 1354.21proxylessnasnet  min = 1547.11  max = 1547.11  avg = 1547.11efficientnet_b0  min = 2013.23  max = 2013.23  avg = 2013.23efficientnetv2_b0  min = 2327.19  max = 2327.19  avg = 2327.19regnety_400m  min = 1743.65  max = 1743.65  avg = 1743.65blazeface  min =  157.64  max =  157.64  avg =  157.64googlenet  min = 3701.03  max = 3701.03  avg = 3701.03googlenet_int8  min = 3422.73  max = 3422.73  avg = 3422.73resnet18  min = 3170.84  max = 3170.84  avg = 3170.84resnet18_int8  min = 2595.68  max = 2595.68  avg = 2595.68alexnet  min = 2305.54  max = 2305.54  avg = 2305.54
Segmentation fault
root@NanoPi-NEO:~/ncnn/build/benchmark# ./benchncnn 1 1 0 -1 0
loop_count = 1
num_threads = 1
powersave = 0
gpu_device = -1
cooling_down = 0squeezenet  min = 2312.63  max = 2312.63  avg = 2312.63squeezenet_int8  min = 2057.98  max = 2057.98  avg = 2057.98mobilenet  min = 4762.58  max = 4762.58  avg = 4762.58mobilenet_int8  min = 3907.42  max = 3907.42  avg = 3907.42mobilenet_v2  min = 2727.87  max = 2727.87  avg = 2727.87mobilenet_v3  min = 2154.93  max = 2154.93  avg = 2154.93shufflenet  min = 1102.24  max = 1102.24  avg = 1102.24shufflenet_v2  min = 1200.01  max = 1200.01  avg = 1200.01mnasnet  min = 2547.67  max = 2547.67  avg = 2547.67proxylessnasnet  min = 2770.91  max = 2770.91  avg = 2770.91efficientnet_b0  min = 3863.97  max = 3863.97  avg = 3863.97efficientnetv2_b0  min = 4651.81  max = 4651.81  avg = 4651.81regnety_400m  min = 3313.56  max = 3313.56  avg = 3313.56blazeface  min =  287.59  max =  287.59  avg =  287.59googlenet  min = 7387.17  max = 7387.17  avg = 7387.17googlenet_int8  min = 6645.12  max = 6645.12  avg = 6645.12resnet18  min = 6311.82  max = 6311.82  avg = 6311.82resnet18_int8  min = 4906.03  max = 4906.03  avg = 4906.03alexnet  min = 4647.50  max = 4647.50  avg = 4647.50
Segmentation fault
第三步、升级python3.5-python3.6,可以安装pytorch进行推理,但是本菜鸡没用pytorch,虽然安装上去了~,本菜鸡用的c++完成自己的任务,不使用pytorch的,可以跳过第三步
(1)先进行时间校准
root@NanoPi-NEO:~# sudo apt-get install software-properties-common
root@NanoPi-NEO:~# sudo tzselect
#Asia----china---beijing---ok
root@NanoPi-NEO:~# sudo ln -sf /usr/share/zoneinfo/Asia/Shanghai /etc/localtime
root@NanoPi-NEO:~# date
Fri Apr 15 23:45:09 UTC 2022
root@NanoPi-NEO:~# cp  /usr/share/zoneinfo/Asia/ShangHai  /etc/localtime
cp: cannot stat '/usr/share/zoneinfo/Asia/ShangHai': No such file or directory
root@NanoPi-NEO:~# sudo ln -sf /usr/share/zoneinfo/Asia/Shanghai /etc/localtime
root@NanoPi-NEO:~# sudo apt-get install ntpdate
Reading package lists... Done
Building dependency tree
Reading state information... Done
The following NEW packages will be installed:ntpdate
0 upgraded, 1 newly installed, 0 to remove and 219 not upgraded.
Need to get 44.2 kB of archives.
After this operation, 147 kB of additional disk space will be used.
Get:1 http://ports.ubuntu.com xenial-security/main armhf ntpdate armhf 1:4.2.8p4+dfsg-3ubuntu5.10 [44.2 kB]
Fetched 44.2 kB in 1s (35.9 kB/s)
debconf: delaying package configuration, since apt-utils is not installed
Selecting previously unselected package ntpdate.
(Reading database ... 110357 files and directories currently installed.)
Preparing to unpack .../ntpdate_1%3a4.2.8p4+dfsg-3ubuntu5.10_armhf.deb ...
Unpacking ntpdate (1:4.2.8p4+dfsg-3ubuntu5.10) ...
Processing triggers for man-db (2.7.5-1) ...
Setting up ntpdate (1:4.2.8p4+dfsg-3ubuntu5.10) ...
root@NanoPi-NEO:~#  ntpdate 210.72.145.44
16 Apr 07:53:49 ntpdate[4808]: the NTP socket is in use, exiting
root@NanoPi-NEO:~# date
Sat Apr 16 07:53:58 CST 2022ot@NanoPi-NEO:~# sudo apt-get install --reinstall ca-certificates
root@NanoPi-NEO:~# sudo add-apt-repository ppa:deadsnakes/ppa
root@NanoPi-NEO:~# sudo add-apt-repository ppa:jonathonf/python-3.6
gpg: keyring `/tmp/tmpfjuhizpl/secring.gpg' created
gpg: keyring `/tmp/tmpfjuhizpl/pubring.gpg' created
gpg: requesting key 6A755776 from hkp server keyserver.ubuntu.com
gpg: /tmp/tmpfjuhizpl/trustdb.gpg: trustdb created
gpg: key 6A755776: public key "Launchpad PPA for deadsnakes" imported
gpg: Total number processed: 1
gpg:               imported: 1  (RSA: 1)
OK
root@NanoPi-NEO:~# sudo apt-get install python3.6
仍然无法安装。。。。还是源码安装把
root@NanoPi-NEO:~# wget --no-check-certificate https://www.python.org/ftp/python/3.6.5/Python-3.6.5.tgz
root@NanoPi-NEO:~# tar -xzvf Python-3.6.5.tgz
root@NanoPi-NEO:~# cd Python-3.6.5
root@NanoPi-NEO:~# sudo ./configure --prefix=/usr/local/python3.6.5
root@NanoPi-NEO:~# sudo make install
root@NanoPi-NEO:~# sudo cp /usr/bin/python3 /usr/bin/python3_bak
root@NanoPi-NEO:~# sudo rm /usr/bin/python3
root@NanoPi-NEO:~# sudo ln -s /usr/local/python3.6.5/bin/python3 /usr/bin/python3
oot@NanoPi-NEO:~# python3 -v
Python 3.6.5 (default, Apr 16 2022, 08:39:54)
[GCC 5.4.0 20160609] on linux
Type "help", "copyright", "credits" or "license" for more information.
import 'atexit' # <class '_frozen_importlib.BuiltinImporter'>
>>>
然后配置一下pip3,否则无法使用
root@NanoPi-NEO:~# sudo vim /usr/local/bin/pip3
root@NanoPi-NEO:~# cat /usr/local/bin/pip3
#!/usr/bin/python3# -*- coding: utf-8 -*-
import re
import sys#from pip._internal.cli.main import main
from pip import main
if __name__ == '__main__':sys.argv[0] = re.sub(r'(-script\.pyw|\.exe)?$', '', sys.argv[0])sys.exit(main())
root@NanoPi-NEO:~# pip3Usage:pip <command> [options]Commands:install                     Install packages.download                    Download packages.uninstall                   Uninstall packages.freeze                      Output installed packages in requirements format.list                        List installed packages.show                        Show information about installed packages.check                       Verify installed packages have compatible dependencies.search                      Search PyPI for packages.wheel                       Build wheels from your requirements.hash                        Compute hashes of package archives.completion                  A helper command used for command completion.help                        Show help for commands.General Options:-h, --help                  Show help.--isolated                  Run pip in an isolated mode, ignoring environment variables and user configuration.-v, --verbose               Give more output. Option is additive, and can be used up to 3 times.-V, --version               Show version and exit.-q, --quiet                 Give less output. Option is additive, and can be used up to 3 times (corresponding toWARNING, ERROR, and CRITICAL logging levels).--log <path>                Path to a verbose appending log.--proxy <proxy>             Specify a proxy in the form [user:passwd@]proxy.server:port.--retries <retries>         Maximum number of retries each connection should attempt (default 5 times).--timeout <sec>             Set the socket timeout (default 15 seconds).--exists-action <action>    Default action when a path already exists: (s)witch, (i)gnore, (w)ipe, (b)ackup,(a)bort.--trusted-host <hostname>   Mark this host as trusted, even though it does not have valid or any HTTPS.--cert <path>               Path to alternate CA bundle.--client-cert <path>        Path to SSL client certificate, a single file containing the private key and thecertificate in PEM format.--cache-dir <dir>           Store the cache data in <dir>.--no-cache-dir              Disable the cache.--disable-pip-version-checkDon't periodically check PyPI to determine whether a new version of pip is available fordownload. Implied with --no-index.
可以安装torch了,参考下面教程
Install PyTorch on Jetson Nano - Q-engineering
测试结果
root@NanoPi-NEO:~# python3
Python 3.6.5 (default, Apr 16 2022, 08:39:54)
[GCC 5.4.0 20160609] on linux
Type "help", "copyright", "credits" or "license" for more information.
>>> import torch
>>>
第四步、先测试视频流、完成我们识别任务
root@NanoPi-NEO:~/C/mjpg-streamer# export LD_LIBRARY_PATH="$(pwd)"
root@NanoPi-NEO:~/C/mjpg-streamer# make
root@NanoPi-NEO:~/C/mjpg-streamer# ./mjpg_streamer -i "./input_uvc.so -d /dev/video0 -y 1 -r 1280x720 -f 30 -q 90 -n -fb 0" -o "./output_http.so -w ./www"测试视频结果 在网页输入192.168.10.80:8080

第五步、配置一下clion远程开发功能,开始写检测模块和摄像头进行联调


测试一下远程调用代码,可用测试代码 main.cpp
#include <iostream>int main() {std::cout << "Hello, World!" << std::endl;return 0;
}
测试结果
/root/sxj731533730/cmake-build-debug/nano_pi
Hello, World!Process finished with exit code 0
测试一下ncnn+nanodet,然后将代码集成到视频流代码中吧,官方例子是makefile ......
(1)先测试那只狗

cmakelists.txt 这里用的交叉编译库.a
cmake_minimum_required(VERSION 3.5)
project(nano_pi)set(CMAKE_CXX_STANDARD 14)
set(CMAKE_CXX_FLAGS "${CMAKE_CXX_FLAGS} -fopenmp")
set(CMAKE_C_FLAGS "${CMAKE_C_FLAGS} -fopenmp")
include_directories(${CMAKE_SOURCE_DIR}/include/ncnn)
include_directories(${CMAKE_SOURCE_DIR}/include)
#导入ncnn
add_library(libncnn STATIC IMPORTED)
set_target_properties(libncnn PROPERTIES IMPORTED_LOCATION ${CMAKE_SOURCE_DIR}/lib/libncnn.a)
find_package(OpenCV REQUIRED)
set(CMAKE_CXX_STANDARD 11)add_executable(nano_pi main.cpp)
target_link_libraries(nano_pi libncnn ${OpenCV_LIBS})
测试代码
#include <iostream>
#include<time.h>#include "net.h"#if defined(USE_NCNN_SIMPLEOCV)
#include "simpleocv.h"
#else
#include <opencv2/core/core.hpp>
#include <opencv2/highgui/highgui.hpp>
#include <opencv2/imgproc/imgproc.hpp>
#endif
#include <stdlib.h>
#include <float.h>
#include <stdio.h>
#include <vector>struct Object
{cv::Rect_<float> rect;int label;float prob;
};static inline float intersection_area(const Object& a, const Object& b)
{cv::Rect_<float> inter = a.rect & b.rect;return inter.area();
}static void qsort_descent_inplace(std::vector<Object>& faceobjects, int left, int right)
{int i = left;int j = right;float p = faceobjects[(left + right) / 2].prob;while (i <= j){while (faceobjects[i].prob > p)i++;while (faceobjects[j].prob < p)j--;if (i <= j){// swapstd::swap(faceobjects[i], faceobjects[j]);i++;j--;}}#pragma omp parallel sections{
#pragma omp section{if (left < j) qsort_descent_inplace(faceobjects, left, j);}
#pragma omp section{if (i < right) qsort_descent_inplace(faceobjects, i, right);}}
}static void qsort_descent_inplace(std::vector<Object>& faceobjects)
{if (faceobjects.empty())return;qsort_descent_inplace(faceobjects, 0, faceobjects.size() - 1);
}static void nms_sorted_bboxes(const std::vector<Object>& faceobjects, std::vector<int>& picked, float nms_threshold)
{picked.clear();const int n = faceobjects.size();std::vector<float> areas(n);for (int i = 0; i < n; i++){areas[i] = faceobjects[i].rect.width * faceobjects[i].rect.height;}for (int i = 0; i < n; i++){const Object& a = faceobjects[i];int keep = 1;for (int j = 0; j < (int)picked.size(); j++){const Object& b = faceobjects[picked[j]];// intersection over unionfloat inter_area = intersection_area(a, b);float union_area = areas[i] + areas[picked[j]] - inter_area;// float IoU = inter_area / union_areaif (inter_area / union_area > nms_threshold)keep = 0;}if (keep)picked.push_back(i);}
}static void generate_proposals(const ncnn::Mat& cls_pred, const ncnn::Mat& dis_pred, int stride, const ncnn::Mat& in_pad, float prob_threshold, std::vector<Object>& objects)
{const int num_grid = cls_pred.h;int num_grid_x;int num_grid_y;if (in_pad.w > in_pad.h){num_grid_x = in_pad.w / stride;num_grid_y = num_grid / num_grid_x;}else{num_grid_y = in_pad.h / stride;num_grid_x = num_grid / num_grid_y;}const int num_class = cls_pred.w;const int reg_max_1 = dis_pred.w / 4;for (int i = 0; i < num_grid_y; i++){for (int j = 0; j < num_grid_x; j++){const int idx = i * num_grid_x + j;const float* scores = cls_pred.row(idx);// find label with max scoreint label = -1;float score = -FLT_MAX;for (int k = 0; k < num_class; k++){if (scores[k] > score){label = k;score = scores[k];}}if (score >= prob_threshold){ncnn::Mat bbox_pred(reg_max_1, 4, (void*)dis_pred.row(idx));{ncnn::Layer* softmax = ncnn::create_layer("Softmax");ncnn::ParamDict pd;pd.set(0, 1); // axispd.set(1, 1);softmax->load_param(pd);ncnn::Option opt;opt.num_threads = 1;opt.use_packing_layout = false;softmax->create_pipeline(opt);softmax->forward_inplace(bbox_pred, opt);softmax->destroy_pipeline(opt);delete softmax;}float pred_ltrb[4];for (int k = 0; k < 4; k++){float dis = 0.f;const float* dis_after_sm = bbox_pred.row(k);for (int l = 0; l < reg_max_1; l++){dis += l * dis_after_sm[l];}pred_ltrb[k] = dis * stride;}float pb_cx = (j + 0.5f) * stride;float pb_cy = (i + 0.5f) * stride;float x0 = pb_cx - pred_ltrb[0];float y0 = pb_cy - pred_ltrb[1];float x1 = pb_cx + pred_ltrb[2];float y1 = pb_cy + pred_ltrb[3];Object obj;obj.rect.x = x0;obj.rect.y = y0;obj.rect.width = x1 - x0;obj.rect.height = y1 - y0;obj.label = label;obj.prob = score;objects.push_back(obj);}}}
}static int detect_nanodet(const cv::Mat& bgr, std::vector<Object>& objects)
{ncnn::Net nanodet;nanodet.opt.use_vulkan_compute = true;// nanodet.opt.use_bf16_storage = true;// original pretrained model from https://github.com/RangiLyu/nanodet// the ncnn model https://github.com/nihui/ncnn-assets/tree/master/modelsnanodet.load_param("../model/nanodet_m.param");nanodet.load_model("../model/nanodet_m.bin");int width = bgr.cols;int height = bgr.rows;const int target_size = 320;const float prob_threshold = 0.4f;const float nms_threshold = 0.5f;// pad to multiple of 32int w = width;int h = height;float scale = 1.f;if (w > h){scale = (float)target_size / w;w = target_size;h = h * scale;}else{scale = (float)target_size / h;h = target_size;w = w * scale;}ncnn::Mat in = ncnn::Mat::from_pixels_resize(bgr.data, ncnn::Mat::PIXEL_BGR, width, height, w, h);// pad to target_size rectangleint wpad = (w + 31) / 32 * 32 - w;int hpad = (h + 31) / 32 * 32 - h;ncnn::Mat in_pad;ncnn::copy_make_border(in, in_pad, hpad / 2, hpad - hpad / 2, wpad / 2, wpad - wpad / 2, ncnn::BORDER_CONSTANT, 0.f);const float mean_vals[3] = {103.53f, 116.28f, 123.675f};const float norm_vals[3] = {0.017429f, 0.017507f, 0.017125f};in_pad.substract_mean_normalize(mean_vals, norm_vals);ncnn::Extractor ex = nanodet.create_extractor();ex.input("input.1", in_pad);std::vector<Object> proposals;// stride 8{ncnn::Mat cls_pred;ncnn::Mat dis_pred;ex.extract("792", cls_pred);ex.extract("795", dis_pred);std::vector<Object> objects8;generate_proposals(cls_pred, dis_pred, 8, in_pad, prob_threshold, objects8);proposals.insert(proposals.end(), objects8.begin(), objects8.end());}// stride 16{ncnn::Mat cls_pred;ncnn::Mat dis_pred;ex.extract("814", cls_pred);ex.extract("817", dis_pred);std::vector<Object> objects16;generate_proposals(cls_pred, dis_pred, 16, in_pad, prob_threshold, objects16);proposals.insert(proposals.end(), objects16.begin(), objects16.end());}// stride 32{ncnn::Mat cls_pred;ncnn::Mat dis_pred;ex.extract("836", cls_pred);ex.extract("839", dis_pred);std::vector<Object> objects32;generate_proposals(cls_pred, dis_pred, 32, in_pad, prob_threshold, objects32);proposals.insert(proposals.end(), objects32.begin(), objects32.end());}// sort all proposals by score from highest to lowestqsort_descent_inplace(proposals);// apply nms with nms_thresholdstd::vector<int> picked;nms_sorted_bboxes(proposals, picked, nms_threshold);int count = picked.size();objects.resize(count);for (int i = 0; i < count; i++){objects[i] = proposals[picked[i]];// adjust offset to original unpaddedfloat x0 = (objects[i].rect.x - (wpad / 2)) / scale;float y0 = (objects[i].rect.y - (hpad / 2)) / scale;float x1 = (objects[i].rect.x + objects[i].rect.width - (wpad / 2)) / scale;float y1 = (objects[i].rect.y + objects[i].rect.height - (hpad / 2)) / scale;// clipx0 = std::max(std::min(x0, (float)(width - 1)), 0.f);y0 = std::max(std::min(y0, (float)(height - 1)), 0.f);x1 = std::max(std::min(x1, (float)(width - 1)), 0.f);y1 = std::max(std::min(y1, (float)(height - 1)), 0.f);objects[i].rect.x = x0;objects[i].rect.y = y0;objects[i].rect.width = x1 - x0;objects[i].rect.height = y1 - y0;}return 0;
}static void draw_objects(const cv::Mat& bgr, const std::vector<Object>& objects)
{static const char* class_names[] = {"person", "bicycle", "car", "motorcycle", "airplane", "bus", "train", "truck", "boat", "traffic light","fire hydrant", "stop sign", "parking meter", "bench", "bird", "cat", "dog", "horse", "sheep", "cow","elephant", "bear", "zebra", "giraffe", "backpack", "umbrella", "handbag", "tie", "suitcase", "frisbee","skis", "snowboard", "sports ball", "kite", "baseball bat", "baseball glove", "skateboard", "surfboard","tennis racket", "bottle", "wine glass", "cup", "fork", "knife", "spoon", "bowl", "banana", "apple","sandwich", "orange", "broccoli", "carrot", "hot dog", "pizza", "donut", "cake", "chair", "couch","potted plant", "bed", "dining table", "toilet", "tv", "laptop", "mouse", "remote", "keyboard", "cell phone","microwave", "oven", "toaster", "sink", "refrigerator", "book", "clock", "vase", "scissors", "teddy bear","hair drier", "toothbrush"};cv::Mat image = bgr.clone();for (size_t i = 0; i < objects.size(); i++){const Object& obj = objects[i];fprintf(stderr, "%d = %.5f at %.2f %.2f %.2f x %.2f\n", obj.label, obj.prob,obj.rect.x, obj.rect.y, obj.rect.width, obj.rect.height);cv::rectangle(image, obj.rect, cv::Scalar(255, 0, 0));char text[256];sprintf(text, "%s %.1f%%", class_names[obj.label], obj.prob * 100);int baseLine = 0;cv::Size label_size = cv::getTextSize(text, cv::FONT_HERSHEY_SIMPLEX, 0.5, 1, &baseLine);int x = obj.rect.x;int y = obj.rect.y - label_size.height - baseLine;if (y < 0)y = 0;if (x + label_size.width > image.cols)x = image.cols - label_size.width;cv::rectangle(image, cv::Rect(cv::Point(x, y), cv::Size(label_size.width, label_size.height + baseLine)),cv::Scalar(255, 255, 255), -1);cv::putText(image, text, cv::Point(x, y + label_size.height),cv::FONT_HERSHEY_SIMPLEX, 0.5, cv::Scalar(0, 0, 0));}cv::imwrite("image.jpg",image);//  cv::imshow("image", image);// cv::waitKey(0);
}int main(int argc, char** argv)
{cv::Mat m = cv::imread("../dog.jpg");if (m.empty()){return -1;}clock_t start_t,finish_t;double total_t = 0;start_t = clock();std::vector<Object> objects;detect_nanodet(m, objects);finish_t = clock();total_t = (double)(finish_t - start_t) ;//将时间转换为秒printf("runtime  %f ms\n", total_t);draw_objects(m, objects);return 0;
}
测试结果
/root/sxj731533730/cmake-build-debug/nano_piruntime 850.795ms
16 = 0.64556 at 130.38 218.80 180.83 x 321.38
1 = 0.46087 at 103.48 118.24 458.68 x 311.99
7 = 0.43419 at 378.29 53.21 308.82 x 111.28Process finished with exit code 0
测试图 这友善开发板测试时间有点长。。。

实测代码

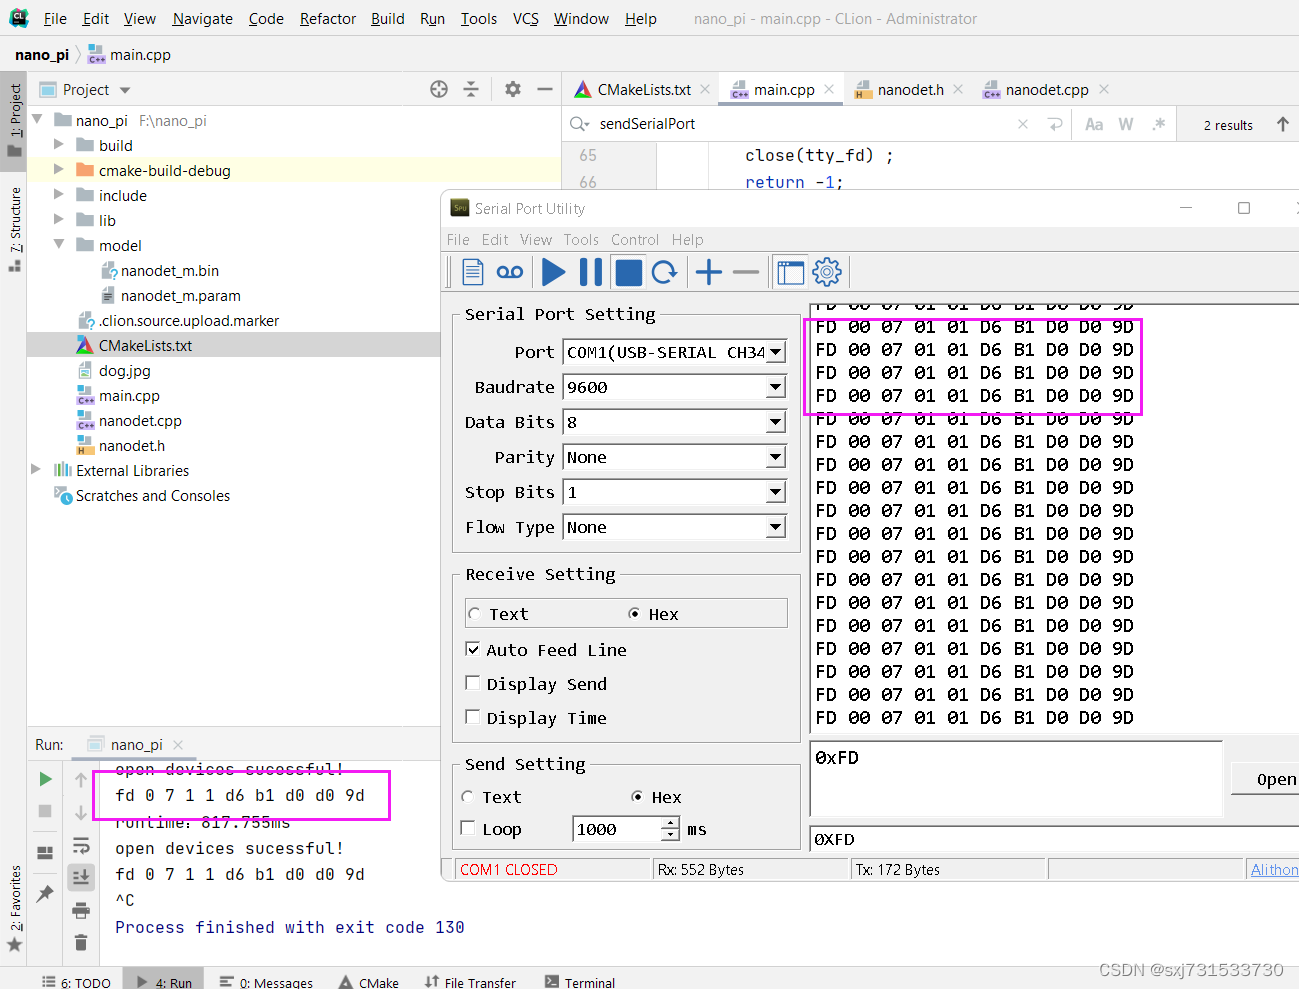
第六步、先进行串口调试,然后在完成自己的任务

测试代码,测试结果
root@NanoPi-NEO:~/sxj731533730# stty -F /dev/ttyS0 speed 115200 cs8 -parenb -cstopb  -echo
115200
root@NanoPi-NEO:~/sxj731533730# echo "666"  >  /dev/ttyS0
root@NanoPi-NEO:~/sxj731533730# echo "6666"  >  /dev/ttyS0
测试结果

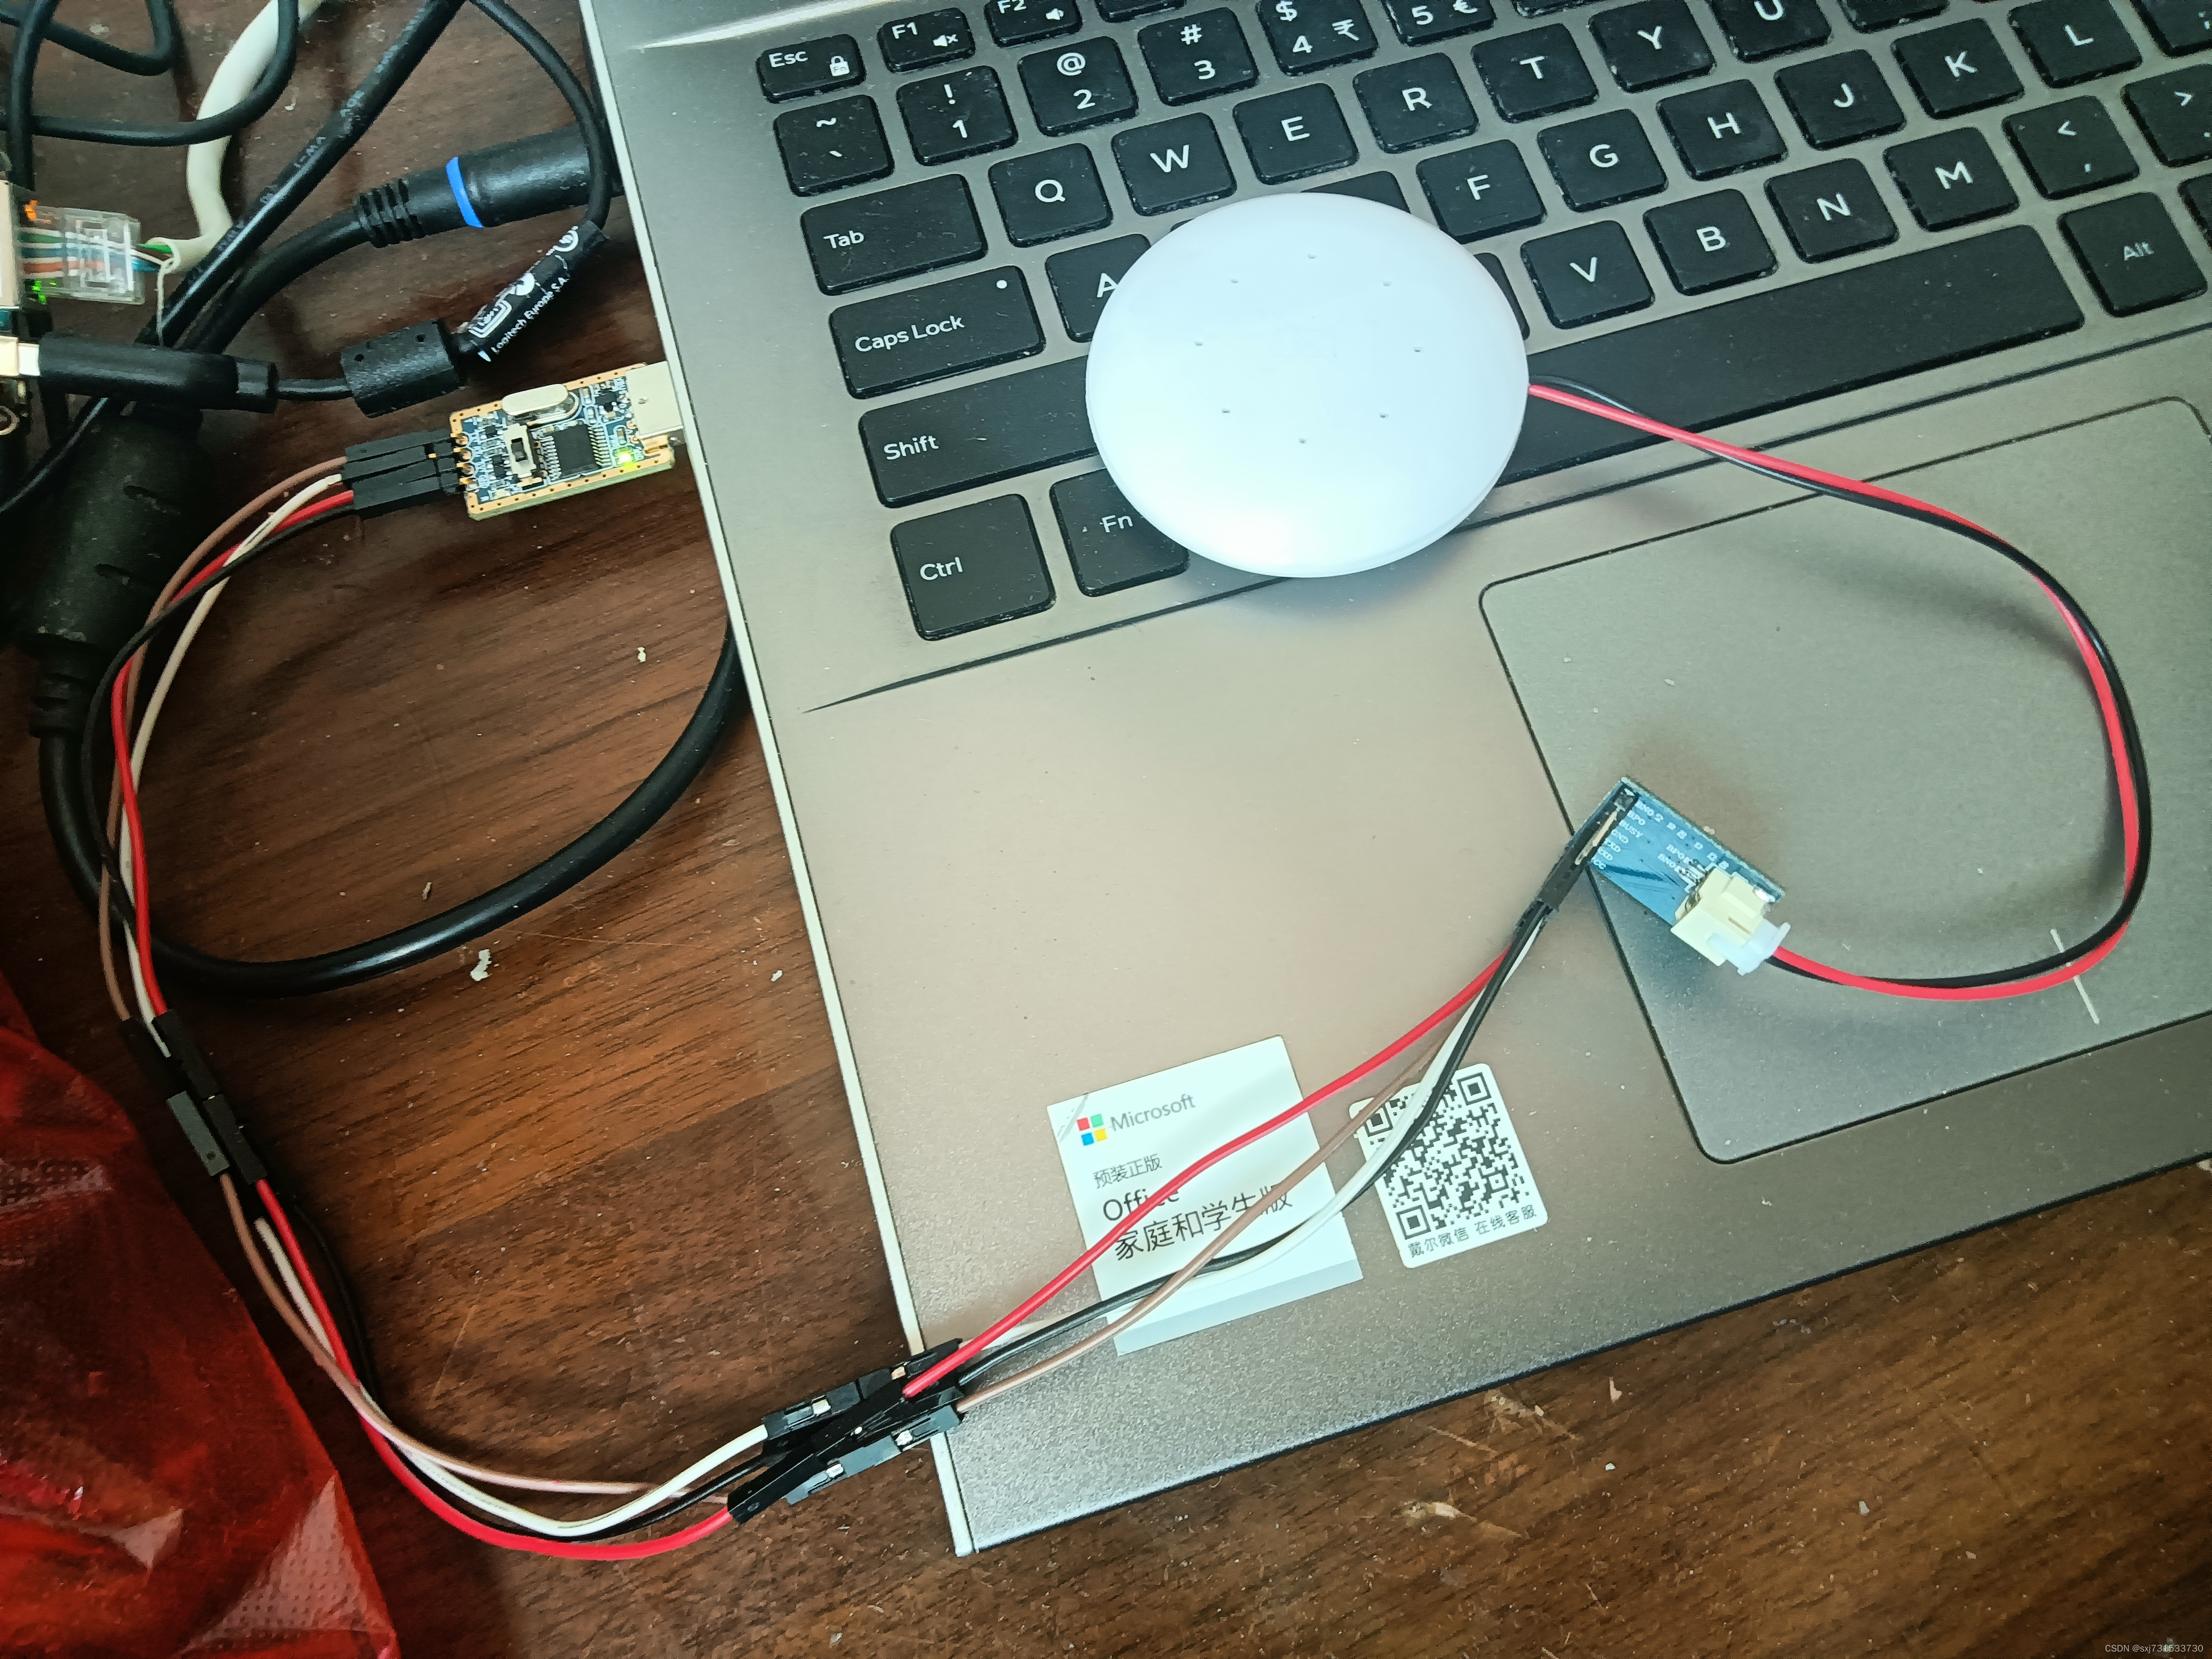
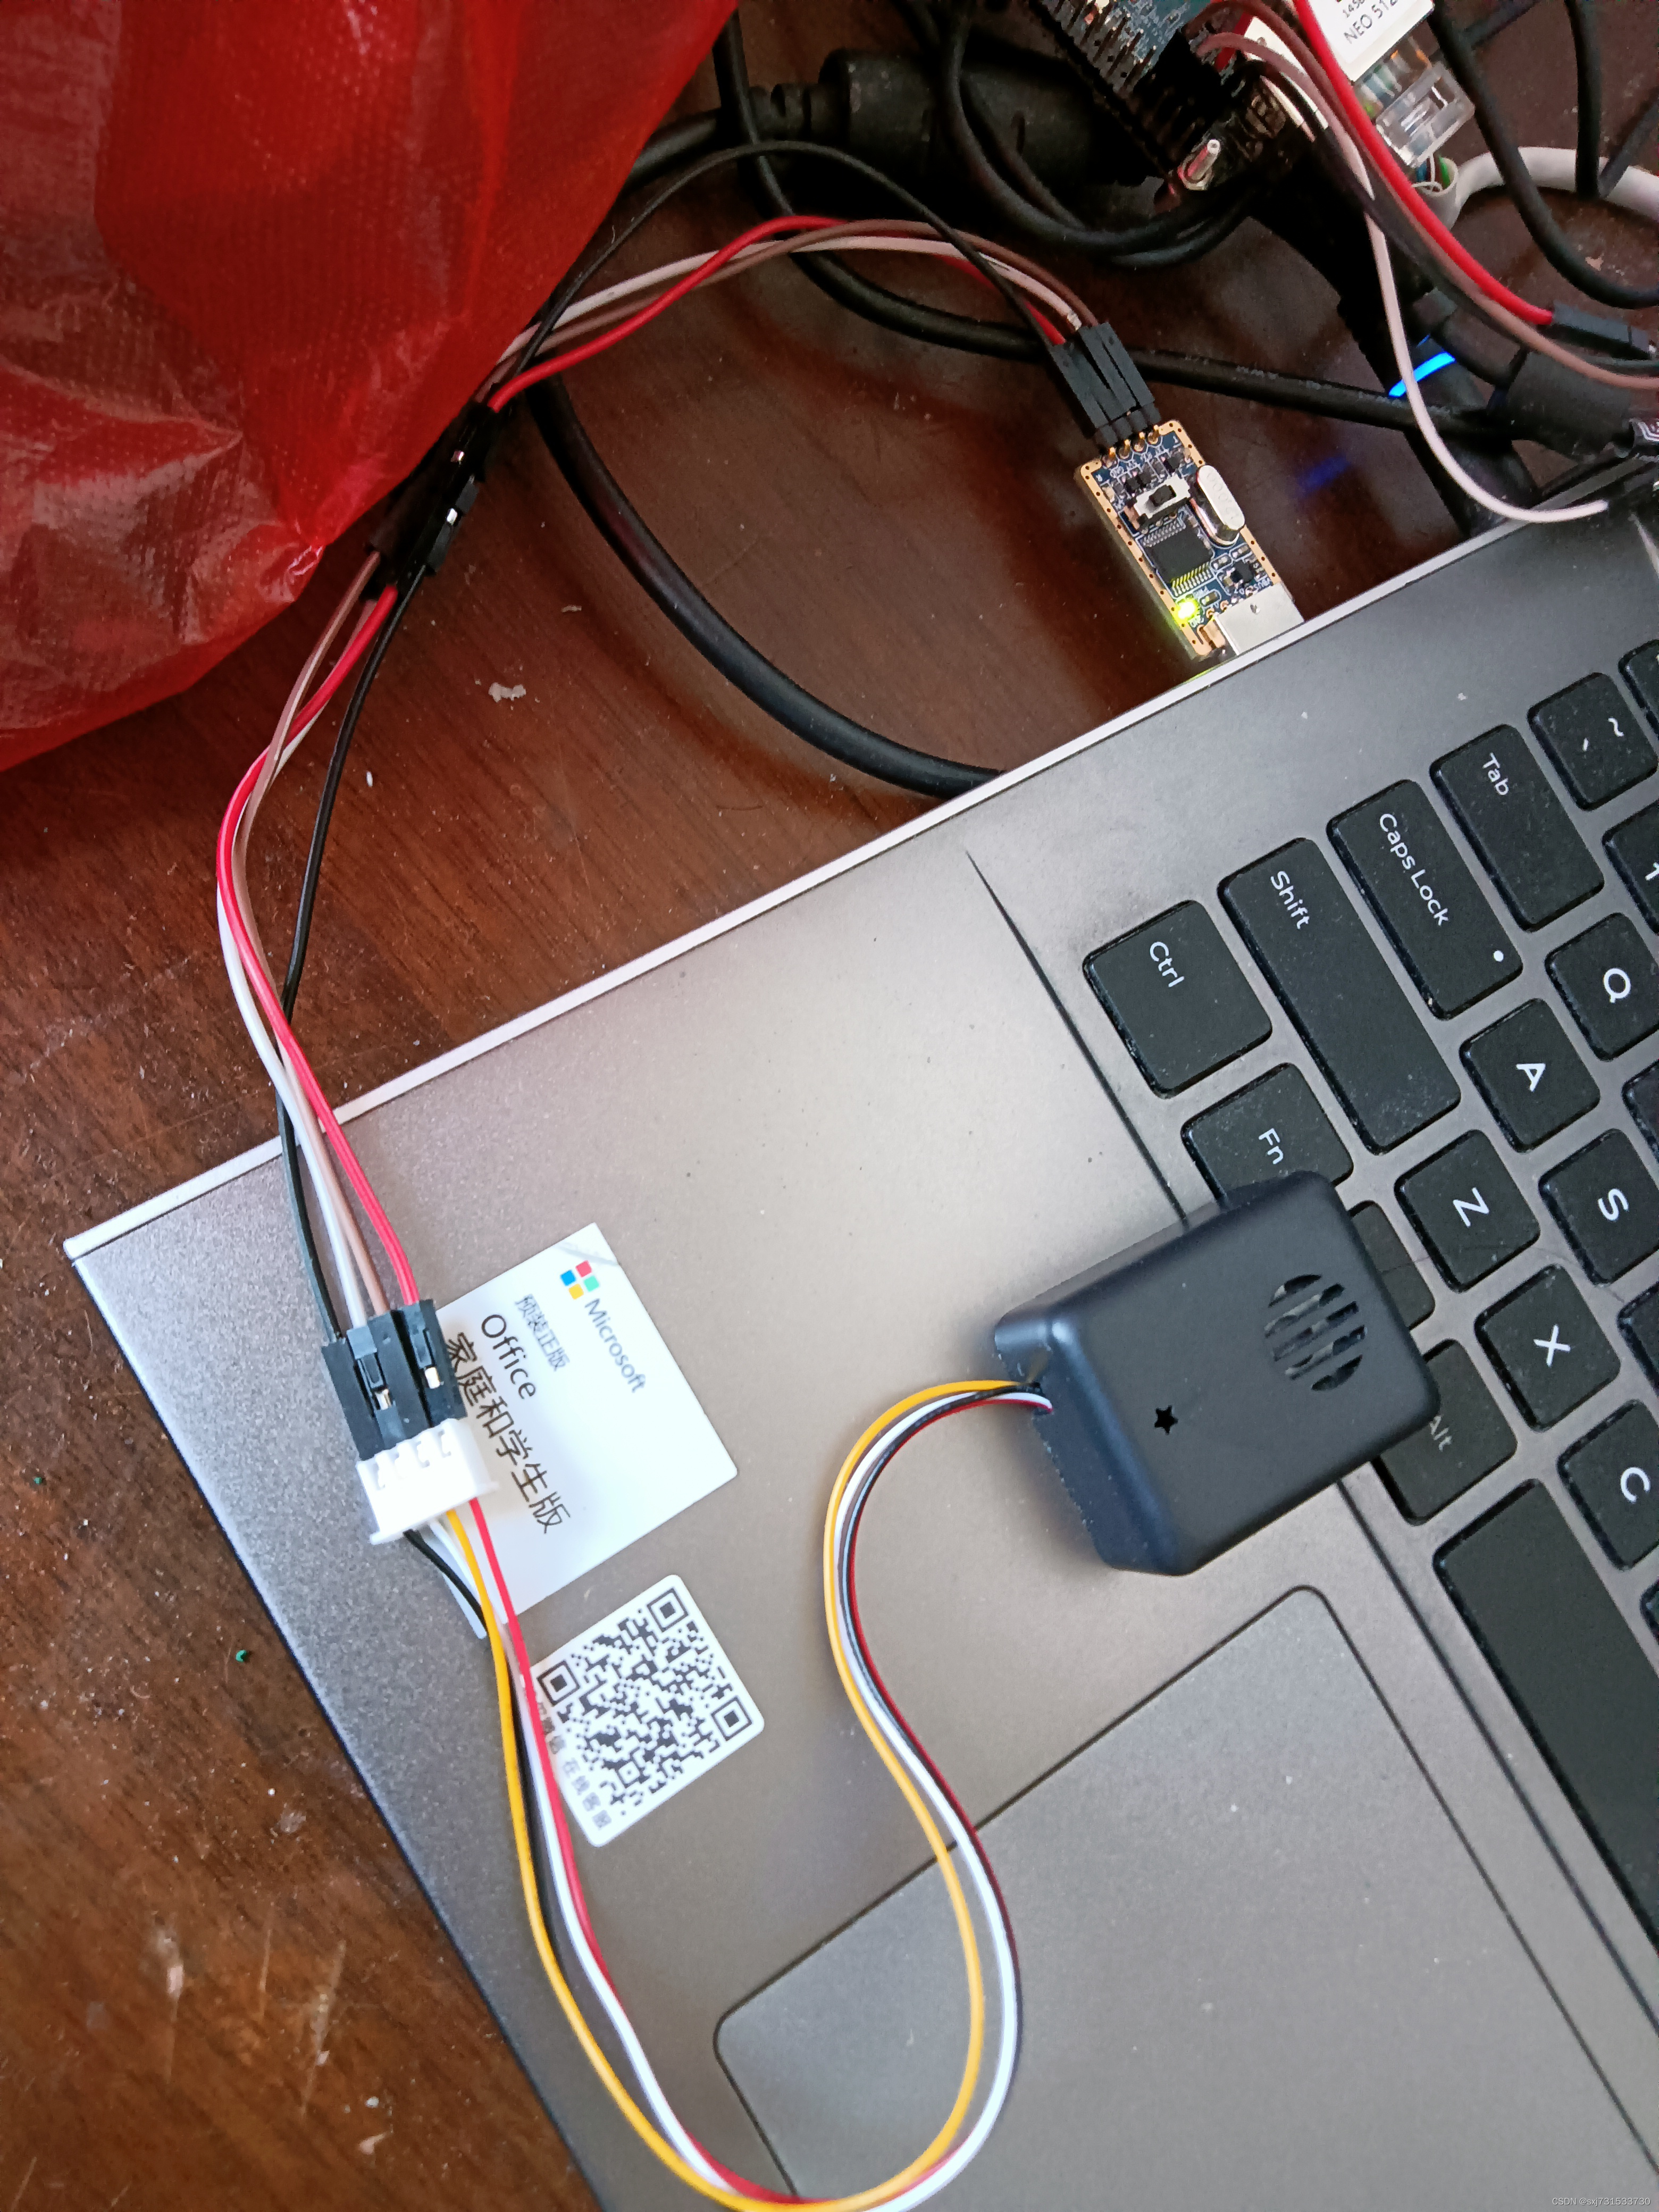
开发板的连线方式示意图


注意(以usb转ttl为基准)GND--GND(黑色)VCC-VCC(红色,可以不连) RX--TX(白色) TX-RX(灰色)

使用代码进行测试 window11+clion+远程+ int sendSerialPort(const char *W_BUF)
#include <chrono>
#include <sys/stat.h>
#include <fcntl.h>
#include <termios.h>
#include <unistd.h>
#include<unistd.h>
#include<stdio.h>
#include<sys/types.h>
#include<sys/stat.h>
#include <iostream>
#include <cstring>using namespace std;int sendSerialPort(const unsigned char W_BUF[], int length) {int tty_fd = -1;int rv = -1;struct termios options;tty_fd = open("/dev/ttyS0", O_RDWR | O_NOCTTY | O_NDELAY); //打开串口设备fcntl(tty_fd, F_SETFL, 0);if (tty_fd < 0) {printf("open tty failed:%s\n", strerror(errno));close(tty_fd);return -1;}printf("open devices sucessful!\n");memset(&options, 0, sizeof(options));rv = tcgetattr(tty_fd, &options); //获取原有的串口属性的配置if (rv != 0) {printf("tcgetattr() failed:%s\n", strerror(errno));close(tty_fd);return -1;}options.c_cflag |= (CLOCAL | CREAD); // CREAD 开启串行数据接收,CLOCAL并打开本地连接模式options.c_cflag &= ~CSIZE;// 先使用CSIZE做位屏蔽options.c_cflag |= CS8; //设置8位数据位options.c_cflag &= ~PARENB; //无校验位cfsetispeed(&options, B9600);cfsetospeed(&options, B9600);options.c_cflag &= ~CSTOPB;options.c_cc[VTIME] = 0;options.c_cc[VMIN] = 0;tcflush(tty_fd, TCIFLUSH);if ((tcsetattr(tty_fd, TCSANOW, &options)) != 0) {printf("tcsetattr failed:%s\n", strerror(errno));close(tty_fd);return -1;}std::cout << std::endl << "length= " << length << std::endl;rv = write(tty_fd, W_BUF, length);if(rv<=0) /* 出错了*/{if (errno == EINTR) /* 中断错误 我们继续写*/{close(tty_fd);printf("[SeanSend]error errno==EINTR continue\n");} else if (errno == EAGAIN) /* EAGAIN : Resource temporarily unavailable*/{sleep(1);//等待一秒,希望发送缓冲区能得到释放close(tty_fd);printf("[SeanSend]error errno==EAGAIN continue\n");} else /* 其他错误 没有办法,只好退了*/{printf("[SeanSend]ERROR: errno = %d, strerror = %s \n", errno, strerror(errno));return (-1);}}if (rv < 0) {printf("Write() error:%s\n", strerror(errno));close(tty_fd);return -1;}for (int i = 0; i < length; i++) {std::cout << std::hex << (int) W_BUF[i] << " ";}close(tty_fd);printf("\nWrite() successfully\n");return 0;}int main(int argc, char **argv) {//0xFD 0x00 0x07 0x01 0x01 0xD6 0xB1 0xD0 0xD0 0x9D  //直行//0xFD 0x00 0x07 0x01 0x01 0xD7 0xF3 0xD7 0xAA 0xA3  //左转//0xFD 0x00 0x07 0x01 0x01 0xD3 0xD2 0xD7 0xAA 0x86  //右转while(true){const unsigned char data[][10] = {{0xFD, 0x00, 0x07, 0x01, 0x01, 0xD6, 0xB1, 0xD0, 0xD0, 0x9D},{0xFD, 0x00, 0x07, 0x01, 0x01, 0xD7, 0xF3, 0xD7, 0xAA, 0xA3},{0xFD, 0x00, 0x07, 0x01, 0x01, 0xD3, 0xD2, 0xD7, 0xAA, 0x86}};sendSerialPort(data[0], sizeof(data[0]));//测试}return 0;
}
测试结果,一步步来,先完成这种串口传递数据到pc端
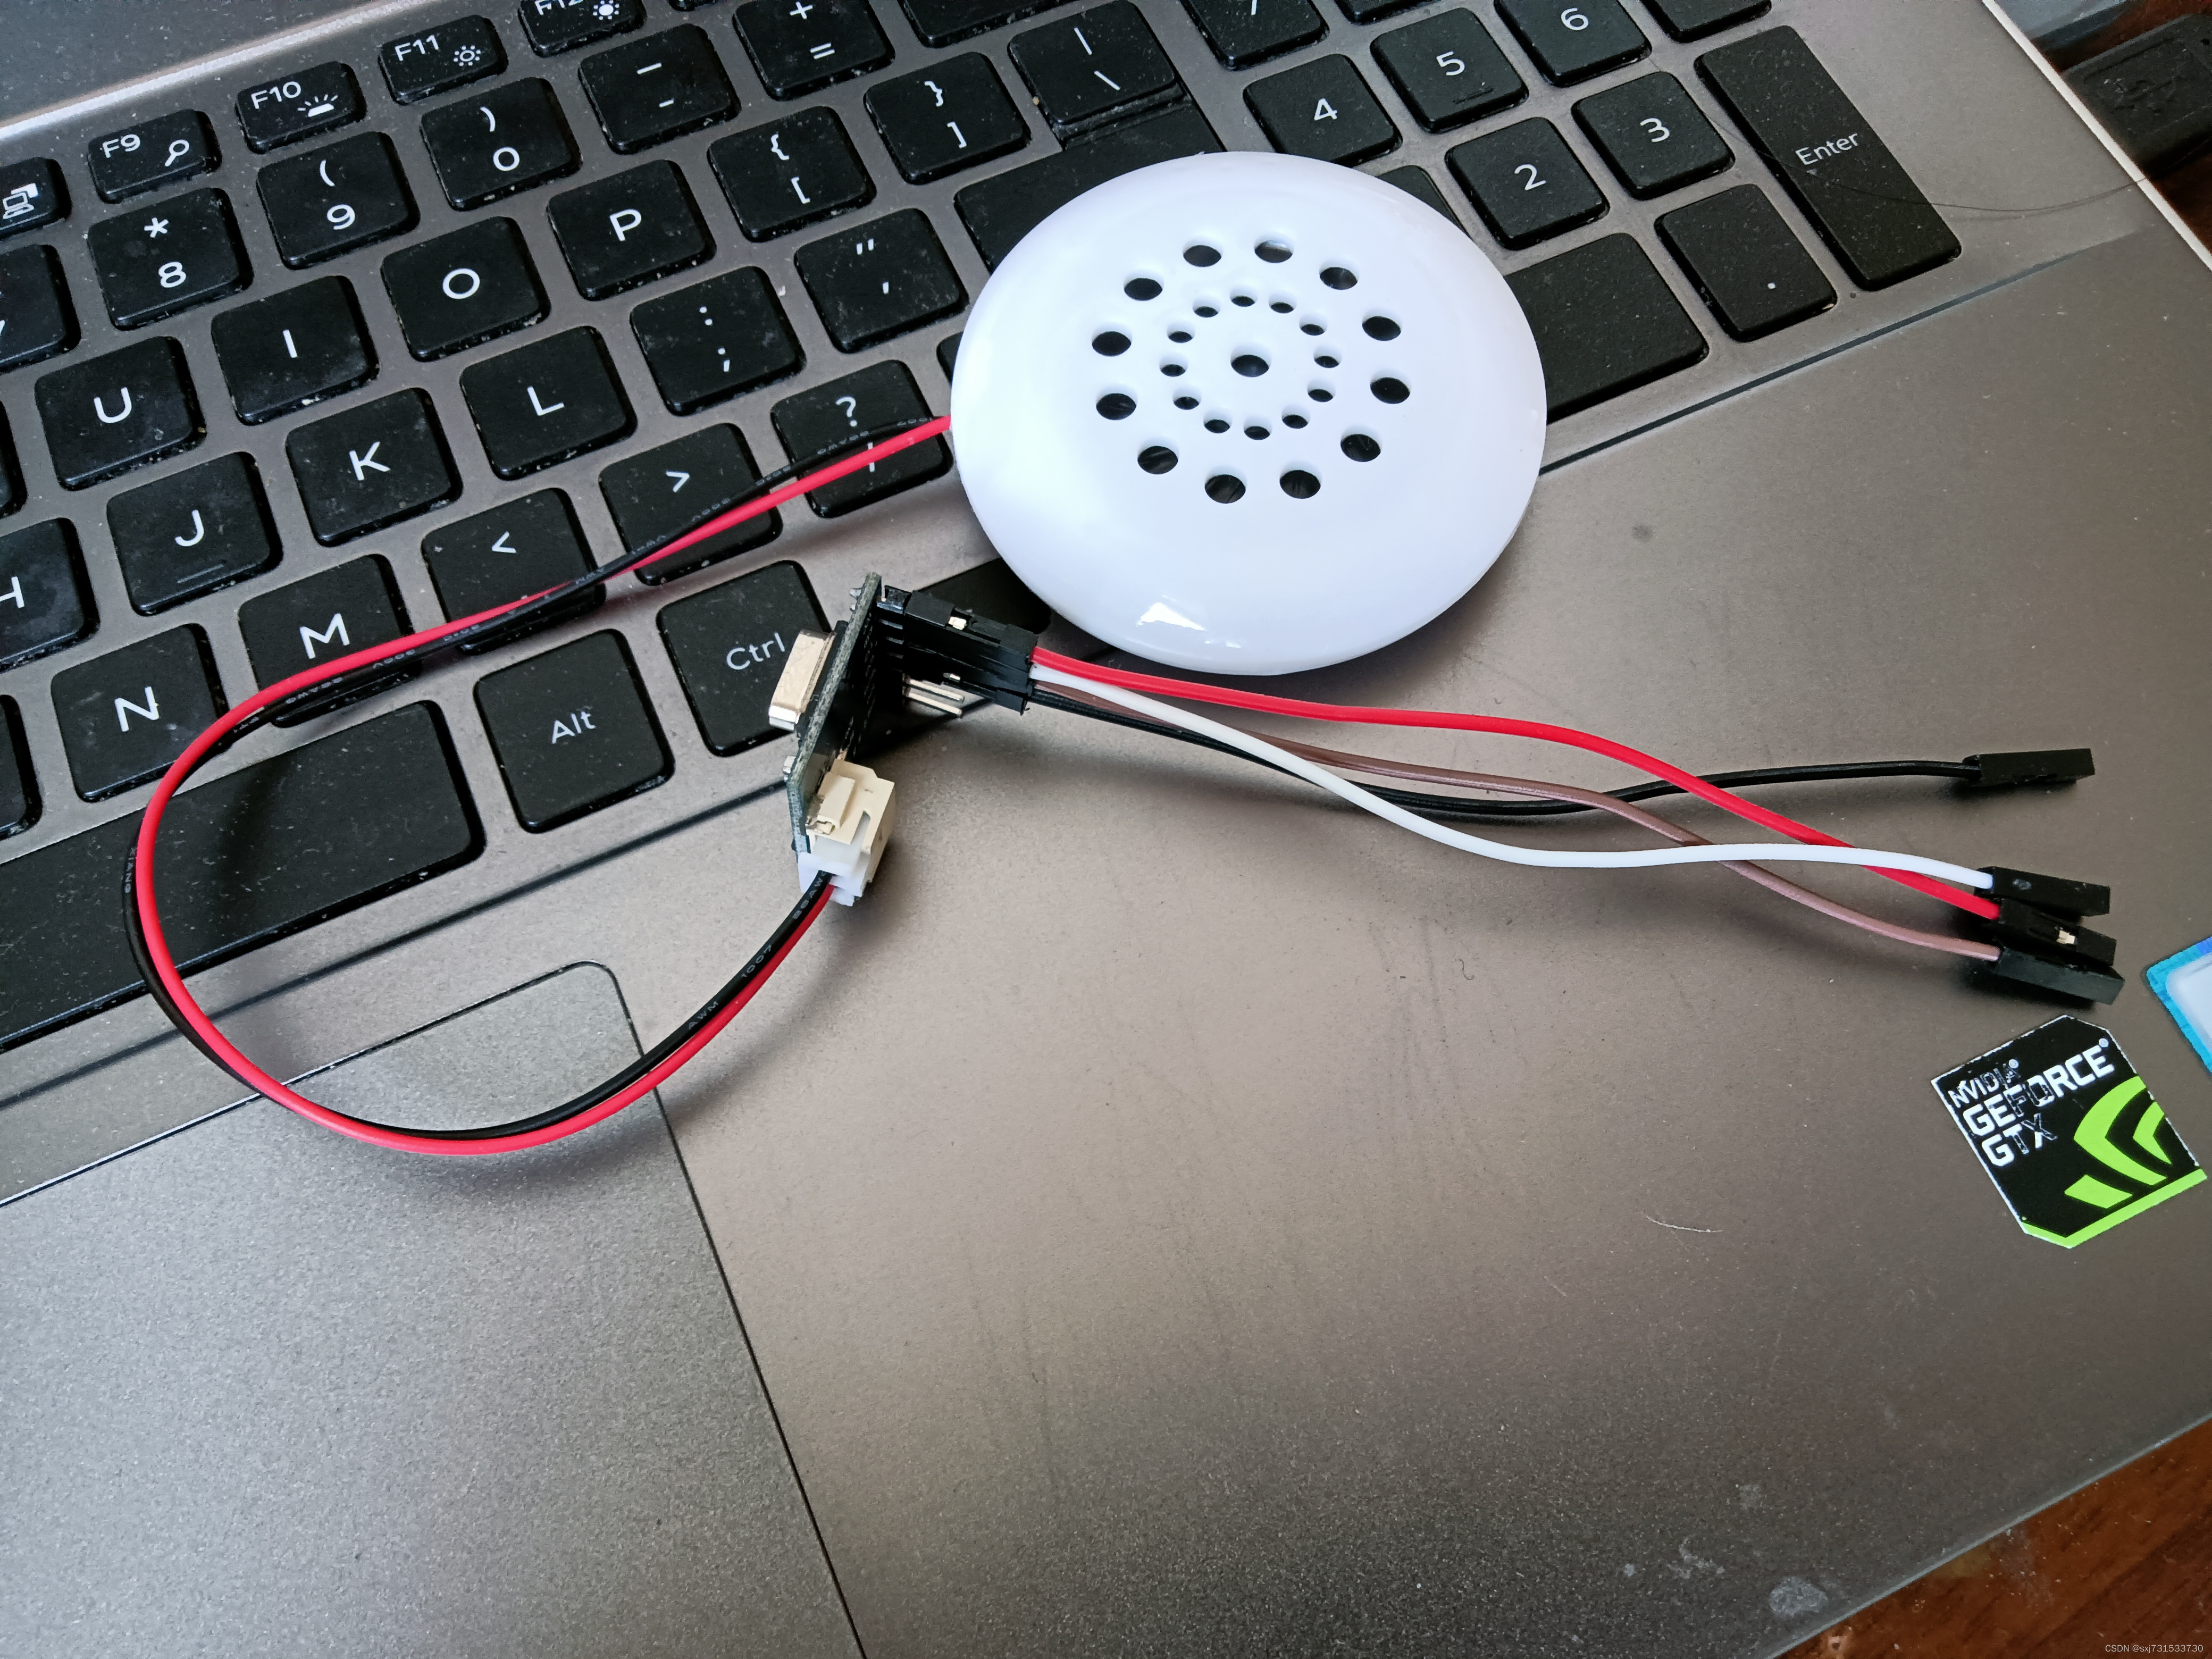
第七步、根据检测目标、驱动小喇叭语音播放,先在pc端验证串口命令;先使用官方《SYN6288语音合成模块资料(绿深旗舰店)》提供的控制台输入“直行”命令,查看发送的指令 购买链接
https://detail.tmall.com/item.htm?spm=a230r.1.14.29.499b4e15oWRrq4&id=636100723867&ns=1&abbucket=3&skuId=4720393766430
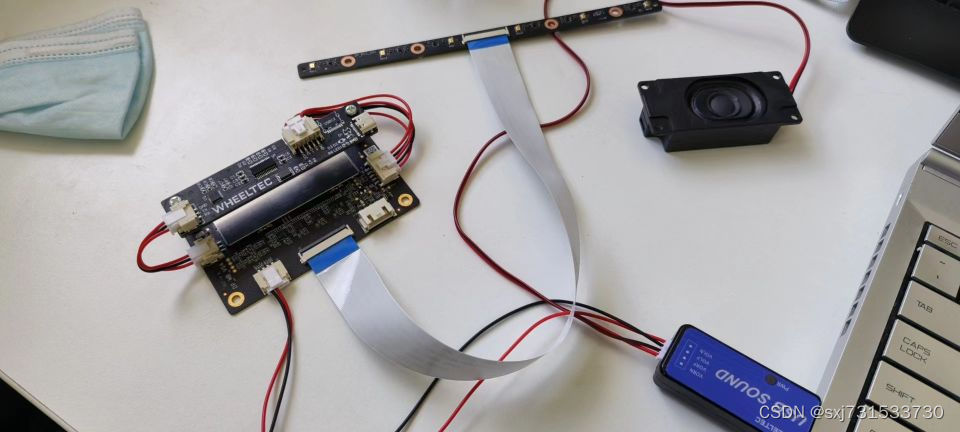
喇叭模样
上位机软件

然后使用串口工具进行发送验证
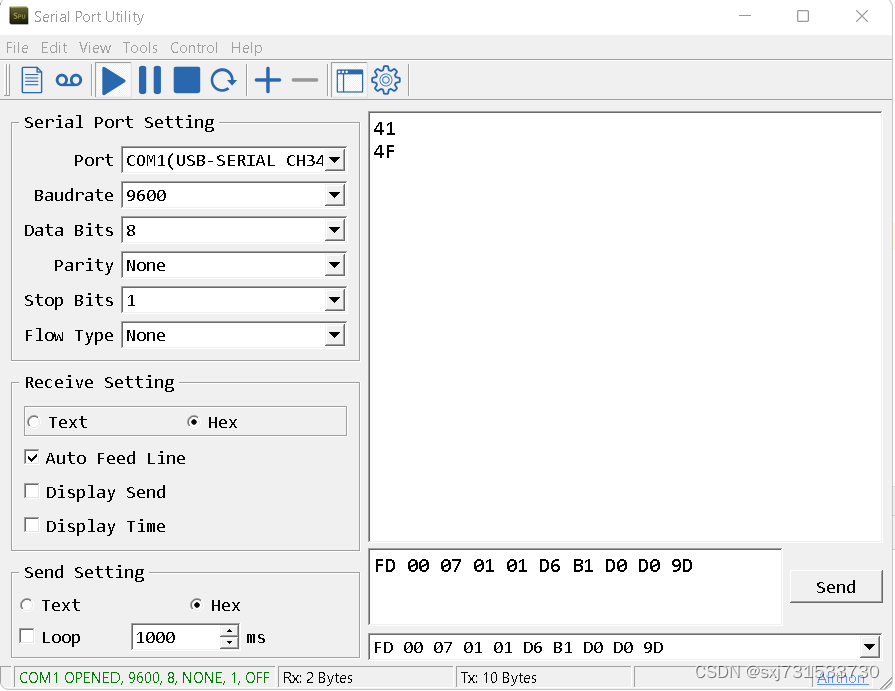
验证没有问题,可以播放直行的语音提播放 直行
测试代码 语音模块也没啥问题,保证接线正确即可GND--GND(黑色)VCC-VCC(红色,可以不连) RX--TX(白色) TX-RX(灰色)
使用这个喇叭也可以https://detail.tmall.com/item.htm?spm=a230r.1.14.11.499b4e15oWRrq4&id=565603673443&ns=1&abbucket=3 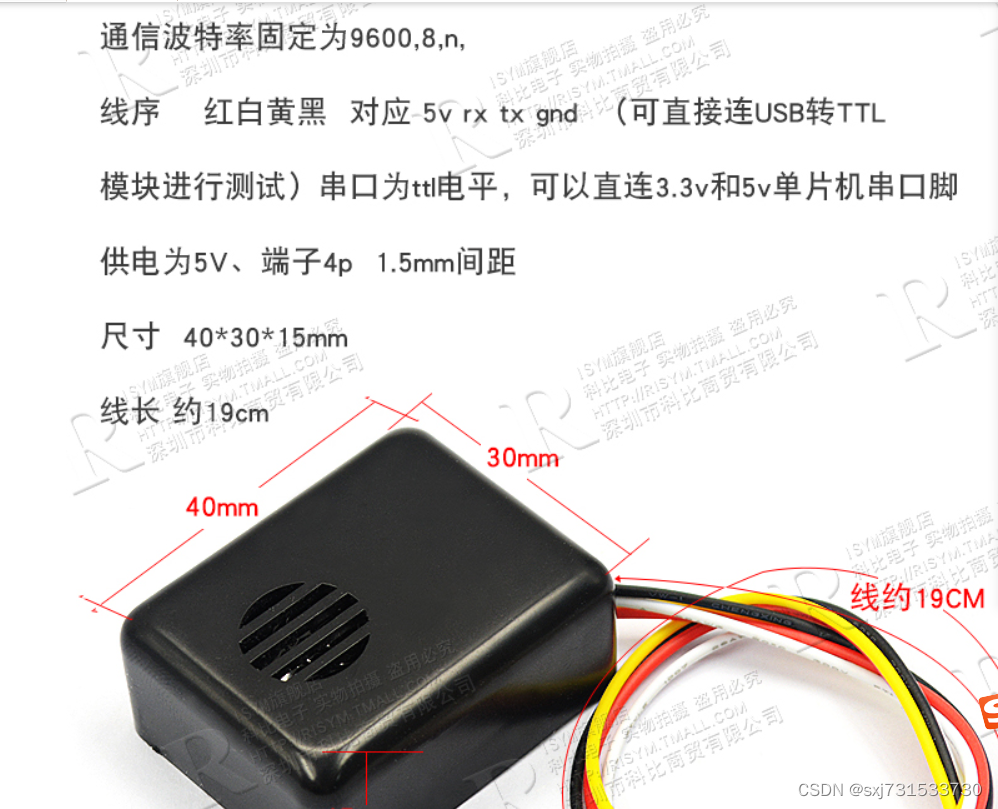
线序和测试没啥问题
命令和串口测试如上,不重复贴了
第八步、最后实现我们意图
#include <stdio.h>
#include <algorithm>
#include <vector>
#include <opencv2/core/core.hpp>
#include <opencv2/highgui/highgui.hpp>
#include <iostream>
#include "net.h"
#include <fcntl.h>
#include <termios.h>
#include <unistd.h>
#include<unistd.h>
#include<stdio.h>
#include<sys/types.h>
#include<sys/stat.h>
#include <iostream>
#include <cstring>
#include <cv.h>#if NCNN_VULKAN
#include "gpu.h"
#endif // NCNN_VULKANncnn::Net shufflenetv2;
int sendSerialPort(const char W_BUF[], int length) {int tty_fd = -1;int rv = -1;struct termios options;tty_fd = open("/dev/ttyS0", O_RDWR | O_NOCTTY | O_NDELAY); //打开串口设备fcntl(tty_fd, F_SETFL, 0);if (tty_fd < 0) {printf("open tty failed:%s\n", strerror(errno));close(tty_fd);return -1;}printf("open devices sucessful!\n");memset(&options, 0, sizeof(options));rv = tcgetattr(tty_fd, &options); //获取原有的串口属性的配置if (rv != 0) {printf("tcgetattr() failed:%s\n", strerror(errno));close(tty_fd);return -1;}options.c_cflag |= (CLOCAL | CREAD); // CREAD 开启串行数据接收,CLOCAL并打开本地连接模式options.c_cflag &= ~CSIZE;// 先使用CSIZE做位屏蔽options.c_cflag |= CS8; //设置8位数据位options.c_cflag &= ~PARENB; //无校验位cfsetispeed(&options, B9600);cfsetospeed(&options, B9600);options.c_cflag &= ~CSTOPB;options.c_cc[VTIME] = 0;options.c_cc[VMIN] = 0;tcflush(tty_fd, TCIFLUSH);if ((tcsetattr(tty_fd, TCSANOW, &options)) != 0) {printf("tcsetattr failed:%s\n", strerror(errno));close(tty_fd);return -1;}std::cout << std::endl << "length= " << length << std::endl;rv = write(tty_fd, W_BUF, length);if(rv<=0) /* 出错了*/{if (errno == EINTR) /* 中断错误 我们继续写*/{close(tty_fd);printf("[SeanSend]error errno==EINTR continue\n");} else if (errno == EAGAIN) /* EAGAIN : Resource temporarily unavailable*/{sleep(1);//等待一秒,希望发送缓冲区能得到释放close(tty_fd);printf("[SeanSend]error errno==EAGAIN continue\n");} else /* 其他错误 没有办法,只好退了*/{printf("[SeanSend]ERROR: errno = %d, strerror = %s \n", errno, strerror(errno));return (-1);}}if (rv < 0) {printf("Write() error:%s\n", strerror(errno));close(tty_fd);return -1;}for (int i = 0; i < length; i++) {std::cout << std::hex << (int) W_BUF[i] << " ";}close(tty_fd);printf("\nWrite() successfully\n");return 0;}
int detect_squeezenet( cv::Mat &bgr, std::vector<float> &cls_scores) {ncnn::Mat in = ncnn::Mat::from_pixels_resize(bgr.data, ncnn::Mat::PIXEL_BGR2RGB, bgr.cols, bgr.rows,320,320);//按照pytorch样例进行标准化const float mean_vals[3] = {0.485f, 0.456f, 0.406f};const float std_vals[3] = {1 / 0.229f, 1 / 0.224f, 1 / 0.225f};const float norm_255[3] = {1 / 255.0f, 1 / 255.0f, 1 / 255.0f};// in.substract_mean_normalize(mean_vals, std_vals);in.substract_mean_normalize(0, norm_255);in.substract_mean_normalize(mean_vals, std_vals);fprintf(stderr, "input shape: %d %d %d %d\n", in.dims, in.h, in.w, in.c);ncnn::Extractor ex = shufflenetv2.create_extractor();ex.input("input", in);//input 是 .param文件中输入节点名称ncnn::Mat out;ex.extract("output", out);fprintf(stderr, "output shape: %d %d %d %d\n", out.dims, out.h, out.w, out.c);cls_scores.resize(out.w);std::vector<float> index_vec;for (int j = 0; j < out.w; j++) {cls_scores[j] = out[j];index_vec.push_back(cls_scores[j]);printf("cls_scores[%d]=%f\n", j, cls_scores[j]);}int maxValue = *max_element(index_vec.begin(), index_vec.end());int maxPosition = max_element(index_vec.begin(), index_vec.end()) - index_vec.begin();std::cout << "road type: " << maxPosition << " conf: " << maxValue << std::endl;cv::putText(bgr,"road type: "+std::to_string(maxPosition), cv::Point2d(0,40), cv::FONT_HERSHEY_PLAIN, 2, cv::Scalar(255,0,0));return maxPosition;
}int main(int argc, char **argv) {shufflenetv2.load_param("../model/model-75.param");shufflenetv2.load_model("../model/model-75.bin");// cv::VideoCapture cap(0); //0 摄像头cv::VideoCapture cap("/root/sxj731533730/nano_pi_1/a.mp4"); //0 摄像头if (!cap.isOpened()) {std::cout << "open camera fail" << std::endl;return -1;}cv::Mat m;//0xFD 0x00 0x07 0x01 0x01 0xD6 0xB1 0xD0 0xD0 0x9D  //直行//0xFD 0x00 0x07 0x01 0x01 0xD7 0xF3 0xD7 0xAA 0xA3  //左转//0xFD 0x00 0x07 0x01 0x01 0xD3 0xD2 0xD7 0xAA 0x86  //右转const  char data[][14] = {{0xFD,0x00 ,0x0B ,0x01 ,0x01 ,0xD6 ,0xB1 ,0xD0 ,0xD0 ,0xC3 ,0xA4 ,0xB5 ,0xC0 ,0x83},{0xFD ,0x00 ,0x0B ,0x01 ,0x01 ,0xD7 ,0xF3 ,0xD7 ,0xAA ,0xC3 ,0xA4 ,0xB5 ,0xC0 ,0xBD},{0xFD ,0x00 ,0x0B ,0x01 ,0x01 ,0xD3 ,0xD2 ,0xD7 ,0xAA ,0xC3 ,0xA4 ,0xB5 ,0xC0 ,0x98 },{0xFD ,0x00 ,0x0B ,0x01 ,0x01 ,0xC6 ,0xD5 ,0xCD ,0xA8 ,0xB5 ,0xC0 ,0xC2 ,0xB7 ,0x80 }};int k=0;while (true) {cap >> m;////cv::Mat m = cv::imread("../dog.jpg");if (m.empty()) {return -1;}std::vector<float> cls_scores;int maxPosition= detect_squeezenet(m, cls_scores);imshow("m", m);cv::waitKey(1);if(k++%10==0){sendSerialPort(data[maxPosition], sizeof(data[maxPosition]));//测试}if(k==1000) k=0;}cap.release();return 0;
}
第九步、接收语音模块我用的这个设备,代码是例程中的改改即可,实现了语音唤醒,然后进行目标检测和播报https://item.taobao.com/item.htm?spm=a1z09.2.0.0.1ad22e8dZZKiG4&id=633822976782&_u=b2jrsof5b32c
参考
NanoPi NEO/zh - FriendlyELEC WiKi
https://wiki.friendlyelec.com/wiki/index.php/NanoPi_NEO/zh
https://dl.friendlyelec.com/nanopineo
Install PyTorch on Jetson Nano - Q-engineering