版权声明:本文为博主原创文章,未经博主允许不得转载。https://mp.csdn.net/postedit/82623704
一、Android studio制作计算器源代码
这是我学Android 以来第一次制作计算器,Android学起来说难也不难,说简单也不简单
制作简易的计算器需要掌握基本布局,监听器,以及使用哪些主题等
废话不多说,直接上代码!
以下是activity_main.xml代码
<?xml version="1.0" encoding="utf-8"?>
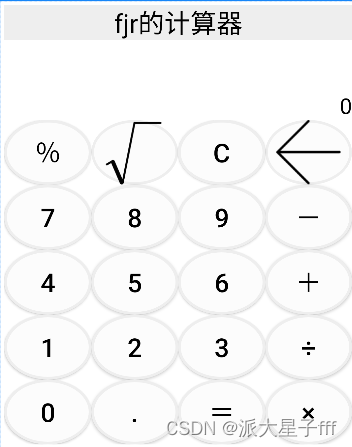
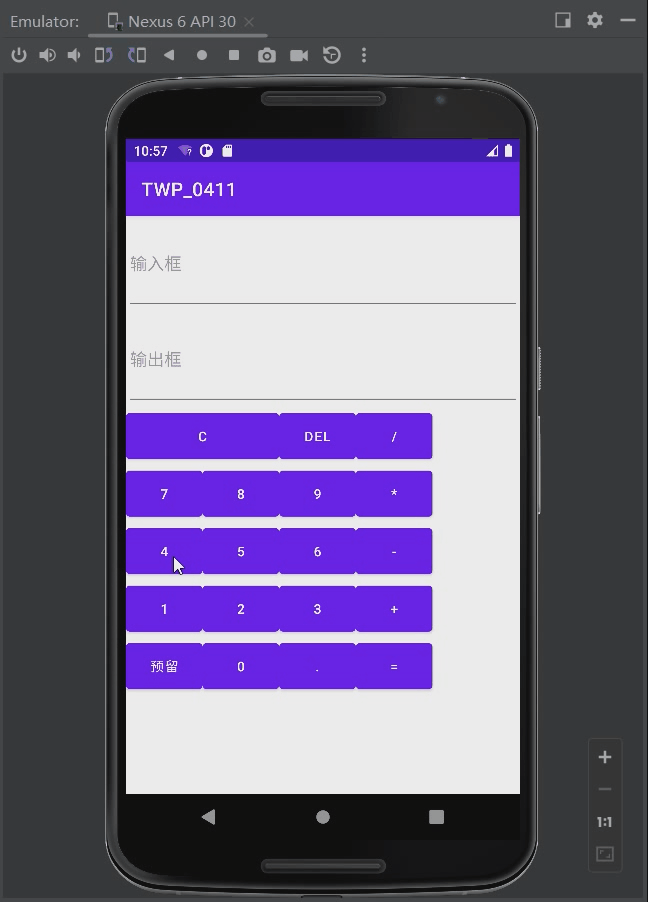
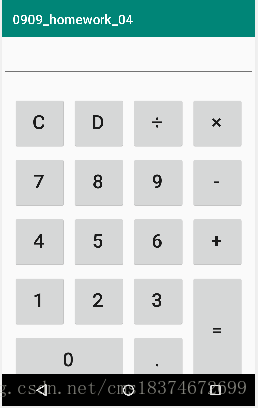
<LinearLayout xmlns:android="http://schemas.android.com/apk/res/android"xmlns:app="http://schemas.android.com/apk/res-auto"xmlns:tools="http://schemas.android.com/tools"android:layout_width="match_parent"android:layout_height="match_parent"android:orientation="vertical"tools:context=".MainActivity"><EditTextandroid:id="@+id/et_input"android:layout_width="match_parent"android:layout_height="60dp"android:paddingBottom="5dp"android:paddingRight="5dp"android:textSize="50sp" /><LinearLayoutandroid:layout_width="fill_parent"android:layout_height="wrap_content"android:layout_marginTop="30dp"android:orientation="horizontal"android:gravity="center_horizontal"><Buttonandroid:id="@+id/btn_clr"android:layout_width="80dp"android:layout_height="80dp"android:text="C"android:textSize="30sp"android:paddingRight="15sp"android:paddingBottom="15sp"/><Buttonandroid:id="@+id/btn_del"android:layout_width="80dp"android:layout_height="80dp"android:text="D"android:textSize="30sp"android:layout_marginLeft="10dp"android:paddingRight="15sp"android:paddingBottom="15sp" /><Buttonandroid:id="@+id/btn_div"android:layout_width="80dp"android:layout_height="80dp"android:text="÷"android:textSize="30sp"android:layout_marginLeft="10dp"android:paddingRight="15sp"android:paddingBottom="15sp" /><Buttonandroid:id="@+id/btn_mul"android:layout_width="80dp"android:layout_height="80dp"android:text="×"android:textSize="30sp"android:layout_marginLeft="10dp"android:paddingRight="15sp"android:paddingBottom="15sp"/></LinearLayout><LinearLayoutandroid:layout_width="fill_parent"android:layout_height="wrap_content"android:layout_marginTop="10dp"android:orientation="horizontal"android:gravity="center_horizontal"><Buttonandroid:id="@+id/btn_7"android:layout_width="80dp"android:layout_height="80dp"android:text="7"android:textSize="30sp"android:paddingRight="15sp"android:paddingBottom="15sp"/><Buttonandroid:id="@+id/btn_8"android:layout_width="80dp"android:layout_height="80dp"android:text="8"android:textSize="30sp"android:layout_marginLeft="10dp"android:paddingRight="15sp"android:paddingBottom="15sp"/><Buttonandroid:id="@+id/btn_9"android:layout_width="80dp"android:layout_height="80dp"android:text="9"android:textSize="30sp"android:layout_marginLeft="10dp"android:paddingRight="15sp"android:paddingBottom="15sp"/><Buttonandroid:id="@+id/btn_sub"android:layout_width="80dp"android:layout_height="80dp"android:text="-"android:textSize="30sp"android:layout_marginLeft="10dp"android:paddingRight="15sp"android:paddingBottom="15sp"/></LinearLayout><LinearLayoutandroid:layout_width="fill_parent"android:layout_height="wrap_content"android:layout_marginTop="10dp"android:orientation="horizontal"android:gravity="center_horizontal"><Buttonandroid:id="@+id/btn_4"android:layout_width="80dp"android:layout_height="80dp"android:text="4"android:textSize="30sp"android:paddingRight="15sp"android:paddingBottom="15sp"/><Buttonandroid:id="@+id/btn_5"android:layout_width="80dp"android:layout_height="80dp"android:text="5"android:textSize="30sp"android:layout_marginLeft="10dp"android:paddingRight="15sp"android:paddingBottom="15sp"/><Buttonandroid:id="@+id/btn_6"android:layout_width="80dp"android:layout_height="80dp"android:text="6"android:textSize="30sp"android:layout_marginLeft="10dp"android:paddingRight="15sp"android:paddingBottom="15sp"/><Buttonandroid:id="@+id/btn_add"android:layout_width="80dp"android:layout_height="80dp"android:text="+"android:textSize="30sp"android:layout_marginLeft="10dp"android:paddingRight="15sp"android:paddingBottom="15sp"/></LinearLayout><LinearLayoutandroid:layout_width="fill_parent"android:layout_height="wrap_content"android:orientation="horizontal"android:layout_marginTop="10dp"android:gravity="center_horizontal"><LinearLayoutandroid:layout_width="wrap_content"android:layout_height="wrap_content"android:orientation="vertical"><LinearLayoutandroid:layout_width="wrap_content"android:layout_height="wrap_content"android:orientation="horizontal"><Buttonandroid:layout_width="80dp"android:layout_height="80dp"android:id="@+id/btn_1"android:text="1"android:textSize="30sp"android:paddingRight="15sp"android:paddingBottom="15sp"/><Buttonandroid:layout_width="80dp"android:layout_height="80dp"android:id="@+id/btn_2"android:text="2"android:textSize="30sp"android:layout_marginLeft="10dp"android:paddingRight="15sp"android:paddingBottom="15sp"/><Buttonandroid:layout_width="80dp"android:layout_height="80dp"android:id="@+id/btn_3"android:text="3"android:textSize="30sp"android:layout_marginLeft="10dp"android:paddingRight="15sp"android:paddingBottom="15sp"/></LinearLayout><LinearLayoutandroid:layout_width="wrap_content"android:layout_height="wrap_content"android:orientation="horizontal"android:layout_marginTop="10dp"><Buttonandroid:layout_width="170dp"android:layout_height="80dp"android:id="@+id/btn_0"android:text="0"android:textSize="30sp"android:paddingRight="15sp"android:paddingBottom="15sp"/><Buttonandroid:layout_width="80dp"android:layout_height="80dp"android:id="@+id/btn_pt"android:text="."android:textSize="30sp"android:layout_marginLeft="10dp"android:paddingRight="15sp"android:paddingBottom="15sp"/></LinearLayout></LinearLayout><Buttonandroid:id="@+id/btn_eq"android:layout_width="80dp"android:layout_height="170dp"android:layout_marginLeft="10dp"android:text="="android:textSize="30sp"android:paddingRight="15sp"android:paddingBottom="15sp" /></LinearLayout></LinearLayout>完成以上代码,你就会看到这样一个效果图
效果如下
如果你觉得这个计算器有点不好看,可以在按钮里面给元素添加颜色
完成简易计算器布局之后就给按钮添加点击事件以及按钮效果
以下是MainActivity.java代码
package com.example.a0909_homework_04;import android.support.v7.app.AppCompatActivity;
import android.os.Bundle;
import android.view.View;
import android.widget.Button;
import android.widget.EditText;public class MainActivity extends AppCompatActivity implements View.OnClickListener {//创建Button对象   也就是activity_main.xml里所设置的IDButton btn_0,btn_1,btn_2,btn_3,btn_4,btn_5,btn_6,btn_7,btn_8,btn_9,btn_pt;Button btn_mul,btn_div,btn_add,btn_sub;Button btn_clr,btn_del,btn_eq;EditText et_input;boolean clr_flag;    //判断et编辑文本框中是否清空@Overrideprotected void onCreate(Bundle savedInstanceState) {super.onCreate(savedInstanceState);setContentView(R.layout.activity_main);//实例化对象setContentView(R.layout.activity_main);btn_0= (Button) findViewById(R.id.btn_0);btn_1= (Button) findViewById(R.id.btn_1);btn_2= (Button) findViewById(R.id.btn_2);btn_3= (Button) findViewById(R.id.btn_3);btn_4= (Button) findViewById(R.id.btn_4);btn_5= (Button) findViewById(R.id.btn_5);btn_6= (Button) findViewById(R.id.btn_6);btn_7= (Button) findViewById(R.id.btn_7);btn_8= (Button) findViewById(R.id.btn_8);btn_9= (Button) findViewById(R.id.btn_9);btn_pt= (Button) findViewById(R.id.btn_pt);btn_add= (Button) findViewById(R.id.btn_add);btn_sub= (Button) findViewById(R.id.btn_sub);btn_mul= (Button) findViewById(R.id.btn_mul);btn_div= (Button) findViewById(R.id.btn_div);btn_clr= (Button) findViewById(R.id.btn_clr);btn_del= (Button) findViewById(R.id.btn_del);btn_eq= (Button) findViewById(R.id.btn_eq);et_input= (EditText) findViewById(R.id.et_input);//给按钮设置的点击事件btn_0.setOnClickListener(this);btn_1.setOnClickListener(this);btn_2.setOnClickListener(this);btn_3.setOnClickListener(this);btn_4.setOnClickListener(this);btn_5.setOnClickListener(this);btn_6.setOnClickListener(this);btn_7.setOnClickListener(this);btn_8.setOnClickListener(this);btn_9.setOnClickListener(this);btn_pt.setOnClickListener(this);btn_add.setOnClickListener(this);btn_sub.setOnClickListener(this);btn_mul.setOnClickListener(this);btn_div.setOnClickListener(this);btn_clr.setOnClickListener(this);btn_del.setOnClickListener(this);btn_eq.setOnClickListener(this);}@Overridepublic void onClick(View v) {String str=et_input.getText().toString();switch (v.getId()){case   R.id.btn_0:case   R.id.btn_1:case   R.id.btn_2:case   R.id.btn_3:case   R.id.btn_4:case   R.id.btn_5:case   R.id.btn_6:case   R.id.btn_7:case   R.id.btn_8:case   R.id.btn_9:case   R.id.btn_pt:if(clr_flag){clr_flag=false;str="";et_input.setText("");}et_input.setText(str+((Button)v).getText());break;case R.id.btn_add:case R.id.btn_sub:case R.id.btn_mul:case R.id.btn_div:if(clr_flag){clr_flag=false;str="";et_input.setText("");}if(str.contains("+")||str.contains("-")||str.contains("×")||str.contains("÷")) {str=str.substring(0,str.indexOf(" "));}et_input.setText(str+" "+((Button)v).getText()+" ");break;case R.id.btn_clr:if(clr_flag)clr_flag=false;str="";et_input.setText("");break;case R.id.btn_del: //判断是否为空,然后在进行删除if(clr_flag){clr_flag=false;str="";et_input.setText("");}else if(str!=null&&!str.equals("")){et_input.setText(str.substring(0,str.length()-1));}break;case R.id.btn_eq: //单独运算最后结果getResult();//调用下面的方法break;}}private void getResult() {String exp=et_input.getText().toString();if(exp==null||exp.equals("")) return ;//因为没有运算符所以不用运算if(!exp.contains(" ")){return ;}if(clr_flag){clr_flag=false;return;}clr_flag=true;//截取运算符前面的字符串String s1=exp.substring(0,exp.indexOf(" "));//截取的运算符String op=exp.substring(exp.indexOf(" ")+1,exp.indexOf(" ")+2);//截取运算符后面的字符串String s2=exp.substring(exp.indexOf(" ")+3);double cnt=0;if(!s1.equals("")&&!s2.equals("")){double d1=Double.parseDouble(s1);double d2=Double.parseDouble(s2);if(op.equals("+")){cnt=d1+d2;}if(op.equals("-")){cnt=d1-d2;}if(op.equals("×")){cnt=d1*d2;}if(op.equals("÷")){if(d2==0) cnt=0;else cnt=d1/d2;}if(!s1.contains(".")&&!s2.contains(".")&&!op.equals("÷")) {int res = (int) cnt;et_input.setText(res+"");}else {et_input.setText(cnt+"");}}//如果s1是空    s2不是空  就执行下一步else if(!s1.equals("")&&s2.equals("")){double d1=Double.parseDouble(s1);if(op.equals("+")){cnt=d1;}if(op.equals("-")){cnt=d1;}if(op.equals("×")){cnt=0;}if(op.equals("÷")){cnt=0;}if(!s1.contains(".")) {int res = (int) cnt;et_input.setText(res+"");}else {et_input.setText(cnt+"");}}//如果s1是空    s2不是空  就执行下一步else if(s1.equals("")&&!s2.equals("")){double d2=Double.parseDouble(s2);if(op.equals("+")){cnt=d2;}if(op.equals("-")){cnt=0-d2;}if(op.equals("×")){cnt=0;}if(op.equals("÷")){cnt=0;}if(!s2.contains(".")) {int res = (int) cnt;et_input.setText(res+"");}else {et_input.setText(cnt+"");}}else {et_input.setText("");}}
}
以上代码写好,简易的计算器就完成了!!!