原文地址:https://www.cnblogs.com/Ming8006/p/6297333.html
1 Mockito 介绍 [3]
1.1 Mockito是什么?
Mockito是mocking框架,它让你用简洁的API做测试。而且Mockito简单易学,它可读性强和验证语法简洁。
1.2 为什么需要Mock
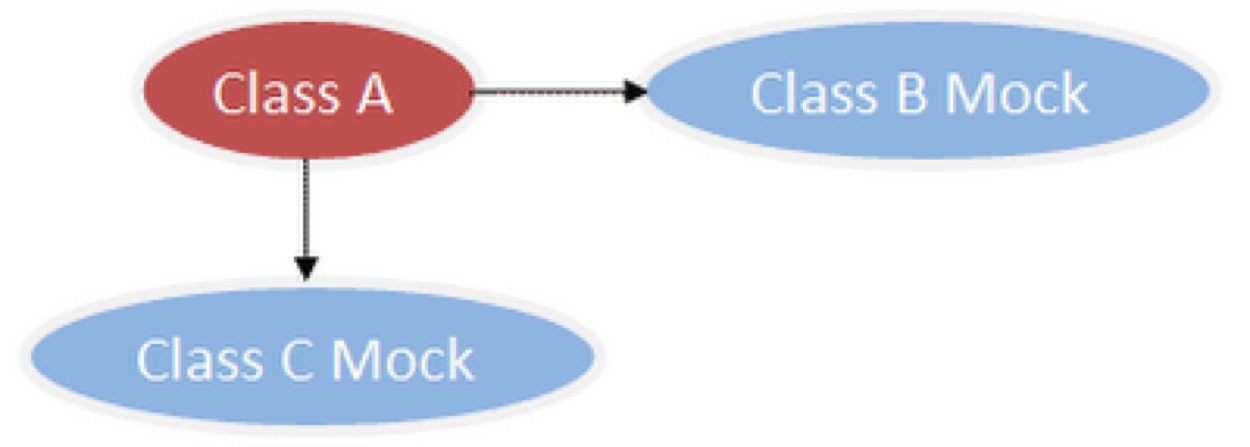
测试驱动的开发( TDD)要求我们先写单元测试,再写实现代码。在写单元测试的过程中,我们往往会遇到要测试的类有很多依赖,这些依赖的类/对象/资源又有别的依赖,从而形成一个大的依赖树,要在单元测试的环境中完整地构建这样的依赖,是一件很困难的事情。如下图所示:

为了测试类A,我们需要Mock B类和C类(用虚拟对象来代替)如下图所示:

1.3 Stub和Mock异同[1]
- 相同:Stub和Mock都是模拟外部依赖
- 不同:Stub是完全模拟一个外部依赖, 而Mock还可以用来判断测试通过还是失败
1.4 Mockito资源
- 官网: http://mockito.org
- API文档:http://docs.mockito.googlecode.com/hg/org/mockito/Mockito.html
- 项目源码:https://github.com/mockito/mockito
1.5 使用场景
- 提前创建测试; TDD(测试驱动开发)
- 团队可以并行工作
- 你可以创建一个验证或者演示程序
- 为无法访问的资源编写测试
- Mock 可以交给用户
- 隔离系统
2 使用Mockito [2][4]
添加maven依赖
<dependency><groupId>org.mockito</groupId><artifactId>mockito-all</artifactId><version>1.9.5</version><scope>test</scope></dependency>添加junit依赖
<dependency><groupId>junit</groupId><artifactId>junit</artifactId><version>4.11</version><scope>test</scope></dependency>添加引用
import static org.mockito.Mockito.*;
import static org.junit.Assert.*;
2.1 验证行为

@Testpublic void verify_behaviour(){//模拟创建一个List对象List mock = mock(List.class);//使用mock的对象mock.add(1);mock.clear();//验证add(1)和clear()行为是否发生verify(mock).add(1);verify(mock).clear();}
2.2 模拟我们所期望的结果
@Testpublic void when_thenReturn(){//mock一个Iterator类Iterator iterator = mock(Iterator.class);//预设当iterator调用next()时第一次返回hello,第n次都返回worldwhen(iterator.next()).thenReturn("hello").thenReturn("world");//使用mock的对象String result = iterator.next() + " " + iterator.next() + " " + iterator.next();//验证结果assertEquals("hello world world",result);}
@Test(expected = IOException.class)public void when_thenThrow() throws IOException {OutputStream outputStream = mock(OutputStream.class);OutputStreamWriter writer = new OutputStreamWriter(outputStream);//预设当流关闭时抛出异常doThrow(new IOException()).when(outputStream).close();outputStream.close();}
2.3 RETURNS_SMART_NULLS和RETURNS_DEEP_STUBS
RETURNS_SMART_NULLS实现了Answer接口的对象,它是创建mock对象时的一个可选参数,mock(Class,Answer)。
在创建mock对象时,有的方法我们没有进行stubbing,所以调用时会放回Null这样在进行操作是很可能抛出NullPointerException。如果通过RETURNS_SMART_NULLS参数创建的mock对象在没有调用stubbed方法时会返回SmartNull。例如:返回类型是String,会返回"";是int,会返回0;是List,会返回空的List。另外,在控制台窗口中可以看到SmartNull的友好提示。
@Testpublic void returnsSmartNullsTest() {List mock = mock(List.class, RETURNS_SMART_NULLS);System.out.println(mock.get(0));//使用RETURNS_SMART_NULLS参数创建的mock对象,不会抛出NullPointerException异常。另外控制台窗口会提示信息“SmartNull returned by unstubbed get() method on mock”System.out.println(mock.toArray().length);}
RETURNS_DEEP_STUBS也是创建mock对象时的备选参数
RETURNS_DEEP_STUBS参数程序会自动进行mock所需的对象,方法deepstubsTest和deepstubsTest2是等价的
@Testpublic void deepstubsTest(){Account account=mock(Account.class,RETURNS_DEEP_STUBS);when(account.getRailwayTicket().getDestination()).thenReturn("Beijing");account.getRailwayTicket().getDestination();verify(account.getRailwayTicket()).getDestination();assertEquals("Beijing",account.getRailwayTicket().getDestination());}@Testpublic void deepstubsTest2(){Account account=mock(Account.class); RailwayTicket railwayTicket=mock(RailwayTicket.class); when(account.getRailwayTicket()).thenReturn(railwayTicket); when(railwayTicket.getDestination()).thenReturn("Beijing");account.getRailwayTicket().getDestination();verify(account.getRailwayTicket()).getDestination(); assertEquals("Beijing",account.getRailwayTicket().getDestination());} public class RailwayTicket{private String destination;public String getDestination() {return destination;}public void setDestination(String destination) {this.destination = destination;} }public class Account{private RailwayTicket railwayTicket;public RailwayTicket getRailwayTicket() {return railwayTicket;}public void setRailwayTicket(RailwayTicket railwayTicket) {this.railwayTicket = railwayTicket;}}
2.4 模拟方法体抛出异常
@Test(expected = RuntimeException.class)public void doThrow_when(){List list = mock(List.class);doThrow(new RuntimeException()).when(list).add(1);list.add(1);}2.5 使用注解来快速模拟
在上面的测试中我们在每个测试方法里都mock了一个List对象,为了避免重复的mock,是测试类更具有可读性,我们可以使用下面的注解方式来快速模拟对象:
@Mockprivate List mockList;OK,我们再用注解的mock对象试试
@Testpublic void shorthand(){mockList.add(1);verify(mockList).add(1);}运行这个测试类你会发现报错了,mock的对象为NULL,为此我们必须在基类中添加初始化mock的代码
public class MockitoExample2 {@Mockprivate List mockList;public MockitoExample2(){MockitoAnnotations.initMocks(this);}@Testpublic void shorthand(){mockList.add(1);verify(mockList).add(1);}
}
或者使用built-in runner:MockitoJUnitRunner
@RunWith(MockitoJUnitRunner.class)
public class MockitoExample2 {@Mockprivate List mockList;@Testpublic void shorthand(){mockList.add(1);verify(mockList).add(1);}
}
2.6 参数匹配
@Testpublic void with_arguments(){Comparable comparable = mock(Comparable.class);//预设根据不同的参数返回不同的结果when(comparable.compareTo("Test")).thenReturn(1);when(comparable.compareTo("Omg")).thenReturn(2);assertEquals(1, comparable.compareTo("Test"));assertEquals(2, comparable.compareTo("Omg"));//对于没有预设的情况会返回默认值assertEquals(0, comparable.compareTo("Not stub"));}
除了匹配制定参数外,还可以匹配自己想要的任意参数
@Testpublic void with_unspecified_arguments(){List list = mock(List.class);//匹配任意参数when(list.get(anyInt())).thenReturn(1);when(list.contains(argThat(new IsValid()))).thenReturn(true);assertEquals(1, list.get(1));assertEquals(1, list.get(999));assertTrue(list.contains(1));assertTrue(!list.contains(3));}private class IsValid extends ArgumentMatcher<List>{@Overridepublic boolean matches(Object o) {return o == 1 || o == 2;}}
注意:如果你使用了参数匹配,那么所有的参数都必须通过matchers来匹配,如下代码:
@Testpublic void all_arguments_provided_by_matchers(){Comparator comparator = mock(Comparator.class);comparator.compare("nihao","hello");//如果你使用了参数匹配,那么所有的参数都必须通过matchers来匹配verify(comparator).compare(anyString(),eq("hello"));//下面的为无效的参数匹配使用//verify(comparator).compare(anyString(),"hello");}
2.7 自定义参数匹配
@Testpublic void argumentMatchersTest(){//创建mock对象List<String> mock = mock(List.class);//argThat(Matches<T> matcher)方法用来应用自定义的规则,可以传入任何实现Matcher接口的实现类。when(mock.addAll(argThat(new IsListofTwoElements()))).thenReturn(true);mock.addAll(Arrays.asList("one","two","three"));//IsListofTwoElements用来匹配size为2的List,因为例子传入List为三个元素,所以此时将失败。verify(mock).addAll(argThat(new IsListofTwoElements()));}class IsListofTwoElements extends ArgumentMatcher<List>{public boolean matches(Object list){return((List)list).size()==2;}}
2.8 捕获参数来进一步断言
较复杂的参数匹配器会降低代码的可读性,有些地方使用参数捕获器更加合适。
@Testpublic void capturing_args(){PersonDao personDao = mock(PersonDao.class);PersonService personService = new PersonService(personDao);ArgumentCaptor<Person> argument = ArgumentCaptor.forClass(Person.class);personService.update(1,"jack");verify(personDao).update(argument.capture());assertEquals(1,argument.getValue().getId());assertEquals("jack",argument.getValue().getName());}class Person{private int id;private String name;Person(int id, String name) {this.id = id;this.name = name;}public int getId() {return id;}public String getName() {return name;}}interface PersonDao{public void update(Person person);}class PersonService{private PersonDao personDao;PersonService(PersonDao personDao) {this.personDao = personDao;}public void update(int id,String name){personDao.update(new Person(id,name));}}
2.9 使用方法预期回调接口生成期望值(Answer结构)
@Testpublic void answerTest(){when(mockList.get(anyInt())).thenAnswer(new CustomAnswer());assertEquals("hello world:0",mockList.get(0));assertEquals("hello world:999",mockList.get(999));}private class CustomAnswer implements Answer<String>{@Overridepublic String answer(InvocationOnMock invocation) throws Throwable {Object[] args = invocation.getArguments();return "hello world:"+args[0];}}
也可使用匿名内部类实现
@Testpublic void answer_with_callback(){//使用Answer来生成我们我们期望的返回when(mockList.get(anyInt())).thenAnswer(new Answer<Object>() {@Overridepublic Object answer(InvocationOnMock invocation) throws Throwable {Object[] args = invocation.getArguments();return "hello world:"+args[0];}});assertEquals("hello world:0",mockList.get(0));assertEquals("hello world:999",mockList.get(999));}
2.10 修改对未预设的调用返回默认期望
@Testpublic void unstubbed_invocations(){//mock对象使用Answer来对未预设的调用返回默认期望值List mock = mock(List.class,new Answer() {@Overridepublic Object answer(InvocationOnMock invocation) throws Throwable {return 999;}});//下面的get(1)没有预设,通常情况下会返回NULL,但是使用了Answer改变了默认期望值assertEquals(999, mock.get(1));//下面的size()没有预设,通常情况下会返回0,但是使用了Answer改变了默认期望值assertEquals(999,mock.size());}
2.11 用spy监控真实对象
- Mock不是真实的对象,它只是用类型的class创建了一个虚拟对象,并可以设置对象行为
- Spy是一个真实的对象,但它可以设置对象行为
- InjectMocks创建这个类的对象并自动将标记@Mock、@Spy等注解的属性值注入到这个中
@Test(expected = IndexOutOfBoundsException.class)public void spy_on_real_objects(){List list = new LinkedList();List spy = spy(list);//下面预设的spy.get(0)会报错,因为会调用真实对象的get(0),所以会抛出越界异常//when(spy.get(0)).thenReturn(3);//使用doReturn-when可以避免when-thenReturn调用真实对象apidoReturn(999).when(spy).get(999);//预设size()期望值when(spy.size()).thenReturn(100);//调用真实对象的apispy.add(1);spy.add(2);assertEquals(100,spy.size());assertEquals(1,spy.get(0));assertEquals(2,spy.get(1));verify(spy).add(1);verify(spy).add(2);assertEquals(999,spy.get(999));spy.get(2);}
2.12 真实的部分mock
@Testpublic void real_partial_mock(){//通过spy来调用真实的apiList list = spy(new ArrayList());assertEquals(0,list.size());A a = mock(A.class);//通过thenCallRealMethod来调用真实的apiwhen(a.doSomething(anyInt())).thenCallRealMethod();assertEquals(999,a.doSomething(999));}class A{public int doSomething(int i){return i;}}
2.13 重置mock
@Testpublic void reset_mock(){List list = mock(List.class);when(list.size()).thenReturn(10);list.add(1);assertEquals(10,list.size());//重置mock,清除所有的互动和预设reset(list);assertEquals(0,list.size());}
2.14 验证确切的调用次数
@Testpublic void verifying_number_of_invocations(){List list = mock(List.class);list.add(1);list.add(2);list.add(2);list.add(3);list.add(3);list.add(3);//验证是否被调用一次,等效于下面的times(1)verify(list).add(1);verify(list,times(1)).add(1);//验证是否被调用2次verify(list,times(2)).add(2);//验证是否被调用3次verify(list,times(3)).add(3);//验证是否从未被调用过verify(list,never()).add(4);//验证至少调用一次verify(list,atLeastOnce()).add(1);//验证至少调用2次verify(list,atLeast(2)).add(2);//验证至多调用3次verify(list,atMost(3)).add(3);}
2.15 连续调用
@Test(expected = RuntimeException.class)public void consecutive_calls(){//模拟连续调用返回期望值,如果分开,则只有最后一个有效when(mockList.get(0)).thenReturn(0);when(mockList.get(0)).thenReturn(1);when(mockList.get(0)).thenReturn(2);when(mockList.get(1)).thenReturn(0).thenReturn(1).thenThrow(new RuntimeException());assertEquals(2,mockList.get(0));assertEquals(2,mockList.get(0));assertEquals(0,mockList.get(1));assertEquals(1,mockList.get(1));//第三次或更多调用都会抛出异常mockList.get(1);}
2.16 验证执行顺序
@Testpublic void verification_in_order(){List list = mock(List.class);List list2 = mock(List.class);list.add(1);list2.add("hello");list.add(2);list2.add("world");//将需要排序的mock对象放入InOrderInOrder inOrder = inOrder(list,list2);//下面的代码不能颠倒顺序,验证执行顺序inOrder.verify(list).add(1);inOrder.verify(list2).add("hello");inOrder.verify(list).add(2);inOrder.verify(list2).add("world");}
2.17 确保模拟对象上无互动发生
@Testpublic void verify_interaction(){List list = mock(List.class);List list2 = mock(List.class);List list3 = mock(List.class);list.add(1);verify(list).add(1);verify(list,never()).add(2);//验证零互动行为verifyZeroInteractions(list2,list3);}
2.18 找出冗余的互动(即未被验证到的)
@Test(expected = NoInteractionsWanted.class)public void find_redundant_interaction(){List list = mock(List.class);list.add(1);list.add(2);verify(list,times(2)).add(anyInt());//检查是否有未被验证的互动行为,因为add(1)和add(2)都会被上面的anyInt()验证到,所以下面的代码会通过verifyNoMoreInteractions(list);List list2 = mock(List.class);list2.add(1);list2.add(2);verify(list2).add(1);//检查是否有未被验证的互动行为,因为add(2)没有被验证,所以下面的代码会失败抛出异常verifyNoMoreInteractions(list2);}
3 Mockito如何实现Mock[3]
Mockito并不是创建一个真实的对象,而是模拟这个对象,他用简单的when(mock.method(params)).thenRetrun(result)语句设置mock对象的行为,如下语句:
// 设置mock对象的行为 - 当调用其get方法获取第0个元素时,返回"first"
Mockito.when(mockedList.get(0)).thenReturn("first");
在Mock对象的时候,创建一个proxy对象,保存被调用的方法名(get),以及调用时候传递的参数(0),然后在调用thenReturn方法时再把“first”保存起来,这样,就有了构建一个stub方法所需的所有信息,构建一个stub。当get方法被调用的时候,实际上调用的是之前保存的proxy对象的get方法,返回之前保存的数据。
参考
[1] 单元测试之Stub和Mock
[2] mockito简单教程
[3] Mockito入门
[4] 学习Mockito


![[Python] Python数值取整](https://img-blog.csdnimg.cn/c9b4f43d8b1347c58a33a9b90751b4e8.png)